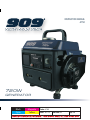
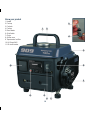
909 A750 is a 720W generator powered by a 2-stroke engine with 63cc displacement. It has a rated power output of 650W and a peak power output of 720W. The generator is equipped with a 4.2L fuel tank and runs on a mixture of unleaded petrol and 2-stroke oil in a ratio of 50:1. It has a single-phase AC output with a voltage of 240Vac and a frequency of 50Hz. The generator is designed for lighting and camping and is not recommended for use with electronic devices. It features safety accessories such as a spark plug, air filter, and fuel filter, and has a net weight of 17kg.
909 A750 is a 720W generator powered by a 2-stroke engine with 63cc displacement. It has a rated power output of 650W and a peak power output of 720W. The generator is equipped with a 4.2L fuel tank and runs on a mixture of unleaded petrol and 2-stroke oil in a ratio of 50:1. It has a single-phase AC output with a voltage of 240Vac and a frequency of 50Hz. The generator is designed for lighting and camping and is not recommended for use with electronic devices. It features safety accessories such as a spark plug, air filter, and fuel filter, and has a net weight of 17kg.


-
 1
1
-
 2
2
-
 3
3
-
 4
4
-
 5
5
-
 6
6
-
 7
7
-
 8
8
-
 9
9
-
 10
10
-
 11
11
-
 12
12
-
 13
13
-
 14
14
-
 15
15
-
 16
16
-
 17
17


909 A750 is a 720W generator powered by a 2-stroke engine with 63cc displacement. It has a rated power output of 650W and a peak power output of 720W. The generator is equipped with a 4.2L fuel tank and runs on a mixture of unleaded petrol and 2-stroke oil in a ratio of 50:1. It has a single-phase AC output with a voltage of 240Vac and a frequency of 50Hz. The generator is designed for lighting and camping and is not recommended for use with electronic devices. It features safety accessories such as a spark plug, air filter, and fuel filter, and has a net weight of 17kg.
Ask a question and I''ll find the answer in the document
Finding information in a document is now easier with AI
Related papers
Other documents
-
FXA PD 2500I User manual
-
Global Machinery Company FCG001 User manual
-
-
ALDI Workzone Titanium+ 52299 User manual
-
-
-
-
-
Draper Petrol Generator Operating instructions
-