Page is loading ...

SPEEDDOME ULTRA 8 CAMERA DOME CONFIGURATION UTILITY 8200-0600-02, REV. B
QUICK REFERENCE GUIDE
1 of 11
SpeedDome
®
Ultra 8
Camera Dome
Configuration Utility
Quick Reference Guide
If you need assistance…
Contact your Sales or Technical Support
Representative.
What is the Dome
Configuration Utility?
The Dome Configuration Utility is used to set
features for your camera dome using a text overlay
menu. This menu is accessed via a keystroke
combination on your camera controller. The utility
provides settings relating to camera functions,
alarms, text display, privacy zones, direction
indicators, and password protection. Some items
supplement similar features that may be available
through your controller or switching system.
To start the utility:
1. Select a dome that you need to configure. Refer to
your controller operating instructions for specific
information.
2. Do one of the following:
− If the dome is installed in a SensorNet or RS-422
network, press and hold Iris Open, press and
hold a Focus button, and then press Zoom Out
(Zoom Wide).
− If the dome is installed in a Manchester network,
turn the key switch to Prog, enter 66, and then
press Set Preset (Set Shot).
3. The Dome Configuration Menu appears.
© 2007 Sensormatic Electronics Corp.
Note: If Password Protection is enabled, the Enter
Password screen (Screen 7) appears first.
Choose an option on this screen to change
settings.
Table 1 describes the available
commands.
IMPORTANT: Commands may differ depending on
your operating environment. These commands
apply to SensorNet, RS-422, and Manchester.
Table 1. SensorNet, RS-422, and Manchester
commands
If you want to... Use...
Move the Highlight Bar.
Pan/Tilt
Select the highlighted item.
Focus
Increase value of selected
setting, or display next choice.
Move cursor to right during
naming.
Zoom In
(Zoom Tele)
Decrease value of selected
setting, or display previous
choice.
Move cursor to left during
naming.
Zoom Out
(Zoom Wide)
Save changes and exit from any
screen.
Iris Close,
then Focus
Pan, Tilt, Zoom and
Synchronization Options
• The default 1st Zoom Stop setting is 52X.
• The default Max Total Zoom setting is 140X.
• Maximum total zoom settings: Vary depending on the
initial zoom position.
• The default Line Lock setting is OFF.
• The default Freeze Frame setting is OFF.
• For Return to Auto settings, go to Return to Auto
Settings (Screen 2.1).
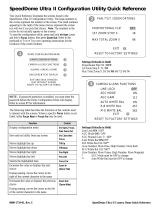
PAN/TILT/ZOOM/SYNC OPTS
PROPORTIONAL FLIP OFF
1ST ZOOM STOP X 35
MAX TOTAL ZOOM X 420
LINE LOCK OFF
FREEZE FRAME OFF
RETURN TO AUTO
RESET TO FACTORY SETTINGS
EXIT
DOME CONFIGURATION MENU
PAN/TILT/ZOOM/SYNC OPTS
CAMERA FUNCTIONS
ALARMS/AREAS/HOME/PRESETS/PZ
ON-SCREEN TEXT DISPLAY
LANGUAGE / PASSWORD
DOME INFORMATION
RESET TO FACTORY SETTINGS
QUIT WITHOUT SAVING
EXIT AND SAVE CHANGES
1
2
2
3
4
5
6
8
Screen

SPEEDDOME ULTRA 8 CAMERA DOME CONFIGURATION UTILITY 8200-0600-02, REV. B
QUICK REFERENCE GUIDE
2 of 11
Return to Auto Settings
35X Camera Dome
• The default Focus setting is ON.
• The default Iris setting is ON.
• The default EIS setting is OFF.
• The default WDR setting is OFF.
• The default IR Mode setting is OFF.
22X Camera Dome
The 22X camera dome does not support the EIS, WDR,
and IR Mode features.
Camera Functions
35X Camera Dome
Some settings appear only when the associated setting
is active. Use
Table 2 and Table 3 to identify which
settings apply.
22X Camera Dome
The 22X camera dome does not support the IR Mode,
WDR, and EIS features.
Auto White Balance and Red/Blue
Values
The Auto White Bal setting determines if the Red
and Blue values can be changed.
Table 2. Auto White Balance settings
Auto White Bal Red Blue
ON
N/A N/A
OFF Yes Yes
AGC/Shutter Settings
The AGC/Shutter setting determines if the Max
Gain and Limit settings apply.
Note:
Table 3 applies to both the 35X and 22X
camera dome.
Table 3. AGC/Shutter settings
AGC/Shutter Max Gain Limit
Open Shutter
Yes Yes
AGC ON
Yes
N/A
AGC OFF
N/A N/A
CAMERA FUNCTIONS
Auto White Bal ON
AGC/Shutter Max Gain Limit
Open Shutter 26 dB 1/3 s
RESET TO FACTORY SETTINGS
EXIT
CAMERA FUNCTIONS
Auto White Bal ON
IR MODE/nM Auto Mid /Visible
WDR OFF
AGC/Shutter Max Gain Limit
Open Shutter 26 dB 1/3 s
EIS OFF
RESET TO FACTORY SETTINGS
EXIT
RETURN TO AUTO
FOCUS ON
IRIS ON
RESET TO FACTORY SETTINGS
EXIT
RETURN TO AUTO
FOCUS ON
IRIS ON
EIS OFF
WDR OFF
IR MODE OFF
RESET TO FACTORY SETTINGS
EXIT
3
2.1

SPEEDDOME ULTRA 8 CAMERA DOME CONFIGURATION UTILITY 8200-0600-02, REV. B
QUICK REFERENCE GUIDE
3 of 11
Alarms, Areas, Home,
Presets and Privacy Zones
T
his screen provides links to lower level screens. See
the following screens:
• Set Alarm Actions (Screen 4.1)
• Set Alarm States (Screen 4.2)
• Set Home Position (Screen 4.3)
• Set North Position (Screen 4.4)
• Area Boundaries (Screen 4.5)
• Privacy Zones (Screen 4.6)
• Presets: Select Preset to Program (Screen 4.7)
• Scan Limits (Screen 4.8)
Set Alarm Actions
• No Action is the default setting for all inputs.
Preset 1-96 or Pattern 1-3 may be assigned as the
alarm action.
Set Alarm States
• Open is the default setting for all inputs.
Set Home Position
• No Action is the default setting for the home
position. Preset 1-96 or Pattern 1-3 may be
assigned to the home position.
Set North Position
• The default North Position is 0-degrees Pan/Tilt.
SET NORTH POSITION
PAN to new north position
ZOOM to mark north position
FOCUS quits w/o changing
SET HOME POSITION
ACTION PRESET 1
RETURN TIME MINS 10
EXIT
SET ALARM STATES
INTERNAL ALARMS
INPUT NORMAL STATE
1 OPEN
2 OPEN
3 OPEN
4 OPEN
EXIT
SET ALARM ACTIONS
INPUT ACTION
1 NO ACTION
2 NO ACTION
3 NO ACTION
4 NO ACTION
SEND INPUTS TO HOST? YES
EXIT
ALARMS/AREAS/HOME/PRESETS/PZ
SET ALARM ACTIONS
SET ALARM STATES
SET HOME POSITION
SET NORTH POSITION
AREA BOUNDARIES
PRIVACY ZONES
PRESETS
SCAN LIMITS
EXIT
4
4.1
4.2
4.3
4.4

SPEEDDOME ULTRA 8 CAMERA DOME CONFIGURATION UTILITY 8200-0600-02, REV. B
QUICK REFERENCE GUIDE
4 of 11
Area Boundaries
Up to 16 areas may be programmed. These areas are
separate from areas that may be available through your
switcher.
Privacy Zones
In addition to hiding all programmed privacy zones, this
screen provides links to lower level screens. See the
following screens:
•
Add Privacy Zones (Screen 4.6a)
• Delete Privacy Zone (Screen 4.6b)
•
Delete All Zones (Screen 4.6c)
Add Privacy Zones
• Up to 8 Privacy Zones may be programmed.
• Three points must be selected to establish the
Privacy Zone. The fourth point is automatically
calculated.
• Use the Pan/Tilt control to position the arrows over
the selection point. If arrows blink, this is not a valid
selection area.
• Press Zoom to save the point.
Delete Privacy Zone
• Arrows must be clearly positioned in zone to delete.
• Use the Pan/Tilt control to position the arrows over
the zone. If arrows blink, this is not a valid selection
area.
• Press Zoom to delete the selected zone.
Delete All Zones
This option permanently removes all programmed
Privacy Zones. To temporarily hide the zones, use Hide
All Zones. See
Privacy Zones (Screen 4.6).
YOU ARE ABOUT TO DELETE
ALL PRIVACY ZONES
CANCEL
CONTINUE
Navigate to zone
ZOOM to delete zone
FOCUS quits w/o changing
NEW PRIVACY ZONE
Navigate corner 1
ZOOM to mark corner
FOCUS to abandon zone
PRIVACY ZONES
ADD PRIVACY ZONE
DELETE SPECIFIC ZONES
DELETE ALL ZONES
HIDE ALL ZONES NO
EXIT
AREA BOUNDARIES
PAN to START OF BOUND 1
PAN RIGHT ONLY
ZOOM to mark BOUNDARY
FOCUS quits w/o changing
4.5
4.6
4.6a
4.6b
4.6c

SPEEDDOME ULTRA 8 CAMERA DOME CONFIGURATION UTILITY 8200-0600-02, REV. B
QUICK REFERENCE GUIDE
5 of 11
Select Preset to Program
The number of presets available depends on your
operating environment.
• If installed under SensorNet or RS-422, up to 96
presets are available.
• If installed under Manchester, up to 64 presets are
available.
This screen provides links to lower level screens. See
the following screens:
•
Sequence Setup Menu (Screen 4.7a)
•
Program Presets (Screen 4.7b)
• Camera Functions (Screen 3)
• The 22X camera dome does not support the
Sequence Setup features.
Sequence Setup Menu
35X Camera Dome Only
Use this screen to create preset sequences.
Program Presets
This screen also appears if a Preset is selected for the
Set Home Position (Screen 4.3) and the selected
preset has not been programmed.
Scan Limits
Scan Limits are used to set right and left areas of
surveillance with compatible controllers. These scans
may be activated using the DirectSet Menu (Screen 10).
• Use Pan/Tilt to adjust the dome’s pointing direction.
• Press Zoom to select the left and right scan limits.
• Press Focus to cancel changes.
• Press Focus when setting right scan limit to delete
the scan limits.
SCAN LIMITS
PAN right to RIGHT limit
ZOOM to mark BOUNDARY
Cancel RIGHT limit to Delete
CANCEL
SCAN LIMITS
PAN to LEFT limit
ZOOM to mark BOUNDARY
Cancel RIGHT limit to Delete
CANCEL
PRESETS
Position camera with PAN,
TILT, ZOOM and IRIS
FOCUS FAR to save and exit
EXIT
SEQUENCE SETUP MENU
SEQUENCE NUMBER 1
STEP 1-4 DWELL TIME
STEP PRESET MIN / SEC
1 0 0 0
2 0 0 0
3 0 0 0
4 0 0 0
EXIT
SELECT PRESET TO PROGRAM
PRESET
NUMBER PRESET NAME
1 PRESET 1
SEQUENCE SETUP MENU
CAMERA FUNCTIONS
FOCUS FAR to program preset
EXIT
4.7
4.8
4.7b
4.7a

SPEEDDOME ULTRA 8 CAMERA DOME CONFIGURATION UTILITY 8200-0600-02, REV. B
QUICK REFERENCE GUIDE
6 of 11
On-Screen Text Display
In addition to the settings available, this screen provides
links to lower level screens. See the following:
•
Name Configuration Menu (Screen 5.1)
• Text Attribute Options (Screen 5.2)
Name Configuration Menu
• Use Zoom to change the display setting.
• Press Focus to start name programming for
highlighted setting.
• If Camera is selected,
Name Programming
(Screen 5.1a) automatically appears. For others,
Select Name to Program (Screen 5.1b) appears.
Name Programming
• Names may contain up to 18 characters.
• Use Pan/Tilt to move the highlight around available
characters. Press Focus to select highlighted
character.
• Zoom In moves the highlight one space right in the
name; Zoom Out moves the highlight left.
Select Name to Program
• Use Zoom to select the appropriate Alarm, Area,
Pattern, or Preset number.
• Press Focus to start name programming.
Text Attribute Options
If Privacy Zones are displayed, Translucent Names is
automatically disabled.
TEXT ATTRIBUTE OPTIONS
CHARACTER OUTLINE ON
TRANSLUCENT NAMES 4
EXIT
SELECT NAME TO PROGRAM
NUMBER CURRENT NAME
1
FOCUS FAR to program names
EXIT
NAME PROGRAMMING
NAME: ALARM 1
ABCDEFGHIJKLMNOPQRST
UVWXYZabcdefghijklmn
opqrstuvwxyz 0123456
789/-
UNDO CHANGES AND QUIT
EXIT
NAME CONFIGURATION MENU
CAMERA NAME OFF
AREA NAME OFF
PRESET NAME OFF
PATTERN NAME OFF
ALARM NAME ON
FOCUS FAR to program names
RESET PROGRAMMABLE NAMES
EXIT
ON-SCREEN TEXT DISPLAY
STATUS DISPLAY ON
DISABLE ALL NAMES? NO
DIAGNOSTICS DISPLAY ON
DIRECTION INDICATOR ON
PATTERN SELECT OFF
NAME CONFIGURATION MENU
TEXT ATTRIBUTE OPTIONS
EXIT
5
5.1
5.1a
5.1b
5.2

SPEEDDOME ULTRA 8 CAMERA DOME CONFIGURATION UTILITY 8200-0600-02, REV. B
QUICK REFERENCE GUIDE
7 of 11
Language and Password
In addition to enabling password protection, this screen
provides links to lower level screens. See the following
screens:
•
Language Selection (Screen 6.1)
• Set Password (Screen 6.2)
Language Selection
• Dome must reset for language setting to change.
• Programmed names do not change after setting the
language. Only the default names change.
Set Password
• Passwords may contain up to 8 characters.
• See
Name Programming (Screen 5.1a) for
instructions on how to set passwords.
Enter Password
This screen only appears when Password Protection is
enabled. The password must be successfully entered
before the Dome Configuration Menu will appear.
See Name Programming (Screen 5.1a) for instructions
on how to enter passwords.
Dome Information
Camera domes with Outdoor IO boards
Camera domes with Indoor IO boards
DOME INFORMATION
DOME MODEL
DOME STATISTICS
INIT IO FLASH
CALIBRATION
EXIT
DOME INFORMATION
DOME MODEL
DOME STATISTICS
INIT IO FLASH
CALIBRATION
BASE IO STATUS
BASE IO CONTROL
EXIT
ENTER PASSWORD
PASSWORD: ********
ABCDEFGHIJKLMNOPQRST
UVWXYZabcdefghijklmn
opqrstuvwxyz 0123456
789/-
CONTINUE
CANCEL
SET PASSWORD
PASSWORD: ********
ABCDEFGHIJKLMNOPQRST
UVWXYZabcdefghijklmn
opqrstuvwxyz 0123456
789/-
CONTINUE
CANCEL
LANGUAGE SELECTION
ENGLISH
SPANISH
FRENCH
GERMAN
ITALIAN
PORTUGUESE
EXIT
LANGUAGE / PASSWORD
LANGUAGE SELECTION
SET PASSWORD
PASSWORD PROTECTION OFF
EXIT
8
6
6.1
6.2
7

SPEEDDOME ULTRA 8 CAMERA DOME CONFIGURATION UTILITY 8200-0600-02, REV. B
QUICK REFERENCE GUIDE
8 of 11
Camera domes with legacy IO boards
This screen provides links to lower level dome
information screens. The choices are:
• Dome model information, select
Dome Model
(Screen 8.1 for all domes)
• Dome usage information, select
Dome Statistics
(Screen 8.2 for all domes)
• Update the IO board flash memory, select
Init IO
Flash (Screen 8.3 for outdoor and indoor domes)
• Calibrate domes when replacing or installing new
domes, select Calibration (Screen 8.4 for outdoor
and indoor domes)
• IO board status information, select
Base IO Status
(Screen 8.5 for outdoor domes only)
• IO board control information, select
Base IO Control
(Screen 8.6 for outdoor domes only)
Dome Model
This screen displays the dome model information.
Dome Statistics
This screen displays operating statistics for the dome.
The information displayed represents the number of
occurrences or time in seconds (displayed in
hexadecimal format).
• R represents time moving Right in seconds.
• L represents time moving Left in seconds.
• M represents Total Move Time in seconds.
• T represents Target Count.
• O represents Operating Time in seconds.
• P represents Power Failure Reset Count.
• W represents Watchdog Reset Count.
• U represents User Reset Count.
Init IO Flash
This screen enables the updating of the IO board flash
memory.
Note: The IO board flash memory initialization feature is
only applicable to Outdoor Housing 0311-0124-xx, and
Indoor Housing 0312-3006-01.
INIT IO FLASH
NO
DOME STATISTICS
PanStat TiltStat ZoomStat
R 000000D0 00000074 0000006C
L 000005E5 00000A5C 00000092
M 0000D8E9 00000F8A 0000019A
T 0000051E 0000050A 00000002
001 SENSORNET
Pwr/Run Pwr/Run
O 002D389 W 00000000
P 0000002 U 00000000
EXIT
DOME MODEL
NAME: ADSDU835D
Mnemonic SDU8
Software Ver 0101-0150-F108
FPGA Ver 2006/10/31 15:58
Device Type 0150
Camera: 2003-0054-01 NTSC
SN 00000000001234567890
Manufacture Date 01212003
EXIT
DOME INFORMATION
DOME MODEL
DOME STATISTICS
EXIT
8.2
8.1
8.3

SPEEDDOME ULTRA 8 CAMERA DOME CONFIGURATION UTILITY 8200-0600-02, REV. B
QUICK REFERENCE GUIDE
9 of 11
The following screen appears during the initialization
process:
Calibration
• This screen allows you to enter a password (135246)
to access the calibration screen shown below, which
enables you to define a zero reference point (or
target) from which all other camera targets will be
referenced.
Note: The Calibration feature is applicable to the
Outdoor Housing, P/N 0311-0124-xx, and the Indoor
Housing board, P/N 0312-3006-01.
• Calibration is used only when replacing a dome in an
existing base.
• The plus (+) sign in the middle of the screen is the
crosshair used for calibration.
Base IO Status
• This screen displays the base IO operating
conditions and status.
• The status information is automatically updated as it
changes.
Note: The Base IO Status feature is only applicable to
the Outdoor Housing board, P/N 0311-0124-xx.
Base IO Control
• This screen displays the base IO firmware version,
enables updating of the firmware, and enables
blower and heater control.
Note: The Base IO Control feature is only applicable to
the Outdoor Housing board, P/N 0311-0124-xx.
Dome Address Change
DOME ADDRESS CHANGED!!
UPDATE DOME DATA FROM BASE
CLEAR BASE DATA
BASE IO CONTROL
Update App: v2.30 => v2.30
Blower Control: AUTO ON
Heater Control: AUTO OFF
EXIT
BASE IO STATUS
BASE App Version: 2.30
BASE Boot Version 2.22
Temp: 40.1 C
Humidity: 37 %
Blower 1: ON
Blower 2: ON
Alarm Bits: 00
EXIT
Position Cross-hair
To Target 1
Press Focus Far
To Calibrate
+
CALIBRATION
PASSWORD:
0123456789
EXIT
Init IO Flash Memory!
Initializing
Please Wait
8.5
8.6
9
8.4

SPEEDDOME ULTRA 8 CAMERA DOME CONFIGURATION UTILITY 8200-0600-02, REV. B
QUICK REFERENCE GUIDE
10 of 11
When a dome powers up, it finds Pan/Tilt home,
determines the network type, and then performs the
following sequential tests:
• Checks if its own address has changed.
• Checks if its address matches the base IO address.
If it does not, the Dome Address Changed screen
appears to allow a change to be made.
• Verifies that its configuration data matches the
configuration data stored in the base IO.
The screen shown below briefly appears during:
• The updating process.
• Verification when dome configuration data does not
match configuration data stored in the base IO
memory and indicates the dome is copying the IO
base configuration data.
The screen below briefly appears when base data is
cleared. When base data is cleared, all presets, patterns,
and other configurations stored in the base IO memory
are deleted.
Note: After verification is complete, the last screen that
was displayed before the dome was powered down will
reappear.
DirectSet Menu
35X Camera Dome
DirectSet Menu Screen 1 of 4
DirectSet Menu Screen 2 of 4
DirectSet Menu Screen 3 of 4
DirectSet Menu Screen 4 of 4
58 SEQUENCE 8
59 SEQUENCE 9
60 SEQUENCE 10
61 SEQUENCE 11
62 SEQUENCE 12
63 SEQUENCE 13
64 SEQUENCE 14
65 SEQUENCE 15
66 SEQUENCE 16
FOCUS NEAR=previous page
49 EIS 5 Hz
50 EIS 10 Hz
51 SEQUENCE 1
52 SEQUENCE 2
53 SEQUENCE 3
54 SEQUENCE 4
55 SEQUENCE 5
56 SEQUENCE 6
57 SEQUENCE 7
Use FOCUS to select page
11 DAY MODE
12 AUTO DAY/NIGHT MODE
13 WDR ON
14 WDR OFF
15 SMOOTH SCAN
16 STEPPED SCAN
17 RANDOM SCAN
20 DOME INFORMATION
48 EIS OFF
Use FOCUS to select page
0 TOGGLE DIRECT SET MENU
1 DOME CONFIGURATION MENU
2 AUTO IRIS & AUTO FOCUS
3 FLIP
4 PEEL PATTERN
5 SET NORTH POSITION
6 LINE LOCK OFF
7 LINE LOCK ON
10 NIGHT MODE
FOCUS FAR=next page
Updating IO Base Memory!
Please Wait!
Restoring Dome Data
Names Buffer
TPB Buffer
10

SPEEDDOME ULTRA 8 CAMERA DOME CONFIGURATION UTILITY 8200-0600-02, REV. B
QUICK REFERENCE GUIDE
11 of 11
22X Camera Dome
DirectSet Menu Screen 1 of 4
DirectSet Menu Screen 2 of 4
DirectSet Menu Screen 3 of 4
DirectSet Menu Screen 4 of 4
The DirectSet Menu provides easy access to dome
features and menus with compatible controllers.
• Press the DirectSet or Info button (varies by
controller) to display the menu.
• Press Focus Far and Focus Near to scroll between
the menu pages.
• Enter a number and press the DirectSet button to
activate the setting or menu.
• Enter 0 and press the DirectSet button to close the
menu.
Refer to your controller instructions to determine if it is
compatible with the DirectSet Menu function.
66 SEQUENCE 16
57 SEQUENCE 7
58 SEQUENCE 8
59 SEQUENCE 9
60 SEQUENCE 10
61 SEQUENCE 11
62 SEQUENCE 12
63 SEQUENCE 13
64 SEQUENCE 14
65 SEQUENCE 15
Use FOCUS to select page
16 STEPPED SCAN
17 RANDOM SCAN
20 DOME INFORMATION
51 SEQUENCE 1
52 SEQUENCE 2
53 SEQUENCE 3
54 SEQUENCE 4
55 SEQUENCE 5
56 SEQUENCE 6
Use FOCUS to select page
0 TOGGLE DIRECT SET MENU
1 DOME CONFIG MENU
2 AUTO IRIS & AUTO FOCUS
3 FLIP
4 PEEL PATTERN
5 SET NORTH POSITION
6 LINE LOCK OFF
7 LINE LOCK ON
15 SMOOTH SCAN
FOCUS FAR=next page
/