
USB 2.0 Su pe r Multi-Burner Drive
User’s
Guide


USB 2.0 Su pe r Multi-Burner Drive
User’s
Guide

Note
Before using this information and the product it supports, read Appendix B, “Service and Support,” Appendix D, “Lenovo
Statement of Limited Warranty,” and Appendix C, “Notices.”
First Edition (March 2006)
© Copyright Lenovo 2006.
Portions © Copyright International Business Machines Corporation 2003.
All rights reserved.
U.S. GOVERNMENT USERS – RESTRICTED RIGHTS: Our products and/or services are provided with
RESTRICTED RIGHTS. Use, duplication or disclosure by the Government is subject to the GSA ADP Schedule
contract with Lenovo Group Limited, if any, or the standard terms of this commercial license, or if the agency is
unable to accept this Program under these terms, then we provide this Program under the provisions set forth in
Commercial Computer Software–Restricted Rights at FAR 52.227-19, when applicable, or under Rights in
Data-General, FAR 52.227.14 (Alternate III).

Contents
Safety . . . . . . . . . . . . . . .v
General safety guidelines . . . . . . . vii
Service . . . . . . . . . . . . . . . . vii
Power cords and power adapters . . . . . . . vii
Extension cords and related devices . . . . . . vii
Plugs and outlets . . . . . . . . . . . . vii
Batteries . . . . . . . . . . . . . . . viii
Heat and product ventilation . . . . . . . . viii
CD and DVD drive safety . . . . . . . . . .ix
About this book . . . . . . . . . . .xi
Registering your option . . . . . . . . . .xi
Chapter 1. USB 2.0 Super Multi-Burner
Drive . . . . . . . . . . . . . . . 1-1
Product description . . . . . . . . . . . 1-1
Application software . . . . . . . . . . . 1-2
Hardware and software requirements . . . . . 1-4
Preparing to use the USB 2.0 Super Multi-Burner
Drive . . . . . . . . . . . . . . . . 1-4
Power mode configurations . . . . . . . . . 1-6
Configuration 1: Connecting the drive using self
power with AC adapter (full operation) . . . . 1-6
Configuration 2: Connecting the drive using
standard USB bus power (Limited Speed
Operation) . . . . . . . . . . . . . 1-7
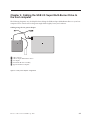
Chapter 2. Cabling the USB 2.0 Super
Multi-Burner Drive to the host
computer . . . . . . . . . . . . . 2-1
Chapter 3. Features . . . . . . . . . 3-1
Chapter 4. USB 2.0 Super Multi-Burner
hardware installation and removal in
Windows 2000 and Windows XP . . . 4-1
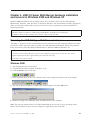
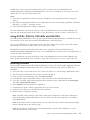
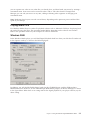
Removing the USB 2.0 Super Multi-Burner
hardware . . . . . . . . . . . . . . . 4-1
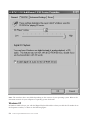
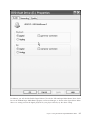
Windows 2000 . . . . . . . . . . . . 4-1
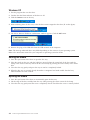
Windows XP . . . . . . . . . . . . . 4-2
Setting the media . . . . . . . . . . . . 4-2
Ejecting the media . . . . . . . . . . . . 4-2
Chapter 5. Using the USB 2.0 Super
Multi-Burner Drive . . . . . . . . . 5-1
Before you begin . . . . . . . . . . . . 5-1
Caring for the USB 2.0 Super Multi-Burner drive 5-1
Cleaning the drive . . . . . . . . . . . 5-1
Using Media . . . . . . . . . . . . . . 5-1
Handling and caring for a disc . . . . . . . 5-1
Using DVD-RAM media . . . . . . . . . 5-2
Using CDs and DVDs . . . . . . . . . 5-2
Using CD-Rs and CD-RWs . . . . . . . . 5-2
Using DVD-Rs, DVD+Rs, DVD+RWs and
DVD-RWs . . . . . . . . . . . . . 5-3
Installing Software . . . . . . . . . . . . 5-3
Using Direct-to-disc . . . . . . . . . . . 5-4
Using Intervideo WinDVD Creator Plus . . . . . 5-4
Playing audio CD’s . . . . . . . . . . . 5-5
Windows 2000 . . . . . . . . . . . . 5-5
Windows XP . . . . . . . . . . . . . 5-6
Using WinDVD . . . . . . . . . . . . . 5-8
Operating system support . . . . . . . . 5-9
DVD region codes . . . . . . . . . . . 5-9
Starting WinDVD . . . . . . . . . . . 5-10
Copying and imaging . . . . . . . . . . 5-10
Chapter 6. Troubleshooting . . . . . 6-1
Appendix A. Product specifications A-1
Appendix B. Service and Support . . . B-1
Online technical support . . . . . . . . . . B-1
Telephone technical support . . . . . . . . B-1
Appendix C. Notices . . . . . . . . C-1
Trademarks . . . . . . . . . . . . . . C-2
Appendix D. Lenovo Statement of
Limited Warranty . . . . . . . . . . D-1
Part 1 - General Terms . . . . . . . . . . D-1
Part 2 - Country-unique Terms . . . . . . . D-3
Part 3 - Warranty Information . . . . . . . D-13
Warranty Period . . . . . . . . . . . D-13
Types of Warranty Service . . . . . . . . D-13
Worldwide telephone list . . . . . . . . D-14
Guarantee supplement for Mexico . . . . . . D-17
Appendix E. Electronic emissions
notices . . . . . . . . . . . . . . E-1
Federal Communications Commission (FCC)
Declaration of Conformity . . . . . . . . . E-1
© Lenovo 2006. Portions © IBM Corp. 2003. iii

iv USB 2.0 Super Multi-Burner Drive User’s Guide

Safety
Before installing this product, read the Safety Information.
Antes de instalar este produto, leia as Informações de Segurança.
Pred instalací tohoto produktu si prectete prírucku bezpecnostních instrukcí.
Læs sikkerhedsforskrifterne, før du installerer dette produkt.
Ennen kuin asennat tämän tuotteen, lue turvaohjeet kohdasta Safety Information.
Avant d’installer ce produit, lisez les consignes de sécurité.
Vor der Installation dieses Produkts die Sicherheitshinweise lesen.
Prima di installare questo prodotto, leggere le Informazioni sulla Sicurezza.
Lees voordat u dit product installeert eerst de veiligheidsvoorschriften.
Les sikkerhetsinformasjonen (Safety Information) før du installerer dette produktet.
Antes de instalar este produto, leia as Informações sobre Segurança.
Antes de instalar este producto lea la información de seguridad.
© Lenovo 2006. Portions © IBM Corp. 2003. v

Läs säkerhetsinformationen innan du installerar den här produkten.
vi USB 2.0 Super Multi-Burner Drive User’s Guide

General safety guidelines
Always observe the following precautions to reduce the risk of injury and property damage.
Service
Do not attempt to service a product yourself unless instructed to do so by the Customer Support Center.
Use only a service provider who is approved to repair your particular product.
Note: Some parts can be upgraded or replaced by the customer. These parts are referred to as Customer
Replaceable Units, or CRUs. Lenovo expressly identifies CRUs as such, and provides documentation with
instructions when it is appropriate for customers to replace those parts. You must closely follow all
instructions when performing such replacements. Always make sure that the power is turned off and that
the product is unplugged from any power source before you attempt the replacement. If you have any
questions or concerns, contact the Customer Support Center.
Power cords and power adapters
Use only the power cords and power adapters supplied by the product manufacturer.
Never wrap a power cord around the power adapter or other object. Doing so can stress the cord in ways
that can cause the cord to fray, crack or crimp. This can present a safety hazard.
Always route power cords so that they will not be walked on, tripped over, or pinched by objects.
Protect the cord and power adapters from liquids. For instance, do not leave your cord or power adapter
near sinks, tubs, toilets, or on floors that are cleaned with liquid cleansers. Liquids can cause a short
circuit, particularly if the cord or power adapter has been stressed by misuse. Liquids can also cause
gradual corrosion of the power cord terminals and/or the connector terminals on the adapter which can
eventually result in overheating.
Always connect power cords and signal cables in the correct order and ensure that all power cord
connectors are securely and completely plugged into receptacles.
Do not use any power adapter that shows corrosion at the ac input pins and/or shows signs of
overheating (such as deformed plastic) at the ac input or anywhere on the power adapter.
Do not use any power cords where the electrical contacts on either end show signs of corrosion or
overheating or where the power cord appears to have been damaged in any way.
Extension cords and related devices
Ensure that extension cords, surge protectors, uninterruptible power supplies, and power strips that you
use are rated to handle the electrical requirements of the product. Never overload these devices. If power
strips are used, the load should not exceed the power strip input rating. Consult an electrician for more
information if you have questions about power loads, power requirements, and input ratings.
Plugs and outlets
If a receptacle (power outlet) that you intend to use with your computer equipment appears to be
damaged or corroded, do not use the outlet until it is replaced by a qualified electrician.
© Lenovo 2006. Portions © IBM Corp. 2003. vii

Do not bend or modify the plug. If the plug is damaged, contact the manufacturer to obtain a
replacement.
Some products are equipped with a three-pronged plug. This plug fits only into a grounded electrical
outlet. This is a safety feature. Do not defeat this safety feature by trying to insert it into a non-grounded
outlet. If you cannot insert the plug into the outlet, contact an electrician for an approved outlet adapter
or to replace the outlet with one that enables this safety feature. Never overload an electrical outlet. The
overall system load should not exceed 80 percent of the branch circuit rating. Consult an electrician for
more information if you have questions about power loads and branch circuit ratings.
Be sure that the power outlet you are using is properly wired, easily accessible, and located close to the
equipment. Do not fully extend power cords in a way that will stress the cords.
Connect and disconnect the equipment from the electrical outlet carefully
Batteries
All personal computers manufactured by Lenovo contain a non-rechargeable coin cell battery to provide
power to the system clock. In addition many mobile products such as notebook PCs utilize a rechargeable
battery pack to provide system power when in portable mode. Batteries supplied by Lenovo for use with
your product have been tested for compatibility and should only be replaced with Lenovo approved
parts.
Never attempt to open or service any battery. Do not crush, puncture, or incinerate batteries or short
circuit the metal contacts. Do not expose the battery to water or other liquids. Only recharge the battery
pack strictly according to instructions included in the product documentation.
Battery abuse or mishandling can cause the battery to overheat, which can cause gasses or flame to
“vent” from the battery pack or coin cell. If your battery is damaged, or if you notice any discharge from
your battery or the buildup of foreign materials on the battery leads, stop using the battery and obtain a
replacement from the battery manufacturer.
Batteries can degrade when they are left unused for long periods of time. For some rechargeable batteries
(particularly Lithium Ion batteries), leaving a battery unused in a discharged state could increase the risk
of a battery short circuit, which could shorten the life of the battery and can also pose a safety hazard. Do
not let rechargeable Lithium-Ion batteries completely discharge or store these batteries in a discharged
state.
Heat and product ventilation
Computers generate heat when turned on and when batteries are charging. Notebook PCs can generate a
significant amount of heat due to their compact size. Always follow these basic precautions:
v Do not leave the base of your computer in contact with your lap or any part of your body for an
extended period when the computer is functioning or when the battery is charging. Your computer
produces some heat during normal operation. Extended contact with the body could cause discomfort
or, potentially, a skin burn.
v Do not operate your computer or charge the battery near flammable materials or in explosive
environments.
v Ventilation slots, fans and/or heat sinks are provided with the product for safety, comfort, and reliable
operation. These features might inadvertently become blocked by placing the product on a bed, sofa,
carpet, or other flexible surface. Never block, cover or disable these features.
viii USB 2.0 Super Multi-Burner Drive User’s Guide

CD and DVD drive safety
CD and DVD drives spin discs at a high speed. If a CD or DVD is cracked or otherwise physically
damaged, it is possible for the disc to break apart or even shatter when the CD drive is in use. To protect
against possible injury due to this situation, and to reduce the risk of damage to your machine, do the
following:
v Always store CD/DVD discs in their original packaging
v Always store CD/DVD discs out of direct sunlight and away from direct heat sources
v Remove CD/DVD discs from the computer when not in use
v Do not bend or flex CD/DVD discs, or force them into the computer or their packaging
v Check CD/DVD discs for cracks before each use. Do not use cracked or damaged discs
General safety guidelines ix

x USB 2.0 Super Multi-Burner Drive User’s Guide

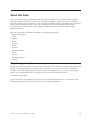
About this book
This user’s manual on the CD included with this option describes how to set up the Lenovo USB 2.0
Super Multi-Burner Drive, how to connect it to a personal computer, and how to operate it. Read the
instruction manual of your computer as well. The CD also includes software applications for use with the
USB 2.0 Super Multi-Burner Drive. They will automatically install by clicking on them. Read this
instruction manual carefully before use for proper handling and operations of the USB 2.0 Super
Multi-Burner Drive.
This manual provides installation instructions in the following languages:
v Brazilian Portuguese
v Czech
v English
v French
v German
v Italian
v Japanese
v Simplified Chinese
v Slovak
v Spanish
v Traditional Chinese
v Turkish
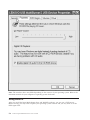
Registering your option
Thank you for purchasing this Lenovo
™
product. Please take a few moments to register your product and
provide us with information that will help Lenovo to better serve you in the future. Your feedback is
valuable to us in developing products and services that are important to you, as well as in developing
better ways to communicate with you. Register your option on the Lenovo Web site at:
www.lenovo.com/register
Lenovo will send you information and updates on your registered product unless you indicate on the
Web site questionnaire that you do not want to receive further information.
© Lenovo 2006. Portions © IBM Corp. 2003. xi

xii USB 2.0 Super Multi-Burner Drive User’s Guide

Chapter 1. USB 2.0 Super Multi-Burner Drive
This chapter contains instructions for installing the Lenovo USB 2.0 Super Multi-Burner Drive.
Product description
The USB 2.0 Super Multi-Burner Drive is a slimline DVD and CD recordable drive that attaches quickly
and conveniently to your computer through a simple connection. This drive conforms with industry
standard specifications for DVD-RAM, DVD-RW, DVD-R, DVD+RW, DVD+R, DVD-R (dual layer),
DVD+R (double layer), CD-RW, and CD-R media. The drive is a USB 2.0 device and requires connection
to two USB 2.0 ports. For more information on write and read speeds, go to Appendix A, “Product
specifications,” on page A-1.
Note: This device is intended for use only with UL Listed host computers when powered by the USB
bus.
Note: The drive is capable of writing up to 5x DVD RAM and 4x DVD+RW Media. Higher speeds are
supported in ″read-only″ mode.
The option package includes:
v USB 2.0 Super Multi-Burner Drive
v 2 Standard USB cables
v AC adapter
United States, Canada, Latin America, and Japan
All other countries
v USB 2.0 Super Multi-Burner Drive Software and Guide Super CD
© Lenovo 2006. Portions © IBM Corp. 2003. 1-1

v USB 2.0 Super Multi-Burner Quick Installation Guide (one)
v Safety Information Manuals (two)
v Carrying case
Contact your place of purchase if an item is missing or damaged. Be sure to retain your proof of
purchase and packing material. They might be required to receive warranty service.
Application software
Your USB 2.0 Super Multi-Burner Software and User’s Guide Super CD contains the following software:
v Intervideo WinDVD Creator Plus
This software enables you to record video files to DVD-RW or DVD-R media that can be played in
most stand-alone DVD players. You can also use this software to edit and modify your own video
assets prior to recording. If you have an analog or IEEE 1394 capture device installed in your
computer, you can use this software to record video from a camera.
Computer part Minimum Optimal
Processor Intel Celeron 800MHz Intel Pentium
®
III 600MHz
Direct DVD support requires P4
1.6GHz or higher for real-time
requirement
RAM 64MB 128MB
Operating system Windows 2000 or Windows XP Windows 2000 or Windows XP
Sound Windows-compatible sound card that
supports 48KHz playback
Windows-compatible sound card that
supports 48KHz playback (PCI
recommended)
Video Windows-compatible AGP or PCI
graphic card
Windows-compatible AGP or PCI
graphic card (overlay support
recommended)
Hard drive
v 70 MB for installation
v 620 MB for every hour of
VCD-quality MPEG-1 video
v 2 GB for every hour of
DVD-quality MPEG-2 video
v 70 MB for installation
v 620 MB for every hour of
VCD-quality MPEG-1 video
v 2 GB for every hour of
DVD-quality MPEG-2 video
1-2 USB 2.0 Super Multi-Burner Drive User’s Guide

Computer part Minimum Optimal
Others CD or DVD burner required for VCD
and DVD burning. Appropriate
hardware needed to import video
from external sources, such as DV
cameras and camcorders
Note: WinDVD Creator Plus can import and export DivX content with the DivX codec pre-installed.
DivX is a trademark of DivX Networks, Inc.
v Direct-to-Disc
This software enables you to write directly to CD-RW, CD-R, DVD-RAM, DVD-RW, and DVD-R media
using the drive letter like you would if you were writing to a diskette. All disc format types can be
formatted by Direct-to-disc. With Direct-to-disc, you can drag-and-drop files, create new directories, or
save files from any application directly to your USB 2.0 Super Multi-Burner. Direct-to-Disc is installed
automatically as part of the Multimedia Center for Think Offerings.
v UDF reader
This software enables you to use DVD-RAM, DVD-RW, and CD-RW media on computers with DVD
drives. It also allows you to read Direct-to-disc-created discs on systems without Direct-to-disc
installed.
v Multimedia Center for Think Offerings
Multimedia Center for Think Offerings is a disc mastering software that allows you to create your own
music or data discs from files on your computer, or from other disc media such as CDs or DVDs.
Music discs created with Multimedia Center for Think Offerings, will play on any CD player, whether
it’s at home, in your car, or through your computer’s CD-ROM. Multimedia Center for Think Offerings
also makes it easy to create data discs that can be read on any appropriate CD or DVD disc reader.
Note: Some DVD players cannot read CD-R media. Refer to the documentation that accompanied
your drive for information on supported media.
Multimedia Center for Think Offerings guides you, step-by-step, through the recording process with
simple Wizards and an intuitive user-interface.
Using Multimedia Center for Think Offerings you can create:
– Exact copies of existing discs - The Exact Copy feature makes a duplicate of your master disc,
transferring the disc layout of the original disc to your CD-R, CD-RW, or DVD media.
– Discs of archived data from your hard drive – The Make a Data Disc feature is used to store
electronic data, such as the files and applications that reside on your computer’s hard drive. Unlike
music discs, data discs are used to store files that are readable only by a computer, and cannot be
played on your home or car stereo—even if audio files are on the disc.
– Music compilations from WAV, MP3, or WMA files, or from existing music discs – The Make a
Music Disc feature creates custom music discs from files on your hard drive or your existing music
discs. The CD music database feature can automatically tag your files with track information to help
you sort through your collection.
Note:
Please reference the Multimedia Center for Think Offerings On-line Help, for more information
on how to Make an Exact copy, Create a Data Disc, or to Create an Audio disc with Multimedia Center
for Think Offerings.
To start Multimedia Center for Think Offerings, complete the following procedure:
1. Click Start.
2. Click Programs.
3. Click Multimedia Center for Think Offerings to open the main recording software window.
v
Intervideo WinDVD
Chapter 1. USB 2.0 Super Multi-Burner Drive 1-3

This software enables you to play back DVD videos on your computer or to play video files from your
hard disk drive.
Note:
Some graphics adapters such as the FIREGL, Intergraph, and 3dLabs, do not support DVD video
playback.
Hardware and software requirements
You must have the following hardware installed on your host computer in order to use this option:
v One or two available USB 2.0 ports
Your computer must have one of the following operating systems installed to use this option:
v Microsoft
®
Windows
®
XP
v Microsoft Windows 2000 Professional (Service Pack 4 or later)
Note: The drive will not operate correctly unless Service Pack 4 or later is installed.
Preparing to use the USB 2.0 Super Multi-Burner Drive
Before using the USB 2.0 Super Multi-Burner Drive, follow the procedure below:
1. Make sure the USB 2.0 Super Multi-Burner Drive is properly connected to your host computer.
2. Check the locations of the functions on the USB 2.0 Super Multi-Burner Drive (refer to the figures
below).
3. Insert the USB 2.0 Super Multi-Burner Drive Software and User’s Guide Super CD that was shipped with
this option to install the CD-R/CD-RW/DVD writing software.
4. Double-click on the application you want and follow the instructions on the screen.
5. Check that the drive operates normally and keep the enclosed warranty in a safe place after filling it
in.
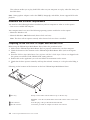
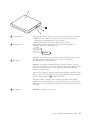
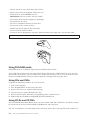
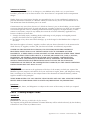
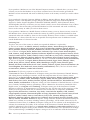
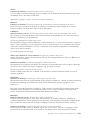
Following are the locations of the functions on the host USB 2.0 Super Multi-Burner Drive:
1 Disc tray Firmly seat the media with the label face up on the disc tray.
Attention: Push the CD/DVD media down until it clicks and is secure in the
center.
2USB connectors Insert the plug of the provided dedicated USB cable.
3 DC IN connector Connect the provided AC adapter into the DC IN connector.
1-4 USB 2.0 Super Multi-Burner Drive User’s Guide

4 Power indicator The green LED indicates the power status and the operation states of the drive.
v LED is on: when the drive is connected in any of the supported power
configurations and the USB port of your computer.
v LED is off: when the drive is not connected to the USB port.
5 Emergency eject When ejecting the media with the power off, insert paper clip into the
emergency eject hole to open the disc tray.
45 mm
1.8 in
Attention: Be sure the power is off when using the emergency eject. Use the
eject button instead of the emergency eject except in an emergency.
6 Eject button Press this button to open the disc tray.
Attention: An electrical locking mechanism is used in this drive so that an
erroneous operation does not open the to disc tray during write. Make sure that
the power is on and the drive is not in operation before pressing the eject
button to open the disc tray.
If the disc tray cannot be opened even when the eject button is pressed or if the
disc tray needs to be opened when power is not supplied from the AC adapter,
use the emergency eject hole5 in front of the drive.
Check that nothing is placed in front of the disc tray when ejecting. When
normal ejection is impossible, an error message may appear on your computer.
When ejection is not performed normally, open the disc tray manually and close
it securely.
7 Busy indicator LED blinks: during data read or write.
Chapter 1. USB 2.0 Super Multi-Burner Drive 1-5

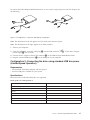
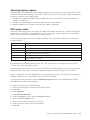
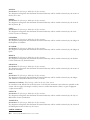
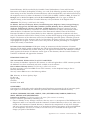
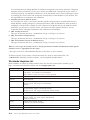
Power mode configurations
This section provides installation instructions for the following configurations:
v Configuration 1: Connecting the drive using self power with AC adapter (full operation)
v Configuration 2: Connecting the drive using USB standard bus power (limited speed operation)
USB PWR INUSB PWR IN
Refer to the diagram above when configuring your drive
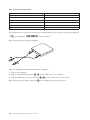
Configuration 1: Connecting the drive using self power with AC
adapter (full operation)
This configuration is used when connecting to AC power (use adapter shipped with the drive).
Requirements
v One standard USB cable (shipped with this option).
v AC adapter (shipped with this option).
Specifications
Read and write CD and DVD media are supported.
Read speeds for Configuration 1
Media Max Speed w/AC Adapter
DVD-ROM (Single layer) 8x CAV
DVD-R (4.7 GB) 8x
DVD+R 8x
CD-ROM 24x
CD-R 24x
CD-RW 20x
CD-DA (DAE) 20x CAV
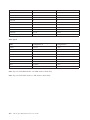
Write speeds for Configuration 1
Media Write speed w/ AC Adapter
DVD-R 8x ZCLV
DVD-RW 4x ZCLV
DVD+R 8x ZCLV
DVD+RW 4x ZCLV
DVD+RW 4x ZCLV
CD-R 24x ZCLV
CD-RW 16x ZCLV
Note: For more information refer to Appendix A, “Product specifications,” on page A-1.
1-6 USB 2.0 Super Multi-Burner Drive User’s Guide
Page is loading ...
Page is loading ...
Page is loading ...
Page is loading ...
Page is loading ...
Page is loading ...
Page is loading ...
Page is loading ...
Page is loading ...
Page is loading ...
Page is loading ...
Page is loading ...
Page is loading ...
Page is loading ...
Page is loading ...
Page is loading ...
Page is loading ...
Page is loading ...
Page is loading ...
Page is loading ...
Page is loading ...
Page is loading ...
Page is loading ...
Page is loading ...
Page is loading ...
Page is loading ...
Page is loading ...
Page is loading ...
Page is loading ...
Page is loading ...
Page is loading ...
Page is loading ...
Page is loading ...
Page is loading ...
Page is loading ...
Page is loading ...
Page is loading ...
Page is loading ...
Page is loading ...
Page is loading ...
Page is loading ...
Page is loading ...
Page is loading ...
Page is loading ...
Page is loading ...
Page is loading ...
Page is loading ...
Page is loading ...
Page is loading ...
Page is loading ...
Page is loading ...
Page is loading ...
-
 1
1
-
 2
2
-
 3
3
-
 4
4
-
 5
5
-
 6
6
-
 7
7
-
 8
8
-
 9
9
-
 10
10
-
 11
11
-
 12
12
-
 13
13
-
 14
14
-
 15
15
-
 16
16
-
 17
17
-
 18
18
-
 19
19
-
 20
20
-
 21
21
-
 22
22
-
 23
23
-
 24
24
-
 25
25
-
 26
26
-
 27
27
-
 28
28
-
 29
29
-
 30
30
-
 31
31
-
 32
32
-
 33
33
-
 34
34
-
 35
35
-
 36
36
-
 37
37
-
 38
38
-
 39
39
-
 40
40
-
 41
41
-
 42
42
-
 43
43
-
 44
44
-
 45
45
-
 46
46
-
 47
47
-
 48
48
-
 49
49
-
 50
50
-
 51
51
-
 52
52
-
 53
53
-
 54
54
-
 55
55
-
 56
56
-
 57
57
-
 58
58
-
 59
59
-
 60
60
-
 61
61
-
 62
62
-
 63
63
-
 64
64
-
 65
65
-
 66
66
-
 67
67
-
 68
68
-
 69
69
-
 70
70
-
 71
71
-
 72
72


Ask a question and I''ll find the answer in the document
Finding information in a document is now easier with AI
Related papers
-
Lenovo ThinkCentre 41N620 User manual
-
-
-
-
-
-
-
-
-
Other documents
-
IBM CD-RW/DVD-ROM Combo Drive User manual
-
Sony DRX-S77U-P Operating instructions
-
-
 EXP Computer 19K4206PT1 User manual
-
 EXP Computer 19K4206PT1 User manual
-
Dell External USB Slim DVD ROM Optical Drive DP61N Owner's manual
-
-
-
Dell PowerEdge T440 User guide
-
Dell PowerEdge R7525 User guide

