Dymo XTL™ 300 Quick start guide
- Category
- Label printers
- Type
- Quick start guide
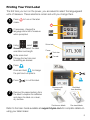
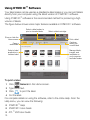
Dymo XTL™ 300 is a high-quality label maker that offers a wide range of features to meet your labeling needs. With its ability to print labels up to 19mm wide, you can create customized labels for a variety of applications, including cable wraps, patch panels, and asset tracking. The XTL™ 300 also comes with a variety of pre-sized label cartridges, so you can get started right away.
In addition to its standard features, the XTL™ 300 also offers a number of advanced features, such as the ability to print barcodes and images. You can also use the XTL™ 300 to create a series of labels, or to view a series of labels one at a time.


-
 1
1
-
 2
2
-
 3
3
-
 4
4
-
 5
5
-
 6
6
-
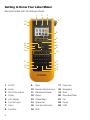 7
7
-
 8
8
-
 9
9
-
 10
10
-
 11
11
-
 12
12
-
 13
13
-
 14
14


Dymo XTL™ 300 Quick start guide
- Category
- Label printers
- Type
- Quick start guide
Dymo XTL™ 300 is a high-quality label maker that offers a wide range of features to meet your labeling needs. With its ability to print labels up to 19mm wide, you can create customized labels for a variety of applications, including cable wraps, patch panels, and asset tracking. The XTL™ 300 also comes with a variety of pre-sized label cartridges, so you can get started right away.
In addition to its standard features, the XTL™ 300 also offers a number of advanced features, such as the ability to print barcodes and images. You can also use the XTL™ 300 to create a series of labels, or to view a series of labels one at a time.
Ask a question and I''ll find the answer in the document
Finding information in a document is now easier with AI
Related papers
-
Dymo 1868815 Owner's manual
-
-
-
-
Dymo NWL0000746328 User guide
-
-
-
-
-
