Apogee ONE for iPad & Mac Quick start guide

Type
Quick start guide

This manual is also suitable for

Apogee ONE
QuickStart Guide
V3, March, 2013
Contents
.........................................................................................................Overview! 5
Introduction! 5
Package contents! 6
ONE Panel Tour! 8
Optional Battery Power! 9
..............................................................................Connecting to your Mac! 10
System Requirements! 10
Install ONE Software ! 10
Connect to Headphones or Speakers! 11
Configuring the Input! 12
..............................................................................Connecting to your iPad! 14
System Requirements! 14
Install Maestro from App Store ! 14
Connect to Headphones or Speakers! 17
Configuring the Input! 18
................................................................Adjusting Input & Output Levels! 20
.............................................................................................Software Setup! 22
Using ONE with iOS Apps! 29
.......................................................................................Additional Support! 30
Overview
Introduction
Thank you for purchasing ONE. This QuickStart guide describes how to set up ONE with your Mac and iPad,
connect headphones to play back music and record your own creations with the built-in mic, an external mic or an
electric instrument.
ONE
The first studio-quality audio interface and microphone for iPad, iPhone and Mac
The Apogee ONE is the first studio quality microphone and USB audio interface for iPad, iPhone and Mac. ONE is
designed for easily creating professional and amazing sounding recordings on your iPod touch, iPhone, iPad or Mac.
Using Apogee’s premium AD/DA conversion, ONE produces pristine music, podcast, and voice-over recordings
while also delivering audiophile quality sound to your headphones.
Overview - Apogee ONE QuickStart Guide
5
Package contents
The following items are included in the ONE box:
ONE
Breakout cable with:
1 XLR Mic input
1 1/4” Instrument input
Microphone stand clip
USB cable
30-pin iOS cable
Universal power supply with NA, EU, UK, AU, JP
QuickStart guide
Software, firmware and the ONE Users Guide are available online only.
Please register your product and download the latest installer here:
http://www.apogeedigital.com/downloads
Overview - Apogee ONE QuickStart Guide
6
Overview - Apogee ONE QuickStart Guide
7
ONE Panel Tour
Built-in microphone
Input/output indicator
Stereo headphone out
Speaker out
Mic/instrument input
Breakout cable included
DC power
Power supply included
USB connection to
iOS device or Mac
Input/output
level meters
Controller knob
- Select function
- Set input level
- Set output level
Overview - Apogee ONE QuickStart Guide
8
Optional Battery Power
When connecting to iPad, iPhone or iPod touch, ONE’s optional battery power provides complete portability. Simply
remove the lid from the battery compartment on the back of ONE and insert 2 AA batteries (not included).
Apogee highly recommends NiMH rechargeable batteries for the maximum amount of uninterrupted recording time.
Alternatively, you can connect ONE’s included power supply to charge your iOS device and continuously power ONE
without any batteries.
Overview - Apogee ONE QuickStart Guide
9
Connecting to your Mac
System Requirements
Computer: Intel Mac 1.5GHz or faster
Memory: 2 GB RAM minimum, 4 GB recommended
OS: 10.6.8 or greater
Connection and power: Any available USB port on a Mac
USB bus powered; DC power optional (DC power supply included)
Install ONE Software
1. Connect ONE’s USB port to a USB port on your Mac using the supplied USB 2 cable.
2. Go to http://www.apogeedigital.com/downloads.php.
3. Download the latest ONE software installer.
4. Once you have downloaded the package, double-click the Apogee icon to run the firmware updater.
5. After the firmware update has completed, double-click the open-box icon to run the software installer.
6. You will be required to restart your computer after the install is complete.
Connecting to your Mac - Apogee ONE QuickStart Guide
10
Choosing ONE for Mac Sound I/O
After connecting ONE, installing the software and restarting your Mac, a dialog box will prompt you to choose ONE
for Mac sound input and output. Click Yes.
Connect to Headphones or Speakers
Connect headphones to the 1/8” output jack on ONE’s front panel.
Alternatively, you can connect ONE’s output to speakers by using an adapter cable. The cable should go from a
stereo 1/8” connection (from ONE) to two separate connectors suitable for your speakers (1/4”, RCA, etc.).
Connecting to your Mac - Apogee ONE QuickStart Guide
11
Configuring the Input
ONE offers the following choices for up to 2
simultaneous inputs:
Built-in microphone
Built-in microphone + 1/4” instrument
XLR microphone
XLR microphone + 1/4” instrument
1/4” instrument
When using an XLR microphone or 1/4” instrument,
connect to ONE’s breakout cable.
Connecting to your Mac - Apogee ONE QuickStart Guide
12
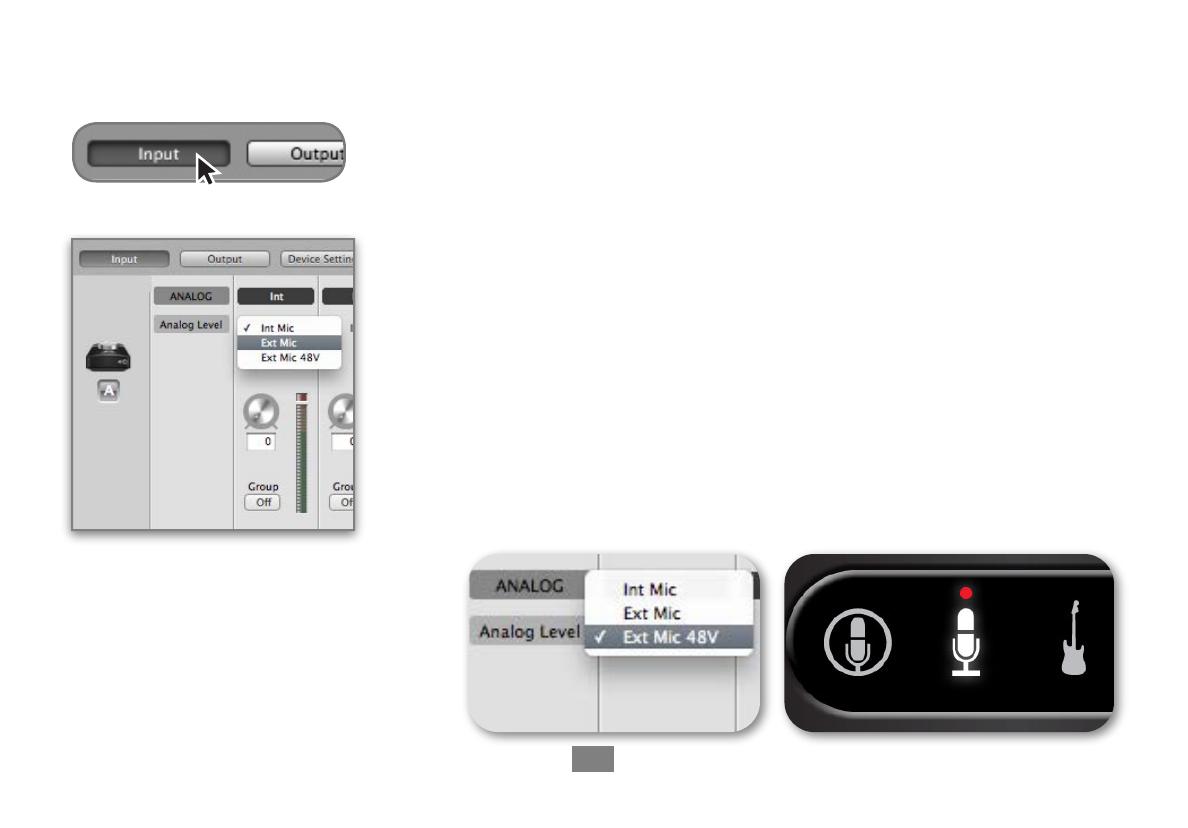
Open Apogee Maestro software (found in your Mac’s Applications folder), and
select the Input tab.
Select the Analog Level setting that corresponds to the microphone source you’d
like to record. For example, if you have a microphone connected to the XLR
connection on the breakout cable, select “Ext Mic” from the Analog Level menu
on channel 1. If you would like to utilize ONE’s built-in microphone, select “Int
Mic”. By default, the 1/4” instrument input is the selected source for Channel 2.
Note: If you are using a condenser
microphone that requires phantom
power, select “Ext Mic 48V”. Phantom
power is indicated on ONE’s display by
a red dot above the microphone icon.
Connecting to your Mac - Apogee ONE QuickStart Guide
13
Connecting to your iPad
System Requirements
iPhone 4, iPhone 4S, iPad, iPad 2, iPad (3rd gen.)
Connection: 30-pin dock connector
iPod Touch (5th gen.), iPhone 5, iPad (4th gen.), iPad Mini
Connection: Apple’s Lighting to 30-pin adapter (sold separately)
iOS version: 5.1.1 or greater
Power supply or two AA batteries required
Install Maestro from App Store
1. Connect the provided external power supply to ONE or insert 2 AA batteries.
Note: The iPad will not be charging when using ONE’s battery power.
2. Connect ONE to your iPad/iPhone using the provided 30-pin iOS cable.
Connecting to your iPad - Apogee ONE QuickStart Guide
14
3. On the iPad/iPhone, open Settings and choose General > About > ONE, then choose "Find App for Accessory".
Connecting to your iPad - Apogee ONE QuickStart Guide
15
The App Store will open and navigate automatically to the Apogee Maestro app.
4. Once you've signed in to the App Store, click INSTALL to download Apogee Maestro.
Note: it's possible to record through the built-in microphone and play back audio without installing Maestro.
Connecting to your iPad - Apogee ONE QuickStart Guide
16
Connect to Headphones or Speakers
Connect headphones to the 1/8” output jack on ONE’s front panel.
Alternatively, you can connect ONE’s output to speakers by using an adapter cable. The cable should go from a
stereo 1/8” connection (from ONE) to two separate connectors suitable for your speakers (1/4”, RCA, etc.).
Connecting to your iPad - Apogee ONE QuickStart Guide
17
Configuring the Input
ONE offers the following choices for up to 2
simultaneous inputs:
Built-in microphone
Built-in microphone + 1/4” instrument
XLR microphone
XLR microphone + 1/4” instrument
1/4” instrument
When using an XLR microphone or 1/4” instrument,
connect to ONE’s breakout cable.
Connecting to your iPad - Apogee ONE QuickStart Guide
18
Open Apogee Maestro app, choose ONE from the main menu and select the Input tab.
Select the Analog Level setting that corresponds to the input source you’d
like to record. For example, if you have a microphone connected to the XLR
connection on the breakout cable, select “Ext Mic” from the Analog Level
menu on channel 1. If you would like to utilize ONE’s built-in microphone,
select “Int Mic”. By default, the 1/4” instrument input is the selected source
for Channel 2.
Note: If you are using a condenser
microphone that requires phantom power,
select “Ext Mic 48V”. Phantom power is
indicated on ONE’s display by a red dot
above the microphone icon.
Connecting to your iPad - Apogee ONE QuickStart Guide
19
Adjusting Input & Output Levels!
Input level
To change ONE’s input level (i.e the preamp gain of microphones and instruments):
1) Push the Controller Knob until the built-in
microphone, external microphone or instrument icon
is lit on the ONE’s display.
2) Turn the Controller Knob until the desired recording
level is obtained.
!
The controller knob operates in parallel with Maestro’s
input controls.
Adjusting Input & Output Levels - Apogee ONE QuickStart Guide
20
  • Page 1 1
  • Page 2 2
  • Page 3 3
  • Page 4 4
  • Page 5 5
  • Page 6 6
  • Page 7 7
  • Page 8 8
  • Page 9 9
  • Page 10 10
  • Page 11 11
  • Page 12 12
  • Page 13 13
  • Page 14 14
  • Page 15 15
  • Page 16 16
  • Page 17 17
  • Page 18 18
  • Page 19 19
  • Page 20 20
  • Page 21 21
  • Page 22 22
  • Page 23 23
  • Page 24 24
  • Page 25 25
  • Page 26 26
  • Page 27 27
  • Page 28 28
  • Page 29 29
  • Page 30 30
  • Page 31 31
  • Page 32 32

Apogee ONE for iPad & Mac Quick start guide

Type
Quick start guide
This manual is also suitable for

Ask a question and I''ll find the answer in the document

Finding information in a document is now easier with AI