AKG HEARO 777 SURROUND Owner's manual
- Category
- Musical Instrument Amplifier
- Type
- Owner's manual

HEARO 777 SURROUND
Bedienungsanleitung
User Instructions
Mode d’emploi
Istruzioni d’uso
Modo de empleo
Instruções de uso
DEUTSCHENGLISH
FRANÇAIS
ITALIANOESPAÑOL
PORTUGUÊS
Mikrofone · Kopfhörer · Drahtlosmikrofone · Drahtloskopfhörer · Kopfsprechgarnituren · Akustische Komponenten
Microphones · Headphones · Wireless Microphones · Wireless Headphones · Headsets · Electroacoustical Components
Microphones · Casques HiFi · Microphones sans fil · Casques sans fil · Micros-casques · Composants acoustiques
Microfoni · Cuffie HiFi · Microfoni senza filo · Cuffie senza filo · Cuffie-microfono · Componenti acustici
Micrófonos · Auriculares · Micrófonos inalámbricos · Auriculares inalámbricos · Auriculares con micrófono · Componentes acústicos
Microfones · Fones de ouvido · Microfones s/fios · Fones de ouvido s/fios · Microfones de cabeça · Componentes acústicos
Technische Änderungen vorbehalten. Specifications subject to change without notice. Ces caractéristiques sont susceptibles de modifications.
Ci riserviamo il diritto di effettuare modifiche tecniche. Nos reservamos el derecho de introducir modificaciones técnicas. Especificações sujeitas à mudanças sem aviso prévio.
5/00/9100 U 0971
AKG Acoustics GmbH
Lemböckgasse 21–25, P.O.B. 158, A-1230 Vienna/AUSTRIA, Tel: (43 1) 86 654-0*, Fax: (43 1) 86 654-516, http://www.akg-acoustics.com, e-mail: [email protected]
AKG Acoustics, Harman Pro GmbH
Bodenseestraße 228, D-81243 München/GERMANY, Tel: (089) 87 16-0, Fax: (089) 87 16-200, http://www.akg-acoustics.de, e-mail: [email protected]
AKG ACOUSTICS, U.S.
1449 Donelson Pike, Nashville, TN 37217, U.S.A., Tel: (615) 360-0499, Fax: (615) 360-0275, http://www.akgonline.com, e-mail: akgu[email protected]
For other distributors worldwide see our website: http://www.akg-acoustics.com
Page is loading ...
Page is loading ...
Page is loading ...
Page is loading ...
Page is loading ...
Page is loading ...
Page is loading ...
Page is loading ...

10
Contents
Page
1 Introduction. . . . . . . . . . . . . . . . . . . . . . . . . . . . . . . . . . . . . . . . . . . . . . . . . . . . . . . . . . . 10
2 Precautions . . . . . . . . . . . . . . . . . . . . . . . . . . . . . . . . . . . . . . . . . . . . . . . . . . . . . . . . . . . 10
3 Description . . . . . . . . . . . . . . . . . . . . . . . . . . . . . . . . . . . . . . . . . . . . . . . . . . . . . . . . . . . 11
3.1 General . . . . . . . . . . . . . . . . . . . . . . . . . . . . . . . . . . . . . . . . . . . . . . . . . . . . . . . . . . . . 11
3.2 IVA- Indivicual Virtual Acoustics . . . . . . . . . . . . . . . . . . . . . . . . . . . . . . . . . . . . . . . . . . . . . . 11
3.3 Dolby Surround Pro Logic Decoder . . . . . . . . . . . . . . . . . . . . . . . . . . . . . . . . . . . . . . . . . . . 11
4 Unpacking. . . . . . . . . . . . . . . . . . . . . . . . . . . . . . . . . . . . . . . . . . . . . . . . . . . . . . . . . . . . 12
5 Controls. . . . . . . . . . . . . . . . . . . . . . . . . . . . . . . . . . . . . . . . . . . . . . . . . . . . . . . . . . . . . . 12
5.1 Headphoones . . . . . . . . . . . . . . . . . . . . . . . . . . . . . . . . . . . . . . . . . . . . . . . . . . . . . . . . 12
5.2 Transmitter . . . . . . . . . . . . . . . . . . . . . . . . . . . . . . . . . . . . . . . . . . . . . . . . . . . . . . . . . . . 12
6 Operating Notes . . . . . . . . . . . . . . . . . . . . . . . . . . . . . . . . . . . . . . . . . . . . . . . . . . . . . . . 13
6.1 Connecting the Transmitter to AC Power . . . . . . . . . . . . . . . . . . . . . . . . . . . . . . . . . . . . . . . . 13
6.2 Connecting the Transmitter to Your Audio Source. . . . . . . . . . . . . . . . . . . . . . . . . . . . . . . . . . . 13
6.3 Charging the Batteries in the Headphones . . . . . . . . . . . . . . . . . . . . . . . . . . . . . . . . . . . . . . 14
6.4 Replacing Batteries . . . . . . . . . . . . . . . . . . . . . . . . . . . . . . . . . . . . . . . . . . . . . . . . . . . . . 14
6.5 Setting Up the System . . . . . . . . . . . . . . . . . . . . . . . . . . . . . . . . . . . . . . . . . . . . . . . . . . . 14
6.6 SELECTOR Switch . . . . . . . . . . . . . . . . . . . . . . . . . . . . . . . . . . . . . . . . . . . . . . . . . . . . . . 15
6.7 CHARGE LED Status . . . . . . . . . . . . . . . . . . . . . . . . . . . . . . . . . . . . . . . . . . . . . . . . . . . . 15
7 Important Notes . . . . . . . . . . . . . . . . . . . . . . . . . . . . . . . . . . . . . . . . . . . . . . . . . . . . . . . 15
8 Specifications . . . . . . . . . . . . . . . . . . . . . . . . . . . . . . . . . . . . . . . . . . . . . . . . . . . . . . . . . 16
9 Specifications . . . . . . . . . . . . . . . . . . . . . . . . . . . . . . . . . . . . . . . . . . . . . . . . . . . . . . . . . 17
10 Warranty. . . . . . . . . . . . . . . . . . . . . . . . . . . . . . . . . . . . . . . . . . . . . . . . . . . . . . . . . . . . . 17
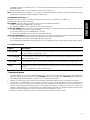
1 Introduction
Dear customer:
Thank you for purchasing an AKG product.
The HEARO 777 SURROUND wireless headphone system is based on advanced UHF transmission technology. The IVA processor
and the Dolby Surround Pro Logic decoder provide optimum spatial reproduction for speech, music, TV and video sound, multimedia
PC applications, and video games. An Autotuning function that automatically tunes the receiver to the carrier frequency selected on
the transmitter adds to the user-friendliness of the HEARO 777 SURROUND
In order to make optimum use of the benefits of your HEARO 777 SURROUND, please take a few minutes to read the instructions
below carefully before operating the equipment.
Please keep the manual for future reference.
2 Precautions
1. Operate the headphones with two AAA size 1.2 V rechargeable (supplied) or 1.5 V dry batteries only.
2. Never try to charge dry batteries using the transmitter’s charging feature.
3. Before charging the headphones batteries, always make sure that the batteries in the headphones are rechargeable types.
4. Dispose of spent dry or rechargeable batteries conforming to local waste disposal rules. Never throw batteries into the fire.
5. Operate the transmitter with the supplied 12 VDC, 300 mA AC adapter only. Check that the AC voltage stated on the AC
adapter is the same as that available in your country. Using the transmitter with a different AC adapter voids the warranty.
6. Always switch the headphones OFF after use.
7. Never try to open the headphone or transmitter case. Refer servicing to qualified service personnel only.
8. Never place the equipment near heat sources such as radiators or electric heaters, or expose it to direct sunlight, excessive dust,
humidity, rain, vibrations, or impacts.
9. Never use alcohol, petroleum-based cleaners, or paint thinners to clean the headphone or transmitter case.
10. If you do not use your transmitter for an extended period of time (e.g., when traveling), disconnect the AC adapter from the AC
outlet.
11. Also refer to section 7 Important Notes.

11
ENGLISH
3 Description
3.1 General
The HEARO 777 SURROUND headphone system
• uses state-of-the-art UHF radio transmission technology;
• uses automatic gain control (AGC) to modulate the transmitter RF section for high transmission quality;
• connects to any audio, video, TV set, or PC with a headphones or line output;
• provides perfect sound reproduction, full mobility, and signal transmission through walls and ceilings over a distance of up to
330 feet (100 m);
• features an ”Autotuning” function that automatically tunes the headphones to the transmitter frequency for optimum reception;
• uses proprietary IVA technology for exceptionally realistic, three-dimensional listening;
• features an integrated Dolby Surround Pro Logic decoder for perfect reproduction of hi-fi, TV, PC, or video sound in Dolby
surround format;
• provides an analog line output for connecting an external headphones amplifer for hardwire headphones.
The HEARO 777 SURROUND system is available for two different LPD frequency bands: 914 MHz for the US and
864 MHz for various European countries (864 MHz version shown on the cover).
The HEARO 777 SURROUND system lets you share your listening enjoyment with other persons. You can operate your transmitter
with several headphones simultaneously. Make sure to use wireless headphones operating in the same UHF frequency band as the
HEARO 777 SURROUND.
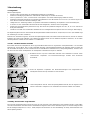
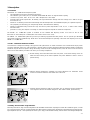
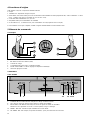
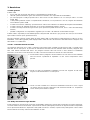
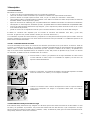
3.2 IVA - Individual Virtual Acoustics
One drawback of headphone listening is the psychoacoustic phenomenon of “inside localization”: the orchestra seems to play inside
your head rather than in the room. AKG developed a binaural audio processing techniquecalled IVA (Individual Virtual Acoustics) that
models the way the head and pinnae change the arriving sound waves (ear matching function). Thus, the various sound sources will
seem to be located outside your head even when you are using headphones.
A: Natural hearing: Due to the effect of the head and pinnae, sound waves arriving at one ear
differ from those arriving at the other. Amplitude and phase differences create a sense of
spatial hearing.
B: Listening through headphones: Amplitude and phase differences are eliminated. Sound
sources are localized inside the head rather than in the room.
C: Listening through headphones with IVA processing: The ear matching function modifies the
audio signals at the ears to resemble diagram A. This restores natural, spatial hearing.
3.3 Dolby Surround Pro Logic Decoder
The Dolby Surround Pro Logic decoder integrated in the transmitter uses the stereo input signal to derive two additional signals, a center
and a surround channel. The IVA circuitry generates from these signals a binaural signal equivalent to reproduction through five high qua-
lity loudspeakers (3 front, 2 rear speakers). This allows you to enjoy all the benefits of Dolby surround sound even through headphones.
RH FILTER
LH FILTER

12
4 Unpacking
Your headphones system comprises the following components:
1 pair of headphones
1 transmitter with integrated battery charger
2 stereo connecting cables with gold plated connectors for linking the transmitter to your audio source: 1 RCA cable, 1 jack cable
(mini jack to 2 x RCA connectors)
1 mini jack/1/4” jack adapter
1 AC adapter for powering the transmitter
2 1.2 V AAA size NiMh rechargeable batteries for powering the headphones (inside the headphones)
If anything is missing, contact your AKG dealer immediately.
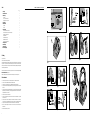
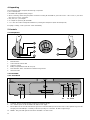
5 Controls
5.1 Headphones
1. POWER switch
2. Green POWER indicator LED
3. Charging contacts
4. Battery compartment (beneath the ear pad)
5. AUTOTUNING switch: activates the automatic tuning function
6. VOLUME control
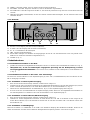
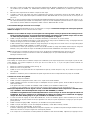
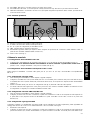
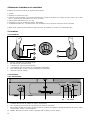
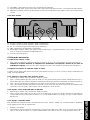
5.2 Transmitter
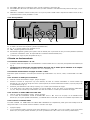
5.2.1 Front Panel
7. CHARGE: This tri-color LED indicates charging and operating modes
8. ON: Switches power to the transmitter ON (left) and OFF (right).
9. INPUT LEVEL: This bi-color LED indicates the signal level at the transmitter input. When the level is in the optimum range, the LED
will light green intermittently to constantly. When the input stage is overloaded, the LED will light orange.
10. STEREO: This green LED lights to indicate the transmitter is in stereo mode.
8 9 7 10 11 13 12

13
ENGLISH
11. IVA STEREO: This green LED lights to indicate the IVA processor is switched in.
12. IVA SURROUND: This green LED lights to indicate that both the Dolby Surround Pro Logic decoder and the IVA processor are
active.
13. SELECTOR: This three-position slide switch selects stereo, IVA, and Surround + IVA modes.
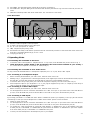
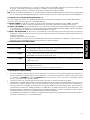
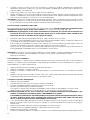
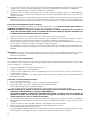
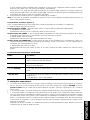
5.2.2 Rear Panel
14. INPUT L/R: Left and right RCA audio input jacks.
15. OUTPUT L/R: Left and right RCA audio output jacks.
16. DC 12 V: DC input jack for AC adapter
17. FREQ. ADJUST: frequency tuning control
18. INPUT LEVEL: This rotarty control sets the input level to the IVA and Surround processors as well as the entire audio section. The
RF section is modulated automatically by an AGC circuit.
19. Charging pins (see fig. 2)
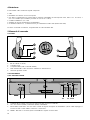
6 Operating Notes
6.1 Connecting the Transmitter to AC Power
1. Connect the cable on the supplied AC adapter to the DC 12 V jack (16) on the transmitter rear panel as shown in fig. 3.
2. Check that the AC voltage stated on the AC adapter is the same as that available in your country. If
it is, connect the AC adapter to a convenient AC outlet (see fig. 4).
6.2 Connecting the Transmitter to Your Audio Source
You may connect the transmitter either to a headphones output (mini jack or 1/4” jack), LINE, or REC outputs.
6.2.1 Connecting to a Headphones Output
1. Before connecting the transmitter to your audio source, switch the audio source OFF.
2. Referring to fig. 5, plug the red RCA connector (right channel) on the supplied jack cable into the red INPUT R socket (14) and
the white RCA connector (left channel) into the white INPUT L socket (14) on the transmitter rear panel.
3. Connect the stereo mini jack plug of the jack cable to the headphones output of your audio source (refer to fig. 6).
4. If the headphones output on your equipment is a 1/4” jack, plug the supplied mini jack to 1/4” adapter jack onto the jack
cable. Connect the adapter jack to the headphones output.
6.2.2 Connecting to a LINE or REC Output
1. Before connecting the transmitter to your audio source, switch the audio source OFF.
2. Use the supplied RCA cable to connect the white LINE OUT L or REC OUT L jack on your audio source to the white INPUT L
jack (14) on the transmitter rear panel and the red LINE OUT R or REC OUT R jack to the red INPUT R jack (14).
6.2.3 Connecting to TAPE Inputs
By connecting your HEARO 777 SURROUND to the ”TAPE” or ”PLAYBACK” inputs on your amplifier, you can enjoy IVA and surround
sound through an extra pari of wired headphones in addition to the wireless ‘phones. Proceed as follows:
1. Switch you audio source OFF.
2. Use the supplied RCA cable to connect the white LINE OUT L or REC OUT L jack on your audio source to the white INPUT L
jack (14) on the transmitter rear panel and the red LINE OUT R or REC OUT R jack to the red INPUT R jack (14).
3. Use another RCA cable (not supplied) to connect the white ”TAPE IN” or ”PLAYBACK IN” jack on the amplifier to the white
OUTPUT jack (15) on the HEARO 777 SURROUND rear panel and the red ”TAPE IN” or ”PLAYBACK IN” jack on the amplifier
to the red OUTPUT jack (15) on the HEARO 777 SURROUND rear panel.
4. Connect your wired headphones to the headphones jack on your amplifier.
18 17 14 15 16

14
5. Refer to the operating manual of your amplifier for instructions on how to listen to and disable the signal at the TAPE” or
”PLAYBACK” input. On most amplifiers, you can push the ”TAPE MONITOR” switch IN to listen to the processed signal and OUT
to cut the processed signal.
Important: In this mode, the loudspeakers will also reproduce the processed signal present at the headphones output. Since IVA
and/or surround processed signals are not loudspeaker compatible, mute the loudspeakers while listening through headphones.
When listening over loudspeakers, cut the processed signal.
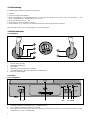
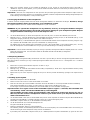
6.3 Charging the Batteries in the Headphones
In order to ensure the longest possible service life for the rechargeable batteries, we deliver them uncharged. Therefore, charge
the supplied batteries before first operating your headphones system.
The supplied batteries have been inserted into the headphones for your convenience.
WARNING: If you operate the headphones on dry batteries, never try to charge the batteries using the
transmitter’s charging feature. This would cause serious damage to your headphone system. Dispose
of spent batteries conforming to local waste disposal rules.
1. Use the POWER switch (1) to switch the headphones off. When the power is off, the POWER LED (2) will be dark.
2. Referring to fig. 11, place the headphones on the transmitter such that the charging pins (19) on the transmitter (see fig. 2) will
engage the charging contacts (3) on the bottom of the left-hand earphone.
The CHARGE LED (7) on the transmitter will light red to indicate that the batteries in the headphones are being charged. If sig-
nal is present at the transmitter audio input, the CHARGE LED (7) will light orange.
The batteries will be fully charged after approximately 14 hours. (The CHARGE LED (7) will continue lighting red.). You may
leave the headphones on the transmitter for as long as you like without risking to overcharge the batteries.
Important: In order to maintain full battery capacity for as long as possible, discharge the batteries completely about once a month:
Switch the headphones ON and leave them outside the transmitter until the POWER LED (2) extinguishes.
Recharge the batteries.
6.4 Replacing Batteries
The capacity of any rechargeable battery will decrease over time. If you feel that you need to recharge the supplied batteries more
often than would be convenient, you may consider replacing the batteries with new AAA size 1.2 V rechargeable or 1.5 V alkaline
dry batteries.
1. Remove the ear pad from the left-hand earphone as shown in fig. 9.
2. Remove the old batteries.
3. Referring to fig. 10, insert the new batteries into the battery compartment (4). Make sure to align the batteries with the polarity
marks inside the battery compartment.
4. Replace the ear pad on the earphone aligning the four pins on the ear pad with the matching openings in the earphone base
plate.
6.5 Setting Up the System
1. Remove the headphones from the transmitter.
2. Switch ON the audio source to which the transmitter is connected.
3. Slide the ON switch (8) on the transmitter to the left to switch the transmitter on. All front panel LEDs will flash momentarily.
Note that the transmitter will not switch on until it detects an audio signal at the INPUT L/R jacks.
If audio signal is present at the transmitter input, the CHARGE LED (7) on the transmitter will light green.
Important Note: If no signal arrives at the transmitter input for approx. 3 minutes, the transmitter will
automatically switch off and the CHARGE LED (7) will extinguish.
The transmitter will also switch off automatically if the signal level at the audio input is too low. In
this case, turn the volume or headphones control on your audio source up to the point that the trans-
mitter will switch back on.
4. Use the INPUT LEVEL control (18) on the transmitter rear panel to set the input level so that the front panel INPUT LEVEL LED (9)
will light green intermittently or constantly and flash orange only on the loudest signal peaks.
5. Set the FREQ. ADJUST control (17) on the transmitter to its center position.
6. Use the POWER switch (1) to switch the headphones ON.
The green POWER LED (2) will light.
7. Press the AUTOTUNING switch (5) on the headphones.
The Autotuning function will automatically tune the receiver to the carrier frequency set on the transmitter. After a few seconds, you
should hear the signal in the headphones clearly and free of interference.
If your first try fails, set the FREQ. ADJUST control (17) to a different position and press AUTOTUNING (5) again. Be sure not to

15
ENGLISH
rotate FREQ. ADJUST (17) all the way CW or CCW because optimum reception may not always be guaranteed at the ends of
the frequency band.
8. Set the VOLUME control (6) on the headphones to the desired volume level.
Note: If the transmitter signal is disturbed, e.g., by reflections (multipath reception) or shadow effects, the headphones will auto-
matically mute. This function eliminates interference related noise.
6.6 SELECTOR Switch (Fig. 1)
The SELECTOR switch (13) lets you select the desired reproduction modes of your HEARO 777 SURROUND.
The SELECTOR switch (13) has three positions:
Left: STEREO for standard stereo reproduction. The input signal is transmitted unchanged.
In stereo mode the green STEREO LED (10) will light.
We recommend STEREO mode for stereo music and speech reproduction.
Center: IVA STEREO. The IVA processor converts the stereo input signal to a binaural signal. The ear matching function provides
a natural sonic perspective with no inside localization.
In IVA stereo mode the green IVA STEREO LED (11) will light.
We recommend IVA STEREO mode for 3-D music and speech listening.
Right: IVA SURROUND. The Dolby Surround Pro Logic Decoder, in conjunction with the IVA processor, simulates five loudspeaker
channels (front left, center, right and rear left and right) for surround sound in the headphones.
In IVA SURROUND mode the green IVA SURROUND LED (12) will light.
We recommend IVA SURROUND mode for radio drama, TV, PC applications, video, surround sound and pop music recordings.
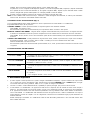
6.7 CHARGE LED Status
If LED is... Transmitter...
…lighting green: …is connected to AC power and audio source, switched ON, and receives signal. Headphones are not
on the transmitter, charging function is off.
…lighting orange: …is connected to AC and audio source, switched ON, and receives signal. Headphones are on the trans-
mitter, charging function is on.
…lighting red: …has detected no signal for several minutes, headphones are on the transmitter, charging function is on.
…dark: …has detected no signal for several minutes, headphones are not on the transmitter, charging function is
off, OR
…is not connected to AC power or switched OFF.
7 Important Notes
1. Operating switches on or connecting the transmitter to your audio source may cause clicks which at high volume settings may
affect your hearing. Therefore, be sure to set the VOLUME control on the headphones to minimum before switching bet-
ween different sources (tuner, turntable, CD player, etc.) or connecting the transmitter.
2. Listening over headphones at high volume levels, particularly over extended periods of time, may damage your hearing.
3. Your HEARO 777 SURROUND is a radio frequency device that conforms to the strict European and FCC standards. For
physical reasons that are not related to the quality of the product, extremely strong interference sources may affect reception. In
order to maintain interference-free listening pleasure, do not operate your HEARO 777 SURROUND in the close vicinity of radio
equipment, cellular telephones, or directly above TV or computer monitor picture tubes. The supplied connecting cables are long
enough to allow the transmitter to be placed at a safe distance from interference sources.
Interference caused by other users of the 914 or 864 MHz LPD band are beyond AKG’s control.

16
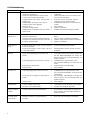
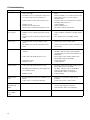
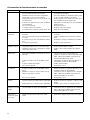
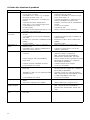
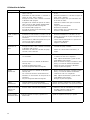
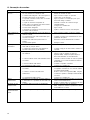
8 Troubleshooting
Symptom
No sound.
CHARGE LED
does not light.
Mono sound.
Noise.
Distorted sound.
Intermodulation
noise.
Headphones receive
unwanted trans-
mitters.
Overemphasized
bass or treble
range:
Possible Cause
1. AC adapter is not connected to transmitter
and/or AC outlet.
2.
Transmitter is OFF or not connected to audio source.
3. Connected audio source is switched off.
4. Volume control on audio source is set too low
.
5. Batteries are low.
6. Headphones are switched off.
7.
Volume control on headphones/transmitter is at zero.
1. Transmitter is not connected to AC power.
2. Batteries are not correctly aligned with polarity
marks.
3. Headphones are incorrectly positioned on trans-
mitter.
1. Connected audio source operates in mono
mode.
2. Transmitter is not correctly connected to audio
source.
1. Transmitter and receiving frequencies are not
identical.
2. Audio level at transmitter input is too low.
3. Input signal is noisy.
4. Batteries are low.
1. Audio level at transmitter input is too high.
2. Transmitter and headphones carrier frequencies
do not match exactly.
3. Batteries are low.
1. Electrical appliances with poor interference pro-
tection.
2. Audio source or sound carrier defective.
1. A neighbor uses similar UHF headphones.
1. Bass or treble control settings on audio source.
Remedy
1. Connect AC adapter to transmitter and/or AC
outlet.
2. Switch transmitter on or connect to audio source.
3. Switch audio source on to feed signal to
transmitter input.
4. Increase audio source volume to the point that
transmitter switches back on.
5. Charge batteries.
6. Switch headphones on.
7. Set volume control to desired level.
1. Connect transmitter to AC power.
2. Check orientation of batteries in battery compart-
ment.
3. Place headphones on transmitter correctly.
1. Switch audio source to stereo mode.
2. Check cable connection between transmitter and
audio source.
1. Press AUTOTUNING switch on headphones or
use FREQ. ADJUST control to select different
carrier frequency and press AUTOTUNING on
headphones.
2. Turn up audio source volume control and/or
INPUT LEVEL control on transmitter.
3. Check audio source.
4. Charge batteries.
1. Turn down audio source volume control and/or
INPUT LEVEL control on transmitter.
2. Use FREQ. ADJUST control on transmitter to
change carrier frequency and press
AUTOTUNING switch on headphones.
3. Charge batteries.
1. Switch off any “suspicious” appliances (if
possible).
2. Check audio source or sound carrier.
1. Use FREQ. ADJUST control on transmitter to
change carrier frequency and press
AUTOTUNING switch on headphones.
1. Readjust bass or treble controls.

17
ENGLISH
9 Specifications
System Performance
Modulation: FM
Carrier frequency band: 914 or 864 MHz (LPD band)
Transmitter
Power supply: 12 VDC, 300 mA
Radiation angle: 360°
Weight: approx. 15.9 oz. (450 g)
Max. range: approx. 330 ft. (100 m)
Headphones
Power supply: 3 VDC (2 x 1.2 V AAA size NiMh rechargeable batteries supplied)
Battery life: approx. 20 hours (NiMh rechargeable batteries)
Frequency range: 20 Hz to 24,000 Hz
Max. SPL: >115 dB SPL
Weight: approx. 8.1 oz. (230 g)
Distortion: <1%
Type: semi-open dynamic headphones
10 Warranty Conditions
AKG warrants AKG products against evident defects in material and workmanship for a period of one year from the date of original
purchase for use. This Warranty does not cover damage resulting from misuse or abuse, or lack of reasonable care, or inadequate
repairs performed by unauthorized service centers. Performance of repairs or replacements under this Warranty is subject to sub-
mission of the sales slip. Shipment of defective items for repair under this Warranty will be at the customer’s own risk and expense.
This Warranty is valid for the original purchaser only.
This Warranty does not cover dry or rechargeable batteries.
Limited Warranty (valid in the United States only)
AKG warrants AKG products against evident defects in material and workmanship for a period of one year and agrees to repair or,
at our option, replace any defective unit without charge for either parts or labor.
This Warranty does not cover dry or rechargeable batteries.
Important: This Warranty does not cover damage resulting from accident, misuse or abuse, lack of reasonable care, the affixing of
any attachment not provided with the product, loss of parts, or connecting the product to any but the specified receptacles. This
Warranty is void unless service or repairs are performed by an authorized service center. No responsibility is assumed for any special,
incidental, or consequential damage. However, the limitation of any right or remedy shall not be effective where such is prohibited
or restricted by law. Simply take or ship your AKG products prepaid to our service department. Be sure to include your sales slip as
proof of purchase date. (We will not repair transit damage under the no-charge terms of this Warranty.)
Note: No other warranty, written or oral, is authorized by AKG Acoustics.
This Warranty gives you specific legal rights, and you may also have other rights which vary from state to state. Some states do not
allow the exclusion or limitation of incidental or con-sequential damage or limitations on how long an implied warranty lasts, so the
above exclusion and limitations may not apply to you.
Page is loading ...
Page is loading ...
Page is loading ...
Page is loading ...
Page is loading ...
Page is loading ...
Page is loading ...
Page is loading ...
Page is loading ...
Page is loading ...
Page is loading ...
Page is loading ...
Page is loading ...
Page is loading ...
Page is loading ...
Page is loading ...
Page is loading ...
Page is loading ...
Page is loading ...
Page is loading ...
Page is loading ...
Page is loading ...
Page is loading ...
Page is loading ...
Page is loading ...
Page is loading ...
Page is loading ...
Page is loading ...
Page is loading ...
Page is loading ...
Page is loading ...
Page is loading ...

50
Notizen -- Notes -- Notes -- Note -- Notas -- Notas
-
 1
1
-
 2
2
-
 3
3
-
 4
4
-
 5
5
-
 6
6
-
 7
7
-
 8
8
-
 9
9
-
 10
10
-
 11
11
-
 12
12
-
 13
13
-
 14
14
-
 15
15
-
 16
16
-
 17
17
-
 18
18
-
 19
19
-
 20
20
-
 21
21
-
 22
22
-
 23
23
-
 24
24
-
 25
25
-
 26
26
-
 27
27
-
 28
28
-
 29
29
-
 30
30
-
 31
31
-
 32
32
-
 33
33
-
 34
34
-
 35
35
-
 36
36
-
 37
37
-
 38
38
-
 39
39
-
 40
40
-
 41
41
-
 42
42
-
 43
43
-
 44
44
-
 45
45
-
 46
46
-
 47
47
-
 48
48
-
 49
49
-
 50
50


AKG HEARO 777 SURROUND Owner's manual
- Category
- Musical Instrument Amplifier
- Type
- Owner's manual
Ask a question and I''ll find the answer in the document
Finding information in a document is now easier with AI
in other languages
Related papers
-
AKG HEARO 888 TITAN Owner's manual
-
-
-
AKG Acoustics K 405 AFC II User manual
-
AKG K940AFCE/230 User manual
-
-
-
AKG Acoustics K 105 UHF User manual
-
-
Other documents
-
-
Naxa NE-954 Owner's manual
-
Sony Headphones MDR-RF975RK User manual
-
Philips SHC8525/00 User manual
-
-
Blaupunkt 1 031 105 002 Owner's manual
-
Panasonic RP-WF950EB-S Owner's manual
-
-
-
RCA WHP145 User guide