Page is loading ...

Owner’s Manual
Model AR383
www.arblueclean.com
AR383-011312

En - 2
IntroductIon
Congratulations on the purchase of your BLUE CLEAN POWER WASHER!
Your BLUE CLEAN POWER WASHER is a power tool in every sense of the
word that may be used outside your house and in. It is one of the nest most
powerful home-use power washers in the marketplace today.
AR383 features include:
A proprietary, all-aluminum water pump.
A full 12-month “bumper to bumper” warranty on the power washer and all
parts/accessories.
A quick release Garden Hose Adapter with an incorporated water lter and
water check valve.
Two high pressure lances: Vari-spray lance and Turbo lance.
A Total Stop System (TSS) which turns the washer on only when the spray
gun trigger is pressed.
Industry-leading customer service with one goal “Happy Customers!”
Please familiarize yourself with the following assembly, operating and safety
information. Read this manual before using the power washer. Failure to follow
these instructions could cause personal injury, property damage, or both. Save
this manual for other users to read prior to using the power washer.
If you have any questions about or problems with your power washer please
call our toll-free number 1- 866-235-5112 and talk with our Customer Service
Support Team at AR North America Inc. We are available to talk with you
Monday through Friday from 8 a.m. to 5 p.m. Central Standard Time (CST).
We can help you with questions regarding operation, warranty, replacement or
optional parts, or contact us at i[email protected].
For more information 24/7 on BLUE CLEAN POWER WASHERS go to www.
arblueclean.com. Power washers, parts, and accessories can be ordered
online 24 hours a day, 7 days a week for your convenience.

En - 3
TABLE OF CONTENTS Page
Introduction 2
Safeguards, Warnings, and Safety Tips 3, 4, 5
Package Contents 6
Unpacking & Assembly 7, 8 , 9
Operating Instructions 9
Operating Tips and Maintenance 9,10, 11
Storage 11
Pump Saver 12
Troubleshooting 13
Replacement Parts 14
Specications 15
Limited Warranty & Warranty Returns 15
SafeguardS, WarnIngS and Safety tIpS
• To avoid personal injury and/or damage to property and to maximize
your power washing experience, carefully follow all of the safety tips,
instructions, warnings and safeguards and become familiar with all of the
controls. Be sure you know how to quickly bleed off the pressure from all
parts of your power washer, and how to turn off the power washer .
• This power washer conforms to CSA and other safety and consumer
standards. Do not modify or rebuild any part of your power washer.
• Do not use your power washer when you are under the inuence of alcohol
or drugs. Use this power tool carefully and only when you are alert .
• Watch your balance and footing while using your power washer. Surfaces
become slippery when wet and are extra slippery when using a detergent or
cleaner.
• Never operate the power washer in bare feet, sandals, or open-toed shoes.
• When using the power washer near children make sure they are closely
supervised by an adult to avoid injury. Never let a child use the power
washer.
• Keep ngers, hands, feet and any part of your body clear of the stream of
high pressure water. The powerful spray can cause blindness or blast holes
in the skin. It can break a window if you are too close when you pull the
trigger on the spray gun .
• Always wear eye protection to prevent injury to eyes when operating the
power washer.
• To avoid mishaps or injury, always use the trigger safety lock when not
using the power washer even if the spraying stops for a moment.

En - 4
• The power washer is equipped with a Ground Fault Circuit Interrupter
(GFCI) which greatly reduces the chance of electric shock while the unit is in
use.
• Point the spray gun in a safe direction when beginning a power washing
session.
• When rst using the spray gun, hold the spray gun and lance with two
hands when pulling the trigger until you get used to the “kick back” from the
spray gun (one hand to pull the trigger and the other to stabilize the gun
assembly).
• When you press the power switch to turn off the power washer, water
pressure may remain in the system. To discharge the pressure, point the
spray gun in a safe direction and pull the trigger.
• Never spray ammable liquids.
• Never use the power washer in areas that contain combustible dust, liquids
or vapors.
• Avoid contact of the pressure hose with sharp objects and examine the hose
regularly. Replace if damaged. Due to the high pressure involved, it cannot
be repaired if cut of damaged.
• Only use detergent specically formulated for power washers and follow
instructions on the detergent’s label. We have a selection of power
washer detergents to choose from. Go to www.arblueclean.com for more
information and to order the detergents. Power washer detergents are also
available at your local hardware store.
• Protect eyes, lungs, and skin from exposure to detergent. Dish or laundry
soap is too thick and will clog the nozzle of your detergent bottle.
• IMPORTANT: Store the power washer indoors to prevent the water in the
unit from expanding under freezing conditions. When the water freezes and
expands, your power washer will be damaged and become inoperable. Or,
if storing outdoors, it is recommended you use Pump Saver. Pump Saver
can be purchased on our website: www.arblueclean.com. See details in the
Pump Saver section of this manual.
• Never use hot water with your power washer. It will overheat and damage
the high pressure pump.
• Never leave the power washer unattended while it is powered “on”.
• Always turn the water supply “on ” before turning the power washer power to
“on”. Running the pump dry will cause damage to the internal components.
• Never use a water supply to your power washer that exceeds 150 psi
maximum.
• Never disconnect the high pressure hose from the power washer while the
system is pressurized.
• Never permanently engage the trigger mechanisms on the spray gun.
• Never operate the power washer unless all components are properly and

En - 5
securely connected.
• Never allow the power washer pump to run for more than one minute, after
you have turned off the water supply. This can cause the motor and pump
to overheat and fail.
• Never use lances or other parts that have not been supplied with your power
washer.
• Never use an extension power cord since it defeats the effectiveness of the
GFCI and increases the chance of electrocuting the operator.
• Never spray any electrical outlet with your power washer.
• Inspect the power cord before using. Do not use it if it is damaged.
Servicing of a Double-Insulated Appliance
In a double-insulated product, two systems of insulation are provided instead of
grounding. Grounding means are not provided for a double-insulated product,
nor should grounding means be added to the product.
Servicing a double-insulated product requires extreme care and knowledge of
the system, and should only be done by qualied service personnel.
Replacement parts for a double-insulated product must be identical to the
original parts. A double-insulated product is marked with the words “Double
Insulation” or “Double Insulated”. Product may also be marked with symbol
shown here.

En - 6
Package content:
1. Power washer unit
2. Manual
3. Adjustable spray lance
4. Turbo lance
5. Spray gun-picture (5A shows trigger lock button)
6. Detergent bottle
7. Nozzle cleaning wire-taped to the manual for safe keeping
8. High-pressure hose
9. Garden hose adapter kit-2 pieces: clear plastic adapter & blue/black collar attachment
10. Accessory holder

En - 7
UnPacking & assembly
• After unpacking the BLUE CLEAN POWER WASHER, lay
out parts and accessories. Familiarize yourself with the parts
in the package by comparing them to those listed on the
“PACKAGE CONTENTS” page.
• The BLUE CLEAN POWER WASHER requires some minor
assembly. You’ll need a Phillips screwdriver to install the
accessory holders .
• Install the accessory holder on the back of your BLUE
CLEAN POWER WASHER (Fig. 1). You’ll notice where the
accessory holder meets the back of the unit. You will see
several male index posts which t into female holes. The
posts and holes enable easy placement of the accessory
holder and easy tightening of the screws. Place the screws
in the holes provided on the accessory holder and screw
them in. Do not use a power screwdriver. When the screw
is completely tight, give a small nal clockwise twist of the
screwdriver. Do not over tighten. After the accessory holder
is installed you will notice a square area in the center of the
holder where the square detergent bottle may be stored and
easily retrieved (Fig. 2).
• Using one of the supplied screws, install the small electric
power cord holder below the accessory holder so that the
“L” - shaped holder faces downward. The electric power cord
can now be wrapped around the accessory holder and the
bottom “L” - shaped holder while your power washer is not in
use (Fig. 1).
• Please refer to (Fig. 3) for accessory storage locations on
the accessory holder.
High Pressure Hose
• Screw the high pressure hose (clockwise) on the back of
the unit at the bottom (Fig. 4). The end of the hose must be
inserted into the water outlet far enough so the collar can
thread onto the outlet threads until hand tight. Do not use
pliers or vice grips to tighten. If it takes fewer than six or so
turns you have not properly tightened the high pressure hose
tting. It is easier to position the power washer in front of you
so to ensure that the threads are started correctly. Failure to
properly tighten the high pressure hose will result in the hose
slipping or popping off immediately upon turning the unit on.
Do not worry about damage if this occurs - just reinstall and
take extra care at screwing on the high pressure hose tting.
• Connect the other end of the high pressure hose to the spray
gun by inserting the brass metal tip of the high pressure hose
into the tting just ahead of the trigger guard. It will lock into
GHA
High Pressure Hose
Pump
Detergent
Bottle
Fig. 1 Fig. 2
Fig. 3
Fig. 4 Fig. 5

En - 8
the spray gun with a “click” (Fig. 5). Conrm the hose is
locked into the spray gun by pulling slightly on the hose. The
hose is now securely attached to the spray gun.
• To release the hose from the spray gun, press the blue
button on the underside of the gun toward the trigger guard.
The hose will slide out from the connection.
Spray Gun
• To lock the trigger of the spray gun aim the gun away from
you and push the lock button from right to left, (Fig. 6), after
doing so, squeeze or pull the trigger to make sure it is locked
and will not move. Get in the habit of leaving the lock button
in the “locked” position when the power washer is not in use.
This ensures the gun is in “safe” mode until it is ready for
use.
Lance and Detergent bottle
• While the spray gun is in the locked position, insert the turbo
lance, the adjustable spray lance, or the detergent bottle
directly into the end of the spray gun by inserting and pushing
together and turning clockwise simultaneously. To remove
push together and turn counter clockwise (Fig. 7). Push the
safety lock button to lock the trigger when changing lances or
detergent tank, to ensure that they do not accidentally eject
with force during removal.
• When using the turbo lance, make sure the turbo nozzle is
screwed on tight at the end of the lance, each time you use
it. The Turbo lance is designed for high impact cleaning. Only
use on hard surfaces such as driveways, cement surfaces,
patio bricks, etc. A test strip should be done prior to avoid
chance of damaging the surface.
• When using the adjustable spray lance, the spray pattern
and intensity can be controlled according to power of water
needed for each task by twisting the spray nozzle at the far
end of the lance (Fig. 8). These can be used for sweeping
leaves or debris from at surfaces or curbing. This lance has
the widest variety of applications as the fan degree allows for
good impact pressure and cleaning coverage.
• When using the detergent bottle, ll it with a properly
formulated detergent or cleaner with water ratio according
to instructions on the container (Fig. 9). The detergent bottle
comes with a straw which is tted into the screw-on top. If
you don’t see the straw, look inside the bottle and attach it to
the screw-on top (Fig. 10).
Note: the ratio of water to detergent is 10:1 or 10 parts water to
1 part detergent.
Gun
Fig. 7
Fig. 9
Fig. 10
Fig. 8
Fig. 6
Gun
Safety
Button
Trigger

En - 9
Garden Hose Adapter
• Install the garden hose adapter (GHA) and quick connect
lter. It is made up of two separate pieces. (1) A clear plastic
adapter with a screen lter (about 3 inches long) and (2) a
blue/black collar attachment (Fig. 11).
• First, remove the plastic shipping cover on the water inlet on
the front of the power washer. Attach the clear plastic adapter
by screwing it into the water inlet (Fig. 12). Hand tight is
ne. Next screw on the blue/black collar attachment to your
garden hose (Fig. 13). Slide the blue/black collar onto the
clear adapter (Fig. 14), it will “click” into place. The water is
now connected to your power washer.
• To remove the water hose, simply pull back on the blue collar
and it will slide off the clear adapter. Note: this can be done
at any time. Water will not come out of the garden hose as
the blue/black collar has a water check valve. Water will only
ow from the garden hose when it is connected to the clear
adapter.
• You have now completed the assembly of your BLUE
CLEAN POWER WASHER and are now ready to begin using
your electric power washer. Read and observe all safety
instructions.
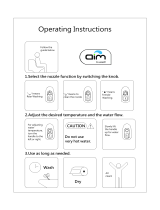
oPerating instrUctions
• Turn on the water supply at the faucet.
• Make sure the “ON/OFF” switch is in the “OFF” position. The
power switch has international symbols for ‘on’ and ‘off’: On
(--) Off (O). (Fig. 15)
• Unwind the power cord completely and plug the GFCI into
a grounded 120 volt outlet. Press the ‘reset’ button on the
GFCI box (Fig. 16). The indicator window should show a red
color. This must be done each time the unit is plugged in.
• Release the safety lock button on spray gun (Fig. 17) while
pointing the spray gun in a safe direction, away from yourself
and others squeeze the trigger on the spray gun until there is
a steady stream of water, letting the water and air out of the
hose.
• Press the ‘ON’ button. The motor and pump should now be
running and providing a powerful spray.
oPerating tiPs and maintenance
• If you hear the motor run intermittently when the trigger is not
being squeezed, that is normal. The pump is priming itself so
it is ready to operate when the trigger is squeezed. Turn off
the power washer if not being used after ve minutes.
QC - Clear
Adapter
Garden Hose
Adapter (GHA)
(GHA)
ON
OFF
Gun
Safety
Button
Trigger
Fig. 11
Fig. 12
Fig. 13
Fig. 15 Fig. 16
Fig. 17
Fig. 14

En - 10
• The o-rings on the bayonet end of the adjustable lance and
detergent bottle should be cleaned regularly and lubricated
with non-water soluble grease.
• The screen inside the clear adapter should be cleaned
periodically. Insert a pen or pencil in small hole at the end of
the adapter. The screen lter will slide out (Fig. 18). Rinse it
with clean water, and then place it back in the adapter.
• Keep the nozzle cleaning wire, Which is taped to this manual
for use in unclogging the lance nozzle. If you lose the
cleaning wire an unbent paper clip works ne.
Cleaning nozzles
• A clogged or partially clogged nozzle can cause signicant
reduction of water pressure coming out of the nozzle and/or
cause the unit to pulsate while spraying.
• Turn off the unit
• Turn off the water supply to the unit
• Relieve any pressure trapped in the hose by squeezing the
trigger 2-3 times, and then lock the spray gun by pushing the
lock button from left to right.
• Take off the adjustable lance. Rotate the nozzle on the
adjustable lance to the narrow stream setting which opens up
the fan blades (Fig. 19).
• Using the nozzle tip cleaner provided (or an unfolded paper
clip), insert the wire into the nozzle hole and move back
and forth until debris is dislodged (Fig. 20). Back ush water
through the nozzles using garden hose and highest pressure
available (either standard water nozzle or use your thumb
over the nozzle to create water pressure for back ush).
How to Avoid Damaging Surfaces
• Damage to surfaces being cleaned occurs because the
impact force of the water pressure exceeds the durability
of the surface. Bare wood can be penetrated; paint can be
peeled off, etc. You can vary the force of your power washer
by controlling:
o the fan pattern of the nozzle (when using the adjustable
nozzle)
o the angle of the surface being cleaned
o the distance of the nozzle from the surface being cleaned
• Never use a narrow high pressure stream of water or the
turbo lance on soft surfaces susceptible to damage.
• Use the adjustable spray lance when cleaning windows. Be
sure to adjust the nozzle to a wide fan spray pattern and
place the nozzle approximately four to ve feet away from the
window with the nozzle at forty ve degree angle. Squeeze
the trigger and vary the fan spray pattern and angle until
optimum cleaning efciency is achieved (Fig. 21).
Fig. 18
Fig. 19
Fig. 20
Fig. 21

En - 11
Detergent Bottle
• Use detergents designed for power washers. We offer
four power washer detergents. They are Auto, Motorcycle,
Boat and Universal. These can be purchased online at
our website www.arblueclean.com. Hardware stores
or home centers also have power washer detergents for
different cleaning projects. The cleaning solution should be
the consistency of water in order to prevent clogging your
detergent bottle and nozzle.
• When using the detergent bottle, our power washer’s
application ratio of water to detergent is 10:1 or 10 parts
water to 1 part detergent. You will need to adjust the
concentration ratio of the detergent, according to the
manufacturer’s instructions.
• This system applies detergent under low pressure. The
cleaning power of the detergents is enhanced when applied
with low pressure; and time is allowed to break down the dirt
and grime. The combination of low pressure and chemical
action is very effective and can be better than scrubbing if
applied properly. Always spray detergent on a dry surface,
do not pre-soak area. Wetting the surface rst dilutes the
detergent and reduces its cleaning ability. Do not allow
detergent to dry on surface. On vertical surfaces being
cleaned, apply detergent to lower surfaces and work your
way up to prevent detergent from causing streaks in the
dirt and grime. Rinse detergent by pressure washing from
bottom up for same reason.
• If a stain is particularly tough, it may be necessary to reapply
the detergent and use a stiff bristled brush to scrub the
stain. Subsequent power washing after brushing should
successfully complete your cleaning job.
storage
• When your pressure washing session has been completed,
turn off the power switch located on the back of the power
washer. Unplug the power cord from the outlet. Turn off the
water supply. Pull the trigger on the spray gun 2-3 times
to drain out the excess water and to release any remaining
water pressure. Disconnect the garden hose adapter from
the water inlet. Do not allow the power washer to run with no
water owing through it.
• The GHA should be stored in the accessory holder when your
unit is not in use to prevent loss or damage (Fig. 22).
• Remove high pressure hose from spray gun (Fig. 23) and
unscrew the other end of the high pressure hose from the
power washer (Fig. 24).
• Remove lance or detergent bottle from the gun and place in
the accessory holder. Place the gun in the accessory holder
Fig. 23 Fig. 24
High Pressure Hose
Pump
GHA
Fig. 22

En - 12
in one of the slots. Lances are pressed into and stored in
the half circle notches (Fig. 22). Make sure to discard any
remaining detergent from the bottle. Flush the bottle and
nozzle head with fresh water to prevent clogging.
• Wrap the power cord around the accessory holder using
the extension tabs at the 3:00 & 9:00 position and the
L-shaped power cord holder/tab located at the 6:00
position (Fig. 25).
• The pressure hose is stored on the hose reel located
above the accessory holder. With the front of the power
washer facing towards you, insert the un-threaded end of
the power hose into the square hole on the inner reel and
begin turning the handle away from you (Fig. 26). After
you have the reel turned about 1/4 turn, with the tting
inserted into the square hole, place the hose under the
indentation on the side of the reel to keep it in place while
winding it up (Fig. 27). When nished winding, push the
handle in to lock it in place. Please remember: the hose
reel is only for storing the high pressure hose. The hose
must be completely removed from the hose reel each time
you use the power washer.
• DO NOT store the power washer where it is exposed
to freezing temperatures unless you use Pump Saver.
It is recommended that you use Pump Saver for storing
in freezing temperatures. Freezing will damage the pump
unless Pump Saver is added to the power washer. If not
using or if storing your power washer for more than one
month, run Pump Saver through it. See the section on
Pump Saver for more information.
PUmP saver
Pump Saver is a product that protects and prolongs the life
of the pump. This will keep the internal parts of the pump
lubricated and protected from freezing while being stored in ALL
climates. It also assists with protection from internal corrosion.
The Blue Clean part # is: PW64511 (16oz. bottle ).
Pump Saver Instructions
Follow the previous storage instructions for your power
washer. To prevent staining, protect the surface under the
power washer from any excess uid. Wear eye protection when
using this product.
1. Turn off your power washer.
2. Disconnect all hoses.
3. Shake the bottle well before connecting to the power
washer.
4. Screw the dispensing valve on the bottle of the Pump Saver
into the water inlet on your power washer.
5. Turn the valve on the bottle to the open position.
6. Turn the power washer on. Turn the power washer off as
soon as the Pump Saver uid begins to exit the water outlet.
7. Turn the valve on the bottle to the off position and remove
the Pump Saver bottle and valve assembly from the power
washer.
Fig. 25 Fig. 26
Fig. 27

En - 13
troUbleshooting and FaQs
Unit will not turn on. Make sure the power washer is in the “OFF” position. Plug in the
electrical cord to a grounded 120 volt outlet (no electrical extension
cord should be used). If the electrical cord will not plug into your
outlet, your electrical outlet is not properly grounded and should not be
used. Use another electrical outlet. Press the reset button on GFCI
power box. If the color of red is not visible in the little window on the
GFCI, unplug and plug in again. Press reset, and look for the red color
in the window, this should remain red in color. If the color is staying
red, turn the power switch on the power washer to “ON”. Squeeze the
trigger on the spray gun and try again.
If this did not correct the problem, try plugging into another electrical
outlet and repeat the above procedure. If it is still not working, call
Customer Service at 1-866-235-5112.
The high pressure (HP)
hose will not connect /
stay connected to the
spray gun. Is this a
spray gun problem?
In most cases, the spray gun is not the problem. The problem is the
rubber sleeve covering the tting at the end of the high pressure hose.
It has likely slipped up toward the metal tip. The x: wiggle, twist and/
or pull the rubber sleeve down until the entire tip is visible plus an 1/8”
of the metal tting below the tip. Now try to insert the hose tip into the
spray gun. It should “click” into place and will not come out until the
hose is released by pushing in the lever on the underside of the gun.
You may cut away the end of the sleeve with a sharp knife if unable to
move the sleeve down. Be careful not to cut or puncture the hose.
The unit is running but
thereisnotwaterow.
Check the water source. Unclog the nozzle on the lance. (See nozzle
cleaning instructions under “Cleaning nozzles”.) Or take off the lance
and just spray out of the spray gun. This will indicate if the problem is
with the lance.
Why is water leaking
where the high pressure
hose connects to the
spray gun?
Make sure there is an o-ring at the end of the metal tip of the high
pressure hose. If no o-ring is present, the connection between the
hose and spray gun will leak. O-Ring Kits are available online at www.
arblueclean.com or call Customer Service at 1-866-235-5112 to place
an order.
I can’t remove the lance
from the spray gun.
What should I do?
All lances and the detergent tank are attached and removed from the
spray gun in the same manner. Insert the quick-release end of the
lance/detergent bottle into the spray gun. Press the spray gun and
lance together (about a 1/8”) and turn clockwise. The lance will lock
in place. Remove the lance by reversing this procedure. Press the
spray gun and lance together and turn counter clockwise. The lance
will slide out. Or, hold the spray gun and lance in an upright position
with the nozzle end on the oor. Push the whole assembly straight
down to loosen the connection, and then follow the removal process
again. You may also spray soapy water or a lubricant in the area
where the lance connects to the spray gun.
The power washer turns
on for 2 seconds, shuts
off, and will not turn
back on. Do I have a
defective unit?
It sounds like your power washer is working just ne. When the water
is connected, the accessories are assembled properly, and the power
switch is turned on, the power washer may turn on for 1 - 2 seconds to
prime the pump. It automatically shuts off and waits for the spray gun
trigger to be pressed. When the trigger is pressed, water starts owing
through the pump. The water sensor in the pump “senses” the moving
water and automatically turns the power washer on. Or, turn the power
switch to off, hold in the trigger on the spray gun, so that you have a
steady stream of water. While you are holding the trigger open on the
spray gun, at the same time, turn the power switch on.
En - 13

En - 14
rePlacement Parts
Pos. Description Part Number Qty.
1 Detergent Bottle PW3080160 1
2 Hose (QC) PW50969 1
3 Spray Gun PW50968 1
4 Adjustable Lance/Nozzle PW50975 1
5 Turbo Lance/Nozzle PW50976 1
6 Garden Hose Adapter (clear plastic) PW3082130 1
7 Garden Hose Adapter (blue/black) PW3082301 1
8 Electric Cord w/GFCI PW2761401110 1
9 GFCI Assembly PW2761401110-1 1
Pump Spare Part Kits
Water Seals & Valves PW3081290 1
Pre-Assembly TSS PW3082350 1
O-Ring Kit PW909104K 1
1
3
4
5
2
8
7
6
9

En - 15
sPeciFications
Model Max PSI
(lbs/sq/in)
Max GPM
(gal/per/min)
Max Temp Volts Amps Weight (lbs)
AR383 1,900 1.58 122° F 120
14
19.5
limited Warranty
This product is under warranty to the original retail consumer against defects in material and
workmanship for a period of 1 (one) year and is a complete “bumper to bumper” warranty including
the spray gun, the high pressure hose and all accessories from the date of purchase. The
warranty is not transferable or assignable. This warranty covers replacement parts. This limited
one year warranty applies only to products used in consumer applications and is void in rental
or any commercial application. Reasonable care must be used in conformity with operation and
maintenance instructions in the owner’s manual and quick start guide. Failure to follow these
instructions will void this warranty.
Warranty retUrns
Keep your original receipt of purchase in case of warranty claim. Any power washer or parts
returned for a warranty claim must have a “RETURNED MERCHANDISE AUTHORIZATION (RMA)
NUMBER.” You must obtain an RMA NUMBER by calling A.R. NORTH AMERICA, INC. at 1-866-
235-5112 Monday through Friday, 8 a.m. to 5 p.m. (CST), or e-mail [email protected]. Any
return without an RMA NUMBER will be considered unauthorized and will be shipped back at
the expense of the sender. Freight costs to the company for warranty work must be paid by the
purchaser.
Cleaning and troubleshooting tips, manuals and other helpful information are available on our
website. For parts and accessories for your Blue Clean washer, visit www.arblueclean.com. Ordering
is easy and all major credit cards are accepted.
A.R. NORTH AMERICA, INC.
Attn: Power Washer Warranty Department
140 - 81st. Avenue NE, Fridley, MN 55432
Phone: 1-866-235-5112
Fax: 1-866-331-2762
Email: [email protected]
Website: www.arblueclean.com

www.arblueclean.com
Model AR383
/