Page is loading ...

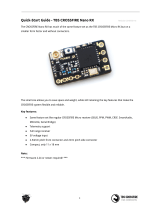
QUICK-START GUIDE
Full manual available to download from: www.Ares-RC.comFull manual available to download from: www.Ares-RC.com
Quick-Start Guide
Product specications are subject to change without notice.
Due to ongoing development, the actual product may vary from
images shown.
This product contains chemicals known to the State of California
to cause cancer, birth defects and other reproductive harm.
This product is not a toy! (14+) Recommended for ages 14 and
up. Adult supervision required for ages under 18 years old.
Contains small parts, keep out of reach of children 3 years of
age and younger.
To download the full Owner’s Manual &
Technical Information Guide, please visit
www.Ares-RC.com or scan the QR code with
your smart phone.
Distributed in the
UK by:
J Perkins Distribution Ltd,
Lenham,
Kent, UK
ME17 2DL.
www.jperkins.com
Distributed in Australia by:
Model Engines (Aust.) Pty. Ltd.,
Unit 1, 158-168 Browns Road,
Noble Park,
Victoria,
3174,
Australia.
www.modelengines.com.au
Ph (03) 8793 5555
Distributed in the US by:
Firelands Customer Service/Product Support
1133 Libra Drive, Lincoln, NE 68512
www.relandsgroup.com
1-800-205-6773
customerservice@relandsgroup.com
MADE IN CHINA
Part Number:
AZSZ2802 Crossre Racer Quad RFR: 200mW VTX
AZSZ2802A Crossre Racer Quad RFR: 25mW VTX

QUICK-START GUIDE
Full manual available to download from: www.Ares-RC.comFull manual available to download from: www.Ares-RC.com
1
Remove the components from
the box and ensure you have the
following parts:
• Factory assembled quad
• Propeller set
• 3S 2200mAh Li-Po battery
• Protected cloverleaf antenna
2
Before starting, make sure you
have the following items to hand:
• 1x 6-channel (minimum)
computer radio set
• 1x 6-channel (minimum) end
pin receiver
• 1x Strip of self adhesive hook
and loop tape
• 1x 10mm prop wrench
3
Remove the rear body clip and
gently ease the fuselage moulding
from the airframe.
4
Locate the receiver wiring loom
on the left-hand side of the
electronics board and note the
location ID for each wire:
• Red/Black/White – Aileron
• Yellow – Elevator
• Green – Throttle
• Blue – Rudder
• Orange – Auxiliary 1 (ight parameters)
• Brown – Auxiliary 2 (motor lock)
This Quick Start guide is written for the RFR (Ready for Receiver) version of the Crossre.
A full instruction manual is available to download from www.ares-rc.com

QUICK-START GUIDE
Full manual available to download from: www.Ares-RC.comFull manual available to download from: www.Ares-RC.com
5
Plug the wires into the respective
sockets on your receiver noting
that the single-pin connectors
should be attached to the ‘signal’
pin, usually reserved for the
yellow, orange or white wire.
6
Secure your receiver to the upper
frame using hook and loop tape
and secure the aerial(s).
7
Note that only end pin receivers
can be secured to the upper
frame due to the proximity of the
body.
8
Install the downlink antenna
noting that the Crossre should
never be powered ON without the
antenna connected as this can
damage the video transmitter
circuitry.

BINDING/PAIRING GUIDE
Full manual available to download from: www.Ares-RC.comFull manual available to download from: www.Ares-RC.com
QUICK-START GUIDE
Full manual available to download from: www.Ares-RC.comFull manual available to download from: www.Ares-RC.com
9
Before ying your Crossre you’ll need to congure and tune the on-board
ight controller using Cleanight open-source software. This software can be
sourced via Google Chrome using the following method:
1. Open Google Chrome
2. Enter ‘Apps’ (icon in top left corner)
3. Enter ‘Web Store’
4. Enter ‘Cleanight’ into the search box
5. Download ‘Cleanight Congurator’ software
10
Connect the Crossre’s ight
control board to your computer
via the board’s micro USB socket
and use the Cleanight software
to congure your quad. Use the
Cleanight Documentation &
Support section for guidance.
11
Disconnect the quad from your
computer, insert the fully charged
3s 2200mAh Li-Po and secure it
with the hook and loop strap. As
the LiPo is installed from under the
Crossre, the body does not need
to be removed.

BINDING/PAIRING GUIDE
Full manual available to download from: www.Ares-RC.comFull manual available to download from: www.Ares-RC.com
QUICK-START GUIDE
Full manual available to download from: www.Ares-RC.comFull manual available to download from: www.Ares-RC.com
12
With the propellers still removed,
switch your transmitter ON and
connect the Crossre’s battery.
A series of beeps will be heard
conrming that the quad is ready
to arm. Place the Crossre on
a level surface and arm the
motors by moving the throttle
stick to the bottom right corner of the gimbal (the default position for Mode 2
transmitters) and holding for three seconds.
13
Check the rotation direction of the
motors by gently increasing the
throttle and viewing from above.
14
Having conrmed that all works
as it should and that the motors
rotate correctly, disconnect the
battery and switch OFF your
transmitter. Identify the propellers
noting that two of the four have
a right-hand rotation (denoted
by the letter R alongside the
dimension embossed on the
root section of the blade). R
designated propellers should be
installed on motors A and C and tted with a black (left-hand thread) prop nut.
The remaining left-hand rotation propellers should be secured to motors B
and D.
Install the propellers using a
suitable 10mm wrench or socket
using adequate, but not excessive,
force to safely tighten the nuts.
Remember that the black prop
nuts are left hand thread and
tighten counter clockwise.
15
D
A
C
B

QUICK-START GUIDE
Full manual available to download from: www.Ares-RC.comFull manual available to download from: www.Ares-RC.com
NOTE: If you experience any problems,
please consult online troubleshooting guide.
17
Please note that specic
guidelines exist regarding the
lawful ying of ‘Small Unmanned
Aircraft’ and ‘Small Unmanned
Surveillance Aircraft’ such as the
camera-equipped Crossre. Stay
within the law and make sure to
visit the website of the Federal
Aviation Administration (US
aviation regulator)
https://www.faa.gov
or, in the UK, the Civil Aviation Authority:
https://www.caa.co.uk
or, in Australia the Civil Aviation Safety Authority:
https://www.casa.gov.au
Remove the downlink antenna, t
the fuselage shell, then ret the
downlink antenna. Your Crossre
is now ready to y.
16
/