3com Wireless LAN PC Card 11Mbps User manual
- Category
- Camera accessories
- Type
- User manual
This manual is also suitable for

http://www.3com.com/
http://www.3com.com/productreg
AirConnect
®
11 Mbps Wireless LAN PC Card
User Guide
Version 2.0
Part No. 09-2046-000
Published December 2000

3Com Corporation
■
5400
Bayfront Plaza
■
Santa
Clara, California
■
95052-8145
■
U.S.A.
Copyright © 2000 3Com Corporation. All rights reserved. No part of this documentation may be
reproduced in any form or by any means or used to make any derivative work (such as translation,
transformation, or adaptation) without written permission from 3Com Corporation.
3Com Corporation reserves the right to revise this documentation and to make changes in content from
time to time without obligation on the part of 3Com Corporation to provide notification of such revision or
change.
3Com Corporation provides this documentation without warranty, term, or condition of any kind, either
implied or expressed, including, but not limited to, the implied warranties, terms or conditions of
merchantability, satisfactory quality, and fitness for a particular purpose. 3Com may make improvements or
changes in the product(s) and/or the program(s) described in this documentation at any time.
If there is any software on removable media described in this documentation, it is furnished under a license
agreement included with the product as a separate document, in the hard copy documentation, or on the
removable media in a directory file named LICENSE.TXT or !LICENSE.TXT. If you are unable to locate a copy,
please contact 3Com and a copy will be provided to you.
UNITED STATES GOVERNMENT LEGEND
If you are a United States government agency, then this documentation and the software described herein
are provided to you subject to the following:
All technical data and computer software are commercial in nature and developed solely at private expense.
Software is delivered as “Commercial Computer Software” as defined in DFARS 252.227-7014 (June 1995)
or as a “commercial item” as defined in FAR 2.101(a) and as such is provided with only such rights as are
provided in 3Com’s standard commercial license for the Software. Technical data is provided with limited
rights only as provided in DFAR 252.227-7015 (Nov 1995) or FAR 52.227-14 (June 1987), whichever is
applicable. You agree not to remove or deface any portion of any legend provided on any licensed program
or documentation contained in, or delivered to you in conjunction with, this User Guide.
Unless otherwise indicated, 3Com registered trademarks are registered in the United States and may or may
not be registered in other countries.
3Com and AirConnect are registered trademarks and the 3Com logo is a trademark of 3Com Corporation.
Microsoft, MS-DOS, Windows, and Windows NT are registered trademarks of Microsoft Corporation.
All other company and product names may be trademarks of the respective companies with which they are
associated.
EXPORT RESTRICTIONS:
This product or software contains encryption code which may not be exported or
transferred from the U.S. or Canada without an approved US Department of Commerce export license.

C
ONTENTS
1
B
EFORE
Y
OU
B
EGIN
Introduction 1
Features 1
Installation Overview 2
Disk Factory 3
2
S
OFTWARE
I
NSTALLATION
Introduction 4
Installation Notes 4
Windows 98 4
Windows 95 4
Windows NT 4.0 4
Windows CE 4
Before Installing the Drivers 5
Installing the Drivers 5
Installing the Card Software 6
Installing the Documentation 6
Product Registration and Support 6
Uninstalling the Card 6
Removing Card Software 7
Removing the Card 7
Troubleshooting 7
3
I
NSTALLING
W
INDOWS
NT D
RIVERS
Before Installing the Driver 8
Installing the Driver 8
Setup With Networking Installed 9
Setup with No Networking Installed 9
Configuring the Adapter 9
Troubleshooting 10
4
I
NSTALLATION
FOR
W
INDOWS
CE
Introduction 11
Installation Procedure 11
Transferring AirConnect Files to Your Mobile Device 11
Configuring AirConnect on Your Mobile Device 12

5
S
OFTWARE
C
ONFIGURATION
, T
OOLS
,
AND
U
TILITIES
Introduction 13
Easy Setup 13
Status 14
Settings 15
Connection 15
Adapter Information 16
Firmware Upgrade 17
Encryption 17
Encryption Configuration Requirements 17
Enabling Encryption on the Wireless Client 17
Encryption Upgrade Access Codes 18
Windows 95, Windows 98, Windows Me 18
Windows 2000 18
Windows NT 4.0 18
Ad Hoc Operation 19
802.11 Ad Hoc 19
Proprietary Ad Hoc 19
Testing Ad Hoc Operation 19
6
I
NSTALLING
THE
PC C
ARD
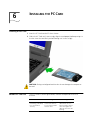
Installing the PC Card 20
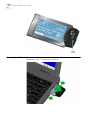
Wireless PC Card LED 20
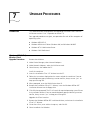
Removing the PC Card 21
7
U
PGRADE
P
ROCEDURES
Introduction 22
Windows 95B (OSR 2) Wireless Client Upgrade Procedure 22
Windows Me, Windows 98, and Windows 98SE Wireless Client Upgrade
Procedure 23
Windows NT 4.0 Workstation/Server Wireless Client Upgrade Procedure 24
Windows 2000 Professional Wireless Client Upgrade Procedure 25
A
T
ECHNICAL
S
UPPORT
Online Technical Services 27
World Wide Web Site 27
3Com FTP Site 27
Support from Your Network Supplier 27
Support from 3Com 28
Returning Products for Repair 29


1
B
EFORE
Y
OU
B
EGIN
Introduction
The AirConnect
®
wireless network offers performance comparable to Ethernet
networks, but without the restraints of network cables. The AirConnect product
family includes the 3CRWE73796B wireless PC Card described in this manual.
Features
AirConnect adapters use IEEE 802.11 B direct-sequence-based technology to
extend the range and versatility of a network. They provide a high-capacity link
across multiple access points within large or small indoor environments.
AirConnect product-family features include:
■
A bridging architecture that allows communication between wired network
devices and mobile devices.
■
Compliance with IEEE 802.11 B specification, an open architecture that allows
AirConnect devices to communicate with wireless devices from other
manufacturers.
■
Extended roaming to allow mobile devices to roam throughout large facilities
while remaining connected to the LAN.
■
Ad hoc mode that allows notebook PC users to create an instant network to
share data anywhere and anytime without the need for an access point.
AirConnect PC Card operating features include:
■
Support for standard NDIS (Network Driver Interface Specification) and drivers.
■
Support for Windows Millennium Edition (Me), Windows 2000, Windows 98,
Windows 95B (OSR 2), Windows NT 4.0 (with Service Pack 3.0 or greater), and
Windows CE 2.11 and 3.0.
■
Card and Socket Services support, including SystemSoft, CardSoft, and
CardWizard.
■
Plug and Play support.
■
Power management.
■
Low-power operation for battery-powered devices with PC Card slots.

Installation Overview
2
AirConnect Wireless LAN cards support a maximum data rate of 11 Mbps. (The
data rate drops back to 5.5, 2, or 1 Mbps when the adapter cannot establish or
maintain an 11 Mbps association.) Factors that can affect the data rate include:
■
A separation or change in signal strength between the Access Point and the
wireless client
■
The ratio of packets transmitted to transmissions attempted falling below a
preset threshold
■
The wireless client finding and switching to another Access Point with a higher
transmit rate
Roaming means the AirConnect PC Card will maintain your network connection
as you roam between Access Points in the same subnet. You can also roam across
routers, depending on how your extended roaming configuration is set. When
configured for extended roaming, the wireless client retains its network address as
it moves between subnets, between Ethernet segments, or from an Ethernet
segment to a wireless LAN. See “Easy Setup” on page 13 for details.
The wireless LAN PC Card supports
Continuous Active
and
Power Save Polling
power-management modes.
■
In
Continuous Active Mode
, the radio that establishes and maintains the link to
the network remains on. Continuous Active mode is not recommended for
battery powered devices.
■
Power Save Polling
conserves power by suspending the adapter’s
communication with an associated access point. The access point saves data
for transmission to the wireless client when it wakes at given intervals. When
the adapter wakes to check for data, it switches back into
Continuous Active
Mode
until it is ready to suspend communications again.
Installation Overview
Installing the AirConnect wireless network PC Card involves these tasks:
■
Running the Setup program from the
Installation CD
. See “Installing the
Drivers” on page 5.
■
Installing the PC Card. Do not install the card until instructed to do so by the
setup software. The procedure for installing the PC Card is described in
“Installing the PC Card” on page 20.
■
Installing the software, including the drivers for the card and the AirConnect
software utilities. See “Installing the Card Software” on page 6.
If you are reading this manual from the CD and want to install it on your hard
disk for easier access, see “Installing the Documentation” on page 6.
■
The card installation procedure covers basic configuration. For advanced
configuration options, or to explore the utilities available for managing and
configuring the card, see “Software Configuration, Tools, and Utilities” on
page 13.

3
C
HAPTER
1: B
EFORE
Y
OU
B
EGIN
Disk Factory
If you are installing the software on a computer that does not have a CD-ROM
drive, or if you choose to install the drivers manually, you will have to make
diskettes from the
Installation CD
. The setup application includes Disk Factory, a
utility for creating disks from CD. To use disk factory, you need access to a
computer with a CD-ROM drive and a floppy drive.
1
For a transfer of the driver software to a diskette, prepare a diskette labeled
Drivers.
For a transfer of the application software to diskette, prepare three disks labeled
as follows:
AirConnect Application Disk 1
AirConnect Application Disk 2
AirConnect Application Disk 3
2 Put the Installation CD in the CD-ROM drive. The SETUP program should start
automatically. If it does not start, you can run it manually by selecting Run from
the Start menu.
3 Select Create Diskettes.
4 In the Disk Factory window, click Next.
5 Select the software you want to transfer to diskette. If you select All, you will need
four floppy diskettes.
6 Select the action, for example, Create and Verify Disks, and click Next.
7 When you are ready to install the application software from diskette, put
AirConnect Application Disk 1 in the floppy drive and run SETUP.
If you are installing the drivers manually, use the Drivers diskette when the setup
wizard for your operating system prompts for drivers supplied by the
manufacturer.

2
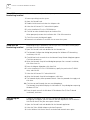
SOFTWARE INSTALLATION
Introduction Use the procedures described in this chapter to install the AirConnect wireless PC
Card software and drivers under Windows 95, Windows 98, Windows 2000, and
Windows Millennium Edition (Windows Me).
Installation Notes The following paragraphs described special considerations for particular operating
systems.
Windows 98
■ Installation under Windows 98 may result in a fatal error caused by the
UHCD.SYS file in the Windows 98 operating system. To avoid this problem, you
should update the UHCD.SYS file from v4.10.1998 to v4.10.2000. This update
is available from the following web site:
http://www.microsoft.com/windows98/downloads/contents/
WURecommended/systemupdata/Default.asp
■ Note that the final Windows 98 installation screen may take 30-60 seconds to
appear. Do not interrupt the installation if the PC appears to be taking too
much time to complete the installation.
Windows 95 Windows 95 users should note that the AirConnect wireless PC Card runs under
Windows 95 version B (OSR 2) or higher. If you do not know which version of
Windows 95 is installed on your computer, follow these steps:
1 In the Control Panel, double-click System to display the System Properties dialog
box.
2 Click the General Tab to display the Windows 95 version information.
Version B (also known as OSR 2) is identified as 4.00.950b.
Windows NT 4.0 Windows NT 4.0 users should refer to the driver installation instructions described
in “Installing Windows NT Drivers” on page 8.
Windows CE Windows CE users should refer to the “Installation for Windows CE” section.
Drivers for other operating systems are located at the 3Com Customer Support
Web site at:
http://support.3com.com

5 CHAPTER 2: SOFTWARE INSTALLATION
Before Installing the
Drivers
Before installing the Windows 98 driver, you will need a copy of the Windows 98
installation media supplied with your computer or operating system. On many
Windows 98 systems, instead of a CD, the installation files are archived on the
hard disk in C:\WINDOWS\OPTIONS\CABS. On Windows 2000 systems, you
may be prompted to load operating system files from the Windows 2000
installation disk.
You will also need the AirConnect Installation CD supplied with your AirConnect
wireless PC Card. Along with other utilities, the Installation CD installs the
AirConnect Network Configuration Properties Application in the Control Panel on
your system. Use this application to view and edit AirConnect WLAN adapter
settings.
If your site requires installation using diskettes, see “Disk Factory” on page 3.
Where the driver installation procedure mentions the Installation CD and CD-ROM
drive, use the diskettes and the floppy drive instead.
Installing the Drivers The following procedure is for installing drivers under Windows 95B (OSR 2),
Windows 98, Windows 2000, and Windows Me.
1 Turn on your computer.
2 Put the Installation CD in the CD-ROM drive.
The setup program should start automatically. If it does not start, you can run it
manually by selecting Run from the Start menu.
3 From the 3Com AirConnect WLAN Installer, select Install AirConnect WLAN
Adapter. Follow the instructions as they appear.
4 When prompted to insert the AirConnect PC Card, insert the card into the
notebook PC slot as described in “Installing the PC Card” on page 20.
The driver installation procedure will guide you through the steps standard for
your operating system. You will be asked to supply a CD or directory path
information for the Installation CD and your operating system software.
As part of the driver installation process, the setup program will install and open
the Network application in the Control Panel.
5 Enter the name of the Wireless LAN Service Area of the wireless network to which
your computer will connect. The name you enter here must match exactly the
name assigned to the access point. Characters, capitalization, and spacing must
be identical.
6 Save the configuration settings and exit by clicking OK.
7 Restart your computer.

Installing the Card Software 6
Installing the Card
Software
1 When the system reboots, restart the setup program and install any other
components required.
3Com recommends that you install the wireless LAN applications so you can
access the WLAN utilities described in Chapter 5.
2 Restart your computer for changes to take effect.
Installing the
Documentation
If you are reading this manual from the CD, you may want to install it on your hard
disk using the following procedure:
1 Put the Installation CD in the CD-ROM drive. The Setup program will start
automatically.
If the Setup program does not start, use Start/Run to run the SETUP.EXE program
from CD-ROM drive.
2 Select Documentation.
You can view the manuals from the CD.
3 To install the manuals on your hard disk, select Install User Documentation. Follow
the instructions on the screen to complete the installation.
4 Exit the setup program.
You can open the manuals from the AirConnect program group.
Product Registration
and Support
To register this product with 3Com, go to the following Web page:
http://www.3com.com/productreg/index.html
For support information and pointers to the latest drivers and utilities available for
the AirConnect wireless PC network interface card, go to the following Web page:
http://support.3com.com
Uninstalling the Card If the card installation is unsuccessful for any reason, your best course may be
to completely uninstall the AirConnect wireless PC Card and its software and
repeat the installation procedure.
Previous installations or interrupted installation attempts sometimes leave
problems that affect card operation. Possible problems include:
■ The card functions not working.
■ Windows 98 not detecting the card.
■ The system issuing a warning tone at startup.
You can remove the card and driver files using the procedures below.

7 CHAPTER 2: SOFTWARE INSTALLATION
Removing Card
Software
Open Control Panel/System/Device Manager. Select the AirConnect WLAN NIC
card components and click Remove.
Using the Device Manager to remove the card will uninstall the driver files.
Removing the Card
When removing the PC Card, use the release lever or button on your card slot to
release the card. When pulling out the card, do not pull on the antenna. Refer to
“Removing the PC Card” on page 21.
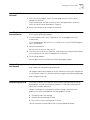
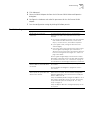
Troubleshooting
CAUTION: Exit any networking applications before removing the card.
Symptom Solution
Weak signal or intermittent
connection.
Try reorienting the antenna. The PC Card antenna is
attached to the end of the card. For best use of the
antenna:
■ Keep the area around the antenna clear from
materials that could block radio transmission, such as
metal objects, electronic devices, and cordless
telephones.
■ If your signal is weak, change the direction of the
antenna slightly.
■ If necessary, move your computer a few inches to find
a better signal. Depending on your environment, a
difference of one or two inches can mean the
difference between a strong and a weak signal. See
“Status” on page 14 for details.
Use the Signal Strength display in the AirConnect Status
application to determine the best location and orientation
for a network connection. See “Connection” on page 15
for information on monitoring your AirConnect
connection.
Windows does not recognize the
adapter when installed.
Verify that PCMCIA support is installed.
Check whether the computer has a Plug and Play BIOS.
Check whether an AirConnect adapter is already in use.
Driver fails to load. A resource conflict could exist. Use the Device Manager to
resolve resource conflicts. Select System from the Control
Panel, then click on the Device Manager tab.
Workstation cannot attach to the
network.
Verify that the adapter Wireless LAN Service Area ID
matches the access point ID. See “Easy Setup” on
page 13
Verify that the adapter Data Rate is configured properly
for the access point.
Network drive mappings disappear
when the notebook suspends or
the adapter is removed then
reinserted.
Windows 98 will not restore NetWare network drive
mappings under these conditions. Log out and log in
again, or restart the machine to restore the connections.
Nonfunctioning PC adapter LED. Verify that the Wireless LAN Service Area ID matches the
access point ID.

3
INSTALLING WINDOWS NT DRIVERS
Before Installing the
Driver
Before installing the driver, you will need a copy of the Windows NT 4.0
installation media supplied with your computer or operating system.
You will also need the AirConnect Installation CD supplied with your AirConnect
wireless PC Card. Along with other utilities, the Installation CD installs the
AirConnect Network Configuration Properties Application in the Control Panel on
your system. Use this application to view and edit AirConnect WLAN adapter
settings.
If your site requires installation using diskettes, see “Disk Factory” on page 3.
Where the driver installation procedure mentions the Installation CD and CD-ROM
drive, use the diskettes and the floppy drive instead.
Installing the Driver Point enabler installation is a basic, manual installation procedure that will work
on nearly all configurations, including systems with third-party card and socket
services installed.
1 Install the card as described in “Installing the PC Card” on page 20.
2 Power up the system.
3 When the Windows NT Setup dialog box appears, click Select from list for
Network Adapters.
4 In the Select Network Adapters dialog box, click Have Disk.
5 Put the Installation CD in the CD-ROM drive. Make sure the path to the CD-ROM
drive is indicated and click OK.
6 When the Select OEM option dialog box appears, select AirConnect WLAN PC
Card and click OK.
7 At the Windows NT Setup dialog box, click Next to continue.
8 When the Windows NT Setup dialog box appears, select the appropriate Network
Protocols and Network Services. If you are unsure about what to select, ask your
MIS representative.
9 Click Next, and Next again to start the network installation.
10 Click Next to start the installed network configuration.
For Windows NT 4.0 installation, you must have Service Pack 4 or later installed
on your computer. After installation, you may need to reinstall the Service Pack
software to update NT network files and eliminate error messages in the Event
Viewer. Contact your Network Administrator or Microsoft if you do not have the
current Service Pack.

9 CHAPTER 3: INSTALLING WINDOWS NT DRIVERS
Setup With
Networking Installed
If networking is already installed on your system:
1 Power up and log into the system.
2 Open the Control Panel.
3 Double-click Network and select the Adapters tab.
4 Select the AirConnect PC Card and click Update.
5 Put the Installation CD in the CD-ROM drive.
6 Click OK to select the default path to the driver files.
When prompted, remove the installation disk. Click OK to continue.
7 Click Close to exit the Network applet.
8 Remove the Installation CD and click Yes to restart the system.
Setup with No
Networking Installed
Before beginning this procedure, note that you must have Administrator group
privileges to install network components.
1 Open the Control Panel and double-click the Network icon.
2 The Network Configuration dialog box prompts for Windows NT Networking
installation, click Yes.
3 Check Wired to the network when the Network Setup Wizard dialog box appears.
Click Next to continue.
4 When the Network Setup Wizard dialog box prompts for a network installation,
click Select from list.
5 From the Adapter dialog box, click Have Disk.
6 Put the Installation CD in the CD-ROM drive, specify the path to the CD-ROM
drive, and click OK.
7 Select the AirConnect PC Card and click OK.
8 When the Network Setup Wizard reappears, click Next.
9 The Protocols display shows protocol choices. Select the protocols that apply and
click Next.
10 Click Next to scroll through the next two dialog boxes.
The Network Setup Wizard displays the Windows NT Setup dialog box requesting
Windows NT files.
11 Enter the path name of the Windows NT distribution files (E:\ for CD-based
installation), click Next.
Configuring the
Adapter
Configure the adapter using the Easy Configuration dialog box. Before
configuring the adapter, you will need ask your MIS department for the Wireless
LAN Service Area ID for your access point network.
1 Open the Control Panel and double-click the Network application.
2 Select the 3Com WLAN Adapter and select Properties.
3 Set the Wireless LAN Service Area ID to the desired network access point.

Troubleshooting 10
4 Click Advanced.
5 Select the WLAN Adapter tab from the AirConnect WLAN Advanced Properties
dialog box.
6 Configure the hardware and radio link parameters for the AirConnect WLAN
adapter.
7 Save the configuration settings by clicking OK before you exit.
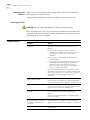
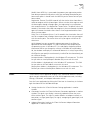
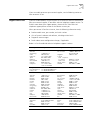
Troubleshooting
Symptom Solution
Weak signal or intermittent
connection.
Try reorienting the antenna. The PC Card antenna is
attached to the end of the card. For best use of the
antenna:
■ Keep the area around the antenna clear from materials
that could block radio transmission, such as metal
objects, electronic devices, and cordless telephones.
■ If your signal is weak, change the direction of the
antenna slightly.
■ If necessary, move your computer a few inches to find
a better signal. Depending on your environment, a
difference of one or two inches can mean the difference
between a strong and a weak signal. See “Status” on
page 14 for details.
Use the Signal Strength display in the AirConnect Status
application to determine the best location and orientation
for a network connection. See “Connection” on page 15
for information on monitoring your AirConnect connection.
A resource conflict (usually IRQ or
I/O base address) caused the driver
not to load.
Check Service Monitor entries in the System Log to look for
the conflicts.
Use the Windows NT Diagnostics program to locate a
free resource.
No resource conflicts were
detected, but the system does not
attach to the network.
Verify that the adapter’s Wireless LAN Service ID matches
that of the access point. Use the Network Configuration
Properties Application in the Control Panel to modify the
Wireless LAN Service ID.
Verify the Mandatory BSSID setting of the adapter is set to
0 or matches the BSSID of the Access Point. Use the Easy
Setup Advanced options to modify the ID. See “Easy
Setup” on page 13.
Verify the adapter data rate is configured properly for the
access point.

4
INSTALLATION FOR WINDOWS CE
Introduction To install AirConnect on your mobile device (handheld PC), you will need the
AirConnect Installation CD supplied with your AirConnect PC Card. Along with
other utilities, the Installation CD installs the AirConnect Network Configuration
Properties Application in the Control Panel on your system. Use this application to
view and edit AirConnect WLAN adapter settings.
You will also need a desktop or notebook PC to transfer AirConnect files to your
mobile device.
If your site requires installation using diskettes, see “Disk Factory” on page 3.
Where the driver installation procedure mentions the Installation CD and
and CD-ROM drive, use the diskettes and the floppy drive instead.
Installation Procedure The AirConnect installation procedure consists of two major steps: transferring the
AirConnect files to your mobile device, and configuring the AirConnect settings.
Transferring AirConnect
Files to Your Mobile
Device
1 Connect the mobile device to the desktop or notebook PC from which you will
transfer files. Use the appropriate cable supplied with your mobile device. The
ActiveSync window opens when it detects the link.
2 Insert the Installation CD into the desktop or notebook PC.
3 From the Installation CD, run the file WinCE\AirConnectNormal.
4 Follow the instructions on the screen.
5 When prompted, select the default directory to continue the installation. The
installation process begins and may take a few minutes to load the application
files onto your mobile device.
6 When the file transfer finishes, a message box appears instructing you to check
your mobile device screen for additional steps to be taken to complete the
installation. Click OK to close the message box.
For Windows CE installation, you must have ActiveSync installed on the desktop
or notebook PC from which you will transfer files.

Installation Procedure 12
Configuring AirConnect
on Your Mobile Device
After the AirConnect files have finished transferring, the 3Com AirConnect WLAN
Easy Setup screen appears on the display of your mobile device.
1 Click OK when a message box appears on the screen.
2 Insert the PC Card into the PC Card slot on your handheld PC.
3 Enter the IP address when prompted.
4 Perform a soft reset of your mobile device according to the manufacturer’s
instructions.

5
SOFTWARE CONFIGURATION, TOOLS,
AND UTILITIES
Introduction The AirConnect wireless PC Card software includes three groups of utilities. The
best way to familiarize yourself with the software, the information it provides, and
the options you can change, is to open and browse through the applications
themselves. If you hold the cursor over an icon or item, a popup window will
identify it for you. Help is available throughout the applications.
Easy Setup Easy Setup lets you set common configuration parameters for the AirConnect
wireless PC card.
1 Open the Control Panel and double-click the Network application.
2 Select the 3Com WLAN Adapter and select Properties.
■ Wireless LAN Service Area lets you specify the ID for the Access Point you will
connect to.
■ Advanced Properties lets you set more advanced options in their WLAN adapter
configuration.
You can also access the Advanced Properties settings through the Network
application located in the control panel. Advanced Properties include:
■ Wireless Client lets you set the two most common settings for the WLAN
adapter, Wireless LAN Service Area, and Power Management settings.
Wireless LAN Service Area is equivalent to the 802.11 parameter ESSID. The
initial value was set when you ran the 3Com Wireless Easy Setup application.
■ Power Management is a slider that controls how you trade off performance
and power management for the adapter. The system polls the other wireless
devices on the network to determine if any traffic exists for this PC. To save
power, increase the interval between polls.
■ Mobile IP lets you enable and configure extended roaming between routers.
To enable extended roaming, check the Mobile IP check box. When this box
is checked, the Home Agent IP Address, Mobile Home MD5 Key, Registration
Timeout, and Delay Time fields are enabled.
Home Agent IP Address lets you register your wireless client with your home
access point through a foreign subnet access point (commonly called a foreign
agent) and tell the Foreign Access Point where your home access point is
located.
For extended roaming to work, you must use a static IP address.

Status 14
Mobile Home MD5 Key is a password that protects your registration packets
from being tampered with by others while they are being forwarded to your
home access point. It should match the MD5 key on the Access Point of your
home subnet.
Registration Timeout (5 to 3600 seconds) tells the wireless client how often it
needs to reregister with the Home Agent. When a wireless client registers with
the home agent through a foreign agent, the registration has an expiration
time associated with it - the Registration Timeout value. The default value is 60
seconds. If the wireless client does not reregister in the time allowed, the home
agent will remove the wireless client from its list of registered wireless clients
when the time expires.
Delay Time is the amount of time (1 to 10 seconds) that the wireless client will
wait for a response from a foreign subnet access point when trying to register
with that access point. The wireless client will try to register a maximum of
three times.
WLAN Adapter lets you set specific hardware parameters that effect the
operation of the WLAN adapter. This tab has different views depending on
the operating system. In Windows NT 4, the tab displays hardware resource
information and lets you change the settings. In Windows 95 and Windows
98, the tab does not display this information because it is set by Plug and Play.
Card Type lets you specify the card currently installed. For the selected card, you
can review or change:
Interrupt Number is displayed only in the Windows NT environment. This field
lets you select an Interrupt Request Number (IRQ) to use with this card.
I/O Port Address is displayed only in the Windows NT environment. This field
lets you select an I/O Port Address to use with this card.
Memory Base Address is displayed only in the Windows NT environment. This
field lets you select an Memory Base Address to use with this card.
Status The AirConnect Status application displays status information about the current
signal strength and provides access to 3Com WLAN application tools, including
Settings, Connection, and Adapter Information utilities.
Start the Status application by clicking the 3Com icon in the tool tray in the lower
right-hand corner of the Windows desktop.
■ Settings launches the 3Com AirConnect Settings application in another
window.
■ Connection launches the 3Com AirConnect Connection application in another
window. The signal status display is constantly updated to show the status
of the wireless signal. The signal is rated as follows: no adapter installed, no
connection, no signal, poor signal, fair signal, average signal, good signal, and
excellent signal.
■ Adapter Information launches the 3Com AirConnect Adapter Information
application in another window.

15 CHAPTER 5: SOFTWARE CONFIGURATION, TOOLS, AND UTILITIES
Settings The Settings application displays information about the current card settings. It
also lets you change the configuration of the card without rebooting your system.
The application lets you set parameters such as wireless LAN service area and
power mode settings.
■ Wireless LAN Service Area displays the name of the access point with which the
wireless PC Card is associated. You can enter a new name in this field or select
a name from the drop-down list.
■ Power Mode lets you select the power mode to use and specify when
power-save options are in effect.
Continuous access does not use power save polling and disables it.
Power save polling uses Power Save Polling at all times.
Switch based upon active power source causes the system to switch the power
mode based upon whether the system is using AC or battery power. In this
mode, the system use continuous polling mode with an AC power source and
power save polling with battery power.
The Power Save Polling slider lets you balance network performance against
power consumption. When the slider is set to lowest power, the adapter
checks network traffic less frequently, reducing power consumption used.
When the slider is set to highest performance, the adapter tries to maintain
constant contact with the network, increasing network performance but
consuming correspondingly more power. If you check Let the adapter manage
power usage, the card will use the best setting available at any given time. The
polling interval is based on whether the system has received data recently. If no
data is being received, the polling interval becomes less frequent over time,
gradually decreasing power consumption.
Connection The Connection application allows more detailed checks of card performance than
is possible with the AirConnect Status application. Signal strength is displayed over
time, which lets you check the performance of the wireless link.
■ Signal Strength tracks the signal strength in real time and displays a graph
showing the historical trend.
■ Link Performance lets you run a ping test between the wireless client and
another IP device on the network. When the ping test is run to another wireless
device, the round trip ping time can give an idea of what the upper limit is for
connection speed.
Start Test starts a ping test using the information provided in the Test Count
and Host Address fields.
Test Count lets you select the number of pings to perform in testing link
performance.
Host Address lets you enter the IP address or host name of the system to
perform the ping test.
Link Performance displays the results of the ping test specified on this tab. A
graph indicating the round trip ping time of each ping and timing statistics
are shown.
Page is loading ...
Page is loading ...
Page is loading ...
Page is loading ...
Page is loading ...
Page is loading ...
Page is loading ...
Page is loading ...
Page is loading ...
Page is loading ...
Page is loading ...
Page is loading ...
Page is loading ...
Page is loading ...
Page is loading ...
Page is loading ...
Page is loading ...
Page is loading ...
Page is loading ...
Page is loading ...
-
 1
1
-
 2
2
-
 3
3
-
 4
4
-
 5
5
-
 6
6
-
 7
7
-
 8
8
-
 9
9
-
 10
10
-
 11
11
-
 12
12
-
 13
13
-
 14
14
-
 15
15
-
 16
16
-
 17
17
-
 18
18
-
 19
19
-
 20
20
-
 21
21
-
 22
22
-
 23
23
-
 24
24
-
 25
25
-
 26
26
-
 27
27
-
 28
28
-
 29
29
-
 30
30
-
 31
31
-
 32
32
-
 33
33
-
 34
34
-
 35
35
-
 36
36
-
 37
37
-
 38
38
-
 39
39
-
 40
40


3com Wireless LAN PC Card 11Mbps User manual
- Category
- Camera accessories
- Type
- User manual
- This manual is also suitable for
Ask a question and I''ll find the answer in the document
Finding information in a document is now easier with AI
Related papers
-
3com AirConnect 3CRWE73796B Quick start guide
-
-
-
-
-
 Cabletron Systems AirConnect 3Com User manual
-
-
-
-

Other documents
-
BEC 8110 User guide
-
 ADS Technologies MEDIA-LINK User manual
-
Acer 270 User manual
-
Xerox C90 Administration Guide
-
-
Cisco Systems Document ID: 15942 User manual
-
Sharper Image Detachable Surround Sound Speakers Owner's manual
-
ZyXEL ANT3218 User manual
-
Microsoft Server E800 User manual
-
 Buffalo Technology AirStation WLA-L11G User manual

