
Fiat Spider - 2000
^,^:^y.^,v:;;-;-0^:
$$M

SERVICE NETWORK
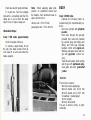
When your car needs Service look
for the sign which identifies all autho -
rized Fiat Dealers where trained per-
sonne!, specially designed equipment
and faciiities are available.
Our organization is at your füll
disposal for any Suggestion or advice
you may need.
SPARE PARTS
Authorized FIA T parts are the bsst
guarantee for top Performance and
satisfactory Operation of all compo-
nents.
When ordering, p/ease quote (see
page 2) :
— Car Model.
— Nurnber for Spates.
— PartNumber(s) of Spare (s) Ordered.
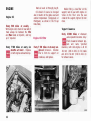
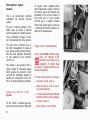
BREAK-IN RECOMMENDATIONS
Current progress in design and
manufacturing technology is so ad-
vanced that no hard-and-fast rule
need be given for break-in, However,
a few simple rules should be fol-
!owed for the first 1000 mües:
Avoid fierce accelerations soon after
starting and allow time for the
engme to warmup (a good habit
even after break-in).
Do not fully depress the accele-
rator pedal and avoid high engine
speeds, when operating in the
lower gears, that is, never allow
the tachometer pointer to move
into the yellow sector indicating
hfgh rpm rates.
Change your road speed occasion-
ally, especially on long trips. Avoid
long drives at constant high or
Iow speeds,
Downshift whenever necessary to
cope with driving conditions on
route: you will avoid engine lug-
ging at excessively iow rpm.
Avoid, if possible, severe stops at
sustained speeds during the first
few hundred miles: brakes will
set properly and improve their life
and effectiveness.
Remember that satisfactory Oper-
ation and iong life are dependent to a
great extent on the care with which
the car is handled during break-in.

Fiat Spider 2000
This Manual provides the Information
necessary for satisfactory
Operation and maintenance
of your car.
We wish you pieasant motoriny
and trust the Information providsd
will help to ensure the
fang Ufe and safety of your car.
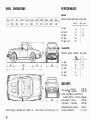
Operation maintenance specifications

KEYS
Each vehicle is provided with two
keys in duplicate; quoting the number
stamped on each key is essential to
obtain a replacement from FIAT's
Sales Organization.
A For ignitron switch
B For door and trunk locks.
B
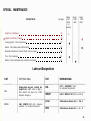
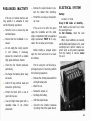
IDENTIFICATION
DATA
• Manufacturer's Plate
A - Name of manufacturer
B - Vehicls identification code
C - Chas&is Number
D - Engine type
E - Version code
F - Number for spares
G - Space reserved for Diesel vehicles
50022
o
1-
2-
MOTOFtE-ENGINE
YEFSIONF- VERSION
N'PERRICAMBI-NäFDR
SPAR£S
Kg
Kg
Kg
Kg
0
i i
1 1
— J
39090

• Engine Type (132 C3.031) and
Identification Number - Punched
on crankcase, near oil filter mount.
• Chassis Type (124 CS2} and
Identification Number - Punched
on engine compartment bulkhead
(permanent structure) right side.
• F.M.V.Safety Standard 115Tag
Type of vehicle and chassis number,
located on panel top between instru-
ment cluster and windshield.
• F.M.V.Safety Standard 110Tag
Tire data and car capacity, located
on R.H. door pillar, above striker.
• A) F.M.V. Safety Standard Con-
formity Tag - Month and year
of manufacture, gross vehicle weight
rating, gross axle weight rating,
chassis number and car type, located
on left door pillar.
• B) Vehicle Emission Control In-
formation Label - Located on left
door pillar.
• E.P.A. and California Regula-
tions Conformity Tag - Air pollution
control specifications for correct engine
tuneup and adjustments, located in
engine compartment, on cowl.
3

1
2 3 4 5 6
7
8 9
10
11
12 13 14 15
16
32
31
30 27
35 34
33

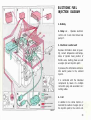
INSTRUMENTS AND CONTROLS
1 lighting switch, three-position
2 Turn signal lights switch levei
3 High/Low beams change-over
switch lever
4 Inspection lamp receptacle
5 Instrument cluster
6 Horn button
7 Steering lock ignition switch
8 Windshield washer and wiper
switch lever, three-position
9 Air outlets
10 Windshield wiper sweep rate knob
11 Low brake fluid level/hand brake
ON indicator
12 «EX. GAS SENSOR)) indicator
13 Fasten belts indicator
14 Knob switch and rheostat for
instrument cluster lighting
15 Glove compartment
16 Glove compartment lock
17 Utility recesses (two)
18 Power window switches housing
19 Courtesy light with switch
20 Vehicular hazard warning signal
indicator and switch
21 Gearshift lever
22 Lever controlling air flow through
outlets 9 and/or under dash
23 Cigar lighter
24 Optional radio housing blanking
lid
25 Ash tray
26 Hand brake lever. To release the
lever press in button on top of
handgrip
27 Two-speed heater fan switch,
three-position
28 Air volume control lever
29 Air temperature control lever
30 Accelerator pedal
31 Service brake pedal
32 Clutch pedal
33 Fusebox
34 Hood release emergency cable
35 Hood catch release lever

a b
n i m n
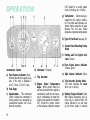
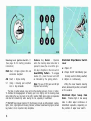
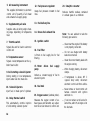
Instrument Cluster
a) Fuel Reserve Indicator (Red) -
Warning that the fuel supply avail-
able in the tank is between 5
and 7.5 liters {17
3
to2 Gals).
b) Fuel Gage
c) Speedometer - This instrument
(which includes the odometer) is
factory-sealed: any tampering by
unauthorized persons will invali-
date the warranty.
o p q f s
d) Odometer (Totalizer)
e) Trip Recorder
f) Engine Water Temperature
Gage - If the pointer enters the
red area it means that the engine is
overheating: it will then be neces-
sary to immediately rev down the
engine to idle speed (do not $witch
off). Should the pointer remain
on the red area, contact the nearest
FIAT Dealer for a cooling system
check (including fan circuitry).
g) Tachometer - Electronically-op-
erated from the ignition distribu-
tor. The yellow area indicates ma-
ximum engine speed for all gears
whereas the red area shows
dangerous engineoperating speeds.
h) Type of Fuel Used (see page 33)
i) Cluster Panel Mounting Knobs
(Four)
I) Parking and Tail Lights Indi-
cator (Green)
m) Turn Signal Arrow Indicator
(Flashes green)
n) High Beams Indicator (Blue)
o) Trip Recorder Zeroing Knob -
Turn knob clockwise but never
when car is running.
p) Battery Charge Indicator (Red)
With engine inoperative, and ig-
nition key in position MAR, the
charge indicator is on and must
go out when engine is started;

should indicator turn on while
engine is running, this is a warn-
ing of a fault in the battery re-
charging system: turn immedia-
tely to a FIAT Dealer for assist-
ance.
q) Insufficient Oil Pressure In-
dicator (Red) - The light should
go off when oil pressure is suffi-
cient to ensure adequate engine
lubrication,
r) Clock Reset Knob - Push and
turn clockwise making sure that
it springs back when released.
5) Quartz Crystal Clock
Lighting Switch
Up = All lights OFF.
With Ignition Key at MAR:
Down — Parking and tail lights,
headlight low or high beams and
flashers (main beams).
With Ignition Key Removed:
Center (night parking oniy) = Park-
ing and tail lights.
Down = All lights OFF.
Fasten Belts Indicator (Red) and
Buzzer - Both are operative for a
few seconds when a starting attempt
is made with seat belts (driver and/or
passenger) unfastened.
Low Brake Fluid Level/Hand Brake
ON Indicator (Red)
With ignition key at MAR the indicator
lights up to warn the driver that the
bulb is efficient. In case the indicator
remains ON it means either that the
hand brake lever is pulled upwards
(brake applied) or that the brake fluid
level is too low.
Should the indicator turn on while
the vehicle is moving, stop and check
the fluid level in reservoir. If the level
is too low, great care should be taken
when applying the brakes and the
nearest FIAT Dealer contacted for a
brake system check.
Vehicular Hazard Warning Signal
Switch - Turns ON (independently of
key position in lock switch) the front
and rear turn signal lights which will all
flash simultaneously to warn of the pre-
sence of the vehicle stopped on the road.
38003
EXHAUST GAS SENSOR
INDICATOR (red)
Lights up:
— Every 30 000 miles to warn owner
of need to replace exhaust gas
sensor (Lambda probe);
— On starting; it should go out when
engine is started.

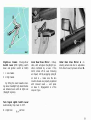
Steering Lock Ignition Switch (*)
(See page 16 for starting procedure
instructions)
MAR (Run) = Engine ignition ON and
accessories energized
AW (Start) = Engine starting
ST [Stop) = Steering post antr-theft
lock in. Key removable
Remove Key Buzzer - Operates
when the steering wheel side door is
opened to leave the car and the igni-
tion key is forgotten in the lock switch.
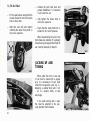
Gearshiftirtg Pattern - To engage
reverse (R), press the lever and shift
as indicated by the gating pattern.
Note: The use of fifth gear over 4B mph
improves fuel economy.
The total or partial removal oi key will lock the steering post even if car is in motion.
To facilitate the disengagement of steering post lock, slightly rock the steering wheel
while rotating the key. Key must not be left in position MAR when engine is inoperative
and must be removed only when leaving the car, especially if unattended.
(*) Even with key removed (position ST) the following circuits are stifl energized : courtesy
lights; horns; cigar lighter and housing indicator; vehicular hazard warning signal; remove
key buzzer; clock; inspection lamp receptacle.
Windshield Wiper/Washer Switch
Lever
a = Wiper off
b = Wiper On-Off intermittently (par-
ticularly useful in drizzly weather)
c = Wiper on continuously
Lifting the lever towards steering
wheel, whatever its position, will switch
on the washer.
Windshield Wiper Sweep Rate
Knob - Provides high or low sweep
rates in either wiper continuous or
intermittent operation, depending on
the position of wiper lever switch.

25947
High/Low Beams Change-Over
Switch Lever {With lighting switch
down and ignition switch at MAR)
I = Low beams
II = High beams
By lifting the lever towards steer-
ing wheel headlight high beam flashes
are obtained even with all lights out
(Daylight signals).
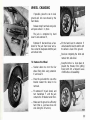
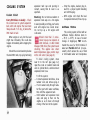
Inner Rear View Mirror - Collap-
sible, with anti-glare (Day/Night) po-
sition controlled by a lever. If the
mirror comes off its seat, following
an impact, refit by engaging spring B
on stud A — make sure the two
location dowels are properly registered
with relevant seats — and press
on base C. Engagement is of the
snap-on type.
Outer Rear View Mirror A on
steering wheel side door is adjustable
from driver's seat, by means of lever B.
Turn Signal Lights Switch Lever
Automatically trips back to OFF.
R = Right turn
Left turn

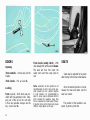
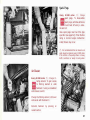
DOORS
Opening
From outside - Unlock and pull the
handle.
From inside - Pull up lever A.
Locking
From outside - Both doors are pro-
vided with key-operated locks. Step-
ping out of the car on the curb side
is thus also possible. Always use the
key; never lever A.
From inside (safety latch) - With
door already shut set the lever A down.
The lever will thus first insert the
safety latch and then snap back to
rest.
Note: Lubrication of lock cylinders is not
recommended. At most, blow some gra-
phite powder into the cylinder keyhole.
In cold climates it is recommended to
squirt in some special antifreeze fuild for
locks. Repeat the operation every time
the car is washed or at least every 15 days,
if insertion of key in the frozen lock proves
difficult, simply warm up the key.
SEATS
Seats may be adjusted for leg reach
after moving control lever A downwards.
Once the desired position is found,
release the lever and make sure the
seat has locked.
The position of the backrest is ad-
justed by turning knob B.
10

For access to the rear compart-
ment push down lever C and tilt
backrest downward.
On top of each seat backrest is fitted
a headrest: to re-set height pull up
or push down as required.
The headrest must be adjusted so
as to support the head and not the
neck of the occupant.
39078
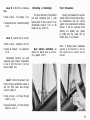
SEAT BELTS
Seat belts provided as standard
original equipment are of the 3-point
lap type.
Pull belt fully out from retractors
without stopping as otherwise it will
be necessary to return the belt to the
stowed position to release the re-
tractor stop mechanism.
To fasten, fit tongue A into buckle
B until a sharp click is heard.
Adjust the belt snugly around the
hips, not the waist, allowing excess
webbing to be pulled back into re-
tractor.
To free yourself from the belt
restraint: simply press in buckle
button C.
Warning
Before fastening the belts make sure
the seats and headrests are properly
positioned.
Each belt is intended for use by
one adult or one child over 6 years
of age.
Occasionally, check that webbing
is in good condition.
In the event of an accident even
if the belt you were wearing is appa-
rently undamaged it is suggested
that you replace it with a new belt
assembly of the same type.
To keep belts clean, wash only,
using warm water and mild soap.
Rinse and dry thoroughly. Do not
use strong detergents and avoid any
chemical that may weaken the equip-
ment.
Users are warned to consult the
Manufacturers in case of doubt and
not to make any alterations of, or
additions to, seat belt assemblies
and/or anchorages.
11

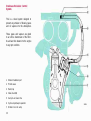
VENTILATION AND HEATING
Ventilation and heating are adjusta-
ble according to seasonal requirements.
To ensure best comfort to occu-
pants it is important to become familiar
with system controls and operation.
Admission of Heated or Fresh Air
Heater fan switch C is ener-
gized only when ignition key is in
position MAR.
Pressed in forward = High speed
Intermediate position = Off
Pressed in backward = Low speed
390 68
12

Lever D controls the air tempera- Defrosting end Demisting
ture.
Pulled all back - No heating of air
Pushed allforward - Maximum heating
of afr
Lever E controls the air volume.
Pulled all back - Maximum air flow
Pushed all forward - No admission
of air
Intermediate positions are used
especially when outdoor temperature
is low to limit the flow of cold air
around heater core.
Lever F controls the amount of air
flowing through windshield outlets A
and into front lower area through
console outlets B.
Pulled all back - Air flows through
outlets A only
Pushed all forward - Air flows through
outlets A and B
For quick defrosting of windshield,
pull back completely lever F, push
forward lever D and set lever E in an
intermediate position. Turn on the
heater fan by switch C.
Door window ventilators are
opened by pulling lever G and tur-
ning upward lock H.
Frost Precautions
If during cold weather the car must
remain inactive for some time at freez-
ing temperatures and the cooling
system is not protected with antifreeze
mixture, it will be necessary while
draining the radiator and Jackets
to empty also the heater core by
shifting lever D all forward.
Note: If heating proves inadequate,
operation of the thermostat on the line
from cylinder block to radiator must be
checked.

: ti|ll
til* Bftl J.s,
*»^ *{ *rr^5^ ^^^
• ** •*&£& ^ ^JStH
-
1
-
* *
!l
r
:
.;
1*
* *•
-
•
> * I 1 " '" •'•' -
1
• * * r ••
^^
! * i &?>*&!
* " r "* ^ """
M
* Itv
Wmgmm
^•
:
i •••••'•
J^ 1^" ^-.H
Si
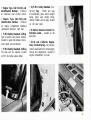
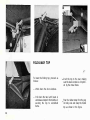
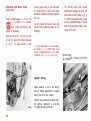
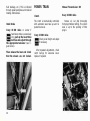
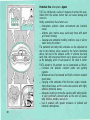
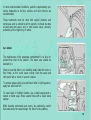
FOLD-AWAY TOP
To lower the folding top, proceed as
follows:
— Wind down the door windows.
— Pull down the two latch levers A
and release clamps B from latches C
securing the top to windshield
frame.
Push the top to the rear, making
sure the back window is not pinch-
ed by the metal frame.
Free the rubber strap from the peg
on body side and strap the folded
top as shown in the figure.
14

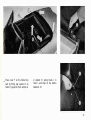
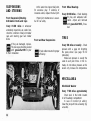
Place cover F on the folded top
well by fitting rear eyelets D on
hooks E (page 14) then catches G
in detents H, spring hooks I in
holes L and snap on the button
fasteners M.
15

38000
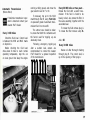
STARTING THE ENGINE
Cold Starts With Manual
Transmission
— Move gearshift lever to neutral.
— Depress clutch pedal, especially in
cold climates.
— Insert and turn ignition key clock-
wise to the stop, that is position
AW. As soon as engine is started
release key which will snap back to
position MAR.
Should the engine fail to start
return ignition key back to ST posi-
tion and repeat starting attempt.
— Do not step on accelerator pedal
until the engine is running smoo-
thly.
— Avoid sudden acceleration when
engine is cold.
Do not continue with repeated start-
ing attempts. If the engine fails to
start or stalls at idling have the fuel
injection and ignition systems checked
as soon as possible.
Cold Starts With Automatic
Transmission
Move the selector lever to HI or P
Engine starting is not possible with
the selector lever in any other po-
sition.
Then proceed according to manual
transmission instructions.
Hot Starts
For vehicles with manual and automatic
transmission turn ignition key without
touching accelerator pedal.
16

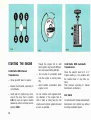
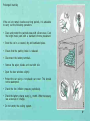
DRIVING THE CAR
Never maintain nor exceed the
maximum allowed speeds and do
not drive with tachometer pointer
steadily on the yellow sector.
Do not travel steadily for long
intervals at top speed in any gear.
All red indicator lights should be
out while driving.
Do not coast downhill with the
clutch pedal depressed, the transmis-
sion in neutral or the engine off, as the
marginal saving in fuel consumption
which may be derived from such
practice does not compensate for the
resulting loss in brake lining life and
driving safety which is provided by the
braking effect of the engine.
Remember that upon switching off
the engine, the brake servo is
deactivated and, therefore, braking
requires more effort.
Do not allow the engine to lug,
particularly when driving up steep
hills, but shift down in good time to
benefit from maximum engine pulling
power.
Do not ride the clutch, otherwise
slippage and damage will result.
Ensure that both the foot and
hand brakes are efficient at all times.
After a car wash apply the foot-brake
a few times so as to restore full
brake effectiveness.
Always apply the foot brake pro-
gressively. Remember that wheel lock-
ing, especially with an unladen car,
will result in dangerous skidding. In
case of emergency the hand brake may
be used to stop the car.
On wet or slippery roads hard
braking will increase the likelihood of
wheel locking and consequent inevi-
table loss of handling control. Instead,
use the engine braking effect by
engaging a gear lower than would
normally be required. Braking, if abso-
lutely unavoidable, should be gentle
and progressive and, in any case,
simultaneous with engine braking.
On icy roads drive slowly, turn
the steering wheel very gently, avoid
using the brakes, change gear smoothly
and do not drive with the clutch
pedal depressed. If the car starts
skidding release the accelerator pedal,
do not brake, but steer smoothly in
the direction of skid; as the car re-
gains its course straighten the wheels
and accelerate gently.
Always use tire chains or snow
tires before starting a journey on ice
or snow covered roads and remember
that while snow chains can be fitted
to the driving wheels only, studded
tires should be fitted to all wheels.
When driving in mist or fog during
daylight switch on the parking and
tail lights: do not use the high beams.
17

Before turning or changing lanes,
in addition to giving the correct signals
glance in the mirrors to ascertain the
intentions of the drivers behind you.
Before cutting back into your lane
after overtaking a vehicle wait until
it appears in your inner mirror.
At night when meeting oncom-
ing traffic, keep your eyes on the
right side of the road rather than
looking straight into the approaching
headlights or other light sources: you
will avoid being blinded.
RECOMMENDED
SHIFTING SPEEDS
1st-2nd 2nd-3rd 3rd-4th 4th-5th
15 mph 25 mph 40 mph 45 mph
Note: In any case the maximum speed
listed on page 62 should never be exceeded.
PARKING
Always apply the hand brake when
parking and if on a grade, for added
safety also shift into first or reverse
depending on whether the car is
heading up- or downhill.
When the car is left in dark areas
always turn on the parking lights:
lighting switch pressed halfway in
at bottom.
18
Page is loading ...
Page is loading ...
Page is loading ...
Page is loading ...
Page is loading ...
Page is loading ...
Page is loading ...
Page is loading ...
Page is loading ...
Page is loading ...
Page is loading ...
Page is loading ...
Page is loading ...
Page is loading ...
Page is loading ...
Page is loading ...
Page is loading ...
Page is loading ...
Page is loading ...
Page is loading ...
Page is loading ...
Page is loading ...
Page is loading ...
Page is loading ...
Page is loading ...
Page is loading ...
Page is loading ...
Page is loading ...
Page is loading ...
Page is loading ...
Page is loading ...
Page is loading ...
Page is loading ...
Page is loading ...
Page is loading ...
Page is loading ...
Page is loading ...
Page is loading ...
Page is loading ...
Page is loading ...
Page is loading ...
Page is loading ...
Page is loading ...
Page is loading ...
Page is loading ...
Page is loading ...
Page is loading ...
Page is loading ...
-
 1
1
-
 2
2
-
 3
3
-
 4
4
-
 5
5
-
 6
6
-
 7
7
-
 8
8
-
 9
9
-
 10
10
-
 11
11
-
 12
12
-
 13
13
-
 14
14
-
 15
15
-
 16
16
-
 17
17
-
 18
18
-
 19
19
-
 20
20
-
 21
21
-
 22
22
-
 23
23
-
 24
24
-
 25
25
-
 26
26
-
 27
27
-
 28
28
-
 29
29
-
 30
30
-
 31
31
-
 32
32
-
 33
33
-
 34
34
-
 35
35
-
 36
36
-
 37
37
-
 38
38
-
 39
39
-
 40
40
-
 41
41
-
 42
42
-
 43
43
-
 44
44
-
 45
45
-
 46
46
-
 47
47
-
 48
48
-
 49
49
-
 50
50
-
 51
51
-
 52
52
-
 53
53
-
 54
54
-
 55
55
-
 56
56
-
 57
57
-
 58
58
-
 59
59
-
 60
60
-
 61
61
-
 62
62
-
 63
63
-
 64
64
-
 65
65
-
 66
66
-
 67
67
-
 68
68


Ask a question and I''ll find the answer in the document
Finding information in a document is now easier with AI
Related papers
-
Fiat 2017 124 Spider Owner's manual
-
Fiat 124 Spider 2019 Owner's manual
-
-
-
-
-
-
-
-
Other documents
-
Porsche 944 Owner's manual
-
-
Chevrolet 1986 Corvair Owner's manual
-
BMW 335i xDrive Owner's manual
-
 Alfa Romeo 2015 4C Owner's manual
-
Volkswagen Golf GTI 2015 Owner's manual
-
-
Mini 2022 HARDTOP 4 DOOR Owner's manual
-
-
