Hotpoint-Ariston Microwave Oven Owner's manual
- Category
- Microwaves
- Type
- Owner's manual
This manual is also suitable for

IT
GB FR
ES
PT NL
Italiano, 1 English, 22 Français, 43
Espagnol, 64 Português, 85 Néerlandais, 106
GB
IInnssttrruuccttiioonn mmaannuuaall
Contents
Notices to the user, 23
Notices to the user, 24
Installing your appliance, 25
General description, 26
The control Panel, 27
Setting the clock / Microwave power
settings, 28
The display, 29
The selector knobs / Programming, 30
Microwave programming, 31
The speed defrost function, 32
The grilling rack * / The grill function *, 33
Programming the grill * /
the microwave + grill function *, 34
The pizza function *, 35
The pizza function *, 36
The pizza dish *, 37
Linked programmes, 38
Recommendations, 39
Care & cleaning, 40
Troubleshooting guide, 41
After Sales Service, 42
Important safety instructions.
Read carefully and keep for future reference.
MICROWAVE OVEN
* for certain models

23
GB
NNoottiicceess ttoo tthhee uusseerr
Important:
Keep this user guide with your appliance. If the
appliance is ever sold or transferred to another
person, ensure that the new owner receives the user
guide. Please become familiar with these
recommendations before installing and using your
appliance. They were written for your safety and the
safety of others.
• SAFETY RECOMMENDATIONS
Your appliance is designed for standard household
use for cooking, reheating and defrosting foods. The
manufacturer declines any responsibility in the case
of inappropriate use.
The appliance is not intended to be used by
persons (including children) with reduced physical,
sensory or mental abilities, or persons lacking
experience or awareness, unless using it with the
help of a person responsible for their safety, or
under supervision and with prior instruction in its
use.
Ensure that the cookware is suitable for use in a
microwave oven.
To avoid damaging your appliance, never operate it
while empty or without the turntable.
Do not interfere with the openings on the lock on
the front of the appliance; this could cause damage
to your appliance that would require a service call.
The seal and frame of the door must be regularly
examined to ensure that they have not deteriorated.
If these areas are damaged, discontinue use of the
appliance and have a specialised technician check
it.
While heating food items in plastic or paper
containers, monitor the microwave’s contents for
there is a risk of spontaneous combustion.
For the microwave and microwave + fan heating
functions, the use of metallic cookware, forks,
spoons, knives or metal staples or fasteners for
frozen foods is not recommended.
The contents of baby bottles and baby food jars
should be shaken or stirred and their temperature
checked before consumption to avoid burns.
Never heat a baby bottle with the nipple on (risk of
explosion).
Make sure children do not play with the appliance.
Do not allow children to use the microwave oven
without supervision, unless appropriate instructions
have been given so that the child can use the oven
safely and understands the dangers of incorrect
operation.
Always use oven mitts to remove dishes from the
oven. Some dishes absorb the heat of foods and,
therefore, are very hot.
Liquids and other foods should not be heated in
sealed containers because they may explode.
It is recommended that you avoid heating eggs in
their shells and whole hard-boiled eggs in the
microwave oven because they run the risk of
explosion, even after cooking is complete.
Heating beverages in the microwave oven can
cause sudden and/or delayed splattering of boiling
liquid, so precautions must be taken when handling
their containers.
In the case of small quantities (a sausage, a
croissant, etc.) place a glass of water next to the
food.
Excessive cooking times may dry out foods and
carbonise them. T
o avoid such incidents, never use
the same times recommended for cooking in a
traditional oven.
If smoke appears, stop or unplug the oven and
leave the door closed to smother any flames that
may appear
.

24
GB
NNoottiicceess ttoo tthhee uusseerr
• OPERATING PRINCIPLE
The microwaves used for cooking are electro-
magnetic waves. They are commonly found in our
environment in the form of radio-electric waves,
light or infrared rays.
Their frequency is in the 2450 MHz range.
Their behaviour:
• They are reflected by metals.
• They travel through all other materials.
• They are absorbed by water, fat and sugar
molecules.
When food is exposed to microwaves, its molecules
begin moving rapidly, which causes heating.
The penetration depth of waves into the food is
approximately 2.5 cm; if the food is thicker, the core
of the food will be cooked by conduction, as in
traditional cooking.
It is valuable to note that the microwaves trigger
within the food a simple thermal phenomenon and
that they are not harmful to one’s health.
• PROTECTING THE ENVIRONMENT
This appliance’s packing materials are recyclable.
Recycle them and play a role in protecting the
environment by disposing of them in municipal
containers provided for this purpose.
Your appliance also contains various
recyclable materials. Thus it is stamped
with this logo to indicate to you that used
appliances should be mixed with other
waste. The recycling of appliances
organised by your manufacturer will take
place under the best conditions, in compliance with
European directive 2002/96/CE concerning electrical
and electronic equipment waste. Consult your city
hall or your retailer to find the drop-off points for
used appliances that is nearest to your home. We
thank you for your help in protecting the
environment.
Fig.01

25
GB
IInnssttaalllliinngg yyoouurr aapppplliiaannccee
•
•
BEFORE HOOK-UP
Warning:
Ensure that your appliance has not suffered
any damage during transport (deformed seal or
door, etc...). If you see any kind of damage,
before doing anything else, contact your retailer.
In order to easily locate the reference information
for your appliance, we recommend that you note
these data on the “After-Sales Service
Department and Customer Relations” page.
• ELECTRICAL CONNECTION
Ensure that:
- The electrical installation has sufficient voltage.
- The electrical wires are in good condition.
- The dia meter of the wires complies with the
installation requirements.
- Your electrical installation is equipped with 16-
ampere thermal-sensitive protection.
In case of doubt, consult your electrician-installer.
The electrical connections are made before the
appliance is installed in its housing.
Electrical safety must be provided by a correct
build-in. During installation and maintenance
operations, the appliance must be unplugged from
the electrical grid; fuses must be cut off or removed.
The oven must be connected with a power cable
(standar
dized) with three 1.5 mm2 conductors (1 ph
+ 1 N + ground) that must be connected to a
monophase 220-240 V network via a CEI 60083
standardised receptacle (1 ph + 1 N + ground lead)
or in accordance with installation rules. The safety
wir
e (green-yellow) is connected to the appliance’s
terminal and must be connected to the ground
lead of the electrical set-up.
In the case of connections with an electric
receptacle, it must remain accessible after
installation of the appliance.
The oven’s neutral conductor (blue wire) must be
connected to the network’s neutral conductor.
In your electrical installation, allow for a user-
accessible device that must be able to separate the
appliance from the main power supply and whose
contact opening is at least 3 mm above all the
terminals.
If the power cable is damaged, it should be
replaced by the manufacturer, its after-sales service
department or by a qua lified person to avoid
danger.
Warning:
We cannot be held responsible for any
accident resulting from an inexistent, defective
or incorrect ground lead.
If the oven malfunctions in any way, unplug the
appliance or remove the relevant fuse at the
oven’s connection lead-in.

26
GB
l
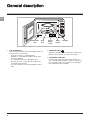
THE TURNTABLE :
ensures equal cooking of food throughout with no
need to stir or turn the dish.
- It may be used as a cooking platter.
- Rotation is controlled by the drive shaft and
the wheel support.
- The turntable revolves in both directions.
- If it does not turn, verify that all components
are properly positioned.
- For easy removal, wells are provided on either
side.
l
TURNTABLE OFF :
stops the turntable from revolving in order to use
platters which require the entire oven space.
l
THE WHEEL SUPPORT :
Do not try to rotate the roller ring manually, as
you could damage the drive system. If it does not
turn smoothly, make sure that there is nothing in
the well beneath the turntable.
GGeenneerraall ddeessccrriippttiioonn
Speed
Defrost
sticker
TurntableDrive
shaft
Wheel
support
Identification
label
R
éf. 1216560

27
GB
Display window :
to simplify programming, the display indicates : the time of day,
the types of food and functions, the minutes / seconds, or
weight programmed.
The selector knob :
to choose the food type or function.
The selector knob :
to choose the programme time or weight.
The “AUTO” keys :
automatically set the appropriate pro-gramme time according to
the weight and the selected food type.
The MODE key :
to choose the appropriate function.
The GRILL/PIZZA key
*
:
to directly programme the grill / microwave + grill / pizza
function.
The KEEP WARM key:
to keep your dish warm.
The PAUSE/CANCEL key C:
to interrupt (press once) or cancel a programme (press twice).
Also used to set the clock.
Stop-Turntable key :
to stop the turntable from revolving.
START key :
to start all programmes.
DOOR OPEN button :
pr
ess this button to open the door or stop the appliance.
CCoonnttrrooll ppaanneell
* for certain models

28
GB
After first plugging in your microwave oven or after a power outage,
the clock reads 00:00 and the two dots flash.
To set the clock :
- Press the PAUSE / CANCEL key C for 5 seconds.
"00:00" flashes, and a tone sounds requesting the hour be set.
- Turn the selector knob to display the correct time .
- Validate by pressing the PAUSE / CANCEL key C.
Your clock is set.
SSeettttiinngg tthhee cclloocckk
00:00
00:00
12:00
MMiiccrroowwaavvee ppoowweerr sseettttiinnggss
power setting APPLICATION
DEFROST
150 W
SIMMER
500 W
HEAT
700 W
HIGH
COOK
900 W
To defrost all frozen food or to top off cooking of delicate
dishes or to cook very slowly.
T
o cook fish and poultry. To finish programmes begun with
the HIGHCOOK power setting, for instance beans, lentils, or
dairy products.
(This power setting is available when you programme the
function using the mode key ).
To heat up all liquids and all fresh or frozen
pre-cooked dishes.
To cook vegetables and soup.
Microwave output power : 900 W

29
GB
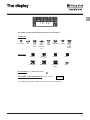
TThhee ddiissppllaayy
The display and the selector knobs guide you in your choice of :
les aliments
functions
DEFROST SIMMER REHEAT COOK
KEEP WARM
LOW GRILL HIGH GRILL MICROWAVE PIZZA
+ GRILL
the weight for an AUTO pr
ogramme
the length of the programme (or time of day)
The food type or function being selected will flash in the display.
+
--
+
--
Craquine
12:00
beverages
+
--
+
--
Craquine
beef,
lamb
+
--
+
--
Craquine
vegetables
+
--
+
--
Craquine
poultry
+
--
+
--
Craquine
frozen
ready-
made
dishes
+
--
+
--
Craquine
fresh
ready-
made dis-
hes
+
--
+
--
Craquine
pork,
veal
turkey
+
--
+
--
Craquine
fish
+
--
+
--
Craquine
12:30

30
GB
The 2 selector knobs are used for the various programmes:
The first to select :
- the food type
- the function
the second to programme :
- the length of the programme
- the weight of the food
TThhee sseelleeccttoorr kknnoobbss
FOOD
TYPE / FUNCTION
TIME / WEIGHT
PPrrooggrraammmmiinngg
Your microwave oven is now plugged in and the
c
lock is set.
Open the door
. Set the dish inside, close the door. If
the door is nor properly shut, the appliance will not
operate.
l
3 beeps announce the end of a programme. The
beeps ar
e r
epeated every minute for 10 minutes
until you open the door.
l
If you think ther
e is insufficient space for the dish
to turn freely inside the oven, press the stop
turntable key before or during the
pr
ogramme.
l
If there is an error in the programming, press the
cancel key C twice.

31
GB
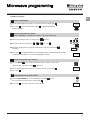
Available programmes :
Express programming
▼
▼
Set the desired programme length (ex. 2 minutes) with the selector knob .
▼
▼
Press start . The maximum power setting is programmed directly
for quick reheating.
MMiiccrroowwaavvee pprrooggrraammmmiinngg
Automatic programming by weight :
with the AUTO keys
, the programme length is calculated
automatically.
▼
▼
Choose the food type with the selector knob (ex. fish).
▼
▼
Press one of the microwaving keys
,
or (ex. COOK ).
▼
▼
50g blinks; programme the weight of your food item using the selector knob
(ex. 500 g).
▼
▼
Press start . The appropriate power level is programmed, the adequate programme length
is displayed automatically (ex. 5 min) and the programme begins.
Automatic programming by function
▼
▼
Press the MODE key to select the desired function, ex. press 4 times for the
SIMMER function. The SIMMER symbol is displayed.
▼
▼
Set the desired programme length (ex. 5 minutes), with the selector knob .
▼
▼
Press start .
Pr
ogramming the keep warm function
▼
▼
Press the KEEP WARM key, 10:00 is displayed, the symbol flashes.
You may shorten the time with the selector knob .
▼
▼
Press start Your dish is kept warm for ten minutes.
2:00
500
+
--
+
--
Craquine
5:00
+
--
+
--
Craquine
5:00
1 0 : 0 0

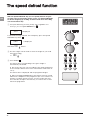
With the Speed DEFROST key you can quickly defrost all types
of frozen food. To guarantee quality results, use Speed DEFROST
for dishes weighing up to 500g. To defrost food items over 500g,
use the microwave key.
1 For quick defrosting of meat, poultry, fish, vegetables and
beverages, press the Speed DEFROST key :
is displayed.
For quick defrosting of bread, rolls and pastry, press the Speed
DEFROST key twice :
is displayed.
Wait until flashes.
2 Use the weight selector knob to enter the weight of your food
item (up to 500g).
ex.
3 Press START .
The defrost time corresponding to the given weight is
automatically calculated.
l
Necessary time may vary according to the initial temperature
of the food (the defrost times were calculated for food frozen at
-18°C).
The defr
ost time is displayed and the programme begins.
l
When using Speed DEFROST or the defrost function a beep
indicates the midpoint of the programme (the oven continues to
operate). T
o obtain the best results, turn the food at this time,
close the door and press the Start key to continue the second
half of the programme.
+
--
+
--
Craquine
40 0
+
--
+
--
Craquine
1 0 0
TThhee ssppeeeedd ddeeffrroosstt ffuunnccttiioonn
32
GB
S 1
j
-
S 2
j
-

33
GB
Make sure that the rack is always well centered on the turntable.
Never use any metal dish with the rack with the microwave, grill + microwave or fan + microwave functions.
Nevertheless you may heat up food in an aluminium tray if you place a plate between the tray and the rack.
The folding rack :
To fold down the rack :
push in on the protruding hooks
and fold in the stands
with the Grill or Grill + Microwave functions :
choose the rack level according to the dish
you wish to grill
- high position to brown dishes which are rather flat
- low position as required for other dishes.
with the fan* or fan* + microwave functions :
always set your dishes on the rack folded down
to the low position.
TThhee ggrriilllliinngg rraacckk **
The 2 level rack
low
position
(folded)
➡
➡
➡
➥
➥
high
position
TThhee ggrriillll ffuunnccttiioonn **
This function enables you to brown dishes such
as gratins or meat.
It may be used before or after
cooking, as called for in the recipe.
l After grilling make sur
e to use an oven mitt to
handle dishes, and r
emember to use only
ovenproof cookware such as ceramic dishes or
heat r
esistant glass.
l For those models featuring the fan function, 2
grilling levels are available :
HIGH GRILL
and
LOW
GRILl . As a rule,
use the HIGH GRILL level to grill meat and fish
and the LOW GRILL level to brown delicate
dishes.
l WARNING : certain exposed parts may heat up
during use of the grill. Be sur
e to keep children
away.
* for certain models

34
GB
Using the 2 level grill
▼
▼
Press the
key once to choose the
LOW GRILL
,
twice to choose the
HIGH GRILL .
▼
▼
Set the desired programme length with the selector knob and press start
.
PPrrooggrraammmmiinngg tthhee ggrriillll **
TThhee mmiiccrroowwaavvee ++ ggrriillll ffuunnccttiioonn **
This function enables you to use the microwaves and grill simultaneously, for rapid cooking.
Using the microwave + grill function
▼
▼
Select the microwave + grill function by pressing the key 4 times.
An intermediate microwave power level together with the high grill are programmed.
▼
▼
Set the programme length with the selector knob , ex. 10 min.
▼
▼
Press start .
10:00
* for certain models

35
GB
With the PIZZA function you can save time and
energy cooking your favorite dishes and have them
turn out as crispy, tasty and golden brown as if
cooked in a traditional oven.
l Use of the PIZZA key together with the PIZZA
dish, allows you to use the grill and microwave
functions simultaneously.
l The PIZZA dish features a special coating that
absorbs microwaves through its bottom.
l It radiates heat from below the food to cook or
reheat it, giving it the required color and
crispness while the grill browns the top.
2 cooking methods :
l Without preheating - by using the PIZZA function
you can cook and brown most frozen meals and
fresh, dough-based dishes without preheating the
PIZZA dish. They turn out as crispy as if cooked
in a traditional oven.
l With preheating - the PIZZA dish can be
preheated using the PIZZA key for a maximum of
2 minutes. Preheating is recommended to cook or
brown small pieces of meat or fish and some
dough-based, frozen and take-out dishes.
Recommendations :
l Take foods out of their metallic or plastic
packaging before cooking or reheating them with
the PIZZA function.
l It is advisable to program shorter cooking times
and extend if necessary.
l All foods with a skin or wrapping, such as
potatoes and sausages, must be pierced before
cooking.
l Make sure pieces of meat are completely thawed
out and dried off before searing with the PIZZA
function.
l Keep an eye on the food’s coloring, just as you
would with a traditional oven.
l Protect your hands when taking out the dish
because it can be extremely hot.
l Do not serve stuffed foods (apple pastry for
example) too quickly because they can be warm
on the surface whereas the filling is extremely
hot.
l Cooking or reheating of eggs with the PIZZA
function is prohibited.
l If you wish to cook several dishes consecutively
with the PIZZA function, allow the oven to cool 10
minutes between dishes for better browning.
TThhee PPIIZZZZAA ffuunnccttiioonn **
* for certain models

36
GB
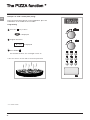
Example : to cook a frozen pizza (350 g)
Place the frozen pizza directly on the PIZZA dish, place the
PIZZA dish on the middle of the turntable.
Programming
11
Press the key 3 times :
is displayed
22
Program 6 minutes
is displayed
33
Press START .
the turntable revolves, the oven light comes on.
➤
Be sure and use an oven mitt to remove the pizza dish.
6:00
+
--
+
--
Craquine
TThhee PPIIZZZZAA ffuunnccttiioonn **
* for certain models

37
GB
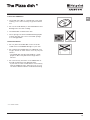
Care of the PIZZA dish
l The inside of the dish is covered with a non-stick
coating, so it is not necessary to grease it before
use.
l Do not cut foods directly in the PIZZA dish as this
damages the non-stick coating.
l The PIZZA dish is dishwasher-safe.
l Use a sponge, hot water and dishwashing liquid
to wash the dish. Do not use a metallic sponge
or scouring powder.
Recommendations
l Do not place the PIZZA dish on the rack; this
could cause irremediable damage to your oven.
l Do not place the PIZZA dish in a traditional oven,
on gas, electric or other stoves or on any very hot
surface.
- The PIZZA dish may be preheated for certain
purposes but never preheat for longer than 2
minutes.
l Do not leave any utensils in a hot PIZZA dish as
the high temperature may damage them.
- If you wish to cook several dishes consecutively
with the PIZZA function, allow the oven to cool
10 minutes between dishes for better browning.
TThhee PPiizzzzaa ddiisshh **
The PIZZA dish
POWDER
* for certain models

38
GB
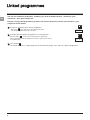
You may link 2 different programmes, combining any of the available functions : microwave / grill /
microwave + grill / pizza / keep warm.
Example : Using linked programming to defrost ten minutes followed by simmer level microwave + grill
programme for 20 minutes
11
Proceed as if setting only a defrost programme :
- press the key and select the defrost function
- set the programme time (ex. 10 min).
22
Instead of pressing START, programme the next operation :
- press the grill key 4 times to select the microwave + grill function
- set the programme length by adding the microwave + grill time (ex. 20 min)
to the defrost time.
33
Press START .
The linked microwave + grill programme will automatically begin at the end of the defrost programme.
LLiinnkkeedd pprrooggrraammmmeess
10:00
20:00

39
GB
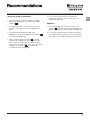
WHILE THE OVEN IS OPERATING :
l You may stop or start the turntable revolving
during a programme by pressing the turntable
stop key .
l To change the food type or function selection,
press the cancel key C twice and programme
again.
l If you open the door before the end of the
programme, shut the door and press the start key
to continue the programme.
l When using the defrost function , a beep
indicates the mid-point of the programme (the
oven continues to operate); to obtain the best
results, turn the food at this time, close the door
and press the start key to continue the
second half of the programme.
l If you remove a dish before the end of the
programme, press the cancel key C twice to
erase the programme.
REMARKS :
l If you wait longer than 4 minutes to press the
start key after having entered a programme, it
will be cancelled (the clocktime will be displayed).
l If you wish to defrost frozen food after using one
of the grill functions, for better results, first let the
microwave oven cool down for about ten minutes.
RReeccoommmmeennddaattiioonnss

40
GB
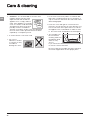
l WARNING : It is recomended to clear the oven
regularly and to take any food
deposit inside and outside the
appliance.Use a soapy and wet
cloth. If the appliance is not kept
clean, its surface could deteriorat
and adversely affect its life and
possibly result in a hazardous
situation. If the door or door seals are damaged,
the oven must not be operated until it has been
repaired by a competent person.
l A steam cleaner is not to be used.
l Do not use
abrasives, alcohol
or solvents as they
are liable to
damage the oven.
l In the event of unsavory odors or caked-on dirt,
boil water containing lemon juice or vinegar in a
cup for 2 minutes and clean the walls with a little
dishwashing liquid.
l For those ovens with grill or convection heat
functions, the top and rear air vents become very
hot. Do not touch these parts after use; wait till
the appliance has cooled down in order to clean
it. Use a fine steel wool pad on the metal parts.
l The turntable can
be removed for
cleaning. Wells are
provided on both
sides for easy
access.
If you remove the drive shaft, do not allow water
to enter the motor shaft hole.
Be sure to put the turntable, the drive shaft and
the wheel support back in their proper place.
CCaarree && cclleeaanniinngg
SOAP
+
WATER

41
GB
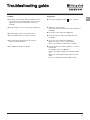
Problem
▼ The time counts down, but the appliance does
not function (the turntable does not rotate, the
light does not come on and the food is not
heated).
▼ The microwave oven is noisy when operating.
▼ Condensation forms on the door glass.
▼ The turntable does not revolve correctly.
▼ The microwave programmes do not pro-
duce the desired results.
▼ The appliance produces sparks.
Suggestion
▼ Press the turntable off key for 5 seconds.
▼ Adjust the front left foot.
Clean the wheels and the well area beneath the
turntable.
▼ Clean the vents under the appliance.
▼ Clean the wheels and the well beneath the
turntable.
▼ Clean the vents under the appliance.
Make sure that you use only containers
which are suitable for microwave cooking.
▼ Check whether the wheel support is correctly
positioned.
Thoroughly clean the appliance :
remove any greasy deposits, cooking residue,
etc...
Move any metal objects away from the oven
walls.
Never use metallic containers with a rack.
TTrroouubblleesshhoooottiinngg gguuiiddee
Page is loading ...
-
 1
1
-
 2
2
-
 3
3
-
 4
4
-
 5
5
-
 6
6
-
 7
7
-
 8
8
-
 9
9
-
 10
10
-
 11
11
-
 12
12
-
 13
13
-
 14
14
-
 15
15
-
 16
16
-
 17
17
-
 18
18
-
 19
19
-
 20
20
-
 21
21


Hotpoint-Ariston Microwave Oven Owner's manual
- Category
- Microwaves
- Type
- Owner's manual
- This manual is also suitable for
Ask a question and I''ll find the answer in the document
Finding information in a document is now easier with AI
Related papers
Other documents
-
Groupe Brandt ME240XE1 Owner's manual
-
-
M-system MCM 450 Owner's manual
-
Caple CM101 User manual
-
Groupe Brandt ME1040X Owner's manual
-
Groupe Brandt SME1138X Owner's manual
-
Groupe Brandt ME640XE1 Owner's manual
-
Groupe Brandt MM420BE1 Owner's manual
-
-