Page is loading ...

1
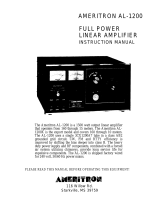
Mirage B 1018 G
This compact, rugged, VHF RF power amplifier greatly improves signal-quality and
range. This unit contains a low-noise GAsFET receiving amplifier, a 160-watt power
amplifier, and associated control and protection circuitry.
This amplifier operates from any well-filtered direct-current 11-15 volt power source
capable of supplying 30 amperes under full-load. The power source must be either
negative grounded or totally ground independent.
Warning, never use this unit with:
1.) positive-ground supplies
2.) vehicles having positive-ground batteries
3.) power sources exceeding 16 volts
Always fuse power leads at the battery with 30-ampere fast-blow fuses.
This amplifier has the following important features:
1.) Automatic RF actuated transmit and receive switching or manual switching
2.) Active bias for greatly improved SSB linearity
3.) Low-noise GAsFET receive preamplifier
4.) True push-pull circuitry and clean RF layout for excellent stability
5.) Excess SWR and overdrive protection
6.) Remote control capabilities

2
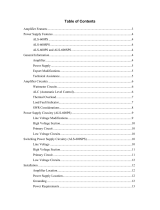
Table of contents
0.0 Quick Connect
Important: Read this section first!
1.0 Mounting Considerations
1.1 Cooling and Temperature
1.2 Power Wiring
1.3 RF and Controls Cables
1.4 Mobile Mounting Conderations
1.5 Home or Fixed Installations
1.6 Repeater Mounting
2.0 Radio or Exciter
2.1 Drive Level
2.2 Duty Cycle
2.3 T/R Control or “Keying”
2.4 Wiring
3.0 FM, CW and Non-Linear Modes
3.1 Drive Power
3.2 Duty Cycle CW and FM
3.3 Feedlines and Antennas
4.0 SSB and Linear modes
4.1 Splatter and Distortion
4.2 Drive Power
4.3 Duty Cycle
4.4 T/R Control or Switching
4.5 Power Output
4.6 Antennas and Feedlines
5.0 Receiving Preamplifier (Pre-Amp)
5.1 Signal-to-noise Ration
5.2 Intermodulation (IMD) Products
6.0 In Case of Difficulties
6.1 Does Not Transmit or Receive at All
6.2 Nothing Lights or Seems to Work
6.3 Transmit OK, Does Not Amplify Receive
6.4 Receives OK, Does Not Amplify Transmit
6.5 Continuously Trips Fault Light
6.6 Relay Chatters or Clicks Off and On
6.7 Technical Assistance
6.8 Ordering Parts
7.0 Notes
8.0 Schematic

3
0.0 QUICK CONNECT
1.) Mount or place the amplifier in a cool area. The best mounting position will place the long
length of heatsink fins vertical.
The amplifier must have sufficient cool air supply. Do not mount in confined or hot
locations, or where exposed to moisture.
2.) Connect the power leads to the battery or power supply.
Be sure to fuse the red positive-lead at the battery or power supply with a 30-ampere fuse.
The red lead must always be positive, with an operating voltage of 12-15 Vdc. We do NOT
recommend connecting the black lead directly to a vehicle battery terminal. Connect the
black lead to the vehicle’s chassis with a good solid connection.
3.) Connect the radio to the UHF-style female RADIO connector with any length or type of
good-quality 50-ohm coaxial cable.
Any size or length 50-ohm coaxial cable will work on the INPUT, just be sure the jumper is
good.
4.) Connect the antenna (or power meter) to the ANTENNA connector through any length of
good-quality 50-ohm coaxial cable capable of handling 200 watts of power.
Any size or length 50-ohm cable will work, as long as losses are acceptable. The cable must
safely handle 200 watts at 150 MHz. Be sure connectors are installed and soldered
properly!
5.) The switches in this unit are self-explanatory. They are MODE, PRE-AMP, and POWER.
a.) The MODE switch adds time to the transmit-relay in the SSB/CW position. This allows
SSB or CW operation without excessive relay chatter or word chopping. It is normally
not necessary to use the SSB/CW mode position when using the RELAY port for relay
control.
b.) The PRE-AMP switch adds a low-noise receiver pre-amplifier, which improves signals if
receiver gain is marginal. In congested areas, it may be advisable to NOT use the pre-
amp to reduce receiver overloading.
c.) The POWER switch controls the transmitting amplifier, and resets any overloads.
6.) The FAULT light illuminates whenever excessive drive power from the radio is applied, or
reflected power from the antenna exceeds a preset value. This light indicates the protection
circuits have locked-on, preventing the amplifier from keying.
If the FAULT indicator is on, you must check drive power and antenna reflected
power. Drive power must be below 10 watts and Reflected power must be below
20 watts (at full output). If SWR is over 2:1, it is unacceptable to run this unit at full
power.

4
1.0 MOUNTING CONSIDERATIONS
To insure long life and optimum performance, pay careful attention to mounting and wiring. This
unit has rubber feet for use where movement is not a problem.
Warning, never install this unit in areas where:
1.) ambient temperatures exceed 110°F (43°C)
2.) exposed to moisture, excessive dust, or dirt
3.) subjected to mechanical shock or vibration
1.1 COOLING AND TEMPERATURE
Reduced operating temperatures almost always extend the life of electronic components.
If the heatsink becomes uncomfortable to touch, the amplifier may require additional cooling.
Heatsink temperatures above 140°F indicate the need for additional cooling, such as re-mounting
the amplifier in a cooler location or the addition of a small fan blowing on the heatsink. Mirage
has a cooling kit, P/N FK-18. This kit includes a 12 Vdc fan and mounting bracket.
Note: As temperature in the mounting area increases, especially if air is not moving, cooling
becomes less effective and the amplifier will “run hotter”. If cooling is a problem, the
largest change will come from forcing air over the heatsink with a small fan.
The heatsink in this amplifier is sized for ICAS operation at 160 watts carrier output with a 33%
long-term duty cycle. Do not exceed 5 minutes total accumulated transmitting time without ten
minutes of total accumulated resting time. This is a rough guideline; actual duty-cycle limitations
depend on many factors.
On SSB and AM, because power is greatly reduced, the duty cycle is much longer. The general
guideline is to watch the heatsink temperature, and improve cooling or reduce duty cycle if the
heatsink is uncomfortable to touch.
If possible, especially if cooling might be marginal and there is no external air blowing across the
heatsink, mount the amplifier with heatsink fins vertical. This allows natural convection to
circulate air.
1.2 POWER WIRING
This amplifier has two main power leads. The red lead connects to the floating (not grounded)
positive 12-15 Vdc battery or power supply terminal. The black lead is the negative lead. It is
grounded inside the amplifier, and is common with the metal case and all connector grounds.

5
To reduce fire hazards or the chance of equipment damage, the red lead must always be fused
with a 30-ampere fuse at the battery. Some power supplies have internal current protection.
Power supplies without current limiting must be protected by properly sized fuses located at the
supply.
The black lead should connect to the negative terminal through the vehicle chassis. We do not
recommend connecting the black lead directly to a battery post.
The heavy RED conductor and black battery return and/or chassis ground conductors carry full
operating-current. This current can reach 30 amperes. For maximum power output, it is
important to minimize the voltage drop along these conductors. For maximum output power, all
high current leads (including the ground lead) should be kept as short as reasonably possible. Be
sure connections are good. Never extract this power from under-dash wiring, unless the vehicle
manufacturer tells you it is safe.
A fuse is must always be installed at the battery to prevent wiring fires. If a fuse is not added,
you run the risk of a fire if the wiring is accidentally shorted between the battery and amplifier.
NEVER omit this fuse, no matter how safe you think it is!
Suitable fuses and holders are generally available from electronics, car stereo, and automotive
parts stores. This device requires a 30-ampere fuse.
The following chart gives the approximate peak voltage drop in volts per foot of a single supply
wire with 30 amperes of current. This chart assumes the negative return to the battery (through
the vehicle chassis) has the same resistance as the positive lead, or that a home power supply uses
equal length and size conductors for positive and negative (ground) leads.
AWG
(single conductor)
Voltage Drop
at 30 amps
Maximum Length For Full
Performance
10 gauge 0.03 V/ft 8 ft.
8 gauge 0.02 V/ft 12 ft.
6 gauge 0.011 V/ft 23 ft.
4 gauge 0.007 V/ft 36 ft.
For best performance, voltage drop in high-current positive and ground leads should be limited to
0.5 volts or less at maximum current of 30 amperes.
1.3 RF AND CONTROL CABLES
Length of RF and control cables is not critical.
The RADIO connector of this amplifier is a SO-239 (UHF Female). UHF-style connectors are
perfectly fine at frequencies below UHF, and have almost immeasurable loss at VHF and lower.
The amplifier input is matched for 50-ohms, and the amplifier is very stable. The input cable can
be any reasonable length, as far as the amplifier is concerned.

6
The ANTENNA connector is a SO-239 (UHF Female). The design load impedance is 50-ohms,
and any load with a VSWR under 2:1. The output cable must safely handle the full power of the
amplifier, and must have good connections.
Be sure connectors are installed and soldered properly, and the coaxial cables are of reasonably
good quality.
Control cables can be any length, within reason, because current is low.
The RELAY jack is used to manually place the amplifier in the transmit-mode when it is pulled
low (to ground). It is a conventional phono female connector (also called “RCA jack”). This
type of connector is common with VCR’s and other consumer electronic devices.
The current from this jack is less than 100 mA, and the open circuit voltage is less than 15 volts.
There are no damaging back-pulses from this jack, it is fully buffered. Never apply voltage to
this jack.
1.4 MOBILE MOUNTING CONSIDERATIONS
A.) Location
Do not locate this amplifier in excessively warm locations, near heater vents, or in unventilated
areas with ambient temperatures exceeding 120 degrees Fahrenheit. Do not install this amplifier
in damp or wet locations. Be sure air can circulate freely around the amplifier. Do not cover the
heatsink. The best location for this unit is a well-ventilated area inside the passenger
compartment. If the trunk area doesn’t get too hot, it can also be a suitable location. Engine
compartments should never be used to house this amplifier!
If possible, mount the amplifier with the LONG length of heatsink fins vertical. This will allow
natural convection to circulate air deeply through the cooling fins. See section 1.1 for details on
temperature.
B.) Wiring
Make sure wiring is installed so wires are not pinched or cut. The length of high-current power
and ground return leads is very important. Keep the heavy dc power-leads short as the
installation permits. This includes the ground lead to the battery or the vehicle's chassis.
Warning, all leads power must be fused at the battery! NEVER depend on fuses
inside the unit for fire protection.
1.) Use a 30 ampere fast-blow fuse at the battery positive connection
2.) Ground the negative lead to a good ground on the vehicle’s sheet metal
3.) Never obtain main supply power from under-dash vehicle wiring
If the negative lead is connected directly to the battery (instead of the vehicle
chassis or sheetmetal) it must be have its own 30-ampere fuse installed at the
battery
Note: The length of the cable supplied with the optional remote control head is not critical.

7
The RF cables should not be excessively long, although they are not critical.
1.5 HOME OR FIXED INSTALLATIONS
Mount the amplifier in any location that is cool, and has air circulation. It is best to mount this
unit with the long length of the heatsink fins vertical. For extended duty, you may want to add a
cooling fan.
The amplifier should be mounted as close to the power supply as possible. Section 1.2 details
wiring considerations.
The power supply should be fused or have internal current limiting at a maximum current of 35
amperes. It should be well filtered and voltage-regulated at no more than 15 volts dc. A power
supply with a crowbar or over-voltage protection system is a good idea, in case supply regulators
fail.
Be sure to ground the case of the unit to the station ground buss with a heavy short lead.
Lightning protection is a good idea, but the safest solution is to disconnect all antennas and
unplug all equipment when not being used.
2.0 RADIO OR EXCITER
This amplifier will work with almost any exciter or radio operating between 140 and 150 MHz.
The most important guidelines are detailed in the following sections:
2.1 DRIVE LEVEL
The radio or exciter used to drive this unit should have an output power between ½ and 10 watts.
Do not drive this unit with more than 12 watts on FM, 2 watts carrier on AM, or 5 watts PEP on
SSB (about 2 watts average power).
2.2 DUTY CYCLE
The duty cycle of this unit is primarily limited by heatsink temperature. The more power output
and hotter the ambient temperature, the more important cooling becomes. See section 1.1
2.3 T/R CONTROL OR “KEYING”
This unit contains an internal RF sensing system. This system will automatically disconnect the
receiving pre-amplifier (if being used). It also places the unit in a transmit-mode when the
POWER switch is ON.
The rear-panel female phono (RCA) jack labeled RELAY can be used to manually force this unit
to switch into a transmit mode. If the PRE-AMP switch is on, the pre-amplifier will be switched

8
off when the RELAY line is pulled low (grounded). If the POWER switch is on, the internal
transmitting relays will switch to the transmit mode.
2.4 WIRING
The exciter can be connected to the amplifier with any type of good quality 50-ohm coaxial cable.
Length and cable size is not important, except as it might add signal loss if the cable is extremely
long.
3.0 FM, CW AND NON-LINEAR MODES
Good linearity is the faithful reproduction of input power level changes by the output power of
the amplifier.
Some modulation methods or operating modes do not depend on distortion-free amplitude
changes for transferring information. Non-linear modes include CW, FM, and FSK. The
amplifier can “gain compress” or “flat-top” without changing signal quality or bandwidth,
because the RF is either on or off.
This allows the amplifier to be driven to higher output levels with no detectable change in signal
bandwidth.
3.1 DRIVE POWER
Drive power on FM, CW, or FSK is limited by power ratings of transistors and heatsink
temperature. The transistor is safely able to accept 12 watts of drive, which corresponds to
approximately 160 watts carrier output.
Do not trust unknown or questionable accuracy meters! Some meters are off by
as much as 50% or more!
3.2 DUTY-CYCLE CW AND FM
The duty-cycle is set by ambient temperature, mounting position, operating power, and airflow.
Temperature and mounting concerns are detailed in section 1.0. Driving-power concerns are
detailed in section 2.0
The maximum amplifier output power on CW, FM and FSK is 160 watts ICAS. At the maximum
power output of 160 watts, this amplifier will normally provide a 33% long-term duty cycle
without overheating. Do not exceed 5 minutes total accumulated transmitting time without ten
minutes of total accumulated resting time. This is a rough guideline; actual duty-cycle limitations
depend on many factors.

9
If possible, especially if cooling might be marginal and there is no external air blowing across the
heatsink, mount the amplifier with heatsink fins vertical. This allows natural convection to
circulate air. See section 1.0 for details.
Warning, the safe maximum temperature of the heatsink is 140°F. If the heatsink
feels too hot to hold, it is almost certainly too hot for safe operation.
3.3 FEEDLINES AND ANTENNAS
This unit will work with any antenna as long as SWR at the OUTPUT of the amplifier is less than
2:1.
Warning, never exceed 20 watts maximum reflected power. Try to keep SWR
below 2:1. Make sure all feedline and antenna connections are good.
4.0 SSB AND LINEAR MODES
SSB and AM operation requires linear amplification of signals. If the amplifier is not linear,
mixing products occur. These mixing products make the signal bandwidth increase, they are
referred to as “splatter”. Amplifier gain changes with power level. One design goal of this
amplifier was minimizing the effects of non-linearity, and reducing needless splatter.
Unlike tube amplifiers, solid-state amplifiers go into gain compression long before
they saturate. Even though this amplifier can produce 160 watts or more on
carrier, do NOT expect to run 160 watts PEP and have acceptable IMD
performance!
In AM operation, carrier power is normally 25% or more of the peak envelope power as indicated
on a true peak-reading meter. Unmodulated carrier output power should not exceed 25 watts.
Peak-envelope output power should not exceed 100 watts when measured on an accurate peak
reading meter.
4.1 SPLATTER AND DISTORTION
At low power levels, amplifier gain is affected by bias settings. If bias is set too low, turning
drive power down can actually make the ratio of distortion-to-signal worse (not better)!
This amplifier has an active-bias system, which forces the bias voltage to a fixed level. This
system is vastly superior to conventional resistor/shunt-diode bias for maintaining operating-bias
as drive power, temperature, and supply voltage varies.

10
At high power levels, three main problems limit linearity and cause splatter. All three problems
are reduced or cured by turning the drive power down.
1.) Output-device current amplification (in this case transistors are used) is a problem.
Transistors, unlike most vacuum tubes, show a gradual decrease in gain as drive level
increases. It is important this amplifier be operated in the area where the gain-slope is linear
or “rounded” in a sine curve to minimize splatter and IMD.
Maximum SSB peak power is approximately 110 watts. This generally
corresponds to an average power of 25 to 50 watts, depending on voice and
compression characteristics.
2.) Output-device voltage saturation caused by incorrect loading. If the amplifier is not properly
matched to the load, the peak collector voltage can get too high. This can not only cause
splatter; it can cause the output transistors to fail.
3.) As base current increases, the base-bias tends to shift negative. Many or most amplifiers with
conventional resistor/ shunt-diode biased amplifiers actually move into class C (a non-linear
mode) as the drive power is increased. This amplifier has active bias, and doe not exhibit this
problem.
In AM operation, carrier output power is normally 25% or more of the peak envelope power as
indicated on a true peak-reading meter. Unmodulated carrier output power should not exceed 25
watts.
4.2 DRIVE POWER
To preserve signal quality in SSB and AM modes, amplifiers must be operated in the linear
portion of their gain-curves. Since this amplifier has no tuning adjustments, the user can control
only the load impedance (SWR) and drive power.
Many operators think RF power meters should show some fixed-ratio of carrier or “whistle”
power to speech power. This is not correct. The ratio varies greatly with many factors, including
the operator’s voice. Pushing up the drive power to “see” a certain output power on a meter that
is NOT a true peak-reading meter is a mistake.
Power should be measured on a true peak-reading meter. Many manufacturers
market meters that are not actual peak-reading meters, even though they call the
meters peak-reading. If you have a meter like that, you will find it impossible to
properly determine drive settings on SSB using the meter.
If you do not have a true peak-reading meter, either an oscilloscope or off-the-air
reports can be used to determine if you are driving the amplifier too hard.
The proper drive power for this amplifier is a drive power allowing output power peaks to reach
approximately 2/3 of the saturated output power, as measured on a true peak-reading meter.

11
Maximum power output for good linearity is 110 watts PEP, as indicated on a properly working
PEP-reading meter.
In AM operation, carrier output power is normally 25% or more of the peak envelope power as
indicated on a true peak-reading meter. Unmodulated carrier power should not exceed 25 watts;
peak envelope power on AM should not exceed 100 watts or so.
4.3 DUTY CYCLE
The duty cycle of this amplifier is limited by temperature considerations. In normal AM or SSB
operation, the duty-cycle is set by ambient temperature, mounting position, operating power, and
airflow. Temperature and mounting concerns are detailed in section 1.0. Driving-power
concerns are detailed in section 4.2.
The maximum PEAK amplifier output power on SSB and AM is 110 watts PEP. At the
maximum power output of 110 watts, this amplifier will normally provide a 100% duty cycle
without overheating.
If possible, especially if cooling might be marginal and there is no external air blowing across the
heatsink, mount the amplifier with heatsink fins vertical. This allows natural convection to
circulate air. See section 1.0 for details.
Warning, the safe maximum temperature of the heatsink is 140°F. If the heatsink
feels too hot to hold, it is almost certainly too hot for safe operation.
4.4 T/R CONTROL OR SWITCHING
This amplifier has an internal RF sensing system that turns off the pre-amplifier and places it in
the transmit mode. A front-panel MODE switch activates an internal hang-delay timer for SSB
(or CW) operation. This hang-time allows the relays to remain energized without input power for
a few seconds.
The hang-time is controlled by R8, located at the front and center of the board behind the MODE
switch. Delay is normally set for 1 second at the factory.
4.5 POWER OUTPUT
The maximum power output for clean linear SSB service is 110 watts PEP. Antenna SWR
should be as low as possible. The 13.8-volt 30-ampere power source must not have hum or
ripple. The voltage should have less than 0.2 volts sag under full-load for best linearity.

12
4.6 ANTENNAS AND FEEDLINES
Any antenna and 50-ohm feedline can be used, providing it presents less than 2:1 SWR to this
amplifier. Linearity and splatter will be better controlled if SWR is as low as possible, with a 1:1
SWR ratio (unity SWR) being ideal.
Be sure to use proper lightning protection techniques when using this amplifier for home or fixed
operation.
5.0 RECEIVING PREAMPLIFIER (PRE-AMP)
This amplifier contains an internal receiving amplifier (also called a pre-amplifier or pre-amp)
that “boosts” weak signals. It has a noise figure of about 1 dB, and about 14 dB maximum gain.
Gain is selectable by internal jumpers located on the small PC board close to where the red and
black power leads enter the unit. These jumpers select approximately 14, 8, and 5 dB gain. As a
general rule, even the lowest gain setting will provide more than enough gain.
5.1 SIGNAL-TO-NOISE RATIO
At 150 MHz, the signal-to-noise ratio (SNR) of the received signal should easily be established at
the antenna. The required preamplifier noise figure varies greatly with the receiver bandwidth
and antenna type, as well as the location.
This preamplifier’s noise figure is just over 1 dB, which is more than adequate for normal
antennas and normal bandwidths used in communications. Noise power is inversely proportional
to bandwidth, and the noise figure of this amplifier will allow CW signals of less than .03µV and
FM signals of less than .30µV to be detected with over 10 dB SNR.
A lower noise-figure amplifier is seldom (if ever) necessary for terrestrial communications. Since
this preamplifier will put almost any system well into ambient noise, no further improvement in
sensitivity will result from more gain or lower noise figure.
5.2 INTERMODULATION (IMD) PRODUCTS
IMD is the result of signals mixing in amplifiers or other less-than-perfect devices. IMD results
in signals appearing on entirely new frequencies. This problem can occur either external to the
PREAMP
BOARD
BACK OF UNIT
˜ 14 dB gain ˜ 8 dB gain ˜ 5 dB gain
PREAMP
BOARD
PREAMP
BOARD

13
receive system or internal to the receive system. Every effort was made to make the preamplifier
in this unit immune to overload.
The receiver may overload if signal levels from the preamplifier are stronger than the receiver can
tolerate. In some cases, the preamplifier itself may be overloaded.
If paging or other commercial transmitters suddenly appear in the receiver while using the
preamplifier, try turning the preamplifier off. In some cases reception may improve. It is best to
use the preamplifiers only when necessary, and to avoid using them in congested areas with many
strong transmitters nearby.
Be sure you are using the lowest gain setting possible, unless the receiver actually needs a bigger
gain boost.
Warning: Never connect this unit backwards, with the radio to the ANTENNA
connector and the antenna to the RADIO connector. If you do, the preamplifier can
be damaged. Never use the preamplifier if the antenna is near other transmitters.
6.0 IN CASE OF DIFFICULTY
Always be sure the power is connected properly (section 1.2) and the RF connections are correct
(section 1.3).
6.1 DOES NOT TRANSMIT OR RECEIVE AT ALL
Does the radio work OK with the amplifier removed from the system and replaced with a barrel
connector without changing anything else? If so, read section 1.2. The coax connectors that
attach to the amplifier, or the amplifier, may be the problem.
If the radio does NOT work ok, you probably have a bad jumper cable or bad coaxial cable.
6.2 NOTHING LIGHTS OR SEEMS TO WORK
Check the power wiring and fuses. The amplifier has an internal fuse also.
Read section 1.2
6.3 TRANSMITS OK, DOES NOT AMPLIFY RECEIVE
If this unit transmits OK, but fails to make a difference on receiving weak signals, and the
Preamp light illuminates, it may have a defective preamplifier.
If the XMIT light remains illuminated when receiving, try unplugging any CONTROL or
RELAY wiring. If that corrects the problem, you have a wiring or control system problem.

14
6.4 RECEIVES OK, DOES NOT AMPLIFY TRANSMIT
Does your radio transmit OK without the amplifier removed and replaced with a barrel
connector? If not, see 1.3, 2.4, 4.4,
Is SWR okay, both with the amplifier in-line and out-of-line? See 3.5,4.6
6.5 CONTINUOUSLY TRIPS FAULT LIGHT
Check transmitter power. Be sure to check the PEAK power, because some radios transmit a
pulse greatly exceeding the continuous power. If your radio has this problem, it is unsuitable for
any amplifier because it will eventually damage the amplifier’s transistors. See sections
2.1,3.1,and 4.2
Check the SWR and reflected power. Look for bad cable connections. See sections 1.3, 2.4, 3.5,
and 4.6
6.6 RELAY CHATTERS OR CLICKS OFF AND ON
RADIO and ANTENNA leads are reversed
Drive power is too low (under ½ watt)
6.7 TECHNICAL ASSISTANCE
Technical assistance is available Monday through Friday by calling 662-323-8287 between the
hours of 8:00 a.m. and 4:30 p.m. central time.
Please be sure you have check the obvious problems, and that you have the model number and
information about your radio and power meter available.
6.8 ORDERING PARTS
Parts are available direct from Mirage, either by calling 662-323-8287; faxing 662-323-6551 or
writing to Mirage, 300 Industrial Park Road, Starkville, MS 39759. When faxing or writing, be
sure to include a phone number you can be reach at during Mirage business hours.
Please have a credit card number available over the phone (do NOT include credit card
information in the mail), or prepay the order with a check after calling for prices.
Part numbers are listed after the schematic. Be sure you have the full part description, the model
and serial number (if used on this product), and the part number.

15
8.0 SCHEMATIC

16
/