Page is loading ...

KT 1750
KT 1800
KT 1900
Classic - Extra
Italiano
English
Français
Español
Čeština
Deutsch
Ελληνικά
Magyar
Nederlands
Polski
Português
Slovenčina
Русский
IT
CS
SK
FR
DE
PL
EN
NL
RU
ES
EL
PT
HU
EN •
Cold Water, Electric High Pressure Cleaners Instruction manual - Use and Maintenance
FR •
Nettoyeurs Haute Pression Électriques à Eau Froide Notice technique - Utilisation et Entretien
ES •
Hidrolavadoras Eléctricas de Agua Fría Manual de Instrucciones - Uso y Mantenimiento
CS •
Vysokotlaké čističe na studenou vodu Návod k používání - používání a Údržba
DE •
Elektrische Kaltwasser-hochdruckreiniger Bedienungs- und Wartungsanleitung
EL •
Ηλεκτρικα Υδροκαθαριστικα Μηχανηματα Με Κρυο Νερο Εγχειριδιο Οδηγιων - Χρησησ και Συντηρησησ
HU •
Hidegvizes Elektromos Magasnyomású Tisztítóberendezések Felhasználói Útmutató - Használat és Karbantartás
NL •
Elektrische Koudwaterhogedrukreinigers Instructiehandleiding - Gebruik en Onderhoud
PL •
Myjki Elektryczne Zimnowodne Instrukcja - Obsługi i Konserwacji
PT •
Lavadoras de Alta Pressão Eléctricas com Água Fria Manual de Instruções - Uso e Manutenção
SK •
Vysokotlakové čističe na studenú vodu Návod na použitie - použitie a Údržba
RU •
Электрические Гидроочистители Без Подогрева Воды Руководство - Эксплуатация И Обслуживание
IT •
ATTENZIONE. Leggere le istruzioni prima di utilizzare la
macchina.
EN •
WARNING. Read the instructions before using the
machine
FR •
ATTENTION. Lire les instructions avant d’utiliser l’appareil
ES •
ATENCIÓN. Leer atentamente las instrucciones antes de
utilizar la máquina.
CS •
POZOR. Před použitím zařízení si přečtěte návod k
použití.
DE •
ACHTUNG. Vor der Verwendung der Maschine die
Anweisungen lesen.
EL •
ΠΡΟΣΟΧΗ. Διαβάστε προσεχτικά τις οδηγίες πριν από
την χρήση της μηχανής.
HU •
FIGYELEM. Olvassa el az utasításokat a gép használata
előtt.
NL •
LET OP. Voor het gebruik van de machine de aanwijzingen
aandachtig doorlezen.
PL •
UWAGA. Przeczytać instrukcje przed użyciem maszyny.
PT •
ATENÇÃO. Ler as instruções antes de utilizar a máquina.
SK •
UPOZORNENIE. Pred použitím zariadenia si prečítajte
návod na použitie
RU •
ВНИМАНИЕ. Перед использованием оборудования
необходимо прочитать данные инструкции.
IT •
IdropulItrIcI ElEttrIchE ad acqua FrEdda
ManualE d’IstruzIonE - uso E ManutEnzIonE

Italiano
English
Français
Español
Čeština
Deutsch
Ελληνικά
Magyar
Nederlands
Polski
Português
Slovenčina
Русский
IT
CS
SK
FR
DE
PL
EN
NL
RU
ES
EL
PT
HU
• Manuale d’Istruzione - Uso e Manutenzione
• Instruction manual - Use and Maintenance
• Notice technique - Utilisation et Entretien
• Manual de Instrucciones - Uso y Mantenimiento
• Návod k používání - používání a Údržba
• Bedienungs- und Wartungsanleitung
• Εγχειριδιο Οδηγιων - Χρησησ και Συντηρησησ
• Használati kézikönyv - Használat és Karbantartás
• Instructiehandleiding - Gebruik en Onderhoud
• Instrukcja - Obsługi i Konserwacji
• Manual de Instruções - Uso e Manutenção
• Návod na použitie - použitie a Údržba
• Руководство - Эксплуатация И Обслуживание
IT 6
EN 12
FR 18
ES 24
CS 30
DE 36
EL 42
HU 48
NL 54
PL 60
PT 66
SK 72
RU 78
INDEX

12
EN
WARNING
TRANSLATION OF THE ORIGINAL INSTRUCTIONS
Read and keep in mind that indicated in the
INSTRUCTION MANUAL SAFETY WARNINGS.
TECHNICAL CHARACTERISTICS AND SPECIFICATIONS
KT 1750 KT 1800 KT 1900
CLASSIC EXTRA CLASSIC EXTRA CLASSIC EXTRA
ELECTRICAL CONNECTIONS
Power supply 230 V - 1~50 Hz
Input 2,4 kW 2,7 kW 2,9 kW
Fuse 16 A
HYDRAULIC CONNECTION
Maximum water supply temperature 40 °C - 98 °F
Minimum water supply temperature 5 °C - 41 °F
Minimum water supply ow rate 650 l/h - 10,8 l/min
172 US gph
700 l/h - 11,6 l/min
185 US gph
750 l/h - 12,5 l/min
198 US gph
Maximum water supply pressure 0,8 MPa - 8 bar - 116 psi
Maximum priming depth 0 m - 0 ft
PERFORMANCES
Flow rate 510 l/h - 8,5 l/min
135 US gph
550 l/h - 9,2 l/min
145 US gph
600 l/h - 10 l/min
159 US gph
Maximum pressure 15 MPa - 150 bar
2175 psi
16 MPa - 160 bar
2320 psi
16 MPa - 160 bar
2320 psi
Reaction force on the gun 24 N 27 N 29 N
Sound pressure level 75 dB(A) 83 dB(A) 83 dB(A)
Vibration on operator’s arm 0,8 m/s² 2,6 m/s² 2,6 m/s²
WEIGHT AND DIMENSIONS
Length x Width x Height 400 x 410 x 910 mm - 16 x 16 x 36 in
Weight
22 kg - 49 lb 25 kg - 55 lb 22 kg - 49 lb 25 kg - 55 lb 22 kg - 49 lb 25 kg - 55 lb
Detergent tank 1,0 l - 0,26 US gal
The characteristics and specications are guidelines only. The manufacturer reserves the right to make all modications to the
equipment deemed necessary.
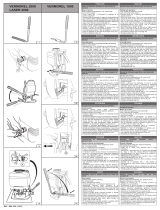
IDENTIFICATION OF COMPONENTS
Please also refer to pictures1, 4, 7 e 8.
1 Electric power cord
2 Main switch
3 Handling bar
4 Housing for water gun / lance hose
5 Warning plate. Informs on the residual risks:
Use before reading the instruction manual is
prohibited
6 Hose reel
EXTRA
7 Identication plate. Indicates the serial number
and main technical characteristics
8 Detergent tank
9 Nozzle hexagonal key
10 Lifting handle
11 Warning plate. Informs on the residual risks:
use forwashing people, animals, electrical
equipment and the high-pressure cleaner itself
is prohibited
12 Water inlet quick-t connector
13 Housing for electric power cord
14 Water gun
15 Lance hose
16 Nozzle support head
17 Nozzle cleaning pin
18 Rotating Lance
EXTRA
(continues on the next page)

13
EN
19 Detergent Cap
20 Inlet Water Filter
21 Hose Reel Knob
EXTRA
22 Fixed Brush
EXTRA
23 High pressure hose
24 Wheel
25 Safety catch on water gun lever
26 Water gun lever
27 Machine Foot
28 High pressure hose Support
CLASSIC
29 Outlet Coupling
CLASSIC
30 Quick fit connector for high-pressure hose
CLASSIC
SAFETY DEVICES
• Amperometric protection (KT 1800 - KT 1900)
This device stops the high-pressure water cleaner in the event of electrical overcurrent, in that condition
the master switch (2) goes in position “0”.
Carry out the following if activated:
- disconnect the plug from the wall socket:
- press lever (26) of the gun to discharge possible residual pressure;
- wait 10-15 minutes to allow the high-pressure cleaner to cool; check that the requirement for the mains
power connections have been respected (see the
INSTRUCTION MANUAL SAFETY WARNINGS
),
paying particular attention to the extension lead used;
- Reconnect the plug and repeat the start procedure described at paragraph
“OPERATION”
.
• Thermic protection (KT 1750)
This device stops the high-pressure water cleaner in the event of electrical overcurrent.
Carry out the following if activated:
- place the master switch (2) in position “0” and disconnect the plug from the wall socket;
- press lever (26) of the gun to discharge possible residual pressure;
- wait 10-15 minutes to allow the high-pressure cleaner to cool; check that the requirement for the mains
power connections have been respected (see the
INSTRUCTION MANUAL SAFETY WARNINGS
),
paying particular attention to the extension lead used;
- Reconnect the plug and repeat the start procedure described at paragraph
“OPERATION”
.
• Pressure restriction/adjustment valve.
This valve that is set by the Manufacturer allows the pumped liquid to return to the pump suction, preventing
the development of hazardous pressures when the gun is closed or when a pressure value is set over the
maximum allowed.
• Gun lever blocking device.
This safety catch (25) allows to block the lever (26) of the gun (14) in the closed position, preventing accidental
activation
PICT. 8, POSITION S
.
STANDARD EQUIPMENT
Make sure that the following parts are included in the packaging of the purchased product:
• high-pressure cleaner;
• high-pressure delivery hose 8 m/26 ft
CLASSIC
;
• hose reel complete with 12 m/39 of high-pressure delivery hose
EXTRA
;
• watergun;
• lance pipe;
• rotating lance
EXTRA
;
• xed brush
EXTRA
;
• hose reel knob;
• handlebar;
• foot;
• 4 screws for assembling braket and handlebar;
• 2 wheel;
• instruction manual - safety warnings;
• instruction manual - use and maintennace;
• warranty certicate;
IDENTIFICATION OF COMPONENTS (continues)

14
• service centres booklet;
• nozzle hexagonal key;
• nozzle cleaning pin.
If there are problems, contact your dealer or an authorised assistance centre.
OPTIONAL ACCESSORIES
The following range of accessories can be added to the standard high-pressure cleaner equipment:
• rotating nozzle lance: designed for the removal of stubborn grime (standard on
EXTRA
);
• sandblasting lance: designed for sanding surfaces, removing rust, paint, incrustations, etc.;
• rotating water jet brush: designed for cleaning delicate surfaces;
• xed water jet brush: designed for cleaning delicate surfaces. (standard on
EXTRA
);
• Pipe ushing probe: designed for unblocking pipes and ducts;
• oor cleaning lance;
• high pressure hose extension kit 8 m/26 ft: ideal for increasing the cleaning surface;
INSTALLATION AND ACCESSORIES ASSEMBLING
In order to prevent damages to the high pressure cleaner, the following operations should be done
by two persons.
• Carefully extract the high pressure washer from the carton box, paying attention not to damage it or let it
fall down.
SEE PICT. 4a
.
• Insert till the end the foot (27) on the high pressure washer frame, checking the correct positioning.
SEE
PICT. 4b
.
• Lock the foot with the 2 screws supplied (cross screew driver not supplyed).
SEE PICT. 4c
.
• Mount the wheel (24), until you hear a “click”.
SEE PICT. 4d
.
• Insert till the end the Hose reel knob (21).
SEE PICT. 4e
.
• Mount and push till it’s completely locked the handlebar (3). Double check that the handlebar is completely
insered into the machine frame (frontal surfaces must be aligned). Lock the handlebar with the 2 screws
supplied (cross screw driver not supplied).
SEE PICT. 4f
.
• Screw the high-pressure pipe connector (23) to the thread of the gun (14) and fully tighten with a 17mm/0,67
in spanner (not supplied).
OPERATION A PICT. 9
OPERATION PRELIMINARY OPERATIONS
• Take the high pressure water cleaner to the work position, getting hold of its handle (2).
SEE PICT. 5
. Use
the lifting handle (10) and handlebar (3) for lifting
SEE PICT. 6.
• Completely unreel the high pressure hose (23).
• Insert the high pressure hose quick coupler (30) on the outlet coupling (29), and fully tighten the ring nut
by hand (only
CLASSIC
).
SEE PICT. 1.
• Seecure a supply hose to the quick-release water inlet tting (12) using a general-purpose gardening
quick-release tting.
OPERATION B PICT. 9
.
• Open the water supply tap, making sure there is no dripping.
OPERATION C PICT. 9
.
• Make sure the main ON/OFF switch (2) is turned to “0” and connect the plug
OPERATION D PICT. 9
.
• Turn the main ON/OFF switch (2) to position “1”.
• Press the lever (26) of the high pressure water cleaner and wait for water to ow out continuously
• Switch the main ON/OFF switch (2) to position “0” and connect the spray lance (15) or (18) to the water
gun(14), tightening rmly.
OPERATION E PICT. 9
.
STANDARD OPERATION AT HIGHPRESSURE
• Check that the nozzle head (16) is not in the detergent distribution position (see also paragraph
“OPERATION
WITH DETERGENT”
).
• Re-start the high pressure water cleaner again, switching the main ON/OFF switch (1) to position “2”.
NOTE:
when starting in this phase, the high pressure water cleaner will stop immediately after the starting
breakaway because the
TOTAL STOP
device trips.

15
EN
• To activate the high pressure water cleaner, to start cleaning, simply operate the lever (26) of the high
pressure cleaning gun.
• The angle of the jet of water can be adjusted via the head (16)
PICT.2 POSITIONS a AND b
.
OPERATION WITH DETERGENT
The detergents recommended by the manufacturer are over 90% biodegradable.
Refer to the label on the detergent packaging for use instruction.
• Place the master switch (2) into position “0”.
• Remove the cap (19) and taking care not to spill the liquid (maximum capacity 1 l/ 0.26 US gal), ll the
tank(8) with detergent, diluted as required.
• Re-insert the cap (19) on the tank (8).
• Connect the lance hose (15) to the watergun (14) and operate the nozzle head (16) as in
PICT. 3-b
• Start the high-pressure cleaner again, by placing the master switch (2) into position “1” and press the
lever(26): suction and mixing are performed automatically as the water passes.
• To stop the distribution of detergent and return to the high-pressure operation, stop the high-pressure
cleaner by placing the master switch (2) into position “0” and operate on the head (16) as shown in
PICT.6.3-a.
INTERRUPTING THE OPERATION TOTAL STOP
• Release the lever (26) of the high pressure water gun and the cleaner will stop automatically. The cleaner
will start again regularly the next time the lever of the high pressure water gun is pressed.
STOPPING
• Completely close the water supply tap.
• Run the high-pressure cleaner for a few seconds with the lever (26) of the gun pressed to expel any excess
water.
• Place the master switch (2) into position “0”.
• Remove the plug from the power socket.
• Eliminate any residual pressure that has remained in the high-pressure pipe (23) by pressing the lever (26)
of the gun for a few seconds.
• Carefully wind up the power cable (1) on the specic cable holder (13).
• Wait for the high-pressure cleaner to cool.
STORAGE
• Carefully wind up the high-pressure pipe (23) making sure there are no kinks.
• Hang the high-pressure pipe on th holder (28) (only
CLASSIC
)
• Place the high-pressure cleaner in a dry and clean location, taking care not to damage the power cable and
high-pressure pipe.
ROUTINE MAINTENANCE
Carry out the operations described in paragraph
“STOPPING”
, following the table below.
MAINTENANCE INTERVAL OPERATION
On every use • Check the power cable, high-pressure pipe, connectors, gun and
lance pipe.
If one or more parts are damaged, do not use the high-pressure water
cleaner and contact a
QUALIFIED TECHNICIAN
.
(continues on the next page)

16
MAINTENANCE INTERVAL OPERATION
Weekly • Cleaning of inlet water lter
Unscrew the hose connector (12)
FIG. 7-a
and remove the lter(20)
FIG. 7-b
.
Cleaning the lter under running water or compressed air is generally
sucient. In more dicult cases, use a scale-removing product or
replace it by contacting an authorised assistance centre to purchase
it.
Ret the lter and tighten the hose connector.
Monthly • Cleaning the nozzle.
It is usually sucient to clean the hole of the nozzle with the pin
supplied (17). If this operation fails to satisfactorily clean the nozzle,
replace the latter by ordering a spare part from an authorised service
centre.
The nozzle is replaced using the key (9) (supplied).
SUPPLEMENTARY MAINTENANCE
Supplementary maintenance must be carried out by a
QUALIFIED TECHNICIAN
, following the table below
(guideline data).
MAINTENANCE INTERVAL OPERATION
Every 50 hours • Check the pump hydraulic circuit (water).
• Check pump xing.
Every 100 hours • Pump oil replacement.
• Check pump delivery/intake valve.
• Check tightness of pump screws.
• Check pump control valve.
• Check the safety devices.
PROBLEMS, CAUSES AND REMEDIES
PROBLEMS CAUSES REMEDIES
The high-pressure water
cleaner does not start when the
master switch (2) is place into
position“1”.
Please refer also to the
NOTE
in the paragraph “
STANDARD
OPERATION AT HIGH
PRESSURE
The safety device of the system
to which the high-pressure water
cleaner is connected has cut-in
(fuse, dierential switch, etc.).
Reset the safety device.
IF IT CUTSIN AGAIN, DO NOT
USE THE HIGHPRESSURE WATER
CLEANER AND CONTACT A
QUALIFIED TECHNICIAN.
Plug not connected correctly. Disconnect the plug and
reconnect it correctly.
The high-pressure water cleaner
vibrates a lot and is noisy.
Dirty water inlet lter (20) sporco. Follow that indicated in paragraph
“ROUTINE MAINTENANCE”
.
Insucient water supply Make sure that the tap is
fully open and that the flow
rate of the mains water is in
accordance with that indicated
in paragraph
“TECHNICAL
CHARACTERISTICS AND
SPECIFICATIONS”
.
(continues on the next page)

17
EN
PROBLEMS CAUSES REMEDIES
The high-pressure water cleaner
does not reach maximum
pressure.
Nozzle head (16) in low pressure
PICT.3-b
.
Carry out the operation indicated
in
PICT. 3-a
.
Nozzle worn-out. Replace the nozzle following that
indicated in paragraph
“ROUTINE
MAINTENANCE”
.
Insucient water supply Make sure that the tap is
fully open and that the flow
rate of the mains water is in
accordance with that indicated
in paragraph
“TECHNICAL
CHARACTERISTICS AND
SPECIFICATIONS”
.
Poor detergent suction. Nozzle head (16) is not in low
pressure
PICT.3-a
.
Carry out the operation indicated
in
PICT.3-b.
No detergent into the tank Add detergent in the tank.
Excessive detergent viscosity Use a detergent recommended
by the manufacturer, maintaining
the dilution indicated on the label.
Water does not exit the nozzle. No Water Check that the mains tap is fully
open or that the suction pipe
can prime.
Blocked nozzle Clean and/or replace the nozzle as
indicated in paragraph
“ROUTINE
MAINTENANCE”
.
The high-pressure water cleaner
stops while operating.
The safety device of the system
to which the high-pressure water
cleaner is connected has cut-in
(fuse, dierential switch, etc.).
Reset the safety device.
IF IT CUTSIN AGAIN, DO NOT
USE THE HIGHPRESSURE WATER
CLEANER AND CONTACT A
QUALIFIED TECHNICIAN.
Amperometric safety device has
cut-in.
Follow that indicated in paragraph
“SAFETY DEVICES”
.
The high-pressure water cleaner
starts spontaneously (during
TOTAL STOP
condition).
Leaks and/or dripping in the
delivery circuit.
Check the condition of the
delivery circuit.
When turning the master
switch(2) the motor hums but
does not
start.
Unsuitable electrical system and/
or extension lead.
Check that the electrical
connections have been made
correctly (see
INSTRUCTION
MANUAL SAFETY WARNINGS
),
with particular reference to the
extension lead used.

COMET S.p.A. - Via G.Dorso, 4 - 42124 Reggio Emilia - ITALY
Tel. +39 0522 386111
E-mail Italia: [email protected].it - fax +39 0522 386300
E-mail Export: expor[email protected] - fax +39 0522 386286
www.comet-spa.com
1610 1195 00A - 11/2014 - REV. 01
/