KitchenAid KUDI220T5 Owner's manual

Category
Dishwashers
Type
Owner's manual

This manual is also suitable for

tche d
Built-In Dishwasher
With Quiet Scrub TM System
Models KUDI22OT, KUDI220W
KUDI22GT
USE and CARE GUIDE
(KUDI22OT, KUDI22OW ILLUSTRATED)
(KUDI22GT NOT ILLUSTRATED)
Table o[ Contents
Important Safety Instructions ......... 3
Ownership Registration Card ........ 4
Important Facts ................... 4
Dishwasher Features ............... 5
Operating Your Dishwasher ......... 6
Automatic Water Heating ........... 6
Energy Saving Tips................. 6
Special Tips On Dishwasher Use ...... 7
Dishwasher Cycles ................ 8
ToCancel A Cycle ................ 9
Adding Dishware During A Cycle ... 9
Loading Your Dishwasher ........... 10
Upper Rack..................... 10
Lower Rack .................... 11
Silverware Basket ................ 12
Filling The Detergent Dispenser ....... 13
How Much Detergent ToUse......... 13
Low Phosphate Detergents .......... 14
Rinse Agents ..................... 14
Caring For Your Dishwasher ......... 14
Seasonal Storage .................. 15
Drain Air Gap .................... 15
Sure-ScrubTM Wash System ........... 16-17
Problem, Cause, Solution Chart ....... 18-19
Removing Spots And Film ........... 19
Changing Front Panels ............. 20-22
Optional Front Panels .............. 22
If You Need Service Or Assistance ...... 23
Warranty .................... Back Cover
© 1989KitchenAid, Inc.
It isyour responsibility to be sure your
dishwasher:
Isinstalled by aqualified installer.
Hasbeen installed where it isprotected
from the elements.
Hasbeen installed on a floor strong
enough to support its weight.
Hasbeen properly connected to
electricity, water and drain.*
Hasbeen properly electrically
grounded.*
Hashad all hang tags and temporary
labels removed.
Isnot used by children or anyone unable
to operate it properly.
Isproperly maintained.
*SeeInstallation Instructions for complete
information.
Important Safety Instructions
To reduce the risk of fire, electrical shock, or injury when using
....... your dishwasher, follow basic precautions including the
following:
1.
.
.
Read all instructions before using the
dishwasher.
This dishwasher must be properly
connected to electricity and water.
Use the dishwasher only for its intended
function.
.
10.
11.
4. Use only detergents and rinse agents 12.
recommended for use in a dishwasher,
and keep them out of the reach of
children.
.
6.
When loading items to be washed:
a. Locate sharp items so that they are
not likely to damage the door seal.
b. Load sharp knives with the handles
up to reduce risk of cut-type injuries.
DO NOT wash plastic items unless
marked "dishwasher safe" or the
equivalent. For plastic items not so
marked, check the manufacturers'
recommendations.
DO NOT touch the heating element
during or immediately after use. Element
must cool at least 20 minutes to avoid
injury.
DO NOT operate your dishwasher
unless all enclosure panels are properly
in place.
.
.
13.
14.
15.
DO NOT tamper with controls.
DO NOT abuse, sit on or stand on the
door or dish rack of the dishwasher.
To reduce the risk of injury, do not
allow children to play in or on a
dishwasher.
If hot water has not been used recently
(usually two weeks or longer],
hydrogen gases may build up in the
water heater and the hot water pipes.
HYDROGEN GAS IS EXPLOSIVE.
To prevent injury or damage, before
using your dishwasher, turn on all hot
water faucets and allow water to run
for several minutes. This will allow
gases to escape. Do not smoke or use
any open flame near the faucet while it
isopen.
When discarding an old dishwasher,
always remove the door to prevent
accidental entrapment.
Install the dishwasher on a floor that is
level and strong enough to support the
weight.
To prevent electrical shock, disconnect
electrical power supply to dishwasher
before attempting to service.
SAVE THESE INSTRUCTIONS
Ownership Registration
Before you use your dishwasher, please fill out and mail your ownership registration card packed
with the Use and Care Guide. This card will enable usto contact you in the unlikely event of a
product safety notification and assist us in complying with the provisions of the Consumer Product
Safety Act. Return of this card isnot necessary to validate your warranty.
Keep a copy of the sales receipt showing the date of purchase and/or date of installation of your
dishwasher. PROOF OF PURCHASEWILL INSUREYOU OF IN-WARRANTY SERVICE.
Write down the following information. You will need it if your dishwasher ever requires service.
Model Number*
Serial Number*
Date Purchased
Date Installed
Dealer's Name
Address
Phone
*Model and SerialNumbers are located on a label at the left sideof the door opening.
Important Facts
KitchenAid dishwashers operate on 115volts, 60 hertz A.C. house current. They cannot be
converted to operate on 220 volts, 50 or 60 hertz house current.
Toprotect against possible rupture of fill valve, BESUREwater lines leading to the dishwasher as
well aswater lines in the dishwasher are protected against freezing. Such ruptures are not
covered by the warranty. Seepage 15.
Toprevent accidental entrapment, remove the door when removing an old dishwasher from
service or discarding it.
Dishwasher Features
I
1. Upper Level Power Wash
(with ChinaGuard TM)
2. Lower Rack
3. Cutlery/Silverware Basket
4. Automatic RinseAgent Dispenser
5. Detergent Dispenser
6. Overflow Protection Float
7. 4-Way Hydro Sweep
(with Jet Spray)
8. Self-Cleaning Filter
9. Removable Coarse Strainer
10. Heating Element
11. FIo-Thru TM Drying Fan
12. Quiet Scrub TM Sound Absorbing Insulation
Operating your
Dishwasher
Step 1 Load dishes into racks according to
instructions on pages 10-12.
Step 2 Add detergent to detergent
dispenser. See page 13.
Step 3 Firmly close the door and latch it by
pushing the door handle down.
Step 4 Push button for desired cycle.
Step 5 Advance Cycle Selection Dial slowly
to corresponding cycle. See page 8
for description of cycles.
Important: If Step 5 is omitted, the timer will
automatically advance to the cycle selected in
Step 4. However, this requires more time than
advancing the dial manually
KitchenAid Quiet Scrub TM System
Your KitchenAid dishwasher is equipped with
a unique sound reduction system. The Quiet
ScrubTM System isdesigned to help eliminate
the common sounds heard while a dish-
washer is operating.
Important: MAKE SURE your dishwasher is
properly installed for quiet operation.
Automatic Water
Heating
Your KitchenAid dishwasher offers automatic
water heating. For best dishwashing results,
water should be at least 120°F (49°C) as it
enters the dishwasher. To check the
temperature, use the faucet closest to your
dishwasher.
1. Set the faucet control for the hottest
water possible. Run water into a glass set
in the sink for at least one minute,
allowing it to overflow.
2. Place a candy or meat thermometer in the
glass and read it at the maximum setting.
3. If the temperature is too low, raise the
setting on your water heater.
Energy Saving
Tips
Usethe ENERGYSAVERDRY (no heat)
option whenever possible. If your
incoming water temperature is 140°F
(60°C) and you don't need your dishes
right away, it pays to air dry them.
Flash dry dishes. After final rinse, unlatch
door and advance Cycle Selection Dial to
Pots/Pans Cycle; open door and pull out
racks. Because of the heat buildup in
dishware during the wash cycle, water
evaporates quickly from the dishware.
Important: In hard water areas, flash drying
can increase the likelihood of spotting and
filming.
Run the dishwasher only with a full load.
Do not rinse dishware before loading.
Use only the cycle and options that you
need.
Run the dishwasher at night during the
summer to avoid daytime heat load.
Special Tips on Dishwasher Use
What Can and Cannot Be Washed in Your Dishwasher
Most tableware, cookware and silverware can be safely washed in your KitchenAid dishwasher. If
you have any doubts about a particular piece of dishware, check with the manufacturer to see if it
isdishwasher safe.
REMEMBER. It is the user's responsibility to deterrnine if dishware should be washed in a
dishwasher.
Material
Aluminum
Cast Iron
i China/
Stoneware
Crystal
Gold
Glass
Hollow-
Handle
Knives
Pewter
Dishwasher
Safe?
Yes
No
Yes
Yes
No
Yes
No
No
Exceptions/
Special Information
High water temperature and
detergents may affect finish of
anodized aluminum.
Seasoning will be removed, and
iron will rust.
Always check manufacturers'
recommendations before
washing. Antique, hand-painted
or over-the-glaze patterns may
fade. Gold leaf may discolor.
Always check manufacturers'
recommendations before
washing. Some types of leaded
crystal may etch with repeated
washings.
Gold-colored flatware will
discolor.
Milk glass will yellow with
repeated dishwasher washing.
Handles of some knives are
attached to the blade with
adhesives which may loosen if
dishwasher washed.
High water temperatures and
detergent may discolor or pit
finish.
Material
Disposable
Plastics
Plastics
Stainless
Steel
Sterling
Silver or
Silverplate
Tin
Wooden
Ware
Dishwasher
Safe?
No
Yes
Yes
Yes
No
No
Exceptions/
Special Information
Cannot withstand high water
temperatures and detergents.
Always check manufacturers'
recommendations before
washing. Plastics vary in their
capacity to withstand high water
temperatures and detergents.
Run a RINSE & HOLD CYCLE if not
washing immediately Prolonged
contact with foods containing
salt, vinegar, milk products or fruit
juice could damage finish.
Run a RINSE & HOLD CYCLE if not
washing immediately. Prolonged
contact with food containing salt,
acid or sulfide (eggs, mayonnaise
and seafood) could damage
finish.
May rust.
Always check manufacturers'
recommendations before
washing. Untreated wood may
warp, crack or lose its finish.
CYCLE SELECTION
(KUDI22OT, KUDI22OW ILLUSTRATED)
(KUDI22GT NOT ILLUSTRATED)
Dishwasher Cycles
Pots/Pans Cycle is used to wash and dry
hard-to-clean, heavily soiled pots, pans and
casseroles along with regular tableware.
Choose this cycle for the toughest jobs.
There are two wash periods and three rinses
followed by a heated dry period.
POTS/
PANS
CYCLE SEQUENCE
h e e e ,
TOTAL CYCLE
TIME (minutes)
88
WATER USED
(gallons)
13
Normal Wash Cycle isused to wash and dry
daily loads with moderate amounts of food
soil.
There are two wash periods and two rinses
followed by a heated dry period.
CYCLE SEQUENCE
IO _O _O, OI, O
WASH _ O I_ ,
TOTAL CYCLE
TIME {minutesJ
78.5
WATER USED
(gallons)
10.75
Light/China Wash Cycle isused to wash
and dry daily loads with light amounts of
food soil. This cycle uses lesswater and time
than the Normal Wash Cycle and isthe most
efficient cycle to use.
There are two wash periods and one rinse
followed by a heated dry period.
LIGHT/CHINA
CYCLE SEQUENCE
T
ToTol o
TOTAL CYCLE
TIME (minutes)
63
WATER USED
(gallons)
7.5
8
WASH SELECTION RINSE/DRY SELECTION
Rinse & Hold Cycle is used to rinse partial
loads of dishes until a full load is accumu-
lated_ No detergent is used. Dishware is kept
moist until a complete wash and dry cycle
can be run.
This cycle provides one rinse.
Important: All cycles may be used to wash
and dry dishwasher-safe china and crystal.
Check manufacturers" recommendations
RINSE& HOLD
CYCLE SEQUENCE
before washing.
TOTAL CYCLE
TIME (minutes)
13
WATER USED
)gallons)
2.25
Energy Saver Dry (no heat) can be used
with any Wash Selection to eliminate the
heat during the drying portion of a cycle. The
fan of the drying system will continue to
operate, helping the dishes to air dry
naturally. Under certain conditions, you may
find a few drops of water on the dishware
and silverware at the end of this cycle.
To Cancel A Cycle
The Cycle Selection Dial may be used to
cancel any cycle in progress. If water is
present in the dishwasher, turn the dial
slowly to the drain portion of the wash or
rinse. You will hear water draining when you
have advanced to the proper location. Letthe
dishwasher drain completely. Lift the door
handle and advance the dial to the Pots/Pans
Cycle. This cancels the cycle.
If water isabsent from the dishwasher, lift
door handle to stop dishwasher action.
Relatch door and advance dial to Pots/Pans
Cycle. This cancels the cycle.
TOSTARTA NEW CYCLE-- Open dish-
washer; check detergent dispenser to be sure
it isproperly filled. Close and latch door;
select the desired new cycle.
Adding Dishware During A Cycle
You can add a forgotten item to the dish-
washer anytime before the main detergent
wash portion of the cycle. Tostop the cycle,
just unlatch the door handle. However,
opening the door during a cycle reduces the
cleaning power, so try to load all items before
starting the cycle.
TO RESTARTDISHWASHER -- Close the door
and latch the handle, push cycle button
originally selected and if desired, the Energy
Saver button. The cycle will start exactly
where it was stopped.
Your KitchenAid dishwasher Jsdesigned with lots of loading space. Glasses, mugs, saucers and
saucepans can be loaded in either the upper or lower rack. For best results, dishware should be
loaded so soiled surfaces face the rotating wash arm.
No hand rinsing tsnecessary before loading your KitchenAid dishwasher. Just scrape leftover food,
bones, toothpicks and other hard items from the dishware.
Some foods like eggs, rice, pasta anti cooked cereals may be hard to remove if left to dry over a
period of time If you do not plar_ to wash your dishes fairly soor_ after use, run RINSE & HOLD
CYCLE to keep them moist until you are ready to run the nextwast_ cycle. Never prewash dishes
with a hand dishwashing detergent It _i!i cat_se sudsing in the dishwasher and result Jnpoor
cleaning and/or spotting ,_nd filmir_,g on the d_shware.
Upper Rack Loading
Examples
Glasses and stemware may be ioadecJ
together. Stability Jsimportant when loading
stlch items.
To achieve stability, load glasses and cups
between pins and over pins. Bowls, cups and
pans may be loaded in the center row as
shovvn.
, CAUTION
Be sure items are stable, If load is not
stable, damage may occur.
_0
Lower Rack
Loading Examples
!
For maximum capacity and _tabihty of an
all-plate load, overlap or butterfly' sin311
plates on rpgi_t side, as shown
" Cereai i'_oup bo_,_/h may be loaded front to
bad<, _ide to s_deand along the outer edge
dependinq t_pon the shape
/
! -
Plates may be loaded front to back or side
to side with Dots F_ans m_x_nc!bow!sand
large cookware.
G asse_ mav he loaded _nthe lower rad<
a_,_r_,c_w_th p,!ates, howls and sal;cepans
11
Silverware Basket
The silverware/cutlery basket can be
removed for loading and unloading.
For best washing results:
Load slim handled silverware with handles
up to prevent them from sticking out
through the basket, possibly causing
damage to the silverware or dishwasher
WARNING
Personal Injury Hazard
Sharp utensils should be loaded with
handles up to prevent possible injury,
The cutlery section in the front of the
basket _sfor long-handled utensils and
KnlveJ
long '
Load forks and spoons with handles up
and down so they do not nest together.
Nested items cannot be properly washed.
, CAUTION
Silver and stainless steel flatware
may be damaged if exposed to foods
containing salt, vinegar, milk prod-
ucts or fruit juices for long periods of
time. Use the RINSE & HOLD CYCLE if
flatware is not washed immediately
after use.
12
Filling The Detergent Dispenser
I. USEAUTOMATIC DISHWASHING 2
DETERGENTS ONLY. Never usesoap,
hand dishwashing detergent, laundry
detergent or laundry enzyme products.
They will produce excessive suds and
slow down the wash arm action which
could cause flooding.
\
.
Add detergent to the dispenser
immediately before starting. Detergent
exposed to moisture over a period of time
may become caked and ineffective. An
open box of detergent should stay fresh
for about one month.
Fill the dispenser with the proper amount
of detergent, and close the compartment.
\
Add detergent to Main Wash compartment
for the Light/China Wash Cycle when the
dinnerware is lightly soiled.
Add detergent to both the Prewash and
Main Wash compartments for the Light !
China Wash Cycle, the Normal Wash Cycle
and the Pots/Pans Cycle when dishes are
heavily soiled.
How Much Detergent To Use
Personal Injury Hazard
Dishwasher detergents and rinse
agents can be harmful if taken inter-
nally, Store these products out of
children's reach,
ALWAYSuse at least one tablespoon of
automatic dishwashing detergent in Main
Wash compartment because there are
ingredients in detergent to help protect your
dinnerware. The amount of detergent
needed depends on the amount of food soil
on the dishes and the hardness of water. If
you have hard water, you will have to use
more detergent than if you have soft water.
Excessive amounts of detergent combined
with soft water may cause etching of glass.
Contact your local water utility, area water
softening company or state university
extension agent to determine whether your
water is hard or soft.
Water Amount of
Hardness Detergent
Soft Water
0-4 grains
per gallon
Medium Hard
Water
4-8 grains
per gallon
Hard Water
8-12 grains
per gallon
Half fill each dispenser
(approximately 2 tablespoons per
dispenser)
Fill each dispenser 3/4full
(approximately 2V2 tablespoons per
dispenser)
Fill each dispenser
(approximately 3 tablespoons per
dispenser)
13
Low Phosphate
Detergents
Caring For your
Dishwasher
If you live in a state that mandates
low-phosphate dishwasher detergents
(phosphate content of 8.7 percent or less),
you may have to use more detergent,
particularly if you have hard water.
Low-phosphate detergents usually work
well in soft water, but in hard water they
can cause spotting and filming, even if the
amount of detergent used isincreased.
Rinse Agents
Your dishwasher usesa liquid rinse agent. A
rinse agent helps water to sheet off dishware
faster than normal, reducing water spots and
speeding up the drying process.
Tofill the rinse agent dispenser, unscrew the
cap located to the left of the detergent
dispenser. This reservoir will hold 7 fluid
ounces of rinse agent, enough to last a few
months. Be sure to replace the cap after filling
the reservoir. A small amount of rinse agent is
automatically released during the final rinse,
Liquid rinse agents such asJET-DRY® are
available in your local supermarket.
General Cleaning
The porcelain enamel interior of your
dishwasher will seldom need cleaning.
However, if mineral deposits from hard
water accumulate, clean the interior with a
mild scouring powder or follow the sugges-
tions indicated in the "Removing Spots and
Film" section on page 19.
DO NOT use any type of cleanser that may
cause foaming and sudsing. Run the dish-
washer through a normal cycle.
The control panel can be wiped clean with a
damp cloth, then dried. NEVER use deter-
gents or abrasive or powdered cleansers
which can mar the finish.
The enamel or wood fronts and sides can be
cleaned with a soft cloth and a mild, non-
abrasive soap and water solution. NEVER use
paper towels for cleaning. Always dry with a
soft cloth.
14
Seasonal Storage Drain Air Gap
The Summer Season:
Two simple steps will safeguard your
KitchenAid dishwasher during an idle
summer:
I. Turn off the water supply
2. Turn off electricity to the dishwasher.
The Winter Season:
To protect against possible rupture of
fill valve, BESURE water lines lead-
ing to, as well as in the dishwasher,
are well protected against freezing.
RUPTURES OF THIS KIND ARE NOT
COVERED BYTHE WARRANTY.
To safeguard your KitchenAid dishwasher
when it is exposed to freezing temperatures
in a seasonal dwelling, have a local qualified
person do the following:
1. Close and latch the door.
2. Turn off electricity to the dishwasher.
3. Shut off water supply Place pan under fill
valve, and disconnect fill valve at both in-
let and outlet sides. Drain water into pan.
4. Place a pan under the drain valve outlet,
and disconnect the flexible tubing at the
drain valve. Drain machine water into
pan. Leave fill and drain valve disconnected.
To restore service, reconnect the fill valve and
the connection at the drain valve. Turn on the
electricity and the water supply. Close and
latch the door. Select the LIGHT/CHINA
WASH CYCLE and let the machine complete
its cycle. Check connections to make sure
they are water tight and do not leak.
Some state or local plumbing codes require
the addition of a drain air gap between a
built-in dishwasher and the home drain
system. This device protects your dishwasher
against water backing up into it when a
drain clogs. The drain air gap is usually
located on top of the sink or countertop near
the dishwasher. Drain air gap accessory part
number 300096 is available from KitchenAid.
REMEMBER. This external plumbing device is
not part of your KitchenAid Dish washer.
To Clean the Drain Air Gap:
Clean the drain air gap periodically to insure
proper drainage of your dishwasher. Follow
drain air gap cleaning instructions provided
by the manufacturer. With most types, just
lift off the chrome cover, unscrew the plastic
cap, and then check for any buildup of soil.
Clean, if necessary
Check the Air Gap Anytime Your
Dishwasher Isn't Draining Well
REMEMBER. The warranty provided with
your dishwasher does not cover service costs
directly associated with the cleaning or repair
of the external drain air gap.
15
S E._ ,ITM
ure- cruv Wash System
The Sure-ScrubTM Wash System in your dish-
washer provides excellent cleaning results.
The wash water iscontinuously filtered by a
triple filtration and soil collector system to
prevent food particles from redepositing on
clean dishes. The triple filtration system
consists of a removable filter (A), an ultrafine
filter (B)and a removable coarse strainer (C).
The removable coarse strainer (C)prevents
bones, pits and other large objects from
entering the pump system. Occasionally
check the strainer for such items that may
have mistakenly gotten into the dishwasher.
The 4-Way Hydro Sweep Wash Arm, the
removable filter and the coarse strainer may
be removed and cleaned if necessary. If food
A
E
D
The removable filter continuously filters the
wash water and traps the food particles that
have been removed from the dishes on the
outside of the filter. These trapped food
particles are removed from the filter by the jet
spray action of water from the single spray
nozzle (D) underneath the wash arm. The
ultrafine filter iscleaned by the nine water
jets (E)underneath the 4-Way Hydro Sweep
Wash Arm.
soils remain on the removable filter, lift the
4-Way Hydro Sweep Wash Arm straight up.
Check underside of wash arm to make sure
the opening of the single stainless steel spray
nozzle (D) and the nine water jets (E)are not
blocked.
16
Next,lifttheremovablefilterstraightupand
out.Toclean,scrubfilterwithastiffbrush
underrunningwater.Toreplace,snap
removablefilterovertheultrafinefilterand
thenreplacethewasharm.Whenreplacing
washarm,besurethatwaterjetsonthe
washarmarefacingup.Checktomakesure
washarmisfreetorotate.
TheOverflowProtectionFloat(G)inthe
frontleftcornerofthedishwashertank
preventsthedishwasherfromoverflowing.
Thefloatmustbeinplaceforthedishwasher
tooperate.
Important:Asmallamountofwateralways
remainsinthebottomofthedishwasher(un-
dertheultrafinefilter)tokeepthesealmoist.
F
G
The coarse strainer may be removed, if
necessary. Toremove, lift strainer out by
squeezing center section (F)and remove. To
replace, squeeze center section so clips snap
into square notch.
Possible Burn Hazard
Heating element will be hot immedi-
ately following use, Do not touch, To
avoid burns wait at least 20 minutes
after a cycle for the heating element
to cool down.
17
Problem, Cause, Solution Chart
A convenient checklist for handling minor performance problems. Go over this list before calling for
service. If you can't solve your dishwasher's problem, turn to page 23 for service information.
PROBLEM CAUSE
Food Soil Left On Slowdown of wash arm
Dishes due to high suds
Spotting and Filming
Dishes Do Not Dry
Completely
Silica Film or Etching
(Silica Film is a White
Iridescent Deposit;
Etching is a Cloudy
Film)
Improper loading
Low water pressure
due to insufficient fill
Use of incorrect, too
little or ineffective
detergent
Detergent cakesin
dispenser
Water temperature is
too low
Filter cleaning spray
nozzle on wash arm is
blocked
SOLUTION
Use recommended dishwasher detergents only. Never use soap or
laundry detergents. Add more dishwasher detergent to increase
amount of suds-inhibitors.
Follow loading instructions in dishwasher Use and Care Guide.
Home water pressure should be 20to 120 psi for proper dishwasher
fill. A booster pump on the water supply may be necessary if pressure
is too low.
Use recommended dishwasher detergents only. Follow recommen-
dations in Use and Care Guide for amounts; never use less than one
tablespoon per load. Detergent must be fresh to be effective. Always
store it in a cool, dry area, preferably in an airtight container.
Use fresh detergent only. Do not allow detergent to sit for several
hours in a wet dispenser. Have dispenser checked to make sure it is
working properly.
Turn home water heater up so water entering dishwasher is 120°F
(49°C) minimum. See recommended procedure "Automatic Water
Heating" page 6. Do not select ENERGY SAVER DRY (no heat).
Remove lower wash arm and turn upside down. Check single
stainless steel spray nozzle and nine water jets located on underside
of wash arm. See page 16. Check to make sure openings are not
blocked.
Hard water or high
mineralcontentin
water
Water temperature is
too low
Use of incorrect
detergents
Incorrect amount of
detergent
Use of ineffective
detergents
Insufficient fill caused
by low water pressure
Dishes do not drain
properly
Plastics
A water chemical
reaction with certain
types of glassware.
Usually caused by some
combination of soft or
softened water, alkaline
washing solutions, in-
sufficient rinsing, over-
loading the dishwasher,
and heat of drying.
Conditioning the final rinse water with a liquid rinse agent helps
eliminate spotting and filming. Keep the dispenser full with a rinse
agent, such as JET-DRY ®, at all times.
Turn home water heater up so water entering dishwasher is 120°F
(49°C) minimum. See recommended procedure "Automatic Water
Heating" page 6. Do not select ENERGY SAVER DRY (no heat).
Use recommended dishwasher detergents only
Follow recommendations in dishwasher Use and Care Guide for
amount. Heavy soil and/or hard water generally require extra
detergent.
Detergent should be fresh. Store in a cool, dry place, preferably in an
airtight container. Discard lumpy detergent.
Home water pressure should be 20 to 120 psi for proper dishwasher
fill. A booster pump on the water supply may be necessary if pressure
is too low.
Dishes must have proper water drainage. Do not overload. Follow
instructions for loading in dishwasher Use and Care Guide. Use a
liquid rinse agent to speed draining.
Some plastics, due to material, may need to be towel dried.
It may not be possible to prevent problem, except by hand washing.
To retard this process, use a minimum amount of detergent but not less
than one tablespoon per load. Use a liquid rinse agent and underload
the dishwasher to allow thorough rinsing. Silica film and etching are
permanent and cannot be removed. Use ENERGY SAVER DRY.
18
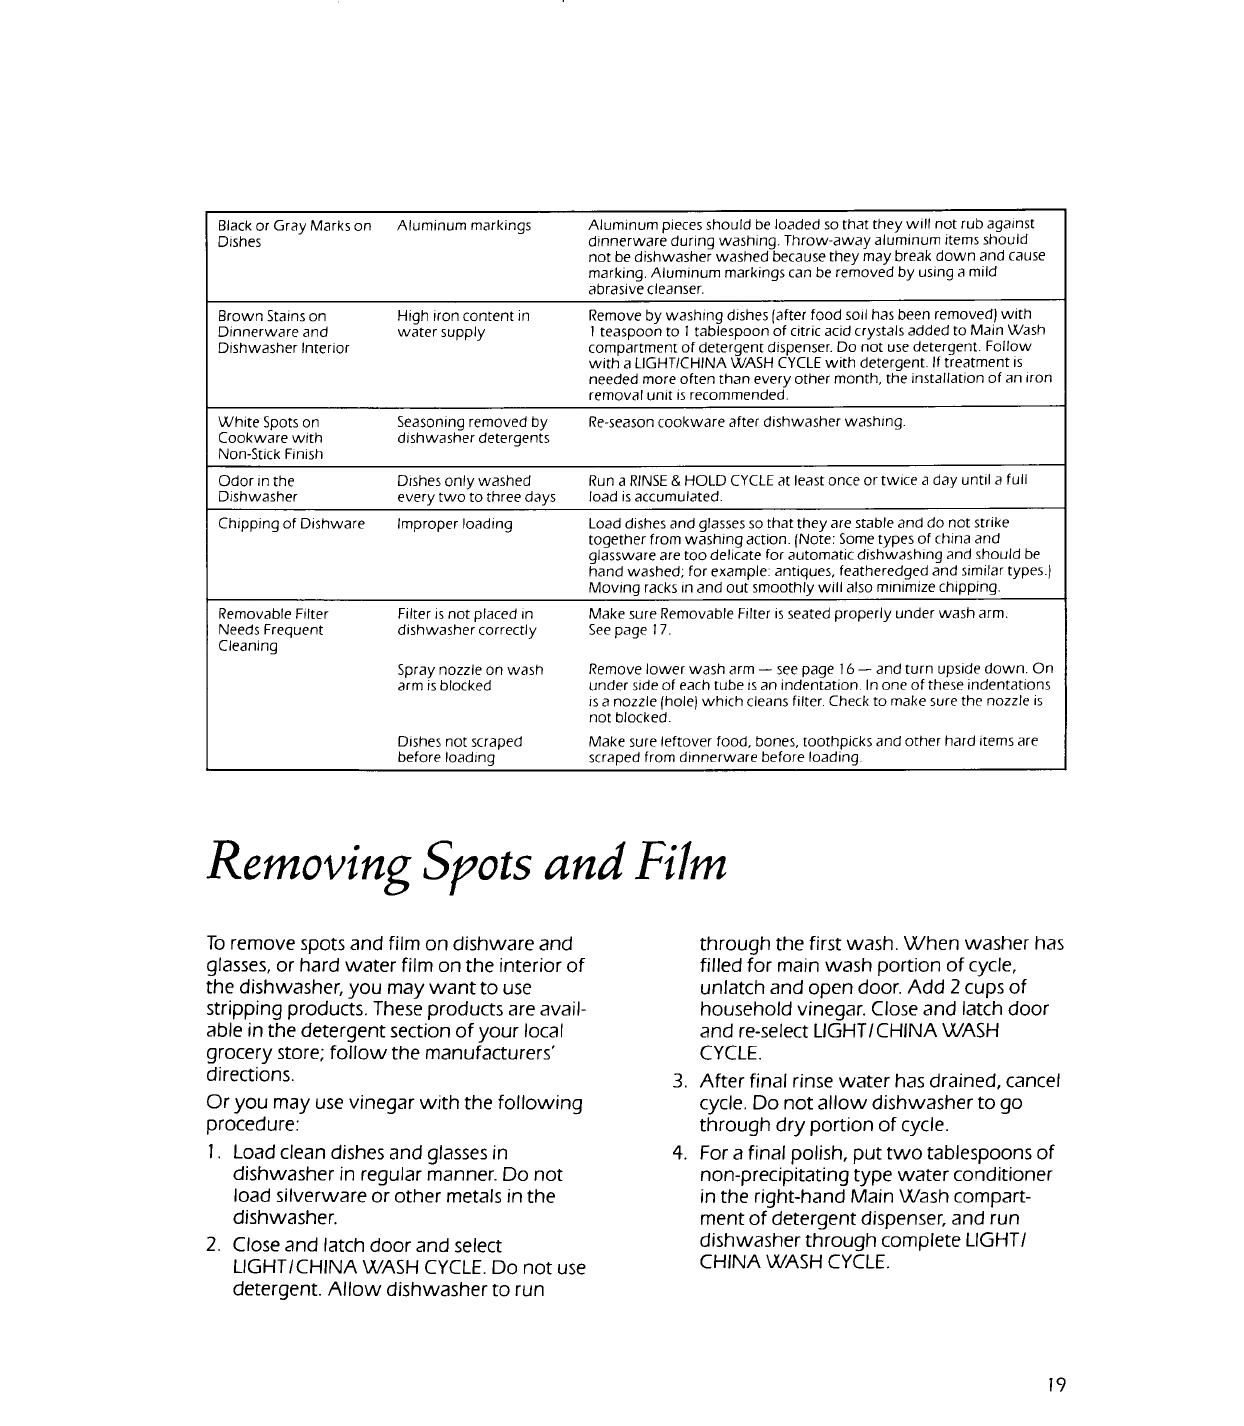
Blackor Gray Marks on
Dishes
Brown Stains on
Dinnerware and
Dishwasher Interior
Aluminum markings
High iron content in
water supply
Aluminum pieces should be loaded so that they will not rub against
dinnerware during washing. Throw-away aluminum items should
not be dishwasher washed because they may break down and cause
marking. Aluminum markings can be removed by using a mild
abrasive cleanser.
Remove by washing dishes (after food soil has been removed) with
1 teaspoon to I tablespoon of citric acid crystals added to Main Wash
compartment of detergent dispenser. Do not use detergent. Follow
with a LIGHT/CHINA WASH CYCLE with detergent. If treatment is
needed more often than every other month, the installation of an iron
removal unit is recommended.
White Spots on Seasoning removed by Re-season cookware after dishwasher washing.
Cookware with dishwasher detergents
Non-Stick Finish
Odor in the Dishes only washed Run a RINSE & HOLD CYCLE at least once or twice a day until a full
Dishwasher every two to three days load is accumulated.
Chipping of Dishware Improper loading Load dishes and glasses so that they are stable and do not strike
together from washing action. (Note: Some types of china and
glassware are too delicate for automatic dishwashing and should be
hand washed; for example: antiques, featheredged and similar types.)
Moving racks in and out smoothly will also minimize chipping.
Removable Filter Filter is not placed in Make sure Removable Filter is seated properly under wash arm.
Needs Frequent dishwasher correctly See page 17.
Cleaning
Spray nozzle on wash
arm is blocked
Dishes not scraped
before loading
Remove lower wash arm -- see page 16 -- and turn upside down. On
under side of each tube is an indentation. In one of these indentations
is a nozzle (hole) which cleans filter. Check to make sure the nozzle is
not blocked.
Make sure leftover food, bones, toothpicks and other hard items are
scraped from dinnerware before loading.
Removing Spots and Film
To remove spots and film on dishware and
glasses, or hard water film on the interior of
the dishwasher, you may want to use
stripping products. These products are avail-
able in the detergent section of your local
grocery store; follow the manufacturers'
directions.
Or you may use vinegar with the following
procedure:
1. Load clean dishes and glasses in
dishwasher in regular manner. Do not
load silverware or other metals in the
dishwasher.
2. Close and latch door and select
LIGHT/CHINA WASH CYCLE. Do not use
detergent. Allow dishwasher to run
.
.
through the first wash. When washer has
filled for main wash portion of cycle,
unlatch and open door. Add 2 cups of
household vinegar. Close and latch door
and re-select LIGHT/CHINA WASH
CYCLE.
After final rinse water has drained, cancel
cycle. Do not allow dishwasher to go
through dry portion of cycle.
For a final polish, put two tablespoons of
non-precipitating type water conditioner
in the right-hand Main Wash compart-
ment of detergent dispenser, and run
dishwasher through complete LIGHT/
CHINA WASH CYCLE.
19
Changing Front Panels
(FOR MODEL
Your new KitchenAid dishwasher comes with
a stainless steel trim kit and two front panels
installed one behind the other. You can
choose from almond or white (front and back
of one panel) and black or harvest wheat
(front and back of the second panel).
If you want to change the color of the
panels, follow one of the options below:
OPTION A may be used if your dishwasher
front sticks out several inches from the cabinets.
KUDI220T/GT ONLY)
OPTION B may be used if your dishwasher
front isflush with the cabinets.
Electrical Shock Hazard
Disconnect electrical power supply to
dishwasher before changing panels,
Failure to do socould result in
electrical shock or personal injury.
OPTION A
Upper Panel:
1. Disconnect electrical power supply.
2. Pull door open and on either side of the
dishwasher door, remove the three
screws (A) from the trim (B).Remove the
loosened piece of trim.
3. Slide the color panel out. Handle carefully
sothe panel will not be scratched or bent.
Turn the panel to the desired color. Place
the color panel in position then push the
filler panel in behind it.
4. Replace the trim (B)and the three screws (A).
Lower Panel:
1. Remove the two screws (C)on either side
of the lower panel assembly. Remove the
loosened piece of trim (D).
2. Slide the color panel out. Handle carefully
so the panel will not be scratched or bent.
Turn the panel to the desired color. Place
the color panel in position then push the
filler panel in behind it.
3. Replace the trim (D)and the two screws (C).
4. Reconnect electrical power supply.
L
2O
  • Page 1 1
  • Page 2 2
  • Page 3 3
  • Page 4 4
  • Page 5 5
  • Page 6 6
  • Page 7 7
  • Page 8 8
  • Page 9 9
  • Page 10 10
  • Page 11 11
  • Page 12 12
  • Page 13 13
  • Page 14 14
  • Page 15 15
  • Page 16 16
  • Page 17 17
  • Page 18 18
  • Page 19 19
  • Page 20 20
  • Page 21 21
  • Page 22 22
  • Page 23 23
  • Page 24 24

KitchenAid KUDI220T5 Owner's manual

Category
Dishwashers
Type
Owner's manual
This manual is also suitable for

Ask a question and I''ll find the answer in the document

Finding information in a document is now easier with AI