Toro SnowMaster 724 QXE User manual
- Category
- Snow throwers
- Type
- User manual
This manual is also suitable for

FormNo.3406-735RevA
SnowMaster®724ZXRSnowthrower
ModelNo.36001—SerialNo.400010798andUp
Operator'sManual
Introduction
WARNING
CALIFORNIA
Proposition65Warning
Thisproductcontainsachemicalorchemicals
knowntotheStateofCaliforniatocausecancer,
birthdefects,orreproductiveharm.
Theengineexhaustfromthisproduct
containschemicalsknowntotheStateof
Californiatocausecancer,birthdefects,
orotherreproductiveharm.
Thismachineisintendedtobeusedbyresidential
homeowners.Itisdesignedforremovingsnowfrom
pavedsurfaces,suchasdrivewaysandsidewalks,and
othersurfacesfortrafconresidentialorcommercial
properties.Itisnotdesignedforremovingmaterials
otherthansnow,norisitdesignedforclearingoffgravel
surfaces.
Readthisinformationcarefullytolearnhowtooperateand
maintainyourmachineproperlyandtoavoidinjuryand
machinedamage.Youareresponsibleforoperatingthe
machineproperlyandsafely.
YoumaycontactTorodirectlyatwww .Toro.comformachine
andaccessoryinformation,helpndingadealer,ortoregister
yourmachine.
Wheneveryouneedservice,genuineToroparts,oradditional
information,contactanAuthorizedServiceDealerorToro
CustomerServiceandhavethemodelandserialnumbersof
yourmachineready.Figure1identiesthelocationofthe
modelandserialnumbersonthemachine.Writethenumbers
inthespaceprovided.
Figure1
1.Modelandserialnumberlocation
ModelNo.
SerialNo.
Thismanualidentiespotentialhazardsandhassafety
messagesidentiedbythesafety-alertsymbol(Figure2),
whichsignalsahazardthatmaycauseseriousinjuryordeath
ifyoudonotfollowtherecommendedprecautions.
Figure2
1.Safety-alertsymbol
Thismanualuses2wordstohighlightinformation.
Importantcallsattentiontospecialmechanicalinformation
andNoteemphasizesgeneralinformationworthyofspecial
attention.
Formodelswithstatedpower,thenetpoweroftheenginewas
laboratoryratedbytheenginemanufacturerinaccordance
withSAEJ1940.Asconguredtomeetsafety,emission,and
operatingrequirements,theactualenginehorsepoweronthis
classofsnowthrowerwillbesignicantlylower.
©2016—TheToro®Company
8111LyndaleAvenueSouth
Bloomington,MN55420
Registeratwww.Toro.com.
OriginalInstructions(EN)
PrintedintheUSA
AllRightsReserved
*3406-735*A

Important:Ifyouareusingthismachineabove1500m
(5,000ft)foracontinuousperiod,ensurethattheHigh
AltitudeKithasbeeninstalledsothattheenginemeets
CARB/EPAemissionregulations.TheHighAltitude
Kitincreasesengineperformancewhilepreventing
spark-plugfouling,hardstarting,andincreased
emissions.Onceyouhaveinstalledthekit,attach
thehigh-altitudelabelnexttotheserialdecalonthe
machine.ContactanyAuthorizedToroServiceDealer
toobtaintheproperHighAltitudeKitandhigh-altitude
labelforyourmachine.Tolocateadealerconvenientto
you,accessourwebsiteatwww.Toro.comorcontactour
ToroCustomerCareDepartmentatthenumber(s)listed
inyourEmissionControlWarrantyStatement.
Removethekitfromtheengineandrestoretheengine
toitsoriginalfactorycongurationwhenrunningthe
engineunder1500m(5,000ft).Donotoperateanengine
thathasbeenconvertedforhigh-altitudeuseatlower
altitudes;otherwise,youcouldoverheatanddamage
theengine.
Ifyouareunsurewhetherornotyourmachinehasbeen
convertedforhigh-altitudeuse,lookforthefollowing
label(Figure3).
Figure3
ThissparkignitionsystemcomplieswithCanadianICES-002.
Contents
Introduction..................................................................1
Safety...........................................................................3
SafetyandInstructionalDecals.................................4
Setup............................................................................5
1UnfoldingtheHandle............................................5
2InstallingtheDischargeChute................................6
3CheckingtheEngine-OilLevel...............................6
4CheckingtheTirePressure.....................................6
ProductOverview..........................................................7
Operation.....................................................................7
BeforeOperation.......................................................7
Safety.....................................................................7
FillingtheFuelTank................................................7
CheckingtheEngine-OilLevel..................................8
DuringOperation......................................................8
Safety.....................................................................8
StartingtheEngine..................................................9
EngagingtheAuger.................................................9
DisengagingtheAuger.............................................9
Self-PropellingtheMachine......................................9
ShuttingOfftheEngine...........................................9
AdjustingtheDischargeChuteandChute
Deector...........................................................10
UncloggingtheDischargeChute..............................10
OperatingTips......................................................10
AfterOperation........................................................11
Safety....................................................................11
PreventingFreeze-upafterUse.................................11
Maintenance.................................................................11
RecommendedMaintenanceSchedule(s)......................11
MaintenanceSafety.................................................11
CheckingtheEngine-OilLevel.................................12
CheckingandAdjustingtheSkids.............................12
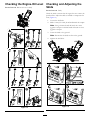
InspectingtheThrowingEdges................................13
ChangingtheEngineOil.........................................13
ReplacingtheSparkPlug.........................................14
AdjustingtheAugerCable.......................................14
AdjustingtheTransmissionCable.............................15
CheckingtheTirePressure......................................15
Storage........................................................................16
StoringtheSnowthrower.........................................16
2

Safety
ThismachinecomplieswithANSIB71.3specications
ineffectatthetimeofproduction.
•Readandunderstandthecontentsofthemanualbefore
youstarttheengine.Makesurethateveryoneusingthis
productknowshowtousetheproductandunderstands
thewarnings.
•Donotputyourhandsorfeetnearmovingcomponents
onthemachine.
•Donotoperatethemachinewithoutallguardsandother
safetyprotectivedevicesinplaceandworkingonthe
machine.
•Keepclearofanydischargeopening.Keepbystandersa
safedistanceawayfromthemachine.
•Keepchildrenoutoftheoperatingareaandunderthe
watchfulcareofaresponsibleadultotherthanthe
operator.Neverallowchildrentooperatethemachine.
•Shutthemachineoffbeforeservicing,fueling,or
unclogging.
Youcanndadditionalitemsofsafetyinformationintheir
respectivesectionsthroughoutthismanual.
3

SafetyandInstructionalDecals
Safetyandinstructiondecalsarelocatednearareasofpotentialdanger.Replacedamagedor
missingdecals.
131-1785
OrderPartNo.131-5921
1.Augerdrive—squeezethelevertoengage;releasethelever
todisengage.
4.Thrownobjecthazard—keepbystandersasafedistance
awayfromthesnowthrower.
2.Warning—readtheOperator'sManual.5.Self-propeldrive—pushdownonthehandletoengagethe
self-propeldrive.
3.Cutting/dismembermenthazardofhandorfoot,auger—keep
awayfrommovingparts;keepallguardsandshieldsinplace;
shutofftheengineandwaitfortheaugertostopbefore
leavingthemachine;removetheignitionkeyandreadthe
instructionsbeforeservicingorperformingmaintenance.
131-5914
OrderPartNo.131-5916
1.Cutting/dismembermenthazardofhandorfoot,auger—do
notplaceyourhandinthechute;removetheignitionkey
andreadtheinstructionsbeforeservicingorperforming
maintenance.
x 3
1
2
3
4
5
120-9805
120-9805
1.Insertthekey.
2.Primetheengine3times.
3.Engagethechoke.
4.Pullthestartercord.
5.Oncetheengineisrunning,disengagethechoke.
4

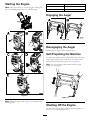
Setup
LooseParts
Usethechartbelowtoverifythatallpartshavebeenshipped.
ProcedureDescription
Qty.
Use
1
Nopartsrequired
–
Unfoldthehandle.
Bolt(1/4-20X1–1/2inches)
1
2
Washer-facedlocknut(1/4-20inch)
1
Installthedischargechute.
3
Nopartsrequired
–
Checktheengine-oillevel.
4
Nopartsrequired
–
Checkthetirepressure.
1
UnfoldingtheHandle
NoPartsRequired
Procedure
Important:Ensurethecablesarenotpinchedwhen
unfoldingthehandle.
Figure4
5

2
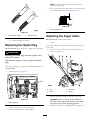
InstallingtheDischargeChute
Partsneededforthisprocedure:
1
Bolt(1/4-20X1–1/2inches)
1
Washer-facedlocknut(1/4-20inch)
Procedure
Insertthechutepostthroughthebracketintothebaseofthe
machineandsecureitusingaboltandalocknut(Figure5).
Figure5
1.Chutepost3.Washer-facedlocknut
(1/4-20inch)
2.Bolt(1/4-20X1–1/2
inches)
4.Bracket
3
CheckingtheEngine-OilLevel
NoPartsRequired
Procedure
Note:Yourmachinecomeswithoilintheenginecrankcase.
Beforestartingtheengine,checktheoillevelandaddoilif
necessary.
RefertoCheckingtheEngine-OilLevel(page12).
4
CheckingtheTirePressure
NoPartsRequired
Procedure
Thetiresareoverinatedatthefactoryforshipping.Reduce
thetirepressureequallyinbothtirestobetween103and137
kPa(15and20psi).
6

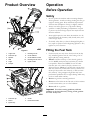
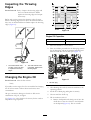
ProductOverview
Figure6
1.Augerlever7.Dischargechute
2.Fuel-tankcap
8.Chutedeector
3.Dipstick
9.Chute-deectorcontrol
4.Skid
10.Discharge-chutecontrol
5.Auger11.Upperhandle
6.Scraper
Figure7
1.Fuel-tankcap
4.Choke
2.Primer5.Recoil-starthandle
3.Ignitionkey
Operation
BeforeOperation
Safety
•Donotoperatethemachinewithoutwearingadequate
wintergarments.Avoidloosettingclothingthatcanget
caughtinmovingparts.Wearsubstantial,slip-resistant
footwearthatwillimprovefootingonslipperysurfaces.
•Alwayswearsafetyglassesoreyeprotectionduring
operationorwhileperforminganadjustmentorrepair
toprotecteyesfromforeignobjectsthatmaybethrown
fromthemachine.
•Thoroughlyinspecttheareawherethemachineistobe
usedandremovealldoormats,sleds,boards,wires,and
otherforeignobjects.
•Ifashield,safetydevice,ordecalisdamaged,illegible,or
lost,repairorreplaceitbeforebeginningoperation.Also,
tightenanyloosefasteners.
FillingtheFuelTank
•Forbestresults,useonlyclean,fresh(lessthan30days
old),unleadedgasolinewithanoctaneratingof87or
higher((R+M)/2ratingmethod).
•Ethanol:Gasolinewithupto10%ethanol(gasohol)
or15%MTBE(methyltertiarybutylether)byvolume
isacceptable.EthanolandMTBEarenotthesame.
Gasolinewith15%ethanol(E15)byvolumeisnot
approvedforuse.Neverusegasolinethatcontainsmore
than10%ethanolbyvolume,suchasE15(contains15%
ethanol),E20(contains20%ethanol),orE85(contains
85%ethanol).Usingunapprovedgasolinemaycause
performanceproblemsand/orenginedamagewhichmay
notbecoveredunderwarranty.
•Donotusegasolinecontainingmethanol.
•Donotstorefueleitherinthefueltankorfuelcontainers
overthewinterunlessyouuseafuelstabilizer.
•Donotaddoiltogasoline.
Important:Toreducestartingproblems,addfuel
stabilizertothefuelallseason,mixingitwithgasoline
lessthan30daysold.
7

Figure8
1.Donotllabovethebottomofthefuel-tankneck.
CheckingtheEngine-OilLevel
RefertoCheckingtheEngine-OilLevel(page12).
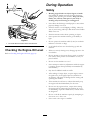
DuringOperation
Safety
•Rotatingaugerbladescaninjurengersorhands.
Staybehindthehandlesandawayfromthedischarge
openingwhileoperatingthemachine.Keepyourface,
hands,feet,andanyotherpartofyourbodyor
clothingawayfrommovingorrotatingparts.
•Neverdirectthedischargetowardpeopleorareaswhere
propertydamagecanoccur.
•Exercisecautiontoavoidslippingorfalling.Alwaysbe
sureofyourfooting,andkeeparmholdonthehandles.
Walk;neverrun.
•Exerciseextremecautionwhenoperatingonslopes.
•Neveroperatethemachinewithoutgoodvisibilityor
light.
•Donotoperatethemachinewhileill,tired,orunderthe
inuenceofalcoholordrugs.
•Lookbehindandusecarewhenbackingupwiththe
machine.
•Whennotactivelyclearingsnow ,disengagepowertothe
rotorblades.
•Donotattempttoclearsnowfromagravelorcrushed
rocksurface.Thisproductisintendedforuseonlyon
pavedsurfaces.
•Donotusethemachineonaroof.
•Neverattempttomakeanyadjustmentswhiletheengine
isrunning(exceptwhenspecicallyrecommendedby
manufacturer).
•Stayalertforhiddenhazardsortrafc.
•Afterstrikingaforeignobject,stoptheengine,remove
theignitionkey,thoroughlyinspectthemachinefor
anydamage,andrepairthedamagebeforestartingand
operatingthemachine.
•Ifthemachineshouldstarttovibrateabnormally,stop
theengineandcheckimmediatelyforthecause.
•Donotruntheengineindoors,exceptwhenstarting
theengineandfortransportingthemachineinorout
ofthebuilding.Opentheoutsidedoors;exhaustfumes
aredangerous.
•Donotoverloadthemachinecapacitybyattemptingto
clearsnowattoofastarate.
•Nevertouchahotengineormufer.
8

StartingtheEngine
Note:Fullyinsertthekeytostarttheengine.Turningthe
keytothemiddlepositiondoesnotstarttheengine.
Figure9
Note:PrimetheengineinBofFigure9accordingtothe
followingtable:
Temperature
SuggestedNumberofPrimes
-23°C(-10°F)andabove
3
Below-23°C(-10°F)
6
EngagingtheAuger
Figure10
DisengagingtheAuger
Todisengagetheauger,releasetheaugerlever.
Self-PropellingtheMachine
Tooperatetheself-propeldrive,simplywalkwithyourhands
ontheupperhandleandyourelbowsatyoursides,andthe
machineautomaticallykeepspacewithyou(Figure11).
Note:Youcanself-propelthemachinewiththeauger
engagedordisengaged.
Figure11
ShuttingOfftheEngine
Toshutofftheengine,removethekeyfromtheignitionor
movethekeytothemiddleposition.
9

AdjustingtheDischargeChute
andChuteDeector
Toraiseorlowertheangleofthechutedeector,pressthe
triggeronthechutedeectorandmovethechutedeector
upordown.
Toadjustthedischargechute,movethechutehandle.
Note:Disengagetheaugerbeforeadjustingthechuteor
chutedeector.
Figure12
1.Trigger
2.Chutehandle
UncloggingtheDischarge
Chute
WARNING
Iftheauger/impellerisrunningbutthereisno
snowcomingoutofthedischargechute,the
dischargechutemaybeclogged.
Neveruseyourhandstoclearacloggeddischarge
chute.Thiscouldresultinpersonalinjury.
1.Whileremainingintheoperatingposition,releasethe
self-propelhandle.
2.Engagetheauger.
3.Pushdownonthehandletoraisethefrontofthe
machineafewcentimeters(inches)offthepavement,
thenliftthehandlesquicklytobumpthefrontofthe
machineontothepavement.
4.Disengagetheauger.
5.Repeatsteps1through4,ifnecessary,untilastreamof
snowcomesoutofthedischargechute.
Note:Ifyoucannotunclogthedischargechutebybumping
thefrontofthemachine,shutofftheengine,waitforall
movingpartstostop,anduseasnow-cleanouttool(not
included);neveruseyourhand.
Important:Uncloggingthedischargechuteby
bumpingthefrontofthemachineonthepavementmay
causetheskidstomove.Adjusttheskidsandtighten
theskidboltssecurely;refertoCheckingandAdjusting
theSkids(page12).
OperatingTips
WARNING
Theaugercanthrowstones,toys,andotherforeign
objectsandcauseseriouspersonalinjurytothe
operatorortobystanders.
•Keeptheareatobeclearedfreeofallobjects
thattherotorbladescouldpickupandthrow.
•Keepallchildrenandpetsawayfromthearea
ofoperation.
•Removethesnowassoonaspossibleafteritfalls.
•Ifthemachinedoesnotpropelitselfforwardonslippery
surfacesorinheavysnow ,pushforwardonthehandle,
butallowthemachinetoworkatitsownpace.
•Overlapeachswathtoensurecompletesnowremoval.
•Dischargethesnowdownwindwheneverpossible.
10

AfterOperation
Safety
•Neverstorethemachinewithfuelinthefueltankinsidea
buildingwhereignitionsourcesarepresent,suchashot
waterheaters,spaceheaters,orclothesdryers.Allowthe
enginetocoolbeforestoringinanyenclosure.
•Whenstoringthemachineformorethan30days,referto
Storage(page16)forimportantdetails.
PreventingFreeze-upafterUse
•Lettheenginerunforafewminutestopreventmoving
partsfromfreezing.Shutofftheengine,waitforall
movingpartstostop,andremoveiceandsnowfromthe
machine.
•Cleanoffanysnowandicefromthebaseofthechute.
•Rotatethedischargechuteleftandrighttofreeitfrom
anyicebuildup.
•WiththeignitionkeyintheOFFposition,pullthe
recoil-starthandleseveraltimestopreventtherecoil
starterfromfreezingup.
•Insnowyandcoldconditions,somecontrolsandmoving
partsmayfreeze.Donotuseexcessiveforcewhen
tryingtooperatefrozencontrols.Ifyouhavedifculty
operatinganycontrolorpart,starttheengineandletit
runforafewminutes.
•Donotusethechutecontroltoattempttomoveafrozen
dischargechute.Holddowntheblueknobanduseyour
handstorotatethechute.
•Transportingthemachineinanopentrailerorvehiclecan
causethecontrolsordischargechutetofreeze.
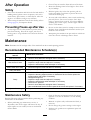
Maintenance
Note:Determinetheleftandrightsidesofthemachinefromthenormaloperatingposition.
RecommendedMaintenanceSchedule(s)
MaintenanceService
Interval
MaintenanceProcedure
Afterthersthour
•Checkforloosefastenersandtightenthemifnecessary.
Aftertherst2hours
•Changetheengineoil.
•Inspecttheaugercableandadjustitifnecessary.
•Inspectthetransmissioncableandadjustitifnecessary.
Beforeeachuseordaily
•Checktheengine-oillevelandaddoilifnecessary.
Every100hours
•Replacethesparkplug.
Yearly
•Checktheskidsandadjustthemifnecessary.
•InspectthethrowingedgesandhaveanAuthorizedServiceDealerreplacethe
throwingedgesandscraperifnecessary.
•Changetheengineoil.
•Inspecttheaugercableandadjustitifnecessary.
•Inspectthetransmissioncableandadjustitifnecessary.
•Checkthetirepressure.
•Checkforloosefastenersandtightenthemifnecessary.
•HaveanAuthorizedServiceDealerinspectthedrivebeltandreplaceitifnecessary.
Yearlyorbeforestorage
•Preparethemachineforstorage.
MaintenanceSafety
Readthefollowingsafetyprecautionsbeforeperformingany
maintenanceonthemachine:
•Beforeperforminganymaintenance,service,or
adjustment,shutofftheengineandremovethekey.If
majorrepairsareeverneeded,contactanAuthorized
ServiceDealer.
•Checkallfastenersatfrequentintervalsforproper
tightnesstobesurethemachineisinsafeworking
condition.
•Maintainorreplacesafetyandinstructionlabels,as
necessary.
•Donotchangethegovernorsettingsontheengine.
•PurchaseonlygenuineTororeplacementpartsand
accessories.
11

CheckingtheEngine-OilLevel
ServiceInterval:Beforeeachuseordaily
Figure13
CheckingandAdjustingthe
Skids
ServiceInterval:Yearly
Checktheskidstoensurethattheaugerdoesnotcontactthe
pavedsurface.Adjusttheskidsasneededtocompensatefor
wear(Figure14).
1.Loosentheskidbolts.
2.Slidea5mm(3/16inch)boardunderneaththescraper.
Note:Usingathinnerboardwillresultinamore
aggressivescraper.Athickerboardwillresultinaless
aggressivescraper.
3.Lowertheskidstotheground.
Note:Ensurethattheskidsareatontheground.
4.Tightentheskidbolts.
Figure14
12

InspectingtheThrowing
Edges
ServiceInterval:Yearly—Inspectthethrowingedgesand
haveanAuthorizedServiceDealer
replacethethrowingedgesandscraper
ifnecessary.
Beforeeachsession,inspectthethrowingedgesforwear.
Whenathrowingedgehasworndowntothewear-indicator
hole,haveanAuthorizedServiceDealerreplacethethrowing
edges(Figure15).
Figure15
1.Thewear-indicatorhole
isintact;youdonotneed
toreplacethethrowing
edges.
2.Thewear-indicatorhole
isexposed;replaceboth
throwingedges.
ChangingtheEngineOil
ServiceInterval:Aftertherst2hours
Yearly
Ifpossible,runtheengineforafewsecondsbeforechanging
theoilbecausewarmoilowsbetterandcarriesmore
contaminants.
Oiltype:automotivedetergentoilwithanAPIservice
classicationofSJ,SL,orhigher.
UseFigure16toselectthebestoilviscosityfortheoutdoor
temperaturerangeexpected:
Figure16
EngineOilCapacities
Model
Maxll
36001
0.5L(17oz)
1.Movethemachinetoalevelsurface.
2.Placeanoil-drainpanundertheoil-drainplug,remove
theoil-drainplug,andtipthemachinebackwardand
draintheusedoilintheoil-drainpan(Figure17).
Figure17
1.Oil-drainplug
3.Afterdrainingtheusedoil,returnthemachinetothe
operatingposition.
4.Installtheoil-drainplugandtightenitsecurely.
5.Cleanaroundtheoil-llcap.
6.Fillthecrankcasewithoil.
A.Removethedipstickandslowlypouroilintothe
oil-lltubetoraisetheoilleveltotheFullmark
onthedipstick(Figure19).Donotoverll.
13

Figure18
1.Lowoillevel—addoil
2.Correctoillevel
B.Installthedipsticksecurely.
ReplacingtheSparkPlug
ServiceInterval:Every100hours—Replacethesparkplug.
WARNING
Replacingthesparkplugwhiletheengineishot
canresultinburns.
Waituntiltheengineiscooltoreplacethespark
plug.
UseaTorosparkplugorequivalent(Champion®RN9YCor
NGKBPR6ES).
1.Removetheboot(Figure19).
Figure19
1.Spark-plugboot
2.Cleanaroundthebaseofthesparkplug.
3.Removeanddiscardtheoldsparkplug.
Note:Youwillneedaratchetwrenchextensionto
removethesparkplug.
4.Setthegapbetweentheelectrodesonanewsparkplug
at0.76mm(0.030inch)asshowninFigure20.
Figure20
1.0.76mm(0.030inch)
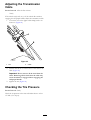
AdjustingtheAugerCable
ServiceInterval:Aftertherst2hours
Yearly
Ifthedrivebeltslipsorsquealsunderheavyload,adjustthe
augercable.
1.Loosenthenutonthelowercableclamp,butdonot
removeit(Figure21).
Figure21
1.Nut
3.Connector
2.Cable4.Spring
2.Pullthecableuptoremovesomeslack(Figure21).
Important:Donotremovealltheslackfrom
thecable.Removingalltheslackfromthecable
preventstheaugerfromstoppingproperly.
3.Holdthecableinplaceandtightenthenut(Figure21).
14

AdjustingtheTransmission
Cable
ServiceInterval:Aftertherst2hours
Yearly
Ifthewheelseasilystallout,orifthewheelsdrivewithout
engagingtheself-propelhandle,adjustthetransmissioncable.
1.Loosenthenutontheuppercableclamp,butdonot
removeit(Figure22).
Figure22
1.Nut
2.Cable
2.Pullthecabledowntoremovemostoftheslackinthe
cable(Figure22).
Important:Donotremovealltheslackfromthe
cable.Removingalltheslackfromthecablemay
causethewheelstoengagewithoutengagingthe
self-propelhandle.
3.Tightenthenut(Figure22).
CheckingtheTirePressure
ServiceInterval:Yearly
Checktheairpressureinthetiresandinatethemto103to
137kPa(15to20psi).
15

Storage
StoringtheSnowthrower
WARNING
•Gasolinefumesarehighlyammable,explosive,
anddangerousifinhaled.Ifyoustorethe
machineinanareawithanopename,the
gasolinefumesmayigniteandcausean
explosion.
•Donotstorethemachineinahouse(living
area),basement,oranyotherareawhereignition
sourcesmaybepresent,suchashotwaterand
spaceheaters,clothesdryers,furnaces,and
otherlikeappliances.
•Donottipthemachinebackwardwithfuelin
thefueltank;otherwise,fuelmayleakoutof
themachine.
1.Onthelastrefuelingoftheseason,addfuelstabilizer
tofreshfuelasdirectedbytheenginemanufacturer.
2.Runtheenginefor10minutestodistributethe
conditionedfuelthroughthefuelsystem.
3.Shutofftheengine,allowittocool,andsiphonthe
fueltankorruntheengineuntilitshutsoff.
4.Starttheengineandrunituntilitstops.
5.Chokeorprimetheengine,startitathirdtime,and
runtheengineuntilitdoesnotstart.
6.Drainthefuelinthecarburetorthroughthe
carburetor-drainboltintoanapprovedgasoline
container.
7.Disposeofunusedfuelproperly.Recycleitaccording
tolocalcodes,oruseitinyourautomobile.
8.Whiletheengineisstillwarm,changetheengineoil.
RefertoChangingtheEngineOil(page13).
9.Removethesparkplug.
10.Squirt2teaspoonsofoilintothespark-plughole.
11.Installthesparkplugbyhandandthentorqueitto27
to30N∙m(20to22ft-lb).
12.WiththeignitionkeyintheOFFposition,pullthe
recoil-starthandleslowlytodistributetheoilonthe
insideofthecylinder.
13.Cleanthemachine.
14.Touchupchippedsurfaceswithpaintavailablefroman
AuthorizedServiceDealer.Sandaffectedareasbefore
painting,andusearustpreventativetopreventthe
metalpartsfromrusting.
15.Tightenanyloosefasteners.Repairorreplaceany
damagedparts.
16.Coverthemachineandstoreitinaclean,dryplace
outofthereachofchildren.Allowtheenginetocool
beforestoringitinanyenclosure.
16

Notes:

*374-0320*
EmissionControlWarrantyStatement
FortheUnitedStates,California,andCanada
YourWarrantyRightsandObligations
TheCaliforniaAirResourcesBoard(CARB),theU.S.EnvironmentalProtectionAgency(EPA),andTheT oroCompany,arepleasedtoexplainthe
emissioncontrolsystemwarrantyonyour2017–2018smalloff-roadengine/equipment.InCaliforniaandtheUnitedStates,newsmalloff-road
engines/equipmentmustbedesigned,built,andcertiedtomeetstringentanti-smogstandards.TheToroCompanywarrantstheemissioncontrol
systemonyoursmalloff-roadengine/equipmentfortheperiodoftimelistedbelow,providedtherehasbeennoabuse,neglect,orimpropermaintenance
ofyoursmalloff-roadengine/equipment.
Youremissioncontrolsystemmayincludepartssuchasthecarburetor,fuel-injectionsystem,theignitionsystem,catalyticconverter,fueltanks,fuellines,
fuelcaps,valves,canisters,lters,vaporhoses,clamps,connectors,andotherassociatedemission-relatedcomponents.
Whereawarrantableconditionexists,TheToroCompanywillrepairyoursmalloff-roadengine/equipmentatnocosttoyouincludingdiagnosis,
partsandlabor.
Manufacturer’sWarrantyCoverage
ThisemissioncontrolsystemiswarrantedfortwoyearsorthedurationofTheToroWarranty,whicheverislonger.Ifanyemission-relatedpartonyour
engine/equipmentisdefective,thepartwillberepairedorreplacedbyTheToroCompany.
OwnerResponsibilities
Asthesmalloff-roadengineowner,youareresponsiblefortheperformanceoftherequiredmaintenancelistedinyourOperator'sManual.Werecommend
thatyouretainallreceiptscoveringmaintenanceonyoursmalloff-roadengine/equipment,butwecannotdenywarrantysolelyforthelackofreceipts.
Asthesmalloff-roadengine/equipmentowner,youshouldhoweverbeawarethatwemaydenyyouwarrantycoverageifyoursmalloff-road
engine/equipmentoraparthasfailedduetoabuse,neglect,impropermaintenanceorunapprovedmodications.
Youareresponsibleforpresentingyoursmalloff-roadengine/equipmenttoaT oroDistributionCenterorServiceCenterassoonasaproblemexists.The
warrantyrepairsshouldbecompletedinareasonableamountoftime,nottoexceedthirty(30)days.
Ifyouhaveanyquestionsregardingyourwarrantycoverage,contactusat:
CustomerCareDepartment,ConsumerDivision
ToroWarrantyCompany
8111LyndaleAvenueSouth
Bloomington,MN55420-1196
1-888-384-9939(U.S.andCanadiancustomers)
emailCustomerSupportat:www.toro.com
GeneralEmissionsWarrantyCoverage
TheToroCompanywarrantstotheultimatepurchaserandeachsubsequentpurchaserthatthesmalloff-roadengine/equipmentis:
•Designed,built,andcertiedtoconformwithallapplicableemissionsregulations;and
•Freefromdefectsinmaterialsandworkmanshipthatcouldcausethefailureofawarrantedpart;and
•Identicalinallmaterialrespectstothepartsasdescribedintheapplicationforcertication.
Thewarrantyperiodbeginsonthedatethesmalloff-roadengine/equipmentisdeliveredtoanultimatepurchaser.Thewarrantedperiodistwoyearsor
thedurationofTheT oroWarranty,whicheverislonger.
Subjecttocertainconditionsandexclusionsasstatedbelow,thewarrantyonevaporativeemissions-relatedpartsisasfollows:
1.Anywarrantedpartthatisnotscheduledforreplacementasrequiredmaintenanceinthewritteninstructionssupplied,iswarranted
forthewarrantyperiodstatedabove.Ifthepartfailsduringtheperiodofwarrantycoverage,thepartwillberepairedorreplacedby
TheToroCompany.Anysuchpartrepairedorreplacedunderwarrantywillbewarrantedfortheremainderofthewarrantyperiod.
2.Anywarrantedpartthatisscheduledonlyforregularinspectioninthewritteninstructionssuppliediswarrantedforthewarranty
periodstatedabove.Anysuchpartrepairedorreplacedunderthewarrantywillbewarrantedfortheremainderofthewarrantyperiod.
3.Anywarrantedpartthatisscheduledforreplacementasrequiredmaintenanceinthewritteninstructionssuppliedis
warrantedfortheperiodoftimebeforetherstscheduledreplacementdateforthatpart.Ifthepartfailsbeforetherst
scheduledreplacement,thepartwillberepairedorreplacedbyTheT oroCompany.Anysuchpartrepairedorreplaced
underwarrantywillbewarrantedfortheremainderoftheperiodpriortotherstscheduledreplacementpointforthepart.
4.Repairorreplacementofanywarrantedpartunderthewarrantyprovisionshereinmustbeperformedatan
AuthorizedServiceDealeratnochargetotheowner.
5.WarrantyservicesorrepairswillbeprovidedatallServiceDealersauthorizedtoservicethesubjectenginesorequipment.
6.Thesmalloff-roadengine/equipmentownerwillnotbechargedfordiagnosticlaborthatisdirectlyassociatedwithdiagnosis
ofadefective,emission-relatedwarrantedpart,providedthatsuchdiagnosticworkisperformedatanAuthorizedServiceDealer.
7.TheT oroCompanyisliablefordamagestootherengine/equipmentcomponentscausedbyafailureunderwarrantyofanywarrantedpart.
8.Throughoutthesmalloff-roadengine/equipmentwarrantyperiodstatedabove,TheT oroCompanywillmaintainasupply
ofwarrantedpartssufcienttomeettheexpecteddemandforsuchparts.
9.Manufacturerapprovedreplacementpartsmaybeusedintheperformanceofanywarrantymaintenanceorrepairsand
mustbeprovidedwithoutchargetotheowner.SuchusewillnotreducethewarrantyobligationsofTheToroCompany.
10.Add-onormodiedpartsthatarenotapprovedbyTheToroCompanymaynotbeused.Theuseofanon-approvedadd-onormodiedpartsby
thepurchaserwillbegroundsfordisallowingawarrantyclaim.TheT oroCompanywillnotbeliabletowarrantfailuresofwarrantedpartscausedby
theuseofannon-approvedadd-onormodiedparts.
374-0320RevA

WarrantedParts
Thefollowingemissionwarrantypartsarecovered,totheextentthesepartswerepresentontheT oroengine/equipmentand/orTorosuppliedfuelsystem:
1.FuelSystemParts
•Carburetorandinternalparts
•Coldstartingenrichment(primerorchoke)
•Fuelpump
•Fuelline,ttings,andclamps
•Fueltank,cap,andtether
•Carboncanister
2.AirInductionSystem
•Aircleaner
•Intakemanifold
•Crankcaseventandline(s)
•Purgelineandttings
3.IgnitionSystem
•Sparkplug(s)andwire(s)
•Magnetoignitionsystem
4.CatalyticExhaustSystem
•Catalyticconverter
•Exhaustmanifold
•Airinjectorsystemandvalve(s)
5.MiscellaneousItemsUsedinEmissionControlSystem
•Valves,switches,andlinkages
•Connectors,ttings,andbrackets
374-0320RevA

SnowMaster
PowerMax
TheToroWarranty
AThree-YearLimitedWarranty(45DayLimitedWarrantyforCommercialUse)
ConditionsandProductsCovered
TheT oroCompanyanditsafliate,T oroWarrantyCompany,pursuantto
anagreementbetweenthem,jointlypromisetorepairtheT oroProduct
listedbelowifusedforresidentialpurposes*,ifdefectiveinmaterialsor
workmanshiporifitstopsfunctioningduetothefailureofacomponent
fortheperiodlistedbelow.
Thiswarrantycoversthecostofpartsandlabor,butyoumustpay
transportationcosts.
Thefollowingtimeperiodsapplyfromtheoriginaldateofpurchase:
ProductsWarrantyPeriod
SnowMasterandPowerMaxSnowthrowers
andAttachments
3years
—ChuteLifetime(originalowner
only)
—DeectorLifetime(originalowner
only)
—SnowMasterLowerChuteLifetime(originalowner
only)
—PowerMaxAnti-CloggingSystem(Plastic
impellerhousingcover)
Lifetime(originalowner
only)
LimitedWarrantyforCommercialUse
Gas-poweredToroProductsusedforcommercial,institutional,orrental
use,arewarrantedfor45daysagainstdefectsinmaterialsorworkmanship.
Componentsfailingduetonormalweararenotcoveredbythiswarranty.
InstructionsforObtainingWarrantyService
IfyouthinkthatyourToroProductcontainsadefectinmaterialsor
workmanship,followthisprocedure:
1.ContactanyAuthorizedToroServiceDealertoarrangeserviceattheir
dealership.T olocateadealerconvenienttoyou,refertotheYellow
Pagesofyourtelephonedirectory(lookunder“LawnMowers”)or
accessourwebsiteatwww.Toro.com.Youmayalsocallthenumbers
listedinitem#3tousethe24-hourToroDealerlocatorsystem.
2.Bringtheproductandyourproofofpurchase(salesreceipt)tothe
ServiceDealer.Thedealerwilldiagnosetheproblemanddetermineif
itiscoveredunderwarranty.
3.IfforanyreasonyouaredissatisedwiththeServiceDealer’s
analysisorwiththeassistanceprovided,contactusat:
ToroWarrantyCompany
CustomerCareDepartment,RLCDivision
8111LyndaleAvenueSouth
Bloomington,MN55420-1196
Tollfreeat866-336-5205(U.S.customers)
Tollfreeat866-854-9033(Canadiancustomers)
OwnerResponsibilities
YoumustmaintainyourT oroProductbyfollowingthemaintenance
proceduresdescribedintheOperator'sManual.Suchroutinemaintenance,
whetherperformedbyadealerorbyyou,isatyourexpense.
ItemsandConditionsNotCovered
Thereisnootherexpresswarrantyexceptforspecialemissionsystem
coverageandenginewarrantycoverageonsomeproducts.Thisexpress
warrantydoesnotcoverthefollowing:
•Costofregularmaintenanceserviceorreplacementofwearparts,
suchasblades,rotorblades(paddles),scraperblades,belts,fuel,
lubricants,oilchanges,sparkplugs,lightbulbs,cable/linkageorbrake
adjustments
•Anyproductorpartwhichhasbeenalteredormisusedorneglected
orrequiresreplacementorrepairduetoaccidentsorlackofproper
maintenance
•Pickupanddeliverycharges
•Operationalmisuse,neglect,oraccidents
•RepairsorattemptedrepairsbyanyoneotherthananAuthorizedT oro
ServiceDealer
•Repairsnecessaryduetofailuretofollowrecommendedfuel
procedure(consultOperator'sManualformoredetails)
–Removingcontaminantsfromthefuelsystemisnotcovered
–Useofoldfuel(morethanonemonthold)orfuelwhichcontains
morethan10%ethanolormorethat15%MTBE
–Failuretodrainthefuelsystempriortoanyperiodofnon-use
overonemonth
GeneralConditions
AllrepairscoveredbythesewarrantiesmustbeperformedbyanAuthorized
ToroServiceDealerusingT oroapprovedreplacementparts.Repairbyan
AuthorizedT oroServiceDealerisyoursoleremedyunderthiswarranty.
NeitherTheToroCompanynorToroWarrantyCompanyisliablefor
indirect,incidental,orconsequentialdamagesinconnectionwiththe
useoftheToroProductscoveredbythesewarranties,includingany
costorexpenseofprovidingsubstituteequipmentorserviceduring
reasonableperiodsofmalfunctionornon-usependingcompletionof
repairsunderthesewarranties.
Allimpliedwarrantiesofmerchantability(thattheproductistforordinary
use)andtnessforuse(thattheproductistforaparticularpurpose)are
limitedtothedurationoftheexpresswarranty.
Somestatesdonotallowexclusionsofincidentalorconsequential
damages,orlimitationsonhowlonganimpliedwarrantylasts,sotheabove
exclusionsmaynotapplytoyou.
Thiswarrantygivesyouspeciclegalrights,andyoumayalsohaveother
rightswhichvaryfromstatetostate.
CountriesOtherthantheUnitedStatesorCanada
CustomerswhohavepurchasedT oroproductsexportedfromtheUnitedStatesorCanadashouldcontacttheirToroDistributor(Dealer)toobtain
guaranteepoliciesforyourcountry,province,orstate.IfforanyreasonyouaredissatisedwithyourDistributor'sserviceorhavedifcultyobtaining
guaranteeinformation,contacttheT oroimporter.Ifallotherremediesfail,youmaycontactusatToroWarrantyCompany.
AustralianConsumerLaw
AustraliancustomerswillnddetailsrelatingtotheAustralianConsumerLaweitherinsidetheboxoratyourlocalT oroDealer.
*Residentialpurposesmeansuseoftheproductonthesamelotasyourhome.Useatmorethanonelocation,orinstitutionalorrentaluse,isconsidered
commercialuse,andthecommercialusewarrantywouldapply.
374-0314RevB
-
 1
1
-
 2
2
-
 3
3
-
 4
4
-
 5
5
-
 6
6
-
 7
7
-
 8
8
-
 9
9
-
 10
10
-
 11
11
-
 12
12
-
 13
13
-
 14
14
-
 15
15
-
 16
16
-
 17
17
-
 18
18
-
 19
19
-
 20
20


Toro SnowMaster 724 QXE User manual
- Category
- Snow throwers
- Type
- User manual
- This manual is also suitable for
Ask a question and I''ll find the answer in the document
Finding information in a document is now easier with AI
Related papers
-
Toro SnowMax 724 QXE Snowthrower User manual
-
Toro SnowMaster 724 QXE User manual
-
Toro SnowMaster 724 ZXR Snowthrower User manual
-
Toro SnowMaster 724 QXE User guide
-
-
-
Toro SnowMaster 824 QXE Snowthrower User manual
-
-
-
Toro Flex-Force Power System 24in 60V Hedge Trimmer User manual