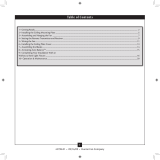
Home Decorators Collection 20018 User guide
- Type
- User guide

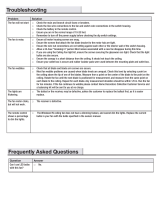
Problem
Solution
The fan will not start
□
Resync the remote & receiver by following the learning process in the
manual or the installation video
□
Check the main and branch circuit fuses or breakers.
□
Check the line wire connections to the fan and switch wire connections in
the switch housing.
□
Check the battery in the remote control.
□
Ensure you are in the normal range of 10-20 feet.
□
Remember to turn off the power supply before checking the dip switch
settings.
The fan is noisy
□
Ensure all motor housing screws are snug.
□
Ensure the screws that attach the fan blade bracket to the motor hub are
tight.
□
Ensure the wire nut connections are not rattling against each other or the
interior wall of the switch housing.
□
Allow a 24-hour “breaking in” period. Most noises associated with a new fan
disappear during this time.
□
If you are using the Ceiling Fan light kit, ensure the screws securing the
glassware are tight. Check that the light
□
bulbs are also secure.
□
Ensure the canopy is a short distance from the ceiling. It should not touch
the ceiling.
□
Ensure your outlet box is secure and rubber isolator pads were used
between the mounting plate and outlet box.
The fan wobbles
□
Check that all blade and blade arm screws are secure.
□
Most fan wobble problems are caused when blade levels are unequal.
Check this level by selecting a point on the ceiling above the tip of one of
the blades. Measure from a point on the center of the blade to the point on
the ceiling. Rotate the fan until the next blade is positioned for
measurement, and measure from the same point on each blade to the
ceiling. Repeat for each blade. Any measurement deviation should be within
1/8 in. Run the fan for ten minutes. If the fan continues to wobble, please
contact Home Decorators Collection Customer Service and a balancing kit
will be sent to you at no charge.
□
The mounting bracket is not firmly attached to the outlet box. Make sure the
mounting bracket is completely tightened to the outlet box.
□
The ball of the downrod assembly is not properly seated in the mounting
bracket. The ball has a notch that aligns with a tab on the mounting bracket.
The fan turns itself on/off.
□
Change the dip switch pattern in the remote control and repeat the learning
process found in your ceiling fan owner’s manual.
□
If after you have changed the dip switches to all 16 possible settings, the
fan continues to turn itself on/off, replace the remote receiver.
The fan will not change
direction.
□
The fan needs to be running prior to pushing the reverse button. Press a
speed button on your remote and allow the fan to start moving, then press
and hold the reverse button for 10 seconds.
Troubleshooting

The lights are flickering.
□
If you are using CFL light bulbs, open the back of the remote control and
verify that the “ON/DIM” dipswitch is set to the “ON” position. If you wish to
use the “DIM” feature, change the light bulbs to 60-watt max. incandescent
bulbs.
□
Replace the CFL bulbs with new CFL bulbs.
□
Do not use LED bulbs as they may damage the receiver, use CFL or
incandescent bulbs only.
-
 1
1
-
 2
2


Home Decorators Collection 20018 User guide
- Type
- User guide
Ask a question and I''ll find the answer in the document
Finding information in a document is now easier with AI
Related papers
-
Home Decorators Collection 51422 User guide
-
-
-
-
-
-
Unbranded 51472 User guide
Other documents
-
 Hampton Bay 51332 User guide
-
 Hunter Fan 27593 Owner's manual
-
Hunter Fan 99145 User manual
-
 Hunter Fan 42798-01 User manual
-
 Hampton Bay 55296 Troubleshooting guide
-
 Hunter Fan 21806 Owner's manual
-
Hunter Fan 20578 Owner's manual
-
 Hunter Fan 23926 Owner's manual
-
 Hunter Fan 28794 Owner's manual
-
 Hunter Fan 20593 Owner's manual


