Page is loading ...

(112PO) 619SP SMART BUILT IN PUMP ENGLISH 4.875” X 7.25” 09/07/2018
112
PO
READ AND SAVE THESE INSTRUCTIONS
Page 1
INTEX
®
OWNER’S MANUAL
Fast-Fill™ Electric 2 Speed Pump
Model
619SP
110 – 120 V~ 60 Hz 1.35 A
IMPORTANT SAFETY INSTRUCTIONS
READ AND FOLLOW ALL INSTRUCTIONS BEFORE USING THIS PRODUCT
To reduce the risk of burns, fire, electric shock, or injury to persons:
• Infants have suffocated on inflatable mattresses. Never place infant aged birth to 15 months to sleep on this
inflatable air mattress / air bed. Infants can suffocate on an underinflated or deflated mattress, on bedding , by
co-sleeping with another person, and by entrapment between the mattress and bed frame or between the
mattress and a vertical surface.
• Children can be entrapped between the inflatable mattress and an adjacent vertical surface. Provide at least a
shoulder width space between the inflatable mattress / airbed and adjacent vertical surfaces such as walls,
dressers or other objects.
• Always keep the inflatable mattress fully inflated when in use.
• Never introduce any flammable substance into the inflatable airbed, SUCH AS AEROSOL TIRE REPAIR
PRODUCTS, as it may ignite or explode.
• For indoor household use only. Use for inflation and deflation for domestic inflatable air bed.
• Unplug from outlet before putting on or taking off parts.
• Close supervision is necessary when this furnishing is used by, or near children, invalids, or disable persons.
• Use this furnishing only for its intended use as described in these instructions. Do not use attachments
not recommended by the manufacturer.
• Do not operate where aerosol (spray) products are being used or where oxygen is being administered.
• This is not a toy. Children must not be left unattended when using the airbed.
• Keep the storage bag away from babies and children. The storage bag is not a toy. When not in use,
fold the bag and put it away out of the reach of children.
• Do not walk, stand on or jump on or use the airbed as a trampoline.
• Do not use on or near water. This is not a raft.
• Do not set up bed near stairs, doors, sharp edges or breakable objects. Provide adequate space between bed
and objects to avoid entrapment.
• Make sure the area is flat, smooth, free of sharp objects that could puncture the bed and keep away from
ledges.
• Keep pets away from the airbed. Pets may puncture the surface of the bed.
• Avoid sleeping on the edge of the airbed. Edges produce less support than the middle of the bed.
• Do not operate air pump for more than 5.5 minutes at a time. Let pump cool at least 30 minutes between use.
• Unplug electrical power cord when not in use. To disconnect, turn all controls to the off position, then remove
plug from outlet.
• Never operate the furnishing with the air openings blocked. Keep the air openings free of lint, hair, and
the like. Never drop or insert object into any opening.
• Never operate this furnishing if it has a damaged cord or plug, if it is not working properly, if it has been
dropped or damaged, or dropped into water. Return the furnishing to a service center for examination and/or
repair.
• If the AC supply cord is damaged, it must be replaced by a special cord or assembly available from the
manufacturer or its service agent.
• Do not run cord under carpeting. Do not cover cord with throw rugs, runners, or similar coverings. Do not route
cord under furniture or appliances. Arrange cord away from traffic area and where it will not be tripped over.
Keep the cord away from heated surfaces.
• The socket-outlet shall be installed near the equipment and shall be easily accessible.
FOLLOW THESE RULES AND ALL INSTRUCTIONS TO AVOID SUFFOCATION, PROPERTY DAMAGE,
ELECTRIC SHOCK, BURNS OR OTHER INJURY.
WARNING
•
To reduce the risk of electric shock: Always unplug this furnishing from the electrical outlet before cleaning.
DANGER
112-*PO-R0-20--

(112PO) 619SP SMART BUILT IN PUMP ENGLISH 4.875” X 7.25” 09/07/2018
112
PO
READ AND SAVE THESE INSTRUCTIONS
Page 2
•
To reduce the risk of electric shock or injury, use indoors only, do not expose to rain. Store indoors.
CAUTION
PARTS REFERENCE
NOTE: Drawings for illustration purpose only. May not reflect actual product. Not to scale.
Due to a policy of continuous product improvement, Intex reserves the right to change
specifications and appearance, which may result in updates to the instruction manual,
without notice.
SERVICING OF A DOUBLE-INSULATED PRODUCT:
In a double-insulated product, two systems of insulation are provided instead of
grounding. No grounding means is provided on a double-insulated product, nor should
a means for grounding be added to the product. Servicing of a double-insulated product
requires extreme care and knowledge of the system, and should be done only by qualified
service personnel. Replacement parts for a double-insulated product must be identical to
those parts in the product. A double-insulated product is marked with the words “DOUBLE
INSULATION” or “DOUBLE INSULATED” and with the symbol .
OPERATING INSTRUCTIONS
General
• This appliance has a polarized plug (one blade is wider than the other). This plug will fit
in a polarized outlet only one way. If the plug does not fit fully in the outlet, reverse the
plug. If it still does not fit, contact a qualified electrician to install the proper outlet. Do not
change the plug in any way.
• For inflatable products with a total air volume up to 2 cubic meter (70 cubic feet), which
correspond to an expected inflation time of about 5 min and 30 sec.
Maintenance instructions:
• No air pump maintenance is required. Air pump has no user serviceable parts.
• For cleaning use only mild soapy solution. Do not use any chemicals.
• In case of repairs, use only common PVC repair glue and patches.
4
2
3
5
6
7
1
11
8
9
10
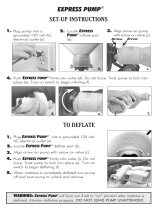
Part Descriptions:
1. AC line cord connector
2. Inflation button (
)
3. Deflation button ( )
4. Soft button ( )
5. Medium button (
)
6. Firm button ( )
7.
USB power socket (5 V DC/2.0 A)
8. Cord compartment cover
9. 2-in-1 valve
10. AC line cord
11. Airbed

(112PO) 619SP SMART BUILT IN PUMP ENGLISH 4.875” X 7.25” 09/07/2018
112
PO
READ AND SAVE THESE INSTRUCTIONS
Page 3
INFLATION
1. Unfold the airbed. Open line cord compartment cover. See Fig (1).
2. Attach the AC line cord to the pump cord connector and plug into an AC electrical outlet.
See Fig (2 & 3).
3. Press the inflation button (
) to inflate. See Fig (4). The inflation indicator will light up
during the inflation.
4. When the airbed is inflated to the desired firmness, press “
” again to switch OFF.
Note: The pump will automatically switch OFF after about five and half minutes of
operation when the pump is left unattended or when airbed is fully inflated.
INFLATION OPTION
1. If electrical power is not available then a conventional foot or manually operated air
pump can be connected to the 2-in-1 valve for inflation.
2. Pull the 2-in-1 inflation valve cap out, insert air pump nozzle into the valve to inflate the
airbed. See Fig (5).
ADJUST THE FIRMNESS USING THE PRESET FIRMNESS BUTTONS
Lie down on the airbed to test and adjust the firmness.
1. Adjust the airbed firmness by pressing one of the following preset firmness buttons:
SOFT (
), MEDIUM ( ) or FIRM ( ). See Fig (6).
2. The indicator light stays on when the airbed is being inflated to the selected preset
firmness. Once the firmness is reached, the pump will stop inflating.
Note: Whenever the airbed pressure drops below the selected preset firmness, the
pump will automatically add air until it reaches the selected preset firmness. The pump
must be connected to an electrical outlet at all time.
FIG (1)
√
110 – 120 V
220 – 240 V
FIG (3) FIG (4)
FIG (2)
FIG (5)
FIG (6)

(112PO) 619SP SMART BUILT IN PUMP ENGLISH 4.875” X 7.25” 09/07/2018
112
PO
READ AND SAVE THESE INSTRUCTIONS
Page 4
OPERATING THE AIR PUMP WITH YOUR SMARTPHONE
Download and install the following air pump APP on
your smartphone at XXXXXXX. Open the APP and
activate the system. See Fig (7). Make sure the pump
is connected to an electrical outlet at all time.
Lie down on the airbed to test and adjust the firmness.
• Mode buttons: tap from the following preset
firmness buttons, “1”, “2”, or “3” (factory default
description names) to achieve
desired firmness. When the
desired firmness is obtained,
the pump stops, and the
automatic pressure maintaining
system will be activated 3
seconds later.
• Custom button: Tap this button
to achieve the desired firmness
you defined.
• Pressure control dial: If the sleeping surface is too hard, let some air out by dragging
the control dial counterclockwise gradually until the desired firmness is achieved. If the
airbed becomes too soft, drag the control dial clockwise to inflate the airbed. See Fig (8).
• Deflation button: tap this button to activate the deflation function. Tap this button again
to stop the deflation.
Note: The pump will automatically switch OFF after about five and half minutes of
operation when the pump is left unattended.
• Stop button: Tap this button to stop the air pump at any time.
Customization:
You can define and adjust your favorite firmness by following steps.
1. Press and hold the pressure control dial center or the “CUSTOM” button for two
seconds, a new window will pop up. See Fig (9).
2. Set the desired firmness by dragging the control dial, or press and hold the center
firmness number then input a new one.
3. Tap “SAVE” to save your favorite firmness into this button.
FIG (8)
Stop
button
Mode
buttons
Deflation
button
FIG (7)
Custom
button
FIG (9)

(112PO) 619SP SMART BUILT IN PUMP ENGLISH 4.875” X 7.25” 09/07/2018
112
PO
READ AND SAVE THESE INSTRUCTIONS
Page 5
DEFLATION
1. Attach the AC line cord to the pump cord connector and plug into an AC electrical
outlet. See Fig (2 & 3).
2. Press the deflation button (
) to deflate. See Fig (10).
3. When the airbed is almost deflated, begin rolling the airbed from the foot of the airbed
towards the head of the airbed where the pump is located. See Fig (11).
Press “
” to switch OFF when the airbed is completely deflated. See Fig (10).
Note: The pump will automatically switch OFF after about five and half minutes of
operation when the pump is left unattended. If there is still some air inside, repeat step
#2 thru #3 as necessary.
4. Disconnect the AC line cord from the pump and the electrical outlet, place it inside the
cord compartment and close the cover. Make sure the power cords are free of twist,
kink and knot.
DEFLATION OPTION
1. If electrical power is not available then open line cord compartment cover, unscrew
the exhaust valve cap to release the air. See Fig (12). Begin rolling the airbed from the
foot of the airbed towards the head of the airbed where the pump is located to remove
all the air. Close the exhaust valve cap back.
Inflate only with a low pressure inflator. Do not over inflate. Fill with cold air only.
IMPORTANT
FIG (11)
FIG (10)
Proper inflation of the airbed.
The ambient temperatures of air have an effect on the airbed internal pressure. At low
ambient temperature the air will contract within the airbed and the airbed will feel softer:
add air as necessary. At high ambient temperature the air within the airbed will expand
significantly and the airbed will become hard and may burst: release air to avoid damage
to the airbed or to soften the feel. Do not expose the airbed to extreme temperatures (hot
or cold). Stretching is a natural characteristic of new vinyl. During initial use, the airbed
may become soft and require additional inflation to maintain desired firmness. This is
normal for the first few days of use. Dimensions shown are approximate and will vary due
to the vinyl temperature and the air temperature.
In no event shall Intex, their authorized agents or employees be liable for damages
(such as pin holes) to the airbed caused by negligence, ordinary wear and tear,
abuse and carelessness, or external forces.
IMPORTANT NOTE
FIG (12)

(112PO) 619SP SMART BUILT IN PUMP ENGLISH 4.875” X 7.25” 09/07/2018
112
PO
READ AND SAVE THESE INSTRUCTIONS
Page 6
USB POWER SOCKET
Output: 5 V DC / 2.0 A
Suitable for smartphones, tablets and portable audio devices charging.
FIG (13)
FIG (14)
FIG (15)
FIG (17)
FIG (16)
4. Disconnect the AC line cord from the pump and wall socket, place the AC line cord and
remote control (if applicable) inside the cord compartment, close the cover.
5. Place the airbed inside the storage bag and store in a dry, cool storage location.
©2019 Intex Marketing Ltd. - Intex Development Co. Ltd. - Intex Recreation Corp. All rights reserved/Tous droits réservés/Todos
los derechos reservados/Alle Rechte vorbehalten. Printed in China/Imprimé en Chine/Impreso en China/Gedruckt in China.
®™ Trademarks used in some countries of the world under license from/®™ Marques utilisées dans certains pays sous licence de/
Marcas registradas utilizadas en algunos países del mundo bajo licencia de/Warenzeichen verwendet in einigen Ländern der Welt in
Lizenz von/Intex Marketing Ltd. to/à/a/an Intex Development Co. Ltd., G.P.O Box 28829, Hong Kong & Intex Recreation Corp., P.O.
Box 1440, Long Beach, CA 90801 • Distributed in the European Union by/Distribué dans l’Union Européenne par/Distribuido en la unión
Europea por/Vertrieb in der Europäischen Union durch/Intex Trading B.V., Venneveld 9, 4705 RR Roosendaal – The Netherlands
Consumer Service 1-800-234-6839\ www.intexcorp.com
STORAGE INSTRUCTIONS
1. Deflate the airbed following the "DEFLATION" instructions.
2. Make sure the airbed is clean and dry.
3. Lay bed flat with sleeping surface facing upwards and follow the folding steps on Figs
(13 - 17). Fold the airbed loosely and avoid sharp bends, corners and creases which
can damage the airbed.
This equipment has been tested and found to comply with the limits for a Class B digital
device, pursuant to Part 15 of the FCC Rules. These limits are designed to provide
reasonable protection against harmful interference in a residential installation. This
equipment generates, uses and can radiate radio frequency energy and, if not installed
and used in accordance with the instructions, may cause harmful interference to radio
communications. However, there is no guarantee that interference will not occur in a
particular installation. If this equipment does cause harmful interference to radio or television
reception, which can be determined by turning the equipment off and on, the user is
encouraged to try to correct the interference by one or more of the following measures:
• Reorient or relocate the receiving antenna.
• Increase the separation between the equipment and the receiver.
• Connect the equipment into an outlet on a circuit different from that to which the receiver
is connected.
• Consult the dealer or an experienced radio/TV technician for help.
This device complies with part 15 of the FCC Rules. Operation is subject to the following
two conditions: (1) This device may not cause harmful interference, and (2) this device must
accept any interference received, including interference that may cause undesired operation.
CAN ICES-3 (B)/NMB-3 (B) Max. transmitting power 2.5dBm
WARNING: Please note that changes or modifications not expressly approved by the party responsible for
compliance could void the user’s authority to operate the equipment.
/