Page is loading ...

What if I have extra cove
pieces left over after I’m
done installing?
Continue on to page 21 for
a few creative ideas on how
to utilize left over cove pieces.
Finding Your Installation Instructions
WARNING: Standard safety precautions should be taken when installing Arch-Rite® archways and ceilings. Installer should be familiar
with safe operating procedures for power tools, wood working tools and ANY ladders necessary for installation. The installer should
follow published installation instructions and wear proper head and eye protection (i.e. hard hat and safety glasses). Arch-Rite® and
its Licensees assume no liability for any injury or accident as a result of installing any Arch-Rite® products. All Arch-Rite® products
are designed to bear only the weight of drywall, drywall products, paint, trim and/or nishing items. Arch-Rite® products are NOT
designed to bear and CANNOT bear the weight and forces of any building or structure. All Arch-Rite® products are to be used ONLY
FOR AESTHETIC PURPOSES and are NOT LOAD-BEARING.
A Quick Note Regarding these Installation Instructions
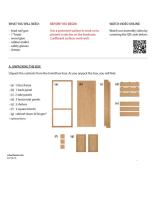
Don’t be overwhelmed by the size of these installation instructions. You’ll only be using a few pages, as this booklet
includes instructions for each of the four dierent cove styles in formats for both new construction and remodels. You’re
simply going to choose your construction setting, and then choose your cove style and use those select pages. We’ve
included drywall instructions with a few tips and tricks to help simplify this process; and, as a bonus, we have included
a few creative ideas to use any leftover cove pieces you may have (some installations won’t have any extras, and that’s
okay, too). We’ve got you covered!
Measuring Tape
Pencil
Square
Simple Calculator
Chalk Line
Circular Saw
Staple Gun w/ 1” (or greater) Staples/Brads (PROs) or
Screw Gun w/ 1” (or greater) deck screws (DIYers)
Nail Gun w/ 16D (PROs) or
Screw Gun w/ 3” (or greater) deck screws (DIYers)
2x4s
Hard Hat & Safety Glasses
Top reveal, bottom reveal and top & bottom reveal in a remodel
3/8” drill bit
1/8” x 3” Steel Mushroom-Head Toggle Bolts
(or any hardware capable of fastening a 2x4 to drywall)
1
/8” x 1” Steel Fender Washers
Stud Finder
No reveal, top reveal and bottom reveal in a remodel
Utility Knife/Wallboard Saw
There are 8 dierent installation instructions included in this booklet. Choose the one that suits your needs based on your
installation. Is it new construction or a remodel? Which of the 4 dierent cove styles will you be installing? Before you can begin
installing your Universal Cove Kit, rst choose whether you’ll be installing to new construction or in a remodel.
NEW CONSTRUCTION
Now that you have chosen to install your Universal Cove Kit to new
construction, choose 1 of the 4 cove styles and then continue to
the correct page for your installation instructions.
in A REMODEL
Now that you have chosen to install your Universal Cove Kit in a
remodel, choose 1 of the 4 cove styles and then continue to the
correct page for your installation instructions.
(If you’ve removed all the
drywall in the room where
you plan to install your
Universal Cove Kit, then
use the New Construction
instructions)
NO REVEAL TOP REVEAL
Continue on to page 3 for the
installation instructions for new
construction with no reveal.
Continue on to page 5 for the
installation instructions for new
construction with top reveal.
NO REVEAL TOP REVEAL
Continue on to page 11 for the
installation instructions for a
remodel with no reveal.
Continue on to page 13 for the
installation instructions for a
remodel with top reveal.
BOTTOM REVEAL TOP & Bottom REVEAL
Continue on to page 7 for the
installation instructions for new
construction with bottom reveal.
Continue on to page 9 for the
installation instructions for new
construction with top/bottom reveal.
Bottom REVEAL TOP & Bottom REVEAL
Continue on to page 15 for the
installation instructions for a
remodel with bottom reveal.
Continue on to page 17 for the
installation instructions for a
remodel with top and bottom reveal.
Round a tray ceiling cove a SMALL SPACE
2
You may also need some
of the following materials
and tools depending upon
your cove style and whether
you’ll be installing to new
construction or in a remodel.
cove a 90 Inside wall
1

4
NEW CONSTRUCTION
WITH
NO REVEAL
Framed room with no drywall
At each corner of the room, measure and mark the wall down
from the ceiling 11 ¼”. Measure and mark the ceiling out from
the wall 11¼”.
1.
Block in-between the wall studs and/or ceiling, if necessary,
to suciently attach the cove pieces. If building code requires
you to re block, reference Step 8. In this case, combining
steps 2 and 8 can save time.
2.
Using your marks as a guide, snap a line (with your chalk line)
on the wall and on the ceiling around the entire perimeter of
the room.
3.
Using a staple gun w/ 1” (or greater) staples/brads (PROs) or a
screw gun w/ 1” (or greater) deck screws (DIYers), install your
90° inside and/or outside corners (right angle) to align with
your snap lines.
4.
Using a staple gun w/ 1” (or greater) staples/brads (PROs) or
Screw Gun w/ 1” (or greater) deck screws (DIYers), attach a cove
piece butted to each side of each corner (either touching the
top of an inside corner or the bottom of an outside corner).
6.
Measure, mark and then attach all other cove pieces in-between
the butted cove pieces on each corner no more than 16” O.C.
Helpful Tip: For help spacing your cove pieces evenly between
each corner, visit www.archkit.com/cove-spacing to watch our
“How-To” video and see the mathematical formula.
7.
If necessary,
and/or
according to code requirements, re block
your Universal Cove Kit in between the studs along
the perimeter.
8.
The 6 90° corners are reversible to t both inside
and outside corners. If you have an inside 90°
corner, then the top halves will are outward like
the etchings of an arrow. If you have an outside 90°
corner, then the top halves will come to a point like
the head of an arrow.
90
o
inside corner 90
o
outside corner
3
If applicable, install your 45° inside corners by using 4 of the
40 cove pieces that have already been modied to be used as
a cove piece as well as 45° inside corner.
5.
If you have a 45° outside corner,
a template on the side panel
of the box has been provided.
Trace your 45° outside corner on
to a piece of ½” plywood/OSB,
cut it out and then install.

NEW CONSTRUCTION
WITH
TOP REVEAL
Framed room with no drywall
At each corner of the room, measure and mark the wall down
from the ceiling 11 ¼” plus the thickness of your top reveal (e.g.
If you used a single 2x4, then you would measure and mark the
wall down from the ceiling 11 ¼” + 1 ½” = 12 ¾”). Measure and
mark the ceiling out from the wall 11 ¼”.
1.
Block in-between the wall studs and/or ceiling, if necessary, to
suciently attach the cove pieces and top ledgers. If building
code requires you to re block, reference Step 9. In this case,
combining steps 2 and 9 can save time.
2.
Using a staple gun w/ 1” (or greater) staples/brads (PROs) or
Screw Gun w/ 1” (or greater) deck screws (DIYers), attach a cove
piece butted to each side of each corner (either touching the
top of an inside corner or the bottom of an outside corner).
7.
Using your marks as a guide, snap a line (with your chalk line)
on the wall and on the ceiling around the entire perimeter of
the room.
3.
Measure, mark and then attach all other cove pieces in-between
the butted cove pieces on each corner no more than 16” O.C.
Helpful Tip: For help spacing your cove pieces evenly between
each corner visit www.archkit.com/cove-spacing to watch our
“How-To” video and see the mathematical formula.
8.
Line up the sides of your top ledger to the snap line on your
ceiling and, using a nail gun w/ 16d nails (PROs) or screw gun
w/ 3” (or greater) deck screws, fasten the ledger securely to
the ceiling around the entire perimeter of the room.
4.
If necessary,
and/or
according to code requirements, re block
your Universal Cove Kit in between the studs along the perimeter.
9.
The 6 90° corners are reversible to t both inside and
outside corners. If you have an inside 90° corner, then
the top halves will are outward like the etchings of
an arrow. If you have an outside 90° corner, then the top
halves will come to a point like the head of an arrow.
90
o
inside corner 90
o
outside corner
5
Using a staple gun w/ 1” (or greater) staples/brads (PROs) or
screw gun w/ 1” (or greater) deck screws (DIYers), install your
90° inside and/or outside corners (right angle) to align to your
top ledgers and snap lines.
5.
6
If applicable, install your 45° inside corners by using 4 of the
40 cove pieces that have already been modied to be used as
a cove piece as well as 45° inside corner.
6.
If you have a 45° outside corner,
a template on the side panel
of the box has been provided.
Trace your 45° outside corner on
to a piece of ½” plywood/OSB,
cut it out and then install.

7
NEW CONSTRUCTION
WITH
Bottom REVEAL
Framed room with no drywall
At each corner of the room, measure and mark the wall down
from the ceiling 11 ¼”. Measure and mark the ceiling out from
the wall 11 ¼” plus the thickness of your bottom reveal (e.g. If
you used a single 2x4, then you would measure and mark the
ceiling out from the wall 11 ¼” + 1 ½” = 12 ¾”).
1.
Block in-between the ceiling, if necessary, to suciently
attach the cove pieces. If building code requires you to re
block, reference Step 9. In this case, combining steps 2 and 9
can save time.
2.
Using a staple gun w/ 1” (or greater) staples/brads (PROs) or
Screw Gun w/ 1” (or greater) deck screws (DIYers), attach a cove
piece butted to each side of each corner (either touching the
top of an inside corner or the bottom of an outside corner).
7.
Using your marks as a guide, snap a line (with your chalk line)
on the wall and on the ceiling around the entire perimeter of
the room.
3.
Measure, mark and then attach all other cove pieces in-between
the butted cove pieces on each corner no more than 16” O.C.
Helpful Tip: For help spacing your cove pieces evenly between
each corner visit www.archkit.com/cove-spacing to watch our
“How-To” video and see the mathematical formula.
8.
Line up the sides of your bottom ledger to the snap line on
your wall and, using a nail gun w/ 16d nails (PROs) or screw
gun w/ 3” (or greater) deck screws, fasten the bottom ledger
securely to the wall around the entire perimeter of the room.
4.
If necessary,
and/or
according to code requirements, re block
your Universal Cove Kit in between the studs along the perimeter.
9.
The 6 90° corners are reversible to t both inside and
outside corners. If you have an inside 90° corner, then
the top halves will are outward like the etchings of
an arrow. If you have an outside 90° corner, then the top
halves will come to a point like the head of an arrow.
90
o
inside corner 90
o
outside corner
Using a staple gun w/ 1” (or greater) staples/brads (PROs) or
screw gun w/ 1” (or greater) deck screws, (DIYers) install your
90° inside and/or outside corners (right angle) to align to your
snap lines and bottom ledgers.
5.
8
If applicable, install your 45° inside corners by using 4 of the
40 cove pieces that have already been modied to be used as
a cove piece as well as 45° inside corner.
6.
If you have a 45° outside corner,
a template on the side panel
of the box has been provided.
Trace your 45° outside corner
on to a piece of ½” plywood/
OSB, cut it out and then install.

NEW CONSTRUCTION
WITH top and
Bottom REVEAL
Framed room with no drywall
At each corner of the room, measure and mark the wall down from
the ceiling 11 ¼” plus the thickness of your top reveal (example
below). Measure and mark the ceiling out from the wall 11 ¼” plus
the thickness of your bottom reveal. Example: If you want a 1 ½”
top reveal and a 3” bottom reveal, you would measure and mark
the
wall down from the ceiling 12 ¾” (11 ¼” + 1 ½” = 12 ¾”) and measure
and mark the ceiling out from the wall 14 ¼” (11 ¼” + 3” = 14 ¼”).
1.
Block in-between the ceiling, if needed, to suciently attach
the top and bottom ledgers. If building code requires you to re
block, reference Step 9. In this case, combining steps 2 and 9
can save time.
2.
Using a staple gun w/ 1” (or greater) staples/brads (PROs) or
Screw Gun w/ 1” (or greater) deck screws (DIYers) attach a cove
piece butted to each side of each corner (either touching the
top of an inside corner or the bottom of an outside corner).
7.
Using your marks as a guide, snap a line (with your chalk line)
on the wall and on the ceiling around the entire perimeter of
the room.
3.
Measure, mark and then attach all other cove pieces in between
the butted cove pieces on each corner no more than 16” O.C.
Helpful Tip: For help spacing your cove pieces evenly between
each corner visit www.archkit.com/cove-spacing to watch our
“How-To” video and see with the mathematical formula.
8.
Line up the sides of your top and bottom ledgers to the snap
lines on your wall and ceiling. Using a nail gun w/ 16d nails
(PROs) or screw gun w/ 3” (or greater) deck screws, fasten the
top and bottom ledgers securely to the wall and ceiling around
the entire perimeter of the room.
4.
If necessary, and/or according to code requirements, re block your
Universal Cove Kit in between the studs along the perimeter.
9.
The 6 90° corners are reversible to t both inside and
outside corners. If you have an inside 90° corner, then
the top halves will are outward like the etchings of
an arrow. If you have an outside 90° corner, then the top
halves will come to a point like the head of an arrow.
90
o
inside corner 90
o
outside corner
Using a staple gun w/ 1” (or greater) staples/brads (PROs) or
screw gun w/ 1” (or greater) deck screws (DIYers), install your
90° inside and/or outside corners (right angle) to align to your
top and bottom ledgers.
5.
If applicable, install your 45° inside corners by using 4 of the
40 cove pieces that have already been modied to be used as
a cove piece as well as 45° inside corner.
6.
If you have a 45° outside corner,
a template on the side panel
of the box has been provided.
Trace your 45° outside corner
on to a piece of ½” plywood/
OSB, cut it out and then install.
109

11
in a remodel
with
no REVEAL
With existing drywall
If applicable, install your 45° inside corners by using 4 of the 40 cove pieces that have
already been modied to be used as a cove piece as well as 45° inside corner.
8.
If you have a 45° outside corner,
a template on the side panel
of the box has been provided.
Trace your 45° outside corner on
to a piece of ½” plywood/OSB,
cut it out and then install.
At each corner of the room, measure and mark the wall down from the ceiling 15 ¼”.
Measure and mark the ceiling out from the wall 15 ¼”.
1.
Using your marks as a guide, snap a line (with your chalk line) on the wall and on the
ceiling around the entire perimeter of the room.
2.
Using a utility knife/wallboard saw, cut along the snap line and remove the drywall.
3.
At each corner of the room, measure and mark the wall down from the ceiling 11 ¼”
inches. Measure and mark the ceiling out from the wall 11 ¼”.
4.
Block in-between the wall studs and/or ceiling, if necessary, to suciently attach
the cove pieces. If building code requires you to re block, reference Step 11. In this
case, combining steps 2 and 11 can save time.
5.
Snap a line at the marks on the wall and along the ceiling around the entire
perimeter of the room using your chalk line.
6.
The 6 90° corners are reversible to t both inside and outside
corners. If you have an inside 90° corner, then the top halves
will are outward like the etchings of an arrow. If you have
an outside 90° corner, then the top halves will come to a point
like the head of an arrow.
90
o
inside corner
90
o
outside corner
Using a staple gun w/ 1” (or greater) staples/brads (PROs) or screw gun w/ 1”
(or greater) deck screws (DIYers) install your 90° inside and/or outside corners (right
angle) to align to your snap lines.
7.
Using a staple gun w/ 1” (or greater) staples/brads (PROs) or Screw Gun w/ 1” (or
greater) deck screws (DIYers) attach a cove piece butted to each side of each corner
(either touching the top of an inside corner or the bottom of an outside corner).
9.
Measure, mark and then attach all other cove pieces in between the butted cove
pieces on each corner no more than 16” O.C.
Helpful Tip: To space your cove pieces evenly between each corner visit www.archkit.
com/cove-spacing to watch our “How-To” video along with the mathematical formula.
10.
If necessary and/or according to code requirements, re block your Universal Cove Kit
in
between the studs along the perimeter.
11.
12

14
in a remodel
with
TOP REVEAL
With existing drywall
If applicable, install your 45° inside
corners by using 4 of the 40 cove
pieces that have already been
modied to be used as a cove
piece as well as 45° inside corner.
9.
If you have a 45° outside corner, a
template on the side panel of the
box has been provided. Trace your
45° outside corner on to a piece of
½” plywood/OSB, cut it out and
then install.
At each corner of the room measure and mark the wall down for the ceiling 15 ¼”
plus the thickness of your top reveal (e.g. If you used a single 2x4, then you would
measure and mark the wall down from the ceiling 15 ¼” + 1 ½” = 16 ¾”).
1.
Snap a line at the marks on the wall around the entire perimeter of the room using
your chalk line.
2.
Using a utility knife/wallboard saw cut along the snap line on your wall and remove the
drywall between the snap line and the ceiling.
3.
At each corner of the room, measure and mark the wall down from the ceiling 11 ¼”
plus the thickness of your top reveal (e.g. If you used a single 2x4, then you would
measure and mark the wall down from the ceiling 11 ¼” + 1 ½” = 12 ¾”). Measure
and mark the ceiling out from the wall 11 ¼”.
4.
Using your marks as a guide, snap a line (with your chalk line) on the wall and on
the ceiling around the entire perimeter of the room.
5.
The 6 90° corners are reversible to t both inside and outside corners.
If you have an inside 90° corner, then the top halves will are outward
like the etchings of an arrow. If you have an outside 90° corner, then
the top halves will come to a point like the head of an arrow.
90
o
inside
corner
90
o
outside
corner
Block in-between the wall studs, if needed, to suciently attach the cove pieces in
the next step.
10.
Using a staple gun w/ 1” (or greater) staples/brads (PROs) or Screw Gun w/ 1” (or
greater) deck screws (DIYers), attach a cove piece butted to each side of each corner
(either touching the top of an inside corner or the bottom of an outside corner).
11.
Measure, mark and then attach all other cove pieces in-between the butted cove pieces
on each corner no more than 16” O.C.
Helpful Tip: For help spacing your cove pieces evenly between each corner visit
www.archkit.com/cove-spacing to watch our “How-To” video and see the mathematical formula.
12.
Where the joist/trusses run perpendicular to your top ledger, line up the sides of your top
ledger to the snap line on your ceiling and use a nail gun w/ 16d nails (PROs) or screw gun
w/ 3” (or greater) deck screws to fasten the top ledger securely through the drywall and
into the joists/trusses.
Where you do NOT have joist/trusses, use 1/8” x 3” Steel Mushroom-Head Toggle Bolts with 1/8”
x 1” washers to securely fasten your top ledger to your existing drywall ceiling (or any hardware capable of fastening a 2x4 to drywall).
Video: For more clarication, visit www.archkit.com/toggle-bolts to watch our “How-To” video which shows you how to securely
fasten your top ledger to your drywall ceiling using toggle bolts.
7.
Using a staple gun w/ 1” (or greater) staples/brads (PROs) or screw gun w/ 1”
(or greater) deck screws (DIYers), install your 90° inside and/or outside corners
(right angle) to align with your top ledgers and snap lines.
8.
Since you’ll need to fasten the top ledger securely to the ceiling, use a stud nder
(or check in the attic if you have access) to determine if there are joists/trusses in the
position and orientation where you’ll need to securely fasten the top ledger.
More than likely, you’ll probably have two parallel walls where you’ll NOT
have joists/trusses to securely fasten your top ledger. In these cases, use
1/8” x 3” Steel Mushroom-Head Toggle Bolts with 1/8” x 1” washers to securely
fasten your top ledger to your drywall ceiling (or any hardware capable of fastening
a 2x4 to drywall).
Video: For more clarication, visit www.archkit.com/top-reveal and watch our
“How-To” video which shows you how to eectively locate your joists/trusses.
6.
13

16
in a remodel
with
bottom REVEAL
With existing drywall
At each corner of the room, measure and mark the ceiling out from the wall 15 ¼”
plus the thickness of your top reveal (e.g. If you used a single 2x4, then you would
measure and mark the ceiling out from the wall 15 ¼” + 1 ½” = 16 ¾”).
1.
Use your chalk line to snap a line at the marks on the ceiling around the entire
perimeter of the room.
2.
Using a utility knife/wallboard saw, cut along the snap line on your ceiling and remove
the drywall between the snap line and the wall.
3.
At each corner of the room, measure and mark the wall down from the ceiling 11 ¼”.
Measure and mark the ceiling out from the wall 11 ¼” inches plus the thickness of
your bottom reveal (e.g. If you used a single 2x4, then you would measure and mark
the ceiling out from the wall 11 ¼” + 1 ½” = 12 ¾”).
4.
Block in-between the ceiling, if necessary, to suciently attach the cove pieces.
5.
Using a staple gun w/ 1” (or greater) staples/brads (PROs) or Screw Gun w/ 1” (or
greater) deck screws (DIYers), attach a cove piece butted to each side of each corner
(either touching the top of an inside corner or the bottom of an outside corner).
11.
Measure, mark and then attach all other cove pieces in-between the butted cove pieces
on each corner no more than 16” O.C.
Helpful Tip: For help spacing your cove pieces evenly between each corner visit
www.archkit.com/cove-spacing to watch our “How-To” video and see the mathematical formula.
12.
Using a staple gun w/ 1” (or greater) staples/brads (PROs) or screw gun w/ 1” (or
greater) deck screws (DIYers), install your 90° inside and/or outside corners (right
angle) to align with your snap lines and bottom ledgers.
9.
Using your chalk line, snap a line at the marks on the wall and along the ceiling
around the entire perimeter of the room.
6.
Since you will need to fasten the bottom ledger securely to your wall, use a stud
nder to locate your studs.
7.
Line up the sides of your bottom ledger to the snap line on your wall and use a
nail gun w/ 16d nails (PROs) or screw gun w/ 3” (or greater) deck screws to fasten
the bottom ledger securely through the drywall into your studs around the entire
perimeter of the room.
8.
15
The 6 90° corners are reversible to t both inside and outside
corners. If you have an inside 90° corner, then the top halves
will are outward like the etchings of an arrow. If you have
an outside 90° corner, then the top halves will come to a point
like the head of an arrow.
90
o
inside corner
90
o
outside corner
If applicable, install your 45° inside corners by using 4 of the 40 cove pieces that have
already been modied to be used as a cove piece as well as 45° inside corner.
10.
If you have a 45° outside corner,
a template on the side panel
of the box has been provided.
Trace your 45° outside corner on
to a piece of ½” plywood/OSB,
cut it out and then install.

in a remodel
with TOP and
bottom REVEAL
With existing drywall
At each corner of the room, measure and mark the wall down for the ceiling 11 ¼” plus
the thickness of your top reveal (example below). Measure and mark the ceiling out
from the wall 11 ¼” plus the thickness of your bottom reveal. Example: If you want a
1 ½” top reveal and a 3” bottom reveal, you would measure and mark the wall down
from the ceiling 12 ¾” (11 ¼” + 1 ½” = 12 ¾”) and measure and mark the ceiling out
from the wall 14 ¼” (11 ¼” + 3” = 14 ¼”).
1.
Using your chalk line, snap a line at the marks on the wall and along the ceiling
around the entire perimeter of the room.
2.
Using a staple gun w/ 1” (or greater) staples/brads (PROs) or Screw Gun w/ 1” (or
greater) deck screws (DIYers), attach a cove piece butted to each side of each corner
(either touching the top of an inside corner or the bottom of an outside corner).
9.
Measure, mark and then attach all other cove pieces in between the butted cove
pieces on each corner no more than 16” O.C.
Helpful Tip: For help spacing your cove pieces evenly between each corner,
visit www.archkit.com/cove-spacing to watch our “How-To” video and see the
mathematical formula.
10.
Using a staple gun w/ 1” (or greater) staples/brads (PROs) or screw gun w/ 1”
(or greater) deck screws (DIYers), install your 90° inside and/or outside corners
(right angle) to align to your top and bottom ledgers.
7.
Where the joist/trusses run perpendicular to your top ledger, line up the sides of your top
ledger to the snap line on your ceiling and use a nail gun w/ 16d nails (PROs) or screw
gun w/ 3” (or greater) deck screws to fasten the top ledger securely through the drywall
and into the joists/trusses.
Where you do NOT have joist/trusses, use 1/8” x 3” Steel Mushroom-Head Toggle Bolts with
1/8” x 1” washers to securely fasten your top ledger to your existing drywall ceiling (or any hardware capable of fastening a 2x4 to drywall).
Video: For more clarication, visit www.archkit.com/toggle-bolts to watch our “How-To” video which shows you how to securely
fasten your top ledger to your drywall ceiling using toggle bolts.
4.
Since you will need to fasten the bottom ledger securely to your wall, use a stud nder
to locate your studs.
5.
Line up the sides of your bottom ledger to the snap line on your wall and use
a nail gun w/ 16d nails (PROs) or screw gun w/ 3” (or greater) deck screws to
fasten the bottom ledger securely through the drywall into your studs around
the entire perimeter of the room.
6.
The 6 90° corners are reversible to t both inside and outside
corners. If you have an inside 90° corner, then the top halves
will are outward like the etchings of an arrow. If you have
an outside 90° corner, then the top halves will come to a point
like the head of an arrow.
90
o
inside corner
90
o
outside corner
Since you’ll need to fasten the top ledger securely to your ceiling, use a stud nder
(or check in the attic if you have access) to determine if there are joists/trusses in the
position and orientation where you’ll need to securely fasten the top ledger.
More than likely, you’ll probably have two parallel walls where you’ll NOT
have joists/trusses to securely fasten your top ledger. In these cases, use
1/8” x 3” Steel Mushroom-Head Toggle Bolts with 1/8” x 1” washers to securely
fasten your top ledger to your drywall ceiling (or any hardware capable of
fastening
a 2x4 to drywall).
Video: For more clarication, visit www.archkit.com/top-reveal to watch our
“How-To” video which shows you how to eectively locate your joists/trusses.
3.
If applicable, install your 45° inside corners by using 4 of the 40 cove pieces that have
already been modied to be used as a cove piece as well as 45° inside corner.
10.
If you have a 45° outside corner,
a template on the side panel
of the box has been provided.
Trace your 45° outside corner on
to a piece of ½” plywood/OSB,
cut it out and then install.
17 18

in A REMODEL
NO REVEAL TOP REVEAL NO REVEAL TOP REVEAL
BOTTOM REVEAL TOP & Bottom REVEAL Bottom REVEAL TOP & Bottom REVEAL
drywalling your cove ceiling
We recommend using two layers of ¼” exible drywall. Some big box stores stock ¼” drywall, but in the event that your
local big box store doesn’t, search Google using the following search terms:
· quarter inch drywall + your city + your state/province
· ¼ inch drywall + your city + your state/province
· ¼” drywall + your city + your state/province
· ¼ inch drywall suppliers + your city + your state/province
· ¼” drywall suppliers + your city + your state/province
Drywall can also be called wallboard, sheetrock, gypsum
board or plaster board. So, if you don’t have any luck with
the search terms above, try replacing the word drywall with
one of its synonyms.
Using the drywall corner templates on the bottom of the box, rst trace the arc of the
appropriate type of corners on to the back of your ¼” drywall and note the top and
bottom as shown on the template.
1.
For a Smoother Finish: Whether in new construction or in a remodel, if you don’t have a reveal, extend the drywall 4” past the end of the
cove. (If you are in a remodel, the installation instructions have already accounted for the 4” when you removed the drywall).
new construction
If you have chosen to extend the drywall 4” past the end of the cove, you need to
extend the template on the appropriate side, depending upon your cove style.
Helpful Tip: This can be a tad confusing, so visit www.archkit.com/drywall-cove and
watch our “How-To” video to learn how to properly lay out drywall corners.
2.
19
Using a utility knife, cut your corners to a length so that they span from the corner to
the middle of a cove piece.
3.
Wet the back of the drywall with a sponge and lean your corners against the wall at a
45° angle so that the back of the drywall faces the wall.
Helpful Tip: We have always been proponents of wetting the back of the drywall to help
it bend easier, as opposed to scoring the back with a utility knife. Scoring the back of the
drywall could potentially weaken the drywall and lead to hairline cracks in your nish.
4.
After letting the moisture soak into the back of drywall a few minutes, gently apply
pressure and begin to create a curve.
5.
Using the cove pieces as a form, mold each corner into place by slowly working the
drywall up a few inches at a time.
6.
Once the corners are in place, use a screw gun and drywall screws to fasten in place.
7.
After all the corners have been drywalled: Measure the correct lengths, then cut, wet,
curve and mold all areas in-between the corners.
8.
That's it! You’re now ready for tape, mud, texture and paint. Want to get fancy?
Add a little gold leaf to make it pop.
Helpful Tip: To get ideas on how to nish your cove ceiling (i.e. paint colors, faux
nishing, gold leaf, etc…), visit www.archkit.com/cove-ceilings and be inspired.
9.
20

22
A few creative Ideas to Utilize LeftOver Cove Pieces
Round a Tray Ceiling
Round out your tray ceiling. Install a cove piece ush to the top and bottom of each corner
of your tray ceiling. You can even get fancy and include a reveal to one side or both.
Cove a 90
o
Inside Wall
Just as if you were coving your ceiling, you can also cove a 90° inside wall.
You can even get fancy and include a reveal to one side or both.
Cove a Small Space
Cove above your master vanity, cove a hallway or cove one wall in a room to accent it.
21
/