Installation Instructions
#7 Whirlpool
Wall Sleeve Brands:
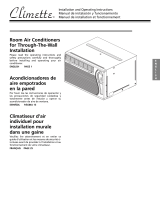
1. Remove existing rear grille as shown on Page 3 of this manual and
replace with provided louvered rear panel. Install as shown here.
80º
50º 50º
Rear Louvers
80º
Top View
23” Deep
Because of the increased unit depth, first try dry fitting using
the method described below:
Use these next steps if the unit requires extra extension into
the room.
2. Place (2) 1" x 1 " x 14" seals against each side.
1
2
11. Install the divider into the slots of the foam blocks. You may need to
trim the length to size.
12. Repeat steps 9-11 for the other vertical shown portion of the grille as
shown in the picture.
9. Attach 1" x " x 14" long seal over the solid vertical portion of the rear
grille.
3
4
10. Attach (2) 4 " x 3 " x 1 " foam blocks with the slot overlapping the
seal above.
3
4
3
4
3
4
13. Attach (2) 1" x 1 " x 14" seals along the sides of the sleeve again
making sure all seals are flush.
1
2
15. Center unit & gently slide unit into sleeve.
16. Before sliding all-the-way back, remove 2nd screw from front on left
side of unit.
17. Remove the plastic washer from the screw.
19. Slide the unit completely to the rear to ensure a good seal, making
sure the ground wire does not become tangled.
20. Seal & Frame the unit as described on the last page of these instructions.
14. Cut the 1" x 1 " x 25" seal to fit the top of the sleeve. The pieces must
be fitted flush to the edge of the divider.
1
2
4. If position is okay, remove unit and Proceed to the next step.If not go
to step 9.
1
2
5. Attach (1) 1" x 1 " x 25" long seal in the center at the top of the
sleeve. Remove the backing paper and press into position.
1
2
6. Attach (2) 1" x 1 " x 14" seals to the left and right sides of the sleeve.
7. Cut (2) 1" x 3/8" x 25" long seal to 14" long each and attach to the
vertical sections of the grille as shown.
8. Attach the tapered spacer blocks to the floor of the sleeve. Now go to
step 15.
3. Gently slide unit in and check if amount extending from the sleeve is
sufficient once the trim frame is attached.
NOTE: You may need to drill holes in flange of existing sleeve to match
new rear grille
21. If you have difficulty with mounting the grill to the sleeve, follow the
instructions for direct mounting on Page 13.
18. Screw and attach the other end of the ground wire from sleeve to the
unit as shown in picture. Make sure that the toothed washer is against
the cabinet.
4.5" 4"
4.5" 4"
4.5" 4"