

Copyright
Information furnished by SMC Networks, Inc. (SMC) is believed to be accurate and reliable.
However, no responsibility is assumed by SMC for its use, nor for any infringements of patents or
other rights of third parties which may result from its use. No license is granted by implication or
otherwise under any patent or patent rights of SMC. SMC reserves the right to change
specifications at any time without notice.
Copyright © 2003 by
SMC Networks, Inc.
38 Tesla
Irvine, California 92618
All rights reserved.
Trademarks
SMC® is a registered trademark; and EZ-Stream, EZ Connect, Barricade and EZ Hub are
trademarks of SMC Networks, Inc. Other product and company names are trademarks or
registered trademarks of their respective holders.

Compliances
FCC - Class B
This equipment has been tested and found to comply with the limits for a Class B digital device,
pursuant to Part 15 of the FCC Rules. These limits are designed to provide reasonable protection
against harmful interference in a residential installation. This equipment generates, uses and can
radiate radio frequency energy and, if not installed and used in accordance with instructions, may
cause harmful interference to radio communications. However, there is no guarantee that the
interference will not occur in a particular installation. If this equipment does cause harmful
interference to radio or television reception, which can be determined by turning the equipment
off and on, the user is encouraged to try to correct the interference by one or more of the
following measures:
• Reorient the receiving antenna
• Increase the separation between the equipment and receiver
• Connect the equipment into an outlet on a circuit different from that to which
the receiver is connected
• Consult the dealer or an experienced radio/TV technician for help
FCC Caution: To assure continued compliance, (for example - use only shielded interface cables
when connecting to computer or peripheral devices). Any changes or modifications not expressly
approved by the party responsible for compliance could void the user’s authority to operate this
equipment.
This device complies with Part 15 of the FCC Rules. Operation is subject to the following two
conditions: (1) This device may not cause harmful interference, and (2) this device must accept
any interference received, including interference that may cause undesired operation.
CAUTION STATEMENT:
FCC Radiation Exposure Statement
This equipment complies with FCC radiation exposure limits set forth for an uncontrolled
environment. This equipment should be installed and operated with a minimum distance of 5
centimeters between the radiator and your body. This transmitter must not be co-located or
operating in conjunction with any other
antenna or transmitter. Note: In order to maintain compliance with the limits of a Class B digital
device, SMC requires that you use a quality interface cable when connecting to this device.
Changes or modifications not expressly approved by SMC could void the user’s authority to
operate this equipment.
Attach unshielded twisted-pair cable (UTP) to the RJ-45 port and shielded USB cable to the USB
port.
Industry Canada - Class B
This digital apparatus does not exceed the Class B limits for radio noise emissions from digital
apparatus as set out in the interference-causing equipment standard entitled “Digital Apparatus,”
ICES-003 of Industry Canada.
Cet appareil numérique respecte les limites de bruits radioélectriques applicables aux appareils
numériques de Classe B prescrites dans la norme sur le matérial brouilleur: “Appareils
Numériques,” NMB-003 édictée par l’Industrie.

EC Conformance Declaration – Class B
SMC contact for these products in Europe is:
SMC Networks Europe,
Edificio Conata II
Calle Fructuos Gelabert 6-8, 2o, 4a
08970 – Sant Joan Despi
Barcelona, Spain
This information technology equipment complies with the essential requirements of the R&TTE
Directive 1999/5/EC and all other related provisions of this directive.
Important Safety Notices
• Unplug this product from the AC power before cleaning. Do not use liquid cleaners or
aerosol cleaners. Use a dry cloth for cleaning.
• Route the power supply cords so that they are not likely to be walked on or pinched by
items placed upon or against them. Pay particular attention to cords at plugs,
convenience receptacles, and the point where they exit from the product.
• Situate the product away from heat sources such as radiators, heat registers, stoves, and
other products that produce heat.
• To prevent fire or shock hazard, do not expose this unit to rain or moisture. Do not allow
water or any foreign objects to enter the interior. This may cause a fire or electric shock.
In the event that water or other foreign objects get into the product, immediately unplug
the AC adapter from the electrical outlet and contact Customer Service for inspection
and/or repair/replacement options.
• Do not take apart the equipment. This may cause fire, electric shock or other injuries.
• Do not overload wall outlets and extension cords as this can result in a fire or electric
shock.
• This product is for use with the AC adapter that comes with it. Use with any other AC
power is strongly discouraged as it may cause fire, electric shock, or damage to the
equipment.

1 | System Requirements
• An available USB port
• Windows 98SE/Me/2000/XP
• A minimum of 10 MB of free disk space for installing the driver and utility program.
• Another IEEE 802.11b or 802.11g compliant device installed in your network, such as the
SMC7004VWBR Barricade™ Wireless Broadband Router, or another PC with a wireless
adapter.
2 | Equipment Checklist
After unpacking the SMCWUSB32 EZ Connect™ 11 Mbps Wireless USB Flash Drive, check the
contents of the box to be sure you have received the following components:
• 1 SMCWUSB32 11 Mbps Wireless USB Flash Drive
• 1 EZ Installation Wizard and Documentation CD
• 1 Laptop Clip
• 1 USB Extension Cable
• 1 Quick Installation Guide
Immediately inform your dealer in the event of any incorrect, missing or damaged parts. If
possible, please retain the carton and original packing materials in case there is a need to return
the product.
Please register this product and upgrade the product warranty at SMC's Web site:
http://www.smc.com

3 | Installation Instructions
- Device Installation
1) Select an available USB port on the PC
2) Make sure the cap of the SMCWUSB32 is pushed down so that the USB interface is
clearly visible
3) Carefully insert the USB adapter’s Type-A plug (i.e., the flat plug) into the USB port
4) Press until it is firmly seated in the port
- Using the Laptop Clip and USB Extension Cable
1) Select an available USB port on the PC
2) Make sure the cap of the SMCWUSB32 is pushed down so that the USB interface is
clearly visible
3) Hold the cap in place while sliding the Laptop Clip onto the cap of the SMCWUSB32.
Make sure the Laptop Clip is held firmly in place.
4) Carefully insert the USB cable’s Type-A plug (i.e., the flat plug) into the USB port and
press until it is firmly seated in the port
5) Insert the other end of the cable into the SMCWUSB32 11 Mbps Wireless USB Flash Drive

4 | Flash Drive Installation
NOTE: Installation processes may require the use of your original, licensed copy of Windows.
Please have your Windows CD available BEFORE proceeding with the installation. The following
instructions are for Windows 98SE/Me. Under Windows 2000/XP, your Flash Drive should be
automatically installed once you plug the SMCWUSB32 into your USB port.
Windows 98SE
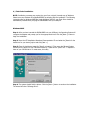
Step 1: After you have inserted the SMCWUSB32 into your USB port, the Operating System will
recognize the adapter and prompt you for the appropriate drivers. Click the [Next >] button to
begin the installation.
Step 2: Insert the EZ Installation Wizard and Documentation CD and select the [Search for the
best driver for your device] option and click [Next >].
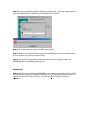
Step 3: Clear all checkboxes except for [Specify a location:]. Then press the [Browse] button
and look for the drivers on your CD-ROM. Browse to ?:\Flash Driver. (Note: The "?" equals the
letter of your CD-ROM drive. In most cases, this is D.)
Step 4: The system should find the drivers. Click the [Next >] button to continue the installation.
The wizard will show "UStorage Drive".

Step 5: Once the system has copied the SMC drivers from the CD, it may then request files from
your original Windows disk. Please insert the Windows CD at this time.
Step 6: The system will copy the files. Do NOT press [Cancel].
Step 7: Once all the necessary files are copied from the Windows CD, the driver install process
will be complete. Click [Finish] to exit the wizard.
Step 8: You will then be prompted to reboot the machine. Press [Yes]. Upon reboot, the
SMCWUSB32 will be initialized and ready for use.
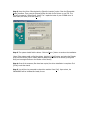
Windows ME
Step 1: After you have inserted the SMCWUSB32 in your machine and turned it back on, the OS
will automatically recognize the adapter and prompt you for the appropriate drivers. Select the
[S
pecify the location of the driver] option. Then click the [Next >] button to begin the
installation.

Step 2: Insert the Driver CD and select the [Specify a location:] option. Clear the [Removable
M
edia] checkbox. Then press the [Browse] button and look for the drivers on your CD. This
should be located in ?:\Flash Driver. (Note: The ? equals the letter of your CD-ROM drive. In
most cases, this is D.) Then click [N
ext >].
Step 3: The system should find the drivers. Click the [N
ext >] button to continue the installation.
(Note: If the system could not find the drivers, click the [< B
ack] button, and select the [Display
a list of all the drivers] option. Select [Network Adapters] from the list of devices, press [Have
Disk] and once again browse to the location of the drivers)
Step 4: Once all the necessary files have been copied, the driver installation is complete. Click
[Finish] to exit the wizard.
Step 5: You will then be prompted to reboot the machine. Press [Y
es]. Upon reboot, the
SMCWUSB32 will be initialized and ready for use.

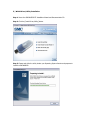
5 | WLAN Driver/Utility Installation
Step 1: Insert the SMCWUSB32 EZ Installation Wizard and Documentation CD.
Step 2: Click the [Install Driver/Utility] button.
Step 3: Please wait while the utility checks your Operating System Version and prepares to
install the SMCWUSB32.

Step 4: Click the [Next] button to continue.
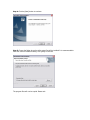
Step 5: Choose the folder where the utility setup files will be installed. It is recommended to
leave this value at its default setting. Click [Next] to continue.
The program files will now be copied. Please wait.

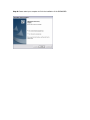
Step 6: Please restart your computer to finish the installation of the SMCWUSB32.

6 | Utility Configuration
NOTE: The following applies to Windows 98SE, Me, 2000. Under Windows XP, please use the
Wireless Zero Configuration tool built into Windows XP to configure your SMCWUSB32.
When the utility program is running, there will be a quick launch icon in the lower right-hand
corner of the taskbar. The icon will be GREEN if you have a good connection to a wireless
network. If it is red, you will need to verify the network settings and check to be sure that the
Wireless Access Point on your network is turned on. You may also need to re-position the Access
Point and place it in a higher position so that you are able to gain more wireless signal strength.
Double-click the quick launch icon in the system tray to bring up the Configuration Utility. This
provides quick access to management statistics and adapter settings.
The Configuration Utility includes the following tabs:
Status: Allows you to view/monitor network status, throughput, wireless channel, and TCP/IP
Information.
Profile: Allows you to implement Profile Management, edit SSID data, change the Tx Rate and
Operating mode, and enable 64/128-bit WEP.
Survey: Displays all the Access Points within range of the wireless adapter's signal. Allows you to
select your desired WLAN.
Statistics: Displays Transmit/Receive and other data used for management and troubleshooting.
About: Shows the driver and utility version information.

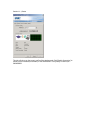
Section 1.1 | Status
This tab will show you the current profile of the wireless card. Click [Disable Connection] to
entirely halt all wirelessly functionality of the SMCWUSB32. Click [Reset] to reboot your
SMCWUSB32.

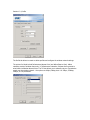
Section 1.2 | Profile
The Profile tab allows to create or delete profiles and configure the wireless network settings.
The options for Mode include Infrastructure(Access Point) and Adhoc(Peer-to-Peer). Adhoc
networks consist of wireless clients only. In Infrastructure networks, wireless clients connect to
wired LANs via Wireless Access Points. The Tx Rate allows you to manually set your Transmission
speed over the wireless network – the options are 1Mbps, 2Mbps, Auto 1 or 2Mbps, 5.5Mbps,
11Mbps, or Fully Automatic.

For more secure data transmissions, it is recommended to enable WEP on your WLAN. Click the
[Encryption] button to get to this configuration. The utility supports HEX or ASCII key entries. For
the HEX Key Format, the security is enabled by entering 10-digit keys for the 64-bit WEP
configuration, and 26-digit keys for a 128-bit WEP configuration. For ASCII Key Format, the
security is enabled by entering five alphanumeric characters for the 64-bit WEP configuration,
and 13 alphanumeric characters for the 128-bit WEP configuration. Select the desired encryption
strength (64-bit or 128-bit) and then enter the appropriate keys in Key 1, 2, 3, or 4. Remember
to select the correct Default Key. You can also check the "Passphrase" option and enter the
desired value. You must be sure to use the same passphrase on all other wireless clients/Access
Points.
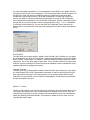
RTS Threshold
This field allows you to select enable or disable. When the field is set to Enabled, you can adjust
the value between 0 to 3000. RTS threshold is a mechanism implemented to prevent the “Hidden
Node” problem. “Hidden Node” is a situation in which two stations are within range of the same
access point, but are not within range of each other. Thus, it provides a solution to prevent data
collisions. However, enabling RTS Threshold may cause redundant network overhead that could
negatively affect the throughput performance.
Fragment Threshold
This field allows you to select enable or disable. When the field is set to Enabled, you can adjust
the value between 256 to 2346. Fragmentation mechanism is used for improving the efficiency
when high traffic flows along in the wireless network. If your wireless devices often transmit
large files in wireless network, you can enable the Fragmentation Threshold and the mechanism
will split the packets being sent.
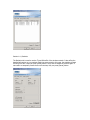
Section 1.3 | Survey
The Survey tab supports a powerful Site-Survey tool to discovery all active wireless devices in the
radio range. After selecting this, other wireless devices are displayed on the screen. Users can
press the [Connect] button to quickly connect to the wireless device chosen and simultaneously
modify the [Default] profile automatically. If users want to update the survey result, they can
press [Rescan] button again.

Section 1.4 | Statistics
The Statistics tab is used to monitor TX and RX traffic of the wireless network. It also offers the
detailed information on error packets. Each time users switch to this page, the statistics will start
counting from zero. Users can press [Reset] button if they want to restart the counter again. If
users want to temporarily freeze the current counters, they can press [Pause] button.

Section 1.5 | About
The About screen displays the version information and MAC address.
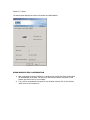
USING WIRELESS ZERO CONFIGURATION
1) After completing the driver installation, in Windows XP, the Wireless Zero Configuration
will automatically be enabled. You will see a new wireless network connection in the
bottom right-hand corner of your taskbar.
2) If you are not automatically connected to your wireless network, click on the wireless
network icon in the system tray:

3) You should see the SSID of your Wireless Base Station or adhoc network in the
“Available wireless networks” window. High-light the desired network.
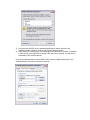
4) If the network is not encrypted, you need to check the [Allow me to connect…] checkbox
in order for the [Connect] button to appear. After that, click [Connect]. You will now be
connected to your wireless network.
If you have advanced security such as WEP or WPA, select the [Advanced] button in the
“Wireless Network Connection” window to continue:

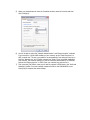
5) Select your desired network from the “Available wireless networks” window and then
click [Configure].
6) You will be able to select the “Network Authentication” and “Data encryption” methods.
If you have 64 or 128-bit WEP enabled on your network, set the “Data encryption” to
WEP, uncheck the “The key is provided for me automatically” box and enter your key in
both the “Network key” and “Confirm network key” fields. If you have WPA enabled on
your network, the common method is to set the “Network Authentication” to WPA-PSK
and set the “Data encryption” to TKIP. Enter your network key and confirm it.
7) Then press the [OK] button. Now you will see the network’s SSID listed in the “Preferred
Networks” window. You have basically created a Profile for the SMCWUSB32 to use.
Press [OK] to complete the network setup.
Page is loading ...
Page is loading ...
Page is loading ...
Page is loading ...
Page is loading ...
Page is loading ...
Page is loading ...
Page is loading ...
Page is loading ...
Page is loading ...
Page is loading ...
Page is loading ...
-
 1
1
-
 2
2
-
 3
3
-
 4
4
-
 5
5
-
 6
6
-
 7
7
-
 8
8
-
 9
9
-
 10
10
-
 11
11
-
 12
12
-
 13
13
-
 14
14
-
 15
15
-
 16
16
-
 17
17
-
 18
18
-
 19
19
-
 20
20
-
 21
21
-
 22
22
-
 23
23
-
 24
24
-
 25
25
-
 26
26
-
 27
27
-
 28
28
-
 29
29
-
 30
30
-
 31
31
-
 32
32


SMC Networks 2.4GHz User manual
- Type
- User manual
Ask a question and I''ll find the answer in the document
Finding information in a document is now easier with AI
Related papers
-
SMC Networks EZ Connect G SMC2835W User manual
-
-
SMC EliteConnect PCI Card User manual
-
-
-
SMC EZ Connect USB 2.0 User manual
-
-
SMC Networks SMCWUSBS-N User manual
-
SMC Networks SMC2632W User manual
-
Other documents
-
Abocom AMC-440 User manual
-
X-Micro XWL-11BUZX User manual
-
-
Sitecom LN-119 Datasheet
-
Zonet ZEW1501 - V2.0 User manual
-
Edimax EW-7124 Datasheet
-
Zonet ZEW2500P - VERSION 1.0 - 07-2004 User manual
-
Allnet ALL0281 Owner's manual
-
-