Unique Home Designs 1S0000CL1BK00A Operating instructions

Type
Operating instructions
PRODUCT MEASURING GUIDE
This guide contains procedures and instructions for
proper measurement before installing a security screen
door. If a circumstance comes up that is not covered in
this guide, please contact us for help at:
Unique Home Designs
973 N. Colorado Street, Gilbert AZ. 85233
or
PREMIUM SECURITY DOOR
VIEW INSTALLATION VIDEOS
AND LATEST INFORMATION AT
Page 1
Getting Started
1
Inspect Your Entryway for Obstructions
Check for any obstructions above and around your entryway that may prevent the outward swing of your new security
door, and/or its installation, such as:
Light xtures
Door bell
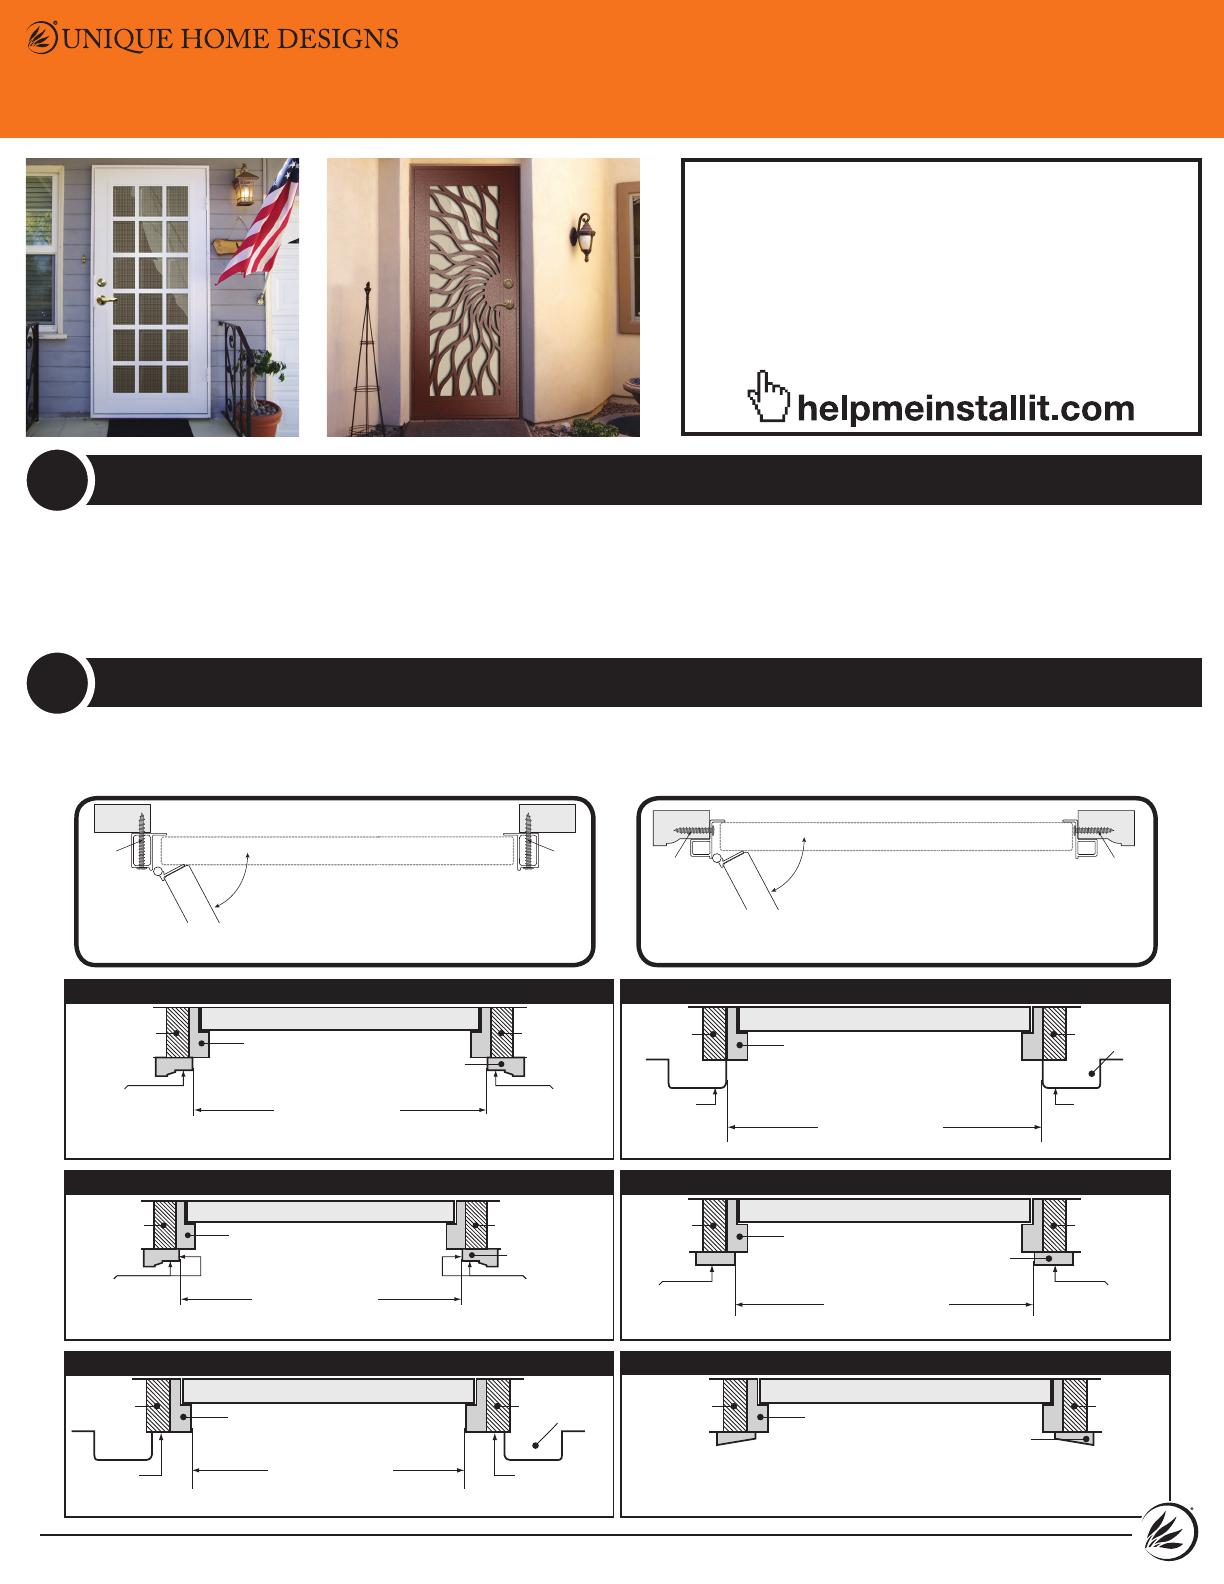
The security door will require a minimum mounting surface of 1" on the trim above and on both sides of the entry
door (1" depth also required for recessed mount). Mounting screws must be secured to a stud in the wall. Review
Figures 1-5 to determine which mounting method you can and wish to use and the rough opening measurement.
Determine Mounting Method and Rough Opening Measuring Points
2
Entry Door Jamb
Brick molding trim
Entry Door
Brick Molding (Top View)
StudStud
1" minimum
mounting
surface
1" minimum
mounting
surface
Figure 1 Brick Molding - Surface Mount
Rough Opening
Width
Entry Door Jamb
Brick molding trim
Entry Door
Brick Molding (Top View)
StudStud
1" minimum
mounting
surfaces
1" minimum
mounting
surfaces
Figure 1a Brick Molding - Recessed Mount
Rough Opening
Width
Entry Door Jamb
Entry Door
Stucco 1 (Top View)
Stucco
Pop-Out
1" minimum
mounting
surface
1" minimum
mounting
surface
StudStud
Rough Opening
Width
Figure 2
Stucco 1
– Mounted between stucco pop-outs
-
Surface Mount
Entry Door Jamb
Entry Door
Stucco 2 (Top View)
Stucco
Pop-Out
1" minimum
mounting
surface
1" minimum
mounting
surface
StudStud
Figure 3
Stucco 2 – Mounted to front surface of stucco pop-outs -
Surface Mount
Rough Opening
Width
Entry Door Jamb
1" minimum
mounting
surface
1" minimum
mounting
surface
Entry Door
Flat Trim (Top View)
Flat Trim
StudStud
Figure 4 Flat Trim - Surface Mount
Rough Opening
Width
Entry Door Jamb
Entry Door
Sloped Trim (Top View)
*Sloped trim must be replaced with at trim
to properly mount your new security door
Once trim is replaced, refer to
Figure 4 for measurement locations
Sloped Trim*
Stud
Stud
Figure 5 Sloped Trim
Figure 4 or 4a for measurement points
Low overhang
Door handle of your existing entry door
Trees, bushes, or hanging plants
Recessed Mount
Surface Mount
Mounting
Screw
Security Door
Security Door
Mounting
Screw
Mounting
Screw
Security Door
Security Door
Mounting
Screw
Typical Surface Mount
Recessed Mount
Surface Mount
Mounting
Screw
Security Door
Security Door
Mounting
Screw
Mounting
Screw
Security Door
Security Door
Mounting
Screw
Typical Recessed Mount
The security door will be mounted
on top of the existing trim.
The security door will be mounted on
the inside of the existing trim.
MK1296 11122014
PRODUCT MEASURING GUIDE
PREMIUM SECURITY DOOR
Measure for Rough Opening Height
3
Page 2
Standard security door handle height is 39½". To check for potential interference with
your main entry door handle, measure from the threshold to the center of the handle (Y). A
measurement within 38½"-40½" inches may result in interference. To ensure you avoid
interference issues in this instance, you may:
• Mount your security door with an opposite swing
• Order 54" handle height
• Build out the trim on your mounting surface to create clearance
Note: Paddle style handles feature a prole less likely to cause interference than knob style
handles… if measurements indicate you may be close to an interference issue, keep this in
mind when selecting your security door handle set.
Measuring Width
5
Measure for Rough
Opening Width
Measure for the rough
opening you identified
in Step 2 (Figures 1-5).
Measure the top, middle
and the bottom of the door
opening. The smallest of the
three measurements will be
your rough opening width.
Enter that measurement on
the measurement worksheet
and follow the instructions to
determine if a standard size
door will fit or to order the
correct custom sized door.
W1
W2
W3
W1
W2
W3
Single Door Double Doors
Measure for Rough Opening Height
Measure from the bottom edge of the
mounting surface to the existing threshold of
your entry door and enter on the measurement
worksheet on the following page.
Check Handle Height
4
Y
Single Door Double Doors
PRODUCT MEASURING GUIDE
PREMIUM SECURITY DOOR
Page 3
Instructions:
Determine which t range your measurements fall within and order that standard size door. If your
measurement does NOT match a standard size door, give the sales associate your rough opening
dimensions to enter in as a custom size.
Door Size
Tamaño de la
Puerta
* Rough Opening Width
Fit Range
Anchura de apertura irregular de ajuste
Your Rough Opening Width
El ancho de la abertura
* Rough Opening Height
Fit Range
Altura aproximada de ajuste
Your Rough Opening Height
La altura de apertura irregular
30" x 80"
29-1/2" - 30-1/2" 79-3/4" - 81-3/4"
32" x 80"
31-1/2" - 32-1/2" 79-3/4" - 81-3/4"
36" x 80"
35-1/2" - 36-1/2" 79-3/4" - 81-3/4"
36" x 96"
35-1/2" - 36-1/2"
95
-3/4
" - 97-3/4"
60" x 80"
59-1/2" - 60-1/2" 79-3/4" - 81-3/4"
72" x 80"
71-1/2" - 72-1/2" 79-3/4" - 81-3/4"
SURFACE MOUNT
Monte de supercie
Door Size
Tamaño de la
Puerta
* Rough Opening Width
Fit Range
Anchura de apertura irregular de ajuste
Your Rough Opening Width
El ancho de la abertura
* Rough Opening Height
Fit Range
Altura aproximada de ajuste
Your Rough Opening Height
La altura de apertura irregular
30" x 80"
29-7/8" - 30-3/8" 80" - 80-1/2"
32" x 80"
31-7/8" - 32-3/8" 80" - 80-1/2"
36" x 80"
35-7/8" - 36-3/8" 80" - 80-1/2"
36" x 96"
35-7/8" - 36-3/8"
96" - 96-1/2"
60" x 80"
59-7/8" - 60-3/8" 80" - 80-1/2"
72" x 80"
71-7/8" - 72-3/8" 80" - 80-1/2"
RECESSED MOUNT
Monte de recreo
Standard size door
* Wider rough opening measurements within the t range may require shimming or ller wood. For opening measurements
outside these ranges, custom doors provide the best t and installation.
  • Page 1 1
  • Page 2 2
  • Page 3 3

Unique Home Designs 1S0000CL1BK00A Operating instructions

Type
Operating instructions

Ask a question and I''ll find the answer in the document

Finding information in a document is now easier with AI