Page is loading ...

2
Before You Begin...
• Read instructions thoroughly prior to assembly.
This kit contains parts that can be damaged if assembled incorrectly or in the wrong sequence.
• Please follow instructions.
Suncast is not responsible for replacing parts lost or damaged due to incorrect assembly.
• Check for all parts before you begin assembly.
Using the provided parts check list, verify that you have all the parts required to assemble your deck box.
Caution
• DO NOT use a torque wrench or hand drill to tighten provided Easy bolts. Use 010210410 Easy Bolt
Easy Driver tool (provided) ONLY.
• Not intended for storage of flammable or caustic chemicals.
• Exercise caution when storing chemicals.
• Not intended for usage by children.
• This is not a toy box.
• To avoid risk of suffocation, do not allow children to play inside container.
• This product may become susceptible to impact damage in freezing temperatures.
• DO NOT store near excessive heat.
• Exercise caution when moving fully loaded product. This product is not intended for transporting heavy
objects. Use as a stationary storage device only.
• DO NOT stand on lid.
Care Instructions
• Your product is made of materials that will withstand outdoor use. Exposure to the elements (such
as dust, plant and animal life, moisture and sunlight) encourages moss, algae, and mold to grow on
outdoor items. To maintain the look of your product, we recommend cleaning it each year with mild
soap and water. DO NOT use bleach, ammonia, or other caustic cleaners, and DO NOT use stiff bristle
brushes. Failure to perform annual cleaning could result in permanent staining of the plastic. This is not a
manufacturing defect and is not covered under warranty.
Suncast Products and Replacement Parts
Suncast Products and Replacement Parts
To purchase Suncast replacement parts and learn about other Suncast products visit us online or call.
www.suncast.com
24 hours a day, 7 days a week, 365 days a year. 1-800-846-2345 or 1-630-879-2050
Page is loading ...
Page is loading ...

5
E
DD
D
C
C
B A
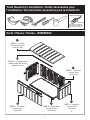
0B00144 – Lid panel
Panneau de couvercle
Panel de la tapa
0B00141 – Back panel
Panneau arrière
Panel trasero
0B00143 – Side panel
Panneau latéral
Panel lateral
x2
0B00140 – Bottom panel
Panneau inférieur
Panel inferior
0B00142 – Front panel
Panneau avant
Panel frontal
0280460 – Lid support bracket
Support d’appui de couvercle
Soporte de la tapa
Parts / Pièces / Piezas – BMDB9900
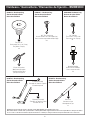
Tools Needed for Installation / Outils nécessaires pour
l’installation / Herramientas necesarias para la instalación
INCLUDED IN KIT / INCLUS DANS
LATROUSSE / INCLUIDA EN EL KIT
Easy Bolt Easy Driver / Outil pour
boulon rapide / Herramienta “Easy
Driver” para pernos “Easy Bolt”
010210410
Page is loading ...

7
1
1
2
1
D
A
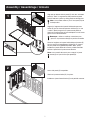
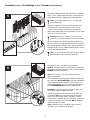
Align tabs on bottom of back panel (D) with slots on bottom
panel (A). "Back" is engraved on floor panel.Lower panel
into slot and lock in place by sliding panel toward right rear.
Note: Use a rubber mallet to “push” back panel (D) into
locked position.
Alignez les languettes de la partie inférieure du panneau
arrière (D) avec les fentes du panneau inférieur (A). Le mot
« Arrière » (Back) est gravé sur le panneau du plancher.
Abaissez le panneau dans la fente et bloquez-le en le faisant
glisser vers le coin arrière droit.
Remarque: utilisez un maillet en caoutchouc pour
«pousser» le panneau arrière (D) en position verrouillée.
Alinee las lengüetas en la parte inferior del panel trasero (D)
con las ranuras a lo largo del panel inferior (A). En el panel
del piso puede verse grabada la palabra “Back” (atrás).
Introduzca el panel dentro de la ranura y trábelo haciendo
deslizar el panel hacia la parte trasera derecha.
Nota: use un martillo de caucho para “empujar” el panel
trasero (D) en la posición en que quede fijo.
Lower side panel (C) into position.
Abaissez le panneau latéral (C) à sa place.
Introduzca el panel lateral inferior (C) en la posición correcta.
2
C
Assembly / Assemblage / Armado

8
3
AA
x2
4
C
Secure panels with two easy bolts (AA). DO NOT use
torque wrench. Use easy bolt easy driver and hand tighten.
Easy bolt head will be flush when fully seated. DO NOT
over tighten easy bolts.
Note: You may hear a click when easy bolt has been
tightened completely.
Fixez les panneaux à l’aide de deux boulons rapides (AA).
N’UTILISEZ PAS de clé dynamométrique. Utilisez l’outil
pour boulon rapide et serrez à la main. La tête du boulon
rapide s’encastre une fois le boulon bien en place.
NE SERREZ PAS les boulons rapides trop fort.
Remarque: il se peut que vous entendiez un déclic une
fois le boulon rapide complètement serré.
Asegure los paneles con dos pernos “Easy Bolt” (AA).
NO use una llave de torsión. Use la herramienta “Easy
Driver” para pernos “Easy Bolt” y apriete manualmente.
La cabeza del perno “Easy Bolt” estará al ras cuando esté
completamente asentado. NO apriete demasiado los per-
nos “Easy Bolt”.
Nota: puede escuchar un chasquido cuando el perno
“Easy Bolt” esté completamente apretado.
Repeat Steps 2 and 3 for remaining side panel (C).
Répétez les étapes2 et 3 pour l’autre panneau
latéral (C).
Repita los pasos 2 y 3 con el panel lateral restante (C).
Assembly (cont.) / Assemblage (suite) / Armado (continuación)

9
6
AA
x4
Assembly (cont.) / Assemblage (suite) / Armado (continuación)
Secure panels with 4 easy bolts (AA) on each side.
DO NOT use torque wrench. Use easy bolt easy driver and
hand tighten. Easy bolt head will be flush when fully seated.
DO NOT over tighten easy bolts.
Note: You may hear a click when easy bolt has been
tightened completely.
Fixez les panneaux en insérant quatre boulons rapides (AA)
de chaque côté. N’UTILISEZ PAS de clé dynamométrique.
Utilisez l’outil pour boulon rapide et serrez à la main. La
tête du boulon rapide s’encastre une fois le boulon bien en
place. NE SERREZ PAS les boulons rapides trop fort.
Remarque: il se peut que vous entendiez un déclic une
fois le boulon rapide complètement serré.
Asegure los paneles con quatro pernos “Easy Bolt” (AA)
encada lado. NO use una llave de torsión. Use la herra-
mienta “Easy Driver” para pernos “Easy Bolt” y apriete
manualmente. La cabeza del perno “Easy Bolt” estará al ras
cuando esté completamente asentado. NO apriete dema-
siado los pernos “Easy Bolt”.
Nota: puede escuchar un chasquido cuando el perno
“Easy Bolt” esté completamente apretado.
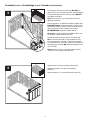
1
1
2
5
B
Align tabs on bottom of front panel (B) with slots on bottom
panel. "Front" is engraved on floor panel. Lower panel into
slot and lock in place by sliding panel toward right front.
Note: Use a rubber mallet to “push” front panel (B)
into locked position.
Alignez les languettes de la partie inférieure du panneau
avant (B) avec les fentes du panneau inférieur. Le mot
« Avant » (Front) est gravé sur le panneau du plancher.
Abaissez le panneau dans la fente et bloquez-le en le faisant
glisser vers le coin avant droit.
Remarque: utilisez un maillet en caoutchouc pour
«pousser» le panneau avant (B) en position verrouillée.
Alinee las lengüetas en la parte inferior del panel delantero
(B) con las ranuras a lo largo del panel inferior. En el panel del
piso aparece grabada la palabra “Front” (frente). Introduzca el
panel dentro de la ranura y trábelo haciendo deslizar el panel
hacia el lado delantero derecho.
Nota: use un martillo de caucho para “empujar” el panel
delantero (B) en la posición en que quede fijo.

10
Assembly (cont.) / Assemblage (suite) / Armado (continuación)
7
A
BB
x6
x6
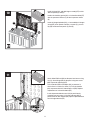
Turn deck box onto back. Secure bottom panel (A) to side
panels (C) with six screws (BB).
Tournez le coffre de terrasse sur le dos. Fixez le panneau
inférieur (A) aux panneaux latéraux (C) avec six vis (BB).
Coloque el arcón de terraza sobre la parte trasera. Asegure
el panel inferior (A) a los paneles laterales (C) con seis
tornillos (BB).
Before attaching hinge (KK), attach Metal Ball Stud (HH) to
hinge using one nut (JJ). Attach hinge (KK) to left side
channel on lid (E) using five screws (BB). Use force when
starting to drive screws. Once the screw pierces the plastic
it will drive easier. Repeat for right hinge (EE).
Avant de fixer la charnière (KK), fixez le boulon à boule
métallique (HH) à la charnière à l’aide d’un écrou (JJ). Fixez
la charnière (KK) à la voie gauche du couvercle (E) à l’aide
de cinq vis (BB). Vissez avec force car les vis seront dif-
ficiles à visser dans le plastique. Une fois que les vis auront
percé le plastique, elles seront plus faciles à visser. Répétez
l’opération avec la charnière droite (EE).
Antes de instalar la bisagra (KK), instale el perno con bola
de metal (HH) a la bisagra con una tuerca (JJ). Instale la
bisagra (KK) en el canal del lado izquierdo de la tapa (E) con
cinco tornillos (BB). Use fuerza al empezar a colocar los
tornillos. Después que el tornillo penetre el plástico entrará
más fácilmente. Repita el procedimiento con la bisagra
derecha (EE).
1
2
BB
DD
E
1
8
x9
Attach lid support bracket (DD) to lid panel (E) using
nine screws (BB).
Fixez le support d’appui du couvercle (DD) au panneau du
couvercle (E) à l’aide de huit vis (BB).
Instale el soporte de refuerzo de la tapa (DD) al panel de
la tapa (E) con ocho tornillos (BB).
2
2
9
BB
HH
x5
JJ
KK
Page is loading ...

12
Assembly (cont.) / Assemblage (suite) / Armado (continuación)
With lid closed, attach a 5/16" lock (not provided) to lock hasp to
properly secure deck box.
Avec le couvercle fermé, insérez une serrure de 8mm (5/16po)
(non fournie) dans le moraillon pour bien verrouiller le coffre
de terrasse.
Con la tapa cerrada, fije el cierre de 0,79 cm (5/16 pulg.) (no
incluido) al pasador de cierre para asegurar el arcón de terraza
adecuadamente.
5/16"
(0.8 cm)
Max.
max.
Máx.
5/16"
(0.8 cm)
5/8"
(1.6 cm)
Min.
min.
Mín.
1"
(2.5 cm)
Min.
min.
Mín.
13
2
12
HH
HH
GG
Attach Gas Shock (GG) to Metal Ball Studs (HH) by pushing
until you hear a "snap". Repeat other side.
Fixer le ressort à gaz (GG) aux boulons à boules métalliques
(HH) en pressant jusqu’à ce qu’il s’enclipse d’un bruit sec.
Instale el amortiguador de gas (GG) a los pernos conbola de
metal (HH) empujando hasta que escuche unchasquido.

13
Warranty
SUNCAST
®
Deck Box Five Year Limited Warranty
Your SUNCAST
®
Deck Box has a FIVE YEAR LIMITED WARRANTY against product failure resulting from defects in
manufacturing or materials. The warranty period starts on the delivery date. Incidental and consequential damages are not covered.
Warranty Claims
To file a warranty claim contact the manufacturer, SUNCAST
®
CORPORATION, 701 North Kirk Road, Batavia, Illinois, 60510. Call toll free
(800) 846-2345 or visit www.suncast.com.
SUNCAST
®
will repair or replace only the parts that failed under the terms of the warranty. In some cases, the replacement parts may not
be identical, but they shall be of equal or greater performance than the original part.
We may require proof of purchase. Proof of purchase may be the original dated store receipt. We may require evidence of the failure.
Evidence of failure may include photographs or returning failed components to SUNCAST.
®
WARRANTY LIMITATIONS
THIS WARRANTY COVERS ONLY DEFECTS THAT AFFECT THE FORM, FIT OR FUNCTION OF THE
UNIT. It excludes natural aging of the unit, discoloration, ordinary wear and tear, ordinary weathering, sunlight fading, or rust. It excludes
staining caused by mold, mildew or tree sap and damage caused by animals including insects, vermin or household pets. The warranty
does not cover damage caused by Acts of Nature including but not limited to: wind in excess of 65 mph; tornado; hurricane; microburst;
hail; flood; blizzard; extreme heat; pollution or fire events. The warranty does not cover damage caused by Sun energy reflected from
“Low-E” windows or other reflective materials. The user is responsible for protecting the product from damage in this situation.
The following actions void the warranty: improper assembly; assembly on a foundation other than as described in the
assembly instructions; use above intended and reasonable capacity; misuse; abuse; failure to perform ordinary maintenance; modifica-
tion; cleaning with abrasive tools, exposing the unit to heat sources and vandalism. Painting, sandblasting, cleaning with harsh chemicals
not recommended for plastics voids the warranty on resin components. Modification of the original product voids all warranties. Suncast
assumes no liability for any modified product or consequences resulting from failure of a modified product. Damage due to moving,
transporting,or relocating the product voids the warranty. Disassembly of this unit for reasons other than authorized repair voids the
warranty.
THIS WARRANTY IS NONTRANSFERABLE. IT IS VALID FOR NORMAL HOUSEHOLD USE ONLY. THE
WARRANTY IS VOIDED BY COMMERCIAL OR INDUSTRIAL USE. IT EXCLUDES FLOOR MODELS,
CLEARANCE AND OPEN BOX UNITS.
Notice
Suncast
®
does not represent that this unit will meet city, county, state, homeowner’s association standards or zoning
requirements. The owner is responsible for securing all permits and meeting other requirements needed for placement, construction and
use.
THE MANUFACTURER'S LIABILITY HEREUNDER IS LIMITED SOLELY TO THE REPAIR OR REPLACE-
MENT OF THE DEFECTIVE PRODUCT OR PART AND THE MANUFACTURER SHALL IN NO EVENT BE
LIABLE FOR ANY INCIDENTAL OR CONSEQUENTIAL DAMAGES WHICH MAY RESULT FROM ANY
DEFECT IN MATERIAL OR WORKMANSHIP OR FROM THE BREACH OF ANY EXPRESS OR IMPLIED
WARRANTY.
This warranty gives you specific legal rights, and you may also have other rights which vary from state to state. Some states do not allow
the exclusion or limitation of incidental or consequential damages; the limitation or exclusion may not apply to you.
Page is loading ...
Page is loading ...
Page is loading ...
-
 1
1
-
 2
2
-
 3
3
-
 4
4
-
 5
5
-
 6
6
-
 7
7
-
 8
8
-
 9
9
-
 10
10
-
 11
11
-
 12
12
-
 13
13
-
 14
14
-
 15
15
-
 16
16


Ask a question and I''ll find the answer in the document
Finding information in a document is now easier with AI
in other languages
- français: Suncast BMDB9900 Mode d'emploi
- español: Suncast BMDB9900 Instrucciones de operación
Related papers
-
Suncast BMDC2200 User manual
-
-
Suncast BMDB1310DT Operating instructions
-
-
-
-
-
-
-
Other documents
-
 Suncast Commercial MPTPLC8101G Operating instructions
-
 Suncast Commercial MPTPLC8101B Operating instructions
-
Suncast Commercial CPD200PRO Installation guide
-
TrailFX 110703S Installation guide
-
 HomePlace Structures CG12WFS User guide
-
Linon Mop Fish School Accent Table Assembly Instructions
-
 Red Dot DKG Installation guide
-
THETFORD Sani-Con® Turbo Storage Box Installation guide


