Page is loading ...

DISHWASHER JACKSON
MODEL M-24BF
Place this chapter in the Small Equipment/
Miscellaneous section of the Equipment Manual.
MANUFACTURED
EXCLUSIVELY FOR
MCDONALD'S®
BY
JACKSON PRODUCTS CO.
P.O. BOX 140
LEXINGTON, TN 38351
PHONE: 1 (901) 968-5753
TOLL FREE: 1 (800) 736-8144
TABLE OF CONTENTS
PARTS IDENTIFICATION/FUNCTION ...........………………………………………………............................ Page 2
OPERATING INSTRUCTIONS ...............................................…………………………………………………. Page 9
EQUIPMENT SET-UP AND CLOSE PROCEDURES..............................…………………………………….. Page 9
TROUBLESHOOTING ...................................................………………………………………………… …..... Page 11
PARTS ORDERING/SERVICE INFORMATION..................................………………………………………… Page 13
NON-SCHEDULED MAINTENANCE......................................………………………………………………..... Page 14
WARRANTY
Jackson dishwashers are warranted to the original purchaser to be free from defects in material or workmanship,
under normal use and operation for a period of (1) year from the date of purchase, but in no event to exceed 18
months from date of shipment from factory.
Jackson agrees under this warranty to repair or replace, at its discretion, any original part which proves to be
defective under normal use due to faulty material or workmanship, providing the machine has been unaltered,
and has been properly installed, maintained and operated in accordance with factory instruction manual. The
labor required to repair or replace such defective parts will be paid by Jackson, provided that the labor is
performed by a Jackson Authorized Service Agency.
There are no warranties, expressed or implied, including for fitness or merchantability, that are not set forth
herein, or that extend beyond the duration hereof. Under no circumstances will Jackson be liable for any loss or
damage, direct or consequential, or for damages in the nature of penalties, arising out of the use or inability to
any of its products.
This manual is for the exclusive use of licensees and employees of McDonald's Systems, Inc.
©1992 McDonald's Corporation Printed in July
All Rights Reserved EM MISC 36

PARTS IDENTIFICATION/FUNCTION
ITEM PART NO. DESCRIPTION QTY. FUNCTION
1 0413838 Top Panel 1 Covers top of dishwasher.
2 0313942 Operations Decal 1 Operating instructions.
3 0013808 Right Side Panel 1 Covers right side of unit.
4 0213941 Electrical Data Plate 1
Shows machine electrical specifications and
machine serial number.
5 0113928 Bottle Holder 1 Holds detergent bottle.
6 0114207 Leveling Feet 4 Adjusted to level machine.
7 0113944 Lower Kick Panel 1 Covers electrical components.
8 0013915 Door Assembly 1 Encloses washing cabinet.
9 0013837 Left Side Panel 1 Covers left side of unit.
10 0213918 Door Handle 1 Grasped to close door.
2

ITEM PART NO. DESCRIPTION QTY. FUNCTION
11 0313921 Upper Rinse Arm Assembly 2
12 0313850 Rinse Arm 1
13 6090400 End Plug 2
14 2001900 Plastic Washer 2
15 0213384 Bushing 1
16 1120111 Retaining Ring 1
Sprays hot water during rinse from the top.
17 3033800 Door Switch & Bracket 1 Starts dishwashing cycle.
18 0013815 Front Door Frame 1 Covers top & sides of door.
19 0313788 Right Side Rack Rail 1 Holds rack in washing area.
20 0313921 Lower Rinse Arm Assembly 1 Sprays hot water during rinse from the bottom.
21 0213923 Wash Arm Assembly 1
22 0213922 Wash Arm 1
23 0213597 Bearing Assembly 1
24 0113430 End Plug 2
Sprays hot water to provide washing action to
fully clean ware/utensils.
25 0313538 Basket Strainer 1 Filters large food particles from pump system.
26 0313789 Left Side Rack Rail 1 Holds rack in washing area.
3

4

ITEM PART NO. DESCRIPTION QTY. FUNCTION
27 0184101 Vacuum Breaker 1/2" 1 One-way water valve for fill.
*28 0184200 Repair Kit (Vacuum Breaker) 1
+29 0113960 Hubble Plug & Cord 1 Supplies power to machine.
30 1000918 Solenoid Valve 1/2" 1
31 0144000 Solenoid Coil 1
Opens water supply line for fresh water fill and
rinse.
*32 0145000 Repair Kit (Solenoid Valve) 1
33 0114040 Pressure Gauge Valve 1 Mounting for pressure gauge.
34 1000406 Pressure Regulator 1
35
Line Strainer 1
Reduces water supply pressure.
36 0113927 Fill Hose Assembly 1 Connects fresh water supply to dishwasher.
37 1113972 Drain Hose 1 Connects dishwasher to kitchen drain system.
5
*Not Shown
+Optional

ITEM PART NO. DESCRIPTION QTY. FUNCTION
38 6011200 Feed Hose 1 Injects detergent in machine.
39 6090700 Injection Fitting 1 Holds feed hose in place.
40 0113980 Pickup Hose 1 Suctions detergent from bottle.
*41 1113952 Buzzer 1 Low detergent alarm.
42 1213710 Detergent Pump Assembly 1 Pumps detergent from bottle.
43 1010100 Squeeze Tube 1 Creates pumping action.
44 7191700 Hose Clamp 2 Holds hose inside tube.
* Not Shown
6

ITEM PART NO. DESCRIPTION QTY. FUNCTION
45 0414194 Control Panel 1 Mounts controls/gauges.
46 1113950 ON/Fill-OFF/Drain Switch 1 Used to select dishwashing functions.
47 1113951 Cycle Switch 1
Used to select Auto/Manual and Standby
functions.
48 1114037 Delime/Priming Switch 1
Used to select deliming or detergent priming
functions.
49 1114445 Red Light 1 Lights when detergent supply in bottle is low.
50 1113949 Green Light 1 Indicates dishwasher is filling or rinsing.
51 5040618 Amber Light 1 Indicates dishwasher is in a dishwashing cycle.
52 5040718 Red Light 1 Indicates power is ON.
53 1114039 Rinse Thermometer 1
Gives temperature reading of rinse water being
supplied from the booster.
54 1114038 Wash Thermometer 1 Gives temperature of wash water in wash tank.
7

ITEM PART NO. DESCRIPTION QTY. FUNCTION
55 0114424 Door Striker 1 Strikes door switch.
56 0114441 Door Latch Assembly 1 Holds door closed.
57 0114458 Door Spring 2 Lifts door.
58 3033800 Door Switch & Bracket 1 Starts dishwashing cycle.

EQUIPMENT SET-UP AND
CLOSE PROCEDURES
Set-Up — Complete the following:
1. Insure basket strainer has been cleaned
thoroughly of debris and is installed properly
into wash tank.
2. Check the wash spray arm and both upper and
lower rinse spray arms to insure they have the
end caps installed and that all are free and
clear of food debris and spin easily.
3. Close the door.
4. Depress the cycle switch to the AUTO position.
5. Depress the power switch to the ON/FILL
position — fill light will come ON.
6. When the rinse/fill light goes OUT the filling of
the dishwasher is complete.
7. Open and close the door and run (3) complete
dishwashing cycles to get the machine's
temperatures up to 150°F wash and 180°F
rinse.
NORMAL OPERATING PROCEDURE
Close the door and the machine will automatically
go through complete wash, drain and rinse cycles.
The amber cycle light will remain ON during the
complete dishwashing cycle and go OUT at the
completion of the cycle. The green light will come
ON only during the rinse portion of the cycle.
DOOR SAFETY SWITCH OPERATION
If door is opened during a dishwashing cycle,
machine will stop the cycle until door is closed.
When door is closed, cycle will resume where it was
stopped.
CAUTION: If door is opened during cycle, open
it very slowly to allow sufficient time for
spraying action to stop.
STANDBY MODE OF OPERATION
Placing the cycle switch in the center OFF position
will allow the door to be opened and closed without
starting an automatic cycle. Machine will still
maintain proper temperatures in this position.
MANUAL WASH
Place cycle switch in the MANUAL wash position. In
this position, machine will wash indefinitely until
switch is placed in center OFF or AUTO cycle
position.
Close - Complete the following:
1. Remove rack from dishwasher.
2. Close the door and start a dishwashing cycle.
3. When the amber cycle light comes ON depress
the power switch to the OFF/Drain position.
Machine will complete the washing cycle and
drain but will not fill back up. The amber cycle
light will go OUT.
4. Open the door.
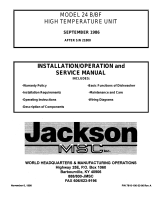
5. Remove the wash spray arm and both upper and
lower rinse spray arms by grasping the arm by
the hub and unscrewing counterclockwise to
remove. (See Figure 1)
STEP 5
Figure 1
6. Remove the basket strainer.
7. Visually inspect the inside of the machine for a
lime build-up (yellowish-white powder). If
deliming is necessary, replace the basket
strainer, wash and rinse spray arms and delime
the interior of the machine. See Non-Scheduled
Maintenance Section procedures (4). Then
continue to Step 8.
9

8. Thoroughly clean these parts in a sink. Remove
end caps of spray arms with flat head
screwdriver and clean inside with tube brush if
needed. Inspect for seeds, bits of food, etc. that
may be clogging the holes or bearings. If spray
holes are clogged, clear the holes with a
straightened paper clip. Replace end caps
tighten securely in place.
9. Use a damp cloth and wipe down the inside and
outside of the machine.
NOTE: Do not use abrasive, sharp objects,
scouring pads, harsh or gritty cleansers on any part
of your dishwasher.
10. Install the basket strainer.
11. Install wash spray arm and both upper and
lower rinse spray arms by grasping the arm by
the hub and screwing clockwise to install.
12. Leave the door ajar to allow the interior to air
out and dry overnight.
NOTE: Do not turn OFF water valve supplying hot
water to dishwasher. If it has been turned OFF —
turn it back ON and leave it ON.
10

TROUBLESHOOTING GUIDE
WARNING: Inspection, testing and repair of
electrical equipment should be performed only
by qualified service personnel. Certain
procedures in this manual require electrical
tests or measurements while power is applied to
the dishwasher. Exercise extreme caution at all
times. If test points are not easily
accessible, disconnect power and attach test
equipment and reapply power to test. Discon-
nect the electrical power to the dishwasher at
the main circuit breaker box when servicing.
Place a tag on the circuit box indicating the
circuit is being repaired.
PROBLEM PROBABLE CAUSE CORRECTIVE ACTION
No detergent being pumped into
dishwasher.
Detergent out — replace.
Improper amount of detergent. Call Jackson Service.
Lack of proper water pressure.
Check pressure to the machine. See page
16.
Line strainer clogged. Clean strainer. See page 17.
Temperature of water supply below 140°F.
Check temperature of water supply. See
page 16.
Wash arm nozzles clogged or not
spinning.
Clean wash arms. Replace worn parts.
See page 15.
Wash/Rinse arms missing end plugs. Replace end plugs. See page 15.
Basket strainer full of food debris. Clean basket.
Wrong type of detergent. Use McD dishwasher detergent.
Drain valve stuck open. Call Jackson Service.
Fill valve defective. Call Jackson Service.
Timer defective. Call Jackson Service.
Thermostat defective. Call Jackson Service.
Ware/utensils not
completely clean.
Booster heater defective. Call Jackson Service.
No power to dishwasher. Check circuit breaker.
Cycle switch in center standby position.
Depress cycle switch to AUTO position
and try.
Door switch needs to be adjusted. Adjust door switch. See page 14.
Reset of timer not completed.
Depress cycle to AUTO position, open
door, wait until cycle light goes OUT, close
door to start.
ON/Fill-OFF/Drain switch defective. Call Jackson Service.
Cycle switch defective. Call Jackson Service.
Timer out of order. Call Jackson Service.
Dishwasher will not run
when door is closed.
Pump motor defective. Call Jackson Service.
Dishwasher not level. Level unit. See page 19.
Excessive sudsing in wash tank. Use McD dishwashing detergent.
High water pressure to dishwasher.
Check water pressure to unit. See page
16.
Water leaking around
door.
Too much water in tank. Call Jackson Service.
Fill valve defective. Call Jackson Service.
Dishwasher fills
continuously.
Timer defective. Call Jackson Service.
Too much detergent. Call Jackson Service.
Excessive sudsing.
Wrong type of detergent. Use McD dishwashing detergent.
11

WARNING: Inspection, testing and repair of
electrical equipment should be performed only
by qualified service personnel. Certain
procedures in this manual require electrical
tests or measurements while power is applied to
the dishwasher. Exercise extreme caution at all
times. If test points are not easily
accessible, disconnect power and attach test
equipment and reapply power to test. Discon-
nect the electrical power to the dishwasher at
the main circuit breaker box when servicing.
Place a tag on the circuit box indicating the
circuit is being repaired.
PROBLEM PROBABLE CAUSE CORRECTIVE ACTION
Split hose at pump. Call Jackson Service.
Pump seal defective. Call Jackson Service.
Split drain hose. Call Jackson Service.
Water under the
dishwasher.
Split rinse hose. Call Jackson Service.
Door does not close and
latch properly
Door latch defective. Replace door latch. See page 16.
Door drops hard and is
heavy to open.
Door spring broken. Replace door spring. See page 16.
Drain valve defective. Call Jackson Service.
Drain hose kinked. Straighten hose.
Water remaining in
machine at end of
OFF/Drain cycle.
Timer inoperative. Call Jackson Service.
Dishwasher has musty
odor.
Dishwasher not cleaned properly or door
kept closed overnight.
Review Equipment Set-Up and Close
Procedures.
Detergent pump runs too long. Call Jackson Service. Too much detergent being
injected into the
dishwasher.
Timer out of order. Call Jackson Service.
Detergent bottle empty.
Replace with full bottle and prime. See
page 14.
Detergent lines not in detergent bottle. Put lines in and prime lines.
Air leak in line between detergent bottle
and pressure switch.
Replace line. See page 18.
Detergent alert warning
light comes ON and the
buzzer sounds.
Pressure switch defective. Call Jackson Service.
Detergent bottle empty.
Replace with full bottle and prime. See
page 14.
Detergent pump bad. Call Jackson Service.
Air leaks at fittings on detergent feed lines. Tighten fittings.
Detergent feed lines pinched or cracked. Replace feed lines. See page 18.
Timer not working. Call Jackson Service.
Not enough or no
detergent being injected
into the dishwasher.
Detergent timer can not set properly. Call Jackson Service.
Water leaking from rinse
arms when unit is OFF.
Fill valve defective. NOTE: A small amount
of water will leak from lower rinse arm as
water in booster tank expands during
heating.
Call Jackson Service.
No water in machine or not enough water. Complete Set-Up Procedures page 6.
Improper water pressure. Check pressure.
Dishwasher runs but
making humming sound
inside.
Pump motor defective. Call Jackson Service.
Vacuum breaker at back
of machine leaking.
Internal parts defective. Install repair kit. See page 17.
12

WARNING: Inspection, testing and repair of
electrical equipment should be performed only
by qualified service personnel. Certain
procedures in this manual require electrical
tests or measurements while power is applied
to the dishwasher. Exercise extreme caution at
all times. If test points are not easily
accessible, disconnect power and attach test
equipment and reapply power to test. Discon-
nect the electrical power to the dishwasher at
the main circuit breaker box when servicing.
Place a tag on the circuit box indicating the
circuit is being repaired.
PROBLEM PROBABLE CAUSE CORRECTIVE ACTION
Wash temperature gauge
not reading any
temperature.
Defective gauge. Call Jackson Service.
Rinse temperature gauge
not reading any
temperature.
Defective gauge. Call Jackson Service.
Wash arm not spinning or
very hard to spin.
Internal parts worn or defective. Replace worn parts. See page 15.
Rinse arm not spinning or
very hard to spin.
Internal parts worn or defective. Replace worn parts. See page 15.
Dish rack hits rack rails
when pushed into
machine.
Rack rails need to be lowered. Adjust rack rails. See page 15.
PARTS ORDERING/SERVCE INFORMATION
Parts orders must be placed directly with your local
Jackson Maintenance & Repair Center at this
telephone number:
The following information should be provided and
may be obtained from the dishwasher data plate
located on the right side of the machine.
Model Number: M-24BF
Serial Number:
Date Installed:______________________________
Local Service Agency: _______________________
Telephone Number:_________________________
Address: _________________________________
Zip Code: _________________________________
(Fill in the above information for your records)
You should also have available the part number, its
description, and the quantity required. A list of
replacement parts is included in this manual and
should be used to assist in identifying and ordering
parts. Contact your local Jackson authorized
maintenance and repair center.
Service assistance may be obtained by calling your
local Jackson authorized maintenance and repair
center.
When calling, the model number, serial number,
and electrical specifications should be available,
along with the nature of the problem, its symptoms
and any other information that would be helpful in
solving the problem.
IMPORTANT SAFETY INSTRUCTIONS
Please read all instructions before using this
dishwasher. Safety precautions in this manual and
preceded by the words "DANGER", "WARNING",
"CAUTION" or "NOTE" and are very important.
DANGER is used to indicate the presence of a
hazard which will cause severe personal injury,
death or substantial property damage if the
statement is ignored. WARNING is used to indicate
the presence of a hazard which can cause severe
personal injury, death or substantial property
damage if the statement is ignored. CAUTION is
used to indicate the presence of a hazard which will
or can cause minor personal injury or property
damage if the statement is ignored. NOTE is used
to notify personnel of installation, operations, or
maintenance information which is important, but not
hazard related.
13

NON-SCHEDULED MAINTENANCE
IMPORTANT SAFETY NOTICE:
The service information in this manual is
intended for use of individuals possessing
adequate backgrounds of electrical and
mechanical experience. Any attempt to repair
this dishwasher may result in personal injury
and property damage. The manufacturer or
seller cannot be responsible for the interpre-
tation of this information, nor can it assume any
liability in connection with its use.
When electrical wires are disconnected, they MUST
be marked in such a way to simplify replacement.
TO REPLACE EMPTY DETERGENT BOTTLE
Tools: None
Parts: Full bottle of detergent
1. Remove detergent pickup hose and low-
detergent alert hose from empty bottle of
detergent.
2. Insert both hoses in full bottle of detergent and
place bottle into holding bracket.
3. Follow "To Prime Detergent Feed Lines" to
prime detergent feed lines.
4. Machine is ready for use.
TO PRIME DETERGENT FEED LINES
Tools: None
Parts: None
1. Place the detergent hose in the bottle of
detergent and place bottle in rack.
2. Close and latch door.
3. Depress the cycle switch to the AUTO position
and depress the power switch to the ON/FILL
position. Machine will fill with water.
4. Depress and hold the prime switch for 20-30
seconds.
TO ADJUST THE DOOR SWITCH & BRACKET
Tools: #2 Phillips screwdriver, 7/16" nut
driver/socket
Parts: None
1. WARNING: Disconnect the electrical power
to the dishwasher at the main circuit box.
Place a tag on the circuit box indicating the
circuit is being worked on.
2. Remove front door flange which is secured by 4
screws and lay aside.
14
Figure 2
3. Loosen the door switch bracket which is
secured by 2 locknuts.
4. Close and latch door completely.
5. Slide door switch & bracket toward door striker
until lever of switch is depressed against striker
and a "click" is heard to indicate switch is
closed.

6. Tighten mounting nuts securely.
7. Reinstall front door flange.
8. Reconnect power.
TO REPLACE RINSE ARM WASHERS OR SNAP
RING
Tools: Flat blade screwdriver (1/4")
Parts: End Plug (Item #13 Washer (Item #14) Snap
Ring (Item #16)
1. Unscrew and remove rinse arm from feed pipe.
2. Remove snap ring from hub and disassemble.
3. Replace both nylatron (plastic) washers and snap
ring.
4. Reverse procedure to assembly arm.
5. Unscrew and replace plastic end caps if worn or
damaged.
6. Reinstall rinse arm into machine.
TO REPLACE WASH ARM BEARING OR END
CAPS
Tools: Adjustable wrench (10"), flat blade
screwdriver (1/4")
Parts: Bearing Assembly (Item #23), End Plug
(Item #24)
1. Unscrew and remove wash arm.
2. Unscrew and remove bearing assembly from
hub.
3. Install new bearing assembly into arm.
4. Replace end caps of arm if worn or damaged.
5. Reinstall arm assembly into machine. TO
DELIME INTERIOR OF THE DISHWASHER
Tools: None
Parts: Packets of Delimer (HCS)
1. Follow Steps 1-3 of "Closing Procedure".
2. Depress power switch to ON/FILL position then
close and latch door. Allow machine to complete
a fill cycle (about 1 minute).
3. Open the door and pour in (2) packets delimer
into basket strainer. Place delime switch in the
deliming position and place cycle switch in
manual wash position.
4. Close and latch the door. The machine will begin
to run continuously. Allow the machine to run in
the deliming position for 10-15 minutes.
5. After deliming is completed, place the delime
switch to the center ON position and cycle
switch to the AUTO position and run a complete
cycle.
6. Run several normal cycles to completely flush
residual deliming solution from the machine.
7. Machine is ready for use.
NOTE: Never leave delimer solution in the machine
overnight or for long periods of time (over (1) hour).
TO ADJUST RACK RAILS INSIDE MACHINE
Tools: Nut driver or open end wrench (7/16")
Parts: None
1. Loosen rack rails which are secured by (2)
locknuts.
2. Raise or lower to level of door and tighten
locknuts.
15

TO CHECK WATER SUPPLY PRESSURE
Tools: None
Parts: Teflon Tape, Pressure Gauge
1. Install a pressure gauge (1/4
//
) into the pet-cock
valve using teflon tape on the threads.
2. Turn petcock valve to open position.
3. Run a dishwashing cycle. During rinse portion of
cycle when green light comes on read pressure
of gauge, it must be between 15 and 25 psi.
4. Turn petcock valve to closed position.
CAUTION: Make certain that petcock valve is
closed before removing gauge.
TO CHECK WATER SUPPLY TEMPERATURE
Tools: None
Parts: Teflon Tape, Temperature Gauge
1. Install a temperature gauge (1/4") into the
petcock valve using teflon tape on the threads.
See "To Check Water Supply Pressure", Step 1
for location.
2. Turn petcock valve to open position.
3. Run a dishwashing cycle. During rinse portion of
cycle when green light comes ON read
temperature of gauge, it must be at least 140°F.
4. Turn petcock valve to closed position.
CAUTION: Make certain that petcock valve is
closed before removing gauge.
TO REPLACE THE DOOR SPRINGS
Tools: #2 Phillips screwdriver
Parts: Door Spring (Item #57)
1. WARNING: Disconnect the electrical power to
the dishwasher at the main circuit box. Place
a tag on the circuit box indicating the circuit
is being worked on.
2. Remove front door flange which is secured by 4
screws and lay aside.
3. Close and latch door completely.
4. Unhook defective spring from door and from lower
frame.
5. Install new spring to lower frame hole and door
hinge.
6. Reinstall front door flange. Reconnect power.
Machine is ready for use.
TO REPLACE DOOR LATCH ASSEMBLY
Tools: #1 Phillips screwdriver
Parts: Latch Assembly (Item #56)
1. Remove latch by removing inner door rail which is
secured by screws.
2. Install new latch and reinstall inner door rail
securely.
16

TO CLEAN WATER LINE STRAINER
NOTE: Frequency of this task will vary depending on
local water quality.
Tools: Adjustable 10" wrench
Parts: None
1. Turn water supply OFF to dishwasher at service
connection.
2. Unscrew cap from pressure regulator valve.
NOTE: Some water will drain when cap is un-
screwed.
3. Remove and clean line strainer completely.
4. Reinstall cap securely.
5. Turn water supply ON to dishwasher.
TO INSTALL VACUUM BREAKER REPAIR KIT
Tools: Flat blade screwdriver (1/4")
Parts: Vacuum Breaker Repair Kit (Item #28)
1. WARNING: Disconnect the electrical power to
the dishwasher at the main circuit box. Place
a tag on the circuit box indicating the circuit
is being worked on.
2. Turn water supply OFF to dishwasher.
3. Remove cap from vacuum breaker which is
secured by (1) screw.
4. Unscrew top using screwdriver.
5. Install all repair kit parts.
Figure 9
6. Reassemble in reverse order.
7. Turn water supply ON to dishwasher. Reconnect
power.
8. Dishwasher is ready for use.
TO REPLACE DETERGENT PUMP
SQUEEZE TUBE
Tools: Hose clamp pliers, adjustable wrench
(6"), Phillips screwdriver (#2)
Parts: Squeeze Tube (Item #43)
1. Remove pickup and feed hoses to squeeze tube
which are secured by hose clamps.
2. Remove pump face plate which is secured by (5)
screws.
17

3. Remove squeeze tube and replace with new
tube.
Figure 10
4. Reassemble in reverse order.
5. Insert feed and pickup hoses into squeeze tube
and secure with clamps.
6. Insert pickup hose into detergent bottle.
7. Machine is now ready to prime detergent lines.
8. Follow "To Prime Detergent Feed Lines" for
priming detergent lines.
CAUTION: When using or working with the liquid
detergent use caution as it can irritate the skin.
TO REPLACE DETERGENT PUMP FEED AND
PICKUP HOSES
Tools: Hose clamp pliers, adjustable wrench (6"),
Phillips screwdriver
Parts: Detergent feed hose (Item #38), detergent
pickup hose (Item #40)
1. Remove detergent pump feed hose from the
pump squeeze tube which is secured by hose
clamps. Remove other end of hose from
injection fitting which is secured by a
compression nut at back of machine. (See
Figures 11 & 12)
Figure 11
2. Replace feed hose and install in reverse order of
above.
3. Remove detergent pickup hose from pump
squeeze which is secured by hose clamps.
Remove other end of hose from detergent bottle.
(See Figures 11 & 12)
18
Figure
12
4. Replace pickup hose and install in reverse order of
above.
5. Place pickup hose into detergent bottle.
6.
Machine is now ready to prime detergent lines.
7. Follow "To Prime Detergent Feed Lines" for priming
detergent lines.

TO LEVEL DISHWASHER AND CHECK FOR
PROPER WATER LEVEL
Tools: Adjustable Wrench (8")
Parts: None
1. Depress the cycle switch to the AUTO position
and depress the power switch to the ON/FILL
position.
2. Install basket strainer squarely and completely in
wash tank.
3. Close and latch the door and allow dishwasher to
complete a cycle.
4. Open door. Adjust the leveling feet until the water
in the wash tank is touching the basket strainer
screen evenly from side to side and front to back.
19
/