Page is loading ...

Installation and
Maintenance
Instructions
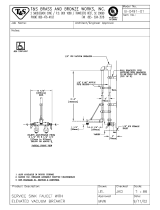
B-0695 Service Sink
Fittings with Concealed
By-Pass Mixing Valves
Deutsch: Installations- und
Wartungsanleitungen
Español: la Instalación y las
Instrucciones de
Mantenimiento
Français: les Instructions
d’Installation et
d’Entretien
Limited One Year Warranty
T&S warrants to the original purchaser (other than
for purposes of resale) that such product is free from
defects in material and workmanship for a period of
one (1) year from the date of purchase. During this
one-year warranty period, if the product is found to
be defective, T&S shall, at its options, repair and/
or replace it. To obtain warranty service, products
must be returned to...
T&S Brass and Bronze Works, Inc.
Attn: Warranty Repair Department
2 Saddleback Cove
Travelers Rest, SC 29690
Shipping, freight, insurance, and other transpor-
tation charges of the product to T&S and the return
of repaired or replaced product to the purchaser are
the responsibility of the purchaser. Repair and/or
replacement shall be made within a reasonable time
after receipt by T&S of the returned product. This
warranty does not cover Items which have received
secondary finishing or have been altered or modi-
fied after purchase, or for defects caused by physi-
cal abuse to or misuse of the product, or shipment
of the products.
Any express warranty not provided herein, and
any remedy for Breach of Contract which might arise,
is hereby excluded and disclaimed. Any implied
warranties of merchantability or fitness for a particu-
lar purpose are limited to one year in duration. Under
no circumstances shall T&S be liable for loss of
use or any special consequential costs, expenses
or damages.
Some states do not allow limitations on how long
and implied warranty lasts or the exclusion or limi-
tation of incidental or consequential damages, so
the above limitations or exclusions may not apply
to you. Specific rights under this warranty and other
rights vary from state to state.
P/N: 098-005910-45 Rev.2
Date: 980504
Drawn: CW
Checked: MAB 7-23-98
Approved: MVW 7-23-98

Exploded View
* Some items are listed for instructional purposes
and may not be sold as separate parts.
7
1
12
15
2
3
13
19
18
17
16
14
4
6
9
8
5
10
11

Part Number Guide
Vacuum Breaker
1 Asm, Vacuum Breaker B-0929-A
2 Asm, Coupling Flange 002893-40
3 Washer, Coupling Nut 001019-45
Mixing Valve Assembly
4 Asm, By-Pass Mixing Valve B-1035
5 Body, Valve *
6 Asm, Spindle (Eterna) Hot 005960-40
7 Escutcheon Tube *
8 Escutcheon *
9 Set Screw, Escutcheon Flange *
10 Loose Key Stop 009745-45
11 Nipple, Close 1/2" *
Nozzle Assembly w/ Brace
19 Asm, Nozzle w/ Brace B-0671-POL
12 Flange 000013-40
13 Asm, Nozzle *
14 Asm, Upper Nozzle Support 009546-40
15 Support Rod *
16 Flange, Support *
17 Roll Pin *
18 Screw, Wall Mount 000915-45

General Instructions
Installation: (Vacuum Breaker)
1. Drill holes 3-3/4” center-to-center in
wall where you will be installing no.1.
Note: Please consult applicable
plumbing codes for proper installed
height of no.1 over outlet of no.13.
2. Remove no.3 from no.1, install no.3
onto piping.
3. Reattach no.1 to no.3, making sure
no.2 is in place and tighten with a
wrench.
Installation: (Faucet Body)
4. After unpacking no.4, remove no.6,
no.7, no.8 and no.9 from no.5.
(Loosen no.8 at base of no.9, slide
both off no.5.)
5. (For B-0695 ST and B-0696 ST
models, add no.10 by using no.11 to
join the couplings together.)
Make connections to no.4:
B-0695: 1/2” IPS (Iron Pipe Size) female
union inlets; 1/2” close nipples.
B-0696: 5/8” union inlets; must solder
copper piping to inlets.
B-0695 ST: use B-0416 stops; 1/2” NPT
(National Pipe Thread) piping.
B-0696 ST: installer must supply 5/8”
solder joint to 1/2” NPT (National Pipe
Thread) adapter in order to attach supply
lines to no.10.
1
outlet
inlet
2
3
wall
6
7
8
8
5
11
10
wall
9
9
Use no.10 and no.11 for B-0695 ST
and B-0696 ST models
inlet
supply
line
15
13
Installation: Nozzle
6. Attach no.12, onto supply pipe;
screw no.15 into no.13 attachment.
12
7. Mark holes on wall for attachment
of no.16; use provided no.18 to
secure no.16 to wall.
8. Insert no.17 into hole of no.16.
18
16
17
15
9. Turn on water and check for leaks.
See flow diagram on page 8.

T&S BRASS AND BRONZE WORKS, INC.
A firm commitment to application-engineered plumbing products
2 Saddleback Cove, P.O. Box 1088, T & S Brass-Europe
Travelers Rest, SC 29690 ‘De Veenhoeve’
Phone: (864) 834-4102 Oude Nieuwveenseweg 84
Fax: (864) 834-3518 2441 CW Nieuwveen
E-mail: [email protected] The Netherlands
Flow diagram
Plumbing supplied
by others
B-0929A
Vacuum
Breaker
Upper Nozzle
Support
Spindle
Assembly
Escutcheon
Support Rod
Spout
Concealed
By-Pass
Mixing Valve
B-0416
Stop
Wall
Water
Supply
Inlet
/