
Dishwasher Guide
mmmJENN-AIR
For Future Assistance ............. i
Safety Instructions ............... 1
Check Before Washing ............ 2
Hot Water
Rinse Aid
Detergents
Loading ........................ 3
Cycles At A Glance .............. 4
Options At A Glance ............. 5
Additional Information ........... 5
Adding A Forgotten Item
Cleaning
Storing
What Can & Cannot
Be Washed .................... 6
Common Questions
& Answers .................. 7-9
Notes ......................... 10
Warranty ............... Back Page
_0_0_0000_0000

]For Future Assistance
Thank you for selecting a new Jenn-Air dishwasher! In addition, keep your sales slip or cancelled check should
We appreciate your purchase decision and feel confident any warranty service be required. Proof of original date of
you will be happy with this appliance for years to come. purchase is needed. For additional questions, please con-
For best results, we suggest reading this material to help tact us:
you properly operate and maintain the appliance. Jenn-Air
Should you ever need our future assistance with your dish- 403 West Fourth Street North
washer, a complete model and serial number recorded in Newton, Iowa 50208
the spaces below will be extremely helpful. These numbers
can be found in the upper left corner of the tub opening. AWARNING - Check with the installer to make sure
the appliance has been properly grounded to avoid pos-
sible electrical shock. Be sure you read the Important
Model Number Personal Safety Instructions before you start to use this
dishwasher.
Serial Number In our continuing effort to improve the quality of our
dishwashers, it may be necessary to make changes to
the appearance without revising this guide.
Important Safety Instructions
Products with a@label have been listed with Underwriter's 8. Be careful not to touch the heating element on the but-
Laboratories, Inc. - those with a CSA tag have been listed tom of the tub during or at the completion of a cycle.
with Canadian Standards Association. Nevertheless, as It may be hot.
with any other equipment using electricity and moving 9. Use only detergents and rinse additives designed for an
parts, there is a potential hazard, automatic dishwasher. Never use soap, laundry deter-
A WARNING - When using your dishwasher, follow gent, or hand washing detergent in your dishwasher.
basic precautions, including the following: Keep these products out of reach of children.
10. Do not sit, stand on or abuse the door or dish racks of
l. Read all instructions before using the dishwasher, the dishwasher.
2. Use the dishwasher only for its intended function. 11. Under certain conditions, hydrogen gas may be pro-
3. Disconnect electrical power to dishwasher before duced in a hot water system that has not been used for
attempting to service, two weeks or more. Hydrogen gas is explosive. If the
hot water system has not been used for such a period,
4. To avoid electrical shock hazard, the sides and back
turn on all hot water faucets and let the water flow
must be enclosed and the front panels must be attached
from each for several minutes. This will release any
before electrical power is applied to the dishwasher.
accumulated hydrogen gas. As the gas is flammable,
Refer to the installation instructions for proper ground- do not smoke or use an open flame during this process.
ing procedures.
12. Do not wash plastic items unless marked "dishwasher
5. Connect to a properly rated, protected and sized power safe" or the equivalent. For plastic items not so
supply circuit to avoid electrical overload, marked, check the manufacturer's recommendations.
6. Children should never be permitted to operate, or play 13. Do not tamper with controls.
in, with, or around this dishwasher.
14. Always remove the door to the washing compartment
7. To reduce the risk of injury when loading items to be when removing an old dishwasher from service or dis-
washed, sharp or pointed items should be located with carding it.
the handles up. Also, load sharp items so they are not
likely to damage the door seal.
Save These Instructions

Check Before Washing
H o t W at e r a liquid rinse aid dispenser automati-
cally releases a measured amount of
For best results, hot water is necessary, additive into the final rinse portion of
The incoming water temperature each cycle.
should be 120-140°F. To check the
water temperature, turn on the hot To fill the dispenser, turn the cap coun-
water faucet nearest the dishwasher terclockwise to open. Pour the rinse aid ""
and let it tun into a glass in the sink. into the reservoir. Replace the cap and be
Place a candy thermometer in the glass sure it is securely in place before closing • Use Hot Water to dissolve
and check the temperature once it has the dishwasher door. Check monthly, and activate detergent, dis-
stopped rising. If the temperature is solve greasy food soils and
below 120°E have a qualified person Detergent improve drying.
raise the water heater setting. Use a detergent designed specifically
Additionally: for use in an automatic dishwasher. • Use a Rinse Aid regularly
• If the outside temperature is unusu- Other types (laundry, hand soap, etc,) to improve drying results
ally low, or if your water travels a will cause oversudsing. For best results and reduce spotting and
long distance from the water heater be sure to use fresh detergent and store filming.
to the dishwasher, you may need to it in a cool, dry place (not under the
increase your home's water heater sink). • Use the Proper Detergent
Amount for best soil
setting and/or select water heating The amount of detergent to use removal, good drying
options on your dishwasher, depends on the water hardness (mea- results and prevention of
If you have not recently used hot sured in grains per gallon-gpg) and the filming, etching and spot-
water, the water in the pipes will be amount of soil on the dishes, ting.
cold. Run water at the sink until the A basic guideline is:
water is hot. Then start the dish- 1.) Use 1 teaspoon of detergent per • Load Properly to ensure
washer, grain of water hardness, soiled surfaces get adequate
• If you've recently done laundry or 2.) A minimum of 3 teaspoons is need- wash action. (See page 3).
ed in soft water.*
used hot water for showers, your
water heater may need time to 3.) For concentrated detergents, de- • Select the Proper Cycle
recover before operating the dish- crease the amount by half. & Options based on the
washer. If the water hardness is 15 grains or amount of food soil, water
harder, it will be virtually impossible to conditions and expected
R ins e Ai d get good results with any dishwasher, drying results. (See pages
Rinse aids come in solid or liquid form. The only solution is a mechanical 4-5).
When using a solid rinse aid, fasten it to water softener to improve water quali-
the back fight corner of the lower rack. ty and detergent effectiveness,
Replace the rinse aid when the contain-
er is empty.
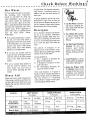
CYCLES SOFT WATER MEDIUM WATER HARD WATER
(0-3 grains) (4-9 1;rains) (10-12 rains)
Main Cup Pre Wash Main Cup Pre Wash Main Cup Pre Wash
Pots & Pans 3 tsp. 3 tsp. 4-9 tsp. 4-9 tsp. 10-12 tsp. 10-12 tsp.
Normal/Heavy minimum minimum
Light/China 3 tsp. rain. none 4-9 tsp. none 10-12 tsp. none
Rinse & Hold Use no detergent Use no detergent Use no detergent

Loading the Dishwasher
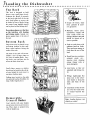
Top Rack _p///
This rack is designed to hold
glasses, cups, small plates, bowls,
cookware etc. Bowls fit securely /T-,,_-_t'_
in the back right half of the top _•
rack. Small plates or saucers can ••
be loaded in front of bowls, facing _, Scrape off bones, large
the center. Long handled utensils food particles & exces-
can be placed on the folding shelf, sire grease/oil.
Do not place glasses over the tines * Mustard, lemon juice,
as this interferes with cleaning mayonnaise, vinegar, and
and drying results. Instead, rest other acidic foods can
glasses against tines or the side of damage stainless steel and
the rack. should be rinsed off as
B o t t o m R a c k soon as possible.
Large items may be placed in any * Soak or scrub pieces with
convenient location in this rack. stubborn burnt-on foods.
Keep soiled surfaces facing the They need more energy to
center of the rack. clean than the rest of the
load.
The back of this rack will accom-
modate a row of large plates or * Starch from rice, potatoes,
two rows of smaller plates. Serv- oatmeal, pasta, etc...
ing bowls, pots and pans also fit requires more cleaning
across the back of the rack. energy (longer cycle or
more detergent).
Small plates, saucers or shallow * Load items so they are
bowls may be loaded in the elevat- separated and facing cen-
ed area behind the wash tower to ter.
maximize loading space.
• Wedge, lightweight fiat
Folding tines located on the right items next to the silver-
side provide loading flexibility for ware basket or along the
large, bulky-shaped pieces, sides and back of the
racks.
• Load items so they do not
rest over the wash tower
or extend beyond the
racks.
Removable I
U t e n s i I Basket Note:Loadingfeaturesvary
slightly per model.
Load utensils with some handles
up and some down to prevent nest-
ing. Place sharp or pointed items
with the handles up.

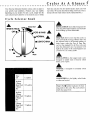
Cycles At A Glance
Your Jenn-Air dishwasher features various cycles to adjust to Start time and press the door until it latches. Each cycle will
your specific load conditions. (Features may vary slightly start with a 90 second drain before filling with water. This is
depending on your model.) To start a cycle, simply turn the normal. (Do not rotate selector knob counterclockwise.)
cycle selector knob clockwise to the desired cycle or Delay
Cycle Selector Knob
A A
Delay Start _ RINSE & HOLD rinses dishes being held for
OFF
RINSE&HOLD a full load. This helps minimize any food odor
• from building up in the dishwasher.
OFF• POTSNoRMAL& PANS__A A
,_ Delay Start allows you to start the cycle at a
more convenient or energy efficient time. Set
• LIGHT/CHINA A the selector knob to the desired number of
delay hours, select the Pots & Pans Plus
cycle or the standard Pots & Pans cycle and
latch the dishwasher door. An indicator will
light in the center of the control panel to let
Dry _ you know it is in a delay mode.
Wash A
POTS & PANS is the longest wash cycle
designed to handle loads of heavily soiled
dishes, pots or pans.
A
NORMAL is designed for normally soiled
dish loads.
A
Off LIGHT/CHINA is for lightly soiled loads
or china and crystal.
3 Rinses
2Main WashRinses ]N°te:The_symb°lindicatestheheat- I
Dry ing points in the cycle. The cycle selector
knob may pause here.
PreWash
2 Rinses
Main Wash
2 Rinses
Dry
2 Rinses
Main Wash 7.5 gallons
2 Rinses
Dry

Options At A Glance Additional Information
Heating Options Adding a Forgotten Item
(Located on buttons on the left side of the panel.)
For best cleaning, the forgotten item should be added early
FAN DRY HEAT improves drying results by turning the in the cycle.
heating element on during a portion of fan dry.
1. Unlatch the door and wait until the sound of circulating
FAN DRY AIR turns the heating element off during the water stops.
fan dry portion of the cycle. Towel drying of some items
may be necessary. 2. Open the door and add the item.
3. Close and latch the door. The cycle will continue at the
Note: With either dry option, it is normal to notice point it was interrupted.
vapor coming out of the vent area.
ACCU TEMP checks the main wash and final rinse water C 1e a n i n g
temperatures and will extend the heating and water circu- Clean the control panel and front panels with a lightly
lation until proper water temperature is reached, dampened cloth. Dry thoroughly. Do not use abrasives or
SANI WASH (Select models only) turns the heating ele- sharp objects on the panel. They can damage it.
ment on during all wash and rinse portions of the cycle. It The inside normally takes care of itself. Occasionally
checks the main wash and final rinse water temperatures check the tub bottom for any large pieces which may have
and will extend the heating and water circulation until collected. Periodically clean the edge of the door liner and
proper water temperature is reached. This option does not gasket if any food spills are noticed.
sanitize the dishes.
To remove any odor, try one of the following:
RESET (Select models only) can be pressed to cancel all , Put baking soda in both cups. Select the normal cycle
heating options, and let the water circulate for about 10 minutes. Unlatch
the door and let it sit overnight. Then relatch the door
POTS & PANS (Select models only) adds water temper-
and let the cycle finish.
ature checks to the main wash and final rinse for proper
cleaning and drying results. , Select the Normal cycle and let the dishwasher fill with
water. Then open the door and pour 1 cup of chlorine
bleach into the bottom of the dishwasher. Latch the door
Indicator Lights
(select models) and let it complete the cycle.
, Try a lemon scent detergent and/or rinse aid to help peri-
ON - The On light will glow during all washes, rinses and odically freshen the dishwasher interior.
the drying periods.
, Run the dishwasher more frequently. Use the Rinse &
DELAY START- The Delay Start light will glow during Hold cycle (if available) to remove any food soil that
the Delay time period. It will go off when the dishwasher
may cause an odor.
starts.
CLEAN - The Clean light will glow after the drying peri- S t O r i n g
od is completed as a reminder that the dishes have. gone
through a wash and dry cycle. It will remain lit until the If your dishwasher will be in storage or an unheated area
dial is manually turned to the Off position, exposed to freezing temperatures:
_[_ HEAT DELAY - The Heat Delay light indicates the , Clean the dishwasher as explained above.
cycle is being extended to heat the water to the proper tem- , Operate the drain portion twice to ensure most of the
perature, water is removed. Most dishwashers begin each cycle
with a drain. For touch control models, press the
Drain/Off pad.
, Disconnect the electrical supply and prop open the door.

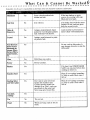
What Can & Cannot Be Washed
Remember,it is the user's responsibility to determine if the item should be washed in a dishwashe_
Aluminum Yes Some colored anodized alu- If the item darkens or spots,
minum can fade. remove by scouring with soap-
filled steel wool pads.
• . • • • • •
Cast Iron No Iron will rust. If in doubt, check with the manu-
facturer. Or test wash one piece
daily for several weeks.
China & Yes Antique, metal-trimmed, hand- Load securely to prevent move-
Stoneware painted or over-the-glaze patterns ment. Check with manufacturer.
fade. Gold leaf will discolor.
......................................................................................................................
["Cl_'stal Antique, metal-trimmed or paint-
ed patterns fade.
Non-dlshware No Do not wash in dishwasher. It
items such as may damage, discolor or stain the
electronic air dishwasher.
cleaner filters,
furnace filters,
paint brushes,
etc.
• • ••• .•••..
Glass Yes Milk Glass may yellow.
Pewter No Pewter tarnishes.
Plastics Yes If it doesn't say DISHWASHER
SAFE, test one piece before dish-
washing an entire set.
Stainless Steel Yes Rinse if not washing immediate-
ly. Salty or acidic foods stain if
left on.
Sterling Silver Yes Don't put in same silverware Rinse if not washing immediate-
and Silver plate basket with stainless steel, ly. Salty or acidic foods stain if
Contact between metals can left on.
damage silver. Don't wash cop-
per utensils in the same load.
Silver may get a brown film.
Non-stick Yes
coatings
Tin No Tin can rust.
Wood No Wood can warp, crack or lose its
finish.
F

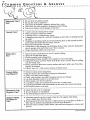
7Common Questions & Answers
. ._,-,_._.........=<..... o. oo...., oo_4o_o. o__ **.oo. oo
Dishwasher Won't * Be sure door is latched securely.
Run? * Be sure the water is turned on.
• Check that the dial/pad is properly selected for a cycle.
Allow time for select models to drain/pause before filling.
• Check your home's circuit breaker or fuse box.
Unusual Noise? _, A water valve hiss during fill is normal.
Water circulation sounds are normal.
A ticking noise is a nomml timer sound.
• A thumping sound may be a wash arm bumping an item that is extending beyond
the racks.
• Chopping or grinding sounds may be heardduring drain as the internal food dis-
poser chops hard items like fruit seeds, nuts etc.
Humming during drain is normal.
• A snap noise is the detergent cup lid hitting the door liner when the dishwasher
door is opened at the end of the cycle. This is normal.
_' Proper installation affects the noise level.
Dishes Don't * Check the rinse aid dispenser to see if it needs refilling.
Dry? • Select the Drying Heat option.
• Check incoming water temperature.
Load properly. Dishes shouldn't nest together. Avoid overloading.
_' Unload the bottom rack first. Water from dishes in the top rack may be spilling
into the bottom rack.
• Plastic and teflon items have a porous surface and tend to hold water. Towel dry-
ing may be required.
• Glasses, cups, etc., with concave bottoms will hold water.
Unclean Dishes • Check incoming water temperature.
And Flatware? * Run hot water at the sink before starting the dishwasher.
• Select water heat (select models).
• Check water hardness and adjust detergent amount accordingly.
• Use fresh detergent stored in a cool dry place.
• Select proper cycle for the soil level.
• Load items so they do not block the wash arms or center tower.
• Load the utensil basket with some handles up and some down to prevent nesting.
• Do not place glasses over tines.
Detergent Left In • Check that the cycle is completed.
Dispenser Cups? • Be sure dispenser is not blocked.
• Use fresh detergent stored in a cool, dry place.
Stains Or Marks • Aluminum utensils can leave marks when they rub against other things.
On Dishes Or Leave a slight space between items.
Tub? • Iron deposits in the water can leave a yellow, brown or orange film on dishes. A
filter may be needed or periodically use RoVer Rust Remover.*
• Food soil stains normally require hotter water and more detergent to remove and
prevent.
Conglstttetlon next page

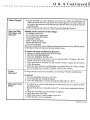
Q & A Continued
Dishes Chipped? , Rough handling can cause chipping. Load with care. Make sure glassware and
china are secure and can't jar loose. Do not load glasses over tines. Make sure
tall glasses and stemware will clear the top of the tub when you push the rack into
the dishwasher.
, Refer to the previous chart on "What Can and Cannot Be Washed".
*oooetooo**ooeeto***oletool *o e,oooo* * e Ioeool***oe,t e,***oo e t o6.* J e o,6,,***,*,, e,o*** e e,*,,,*,oQt o e o.**_ e _t o, f* I*ot t t, _***o o_ooo_***o
Spots And Film Spotting can be caused by all these things:
On Glasses And , Extremely hard water.
Flatware? , Low inlet water temperature.
Overloading the dishwasher.
Improper loading.
Old or damp detergent.
, Rinse aid dispenser empty.
Too little detergent.
Due tothe varyinglocal waterconditions and personal preferences, trydifferent brands
of detergent to find one that gives the best results for you.
To remove the spots and film from glassware:
1. Remove all metal utensils from the dishwasher.
2. DO NOT ADD DETERGENT.
3. Select the NORMAL WASH cycle.
4. Start the dishwasher and allow to run for approximately 20 minutes. The dish-
washer will now be in the main wash.
5. Then open the door and pour 1/2 cup (125ml) of white vinegar into the bottom
of the dishwasher.
6. Close the door and allow the dishwasher to complete the cycle. Using avinegar
rinse more thantwice a month? Consider a home water softener.
Cloudy If vinegar doesn't remove the cloudiness, it is"etching." The film is permanent.
Glassware?
To prevent:
1. Use less detergent if you have soft water.
2. Avoid manually pre-rinsing the dishes.
3. Lower the temperature of water entering the dishwasher to 120° E
Dishwasher Won't _, If hooked up to a food waste disposer, be sure the knock-out is removed from
Drain? the disposer inlet.
* Be sure the drain hose is elevated at least 32" so water cannot.siphon back into the
tub.
*_Check for food obstruction in the drain or disposer.
* Check drain laose for a kink.
Check your home's circuit breaker or fuse box.
_.Check that the cycle is completed.
Cotfflnued on ncxt page

9Q & A Continued
Suds In The TUb? Sudsing detergents are not meant for dishwashers. USE ONLY AUTOMATIC
DISHWASHER DETERGENTS TO AVOID SUDSING.
To remove suds from the tub:
1. Open the dishwasher door and sprinkle 1 cup of salt on top of the suds to help
evaporate them.
2. Close and latch the dishwasher.
3. Turn the dial until a drain is reached or select the drain pad.
4. Repeat if necessary.
• .i, Joot tool e to,to,,,, o,t tl to_o66* • * • ,tttt J, Jott_oe_,et_oooo66olloo °° m,,ottoleooo_e_otott _o6611, .° oom,,ttoleoot,_eotlt_eoooollotoo •
Dishwasher • Check that the dishwasher is level. (Refer to the Installation Instructions.)
Leaks? • Suds can cause the dishwasher to overflow. Measure the detergent carefully and
use only detergents designed for use in a dishwasher. Less detergent is needed
in soft water. Try another brand if sudsing continues.
• Follow directions closely on how to add a forgotten item.
• To avoid rinse aid leaking from the dispenser, be sure the lid is securely attached.
Wipe up any accidental spills.
Odor? • Dishwashers will have a "new" smell when installed. This will decrease with time.
• Soiled dishes held too long. Use the Rinse & Hold, if available.
• Dishwasher not draining properly.
• A chemical odor is usually due to chlorine bleach in dishwashing detergents. You
may want to try another brand.
• Brand names are trademarks of the respective manufacturen
For further help, call Jenn-Air Customer Assistance: 1-800-688-1100.

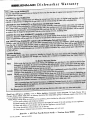
mB JENN-AIR Dishwasher Warranty
Should you still have a problem, write to Major Appliance Consumer Action Program, 20 North Wacker Drive,
Chicago, Illinois 60606. MACAP is an industry sponsored but independent group of consumer experts who receive and
act on complaints from appliance owners.
NOTE:When writing about an unsolved service problem, please include the following information:
(a) Your name, address and telephone number;
(b) Model number and serial number (found on the upper left comer of the tub opening) of your appliance;
(c) Name and address of your dealer and the date the appliance was purchased;
(d)A clear description of the problem you are having.
(e) Waterhardness,detergentbrand and amount,watertemperature,and cycle used.
Jenn-Air * 403 West Fourth Street North * Newton, Iowa 50208
FormNo.212CMA Part No.6 913732 Litho U.S.A.
-
 1
1
-
 2
2
-
 3
3
-
 4
4
-
 5
5
-
 6
6
-
 7
7
-
 8
8
-
 9
9
-
 10
10
-
 11
11


Jenn-Air DW731A Owner's manual
- Category
- Dishwashers
- Type
- Owner's manual
Ask a question and I''ll find the answer in the document
Finding information in a document is now easier with AI
Related papers
-
Jenn-Air JDB1080AWB36 Owner's manual
-
Jenn-Air JDB2100AWW Owner's manual
-
Jenn-Air JDB8910AWW User manual
-
-
-
Jenn-Air JDB6510AWR User manual
-
Jenn-Air JDB2150AWP1 Owner's manual
-
-
-
Other documents
-
Crosley CDU650AWW Owner's manual
-
Maytag MDB7601AWQ - 24 Inch Full Console Dishwasher User manual
-
Magic Chef DDB1501AWB Owner's manual
-
-
-
-
Maytag MDBH985AWW10 Owner's manual
-
Magic Chef DU4J User manual
-
-