Signature Hardware 427456 Installation guide

Type
Installation guide
SHOWER CONVERSION KIT WITH HAND SHOWER
GETTING STARTED
TOOLS AND MATERIALS:
BEFORE YOU BEGIN
We recommend consulting a professional if you are
unfamiliar with installing plumbing fixtures. Signature
Hardware accepts no liability for any damage to the
plumbing, floor, walls, tub, or for personal injury
during installation.
Observe all local plumbing and building codes.
Unpack and inspect the item for shipping damage. If
any damage is found, contact our Customer
Relations team at 1-866-855-2284.
Ensure that you have gathered all of the required
materials that are needed for the installation.
For the following instructions, it is assumed that
the tub faucet is already in place and prepared for
installation of the shower conversion kit
Plumber’s Tape*
Thread Sealant*
Adjustable
Wrench*
Hex Wrench
1Shower Conversion Kit with Hand Shower Installation Instructions
Phillips
Screwdriver*
Not Included*
Hand Shower
Diverter
Cone Washer
Riser Nut
O-ring
O-ring
Tub Faucet
Hand Shower Hose
O-ring
Hand Shower
Hand Shower Cradle
Riser Pipe
2
SHOWER CONVERSION KIT WITH HAND SHOWER
4. Insert the lower riser pipe into the top of the hand
shower diverter and secure it by tightening the riser
nut. Apply a bit of thread sealant or plumber’s tape to
the threads before tightening. Use an adjustable
wrench to tighten firmly.
INSTALLATION
1. Insert the provided rubber O-ring into the base of
the hand shower diverter, and attach the diverter to the
tub faucet as shown. Apply a bit of thread sealant or
plumber’s tape to the threads before tightening. Use an
adjustable wrench to tighten firmly.
Tip: Wrap the nut with a thin wash cloth while tightening
to prevent the wrench from scratching the plated
finish.
2. Slide the hand shower cradle onto the lower riser
pipe. Position the cradle in its desired location, then
tighten the set screw on the cradle to secure using the
provided hex wrench.
Shower Conversion Kit with Hand Shower Installation Instructions
3. Slide the riser nut onto the lower riser pipe, with the
threaded side facing down. Slide the rubber cone
washer onto the lower riser pipe below the riser nut,
with the beveled side of the washer facing down as
shown.
3
SHOWER CONVERSION KIT WITH HAND SHOWER
5. Attach the handheld shower head to its handle, then
use the provided hose to connect the hand shower to
the diverter outlet, as shown. Insert one of the provided
rubber O-rings into each end of the hose before
tightening.
6. Insert the upper riser pipe through the mounting hole
located on the shower curtain rod. Attach the upper
riser pipe by threading it into the lower riser pipe. Apply a
bit of thread sealant or plumber’s tape to the threads
before tightening.
Tip: If your shower curtain rod does not contain a
mounting hole for your riser pipe, secure the riser to the
rod using a double-ringlet coupler (sold separately).
7. Complete the installation by installing the shower
head onto the upper riser pipe.
8. Once installation is complete, turn the faucet on and
divert water to the shower components. Check to ensure
that there are no leaks from any of the connections, and
that all functions are working properly.
Shower Conversion Kit with Hand Shower Installation Instructions
SHOWER CONVERSION KIT - NO HAND SHOWER
GETTING STARTED
TOOLS AND MATERIALS:
BEFORE YOU BEGIN
We recommend consulting a professional if you are
unfamiliar with installing plumbing fixtures. Signature
Hardware accepts no liability for any damage to the
plumbing, floor, walls, tub, or for personal injury
during installation.
Observe all local plumbing and building codes.
Unpack and inspect the item for shipping damage. If
any damage is found, contact our Customer
Relations team at 1-866-855-2284.
Ensure that you have gathered all of the required
materials that are needed for the installation.
For the following instructions, it is assumed that
the tub faucet is already in place and prepared for
installation of the shower conversion kit
Plumber’s Tape*
Thread Sealant*
Adjustable
Wrench*
1Shower Conversion Kit Installation Instructions
Cone Washer
Riser Nut
Tub Faucet
Riser Pipe
Not Included*
2
SHOWER CONVERSION KIT - NO HAND SHOWER
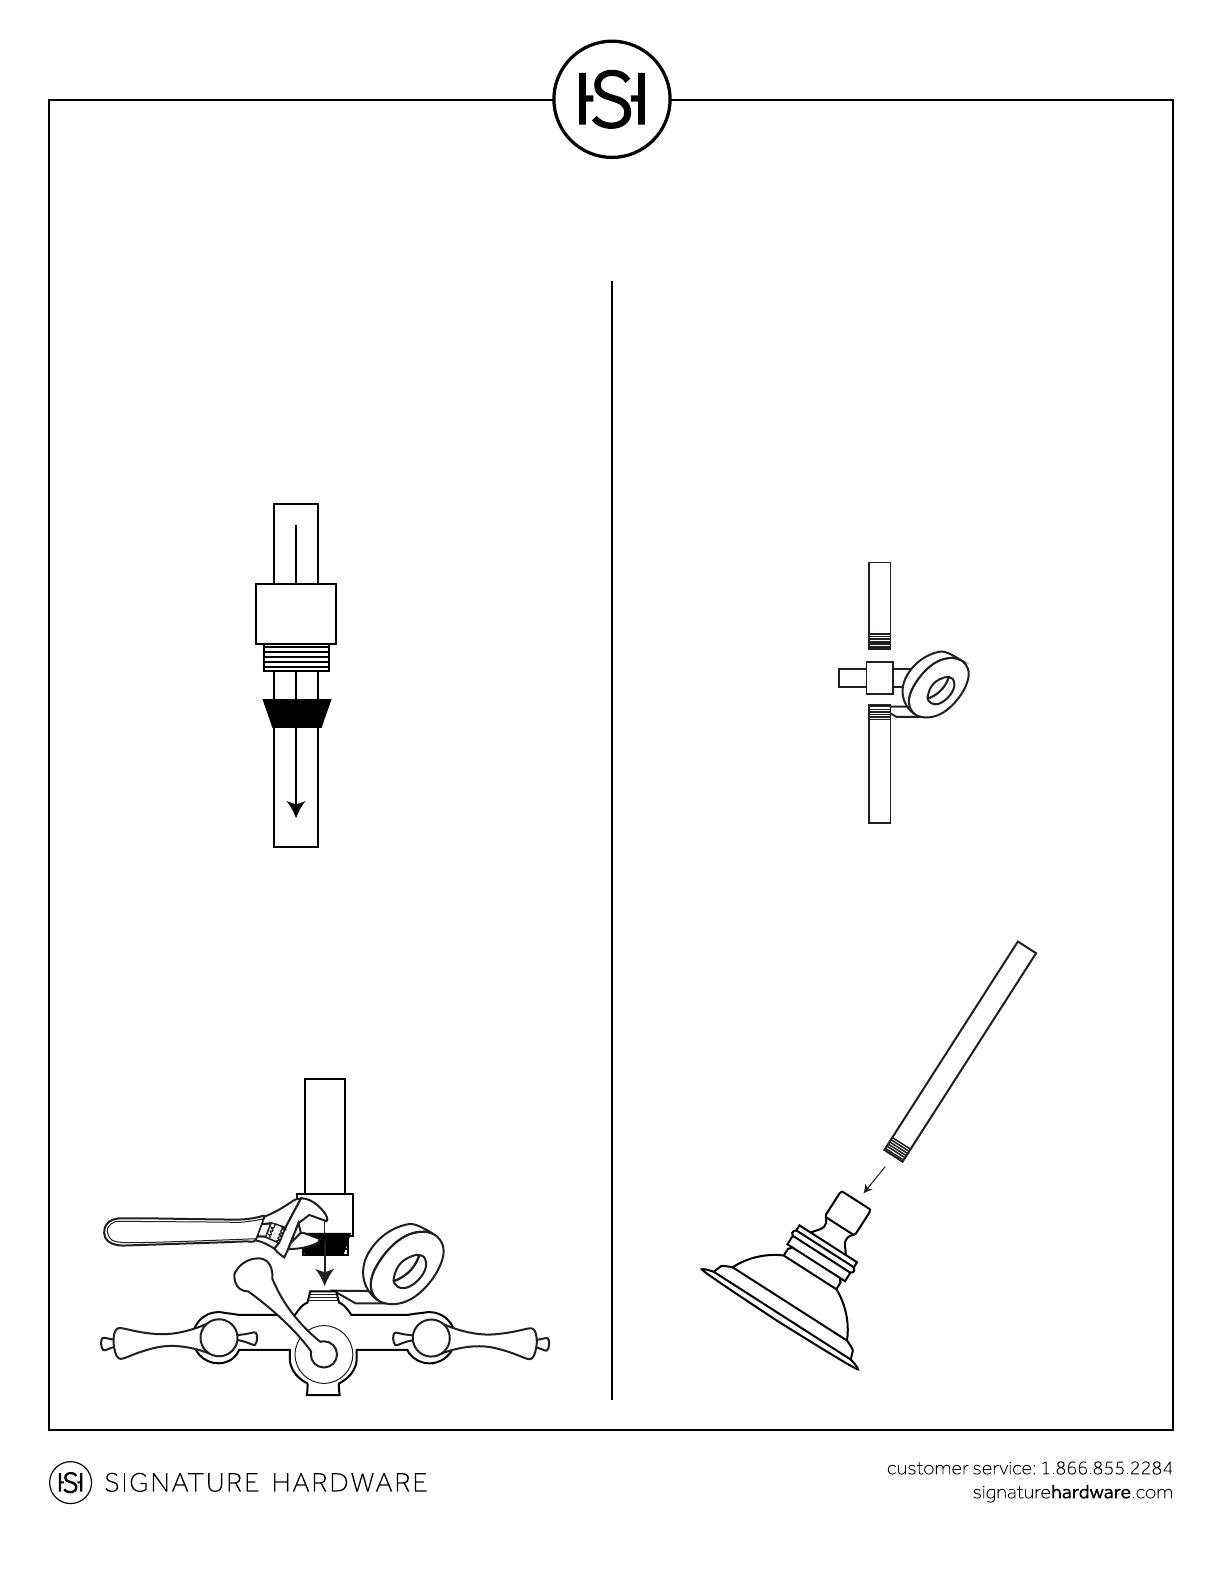
4. Complete the installation by installing the shower
head onto the upper riser pipe.
INSTALLATION
1. Slide the riser nut onto the lower riser pipe, with the
threaded side facing down. Slide the rubber cone
washer onto the lower riser pipe below the riser nut,
with the beveled side of the washer facing down as
shown.
2. Insert the lower riser pipe into the top of the tub
faucet and secure it by tightening the riser nut. Apply a
bit of thread sealant or plumber’s tape to the threads
before tightening. Use an adjustable wrench to tighten
firmly.
Tip: Wrap the nut with a thin wash cloth while tightening
to prevent the wrench from scratching the plated
finish.
Shower Conversion Kit Installation Instructions
3. Insert the upper riser pipe through the mounting
hole located on the shower curtain rod. Attach the
upper riser pipe by threading it into the lower riser pipe.
Apply a bit of thread sealant or plumber’s tape to the
threads before tightening.
Tip: If your shower curtain rod does not contain a
mounting hole for your riser pipe, secure the riser to
the rod using a double-ringlet coupler (sold separately).
3
SHOWER CONVERSION KIT - NO HAND SHOWER
5. Once installation is complete, turn the faucet on and
divert water to the shower head. Check to ensure that
there are no leaks from any of the connections
Shower Conversion Kit Installation Instructions
  • Page 1 1
  • Page 2 2
  • Page 3 3
  • Page 4 4
  • Page 5 5
  • Page 6 6

Signature Hardware 427456 Installation guide

Type
Installation guide

Ask a question and I''ll find the answer in the document

Finding information in a document is now easier with AI