4
Introduction
IMPORTANT SAFEGUARDS S
25) Always operate this equipment
from a 120 V AC, 60 Hz power
source only.
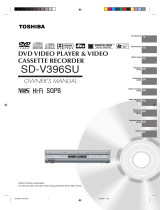
26) Always make sure the antenna system is properly
grounded to provide adequate protection against
voltage surges and built-up static charges (see Section
810 of the National Electric Code).
27) DANGER: RISK OF SERIOUS PERSONAL
INJURY OR DEATH!
• Use extreme care to make sure you are never
in a position where your body (or any item you are in
contact with, such as a ladder or screwdriver) can
accidentally touch overhead power lines. Never locate
the antenna near overhead power lines or other
electrical circuits.
• Never attempt to install any of the following during
lightning activity:
a) an antenna system; or b) cables, wires, or any home
theater component connected to an antenna or phone
system.
Care
For better performance and safer operation of your
TOSHIBA TV, follow these recommendations and
precautions:
28) Always sit approximately 10–25 feet away from the TV
and as directly in front of it as possible. The picture can
appear dull if you sit too far to the left or right of the TV,
or if sunlight or room lights reflect on the screen. Turn
the TV off to check for reflections on the screen, and
then remove the source of reflections while viewing the
TV.
29) Always unplug the TV before
cleaning. Never use liquid or
aerosol cleaners.
30) WARNING: RISK OF ELECTRIC SHOCK!
Never spill liquids or push objects of any kind
into the TV cabinet slots.
31) [This item applies to projection TVs only.] If the air
temperature rises suddenly (for example, when the TV is
first delivered), condensation may form on the lenses.
This can make the picture appear distorted or the color
appear faded. If this happens, turn off the TV for 6 to 7
hours to allow the condensation to evaporate.
32) For added protection of your TV from lightning and
power surges, always unplug the power cord and
disconnect the antenna from the TV if you leave the TV
unattended or unused for long periods of time.
33) During normal use, the TV may make
occasional snapping or popping
sounds. This is normal, especially
when the unit is being turned on or
off. If these sounds become frequent
or continuous, unplug the power cord
and contact a Toshiba Authorized Service Center.
34) Possible Adverse Effects on TV Picture Display: If a
fixed (non-moving) pattern or image remains on the TV
screen for extended periods of time, the image can
become permanently ingrained in the cathode ray
tube(s) of the TV and cause subtle but permanent ghost
images. This type of damage is NOT COVERED BY
YOUR WARRANTY.
Never leave the TV on for extended
periods of time while it is displaying the following images
or formats:
• Fixed Images, including but not limited to PIP/POP
windows, closed captions, video game patterns, TV
station logos, stock tickers, and websites.
• Special Formats that do not use the entire screen,
including but not limited to widescreen or letterbox
format media viewed on a 4:3 aspect ratio display
(with gray or black bars at the top and bottom of the
screen); or 4:3 aspect ratio format media viewed on a
widescreen/16:9 aspect ratio display (with gray or
black bars on the left and right sides of the screen).
Service
35) WARNING: RISK OF ELECTRIC
SHOCK! Never attempt to service the
TV yourself. Opening and
removing the covers may expose
you to dangerous voltage or other
hazards. Refer all servicing to a
Toshiba Authorized Service Center.
36) If you have the TV serviced:
• Ask the service technician to use only replacement
parts specified by the manufacturer.
• Upon completion of service, ask
the service technician to perform
routine safety checks to determine
that the TV is in safe operating
condition.
37)When the TV reaches the end of its useful life, ask a
qualified service technician to properly dispose of the
TV. Improper disposal may result in a picture tube
implosion and possible personal injury.
0303
25) Always operate this equipment
from a 120 V AC, 60 Hz power
source only.
26) Always make sure the antenna system is properly
grounded to provide adequate protection against
voltage surges and built-up static charges (see Section
810 of the National Electric Code).
27) DANGER: RISK OF SERIOUS PERSONAL
INJURY OR DEATH!
• Use extreme care to make sure you are never
in a position where your body (or any item you are in
contact with, such as a ladder or screwdriver) can
accidentally touch overhead power lines. Never locate
the antenna near overhead power lines or other
electrical circuits.
• Never attempt to install any of the following during
lightning activity:
a) an antenna system; or b) cables, wires, or any home
theater component connected to an antenna or phone
system.
Care
For better performance and safer operation of your
TOSHIBA TV, follow these recommendations and
precautions:
28) Always sit approximately 10–25 feet away from the TV
and as directly in front of it as possible. The picture can
appear dull if you sit too far to the left or right of the TV,
or if sunlight or room lights reflect on the screen. Turn
the TV off to check for reflections on the screen, and
then remove the source of reflections while viewing the
TV.
29) Always unplug the TV before
cleaning. Never use liquid or
aerosol cleaners.
30) WARNING: RISK OF ELECTRIC SHOCK!
Never spill liquids or push objects of any kind
into the TV cabinet slots.
Ground clamp
Antenna discharge unit
(NEC Section 810-20)
Grounding conductors
(NEC Section 810-21)
Power service grounding
electrode system (NEC Art 250 Part H)
Ground clamps
Antenna lead-in wire
Electric service equipment
QUALIFIED
SERVICE
TECHNICIAN
5V60101A [E]p02-05 2/22/06, 1:02 PM4