Page is loading ...

Introduction
We are proud to offer the Model H8254 and
H8255 grease gun
s. These tools are part of a
growing Grizzly family of fine
hand tools. The
Model H8254 features solid construction and a
long pump lever for extra l
everage when lubri-
cating tough fittings. The Model H8254 features
similar solid construction as well as hand pump
operation and a flexible coupler extension hose
for increased
maneuverability when clearances
are tight.
Specifications
Bulk Capacity ............................................ 16 OZ
Cartridge Capacity ..................................
14
1
⁄2 OZ
Operation
1. Wipe all fittings clean with a shop towel.
2. Pump grease gun once or twice to purge the
coupler of any contaminates or old grease.
3. Push the grease gun coupler onto the fitting
to be lubricated.
MODEL H8254/H8255
GREASE GUN
INSTRUCTIONS
COPYRIGHT © JULY, 2007 BY GRIZZLY INDUSTRIAL, INC.
WARNING: NO PORTION OF THIS MANUAL MAY BE REPRODUCED IN ANY SHAPE
OR FORM WITHOUT THE WRITTEN APPROVAL OF GRIZZLY INDUSTRIAL, INC.
#LO9648
PRINTED IN CHINA
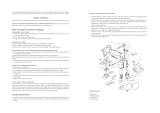
Figure 1. Model H8254 and H8255.
H8255
H8254
Grease guns can devel-
op high pressure up to
7,000 PSI. To reduce the
risk of serious injury, fol
-
low instructions carefully
and always wear ANSI
approved safety glasses
when using this tool, or
when performing any ser-
vice or maintenance.
Note: It is easier to attach the coupler to the
fitting at a slight angle. Be sure to center the
coupler over the fitting when applying lubri
-
cant.
3. Pump the lever (H8254) or squeeze the grip
lever mechanism (H8255) repeatedly to inject
lubricant.
4. After lubricating, turn the coupler at a slight
angle to release it from the fitting.
NOTICE
Some mechanical systems may only require
one or two pumps of grease, while oth
-
ers require many pumps. Understand the
lubrication requirements of the part you are
lubricating. Failure to follow this instruction
can damage seals or under-lubricate parts,
causing costly damage.

-2-
H8254/H8255 Grease Gun
Installing a Lubricant Cartridge
If the grease gun was previously filled with bulk
lubricant instead of a cartridge, the seal may need
to be reversed.
In order to install a lubricant cartridge, the follower
assembly must be fully withdrawn, allowing room
for the new cartridge.
To properly load a new lubricant cartridge:
1. Pull back on the follower rod until it is fully
extended, then pull it sideways to latch the
rod groove into the keyhole slot in the cap
(Figure 2).
Figure 2. Latching the follower rod.
Rod Groove
Keyhole Slot
Follower Rod
Converting Between Cartridge and
Non-Cartridge Sources
When the grease gun is to be filled will lubri-
cant directly inside the container body, the fol
-
lower seal must be cupped outward, toward the
lubricant. Conversely, the seal must be cupped
inward, away from the lubricant, when a cartridge
lubricant is used.
To reverse the follower seal
:
1. Pull back on the follower rod until it is fully
extended, then pull it sideways to latch the
rod groove into the keyhole slot in the cap
(Figure 2).
2. Unscrew the head and plunger assembly and
set it aside.
3. Remove any lubricant or lubricant cartridges
from the container body by carefully unlatch
-
ing the follower rod from the container cap,
and allowing it to slowly move into the con
-
tainer body.
4. Unscrew the container cap from the container
body.
5. Pull the follower handle to extract the follower
and spring from the container body.
6. Grasp the follower between your thumb and
forefinger, and flip the follower lip from the
rear to the front side.
Note: The follower resembles a cup. When
the grease gun is assembled for use with
bulk lubricant, the cup opens toward the head
assembly. When the grease gun is assem
-
bled for use with cartridge lubricants, the cup
opens away from the head assembly.
7. Being careful not to tear the lip of the seal on
the rim of the container body, insert the fol
-
lower into the container body and tighten the
container cap.
8. Securely fasten the head and plunger assem-
bly.
9. Following the instructions for filling with bulk
lubricant on Pages 3 and 4
.
Use caution when performing operations that
require latching the follower rod in the key
-
hole slot. If the rod is accidentally unlatched,
it can forcefully recoil, expelling large vol
-
umes of lubricant, or ejecting grease gun
components at high speeds. Failure to follow
this warning could result in serious injury.
2. Unscrew the head and plunger assembly and
set it aside.

H8254/H8255 Grease Gun
-3-
3. Remove any lubricant from the container
body by carefully unlatching the follower rod
from the container cap, and allowing it to
slowly move into the container body.
4. Without introducing bubbles, pack lubricant
into the cavity of the head and plunger
assembly.
5. Insert the open end of the container body into
the pool of bulk lubricant.
6. Slowly pull the follower handle back while
pushing the container body deeper into the
lubricant. This method will help prevent draw
-
ing in air bubbles.
7. When the follower rod is fully extended, pull
it sideways to latch the rod groove into the
keyhole slot in the container cap (Figure 2
).
8. Securely fasten the head and plunger assem-
bly to the container body and unlatch the fol
-
lower rod from the container cap.
Note: If lubricant does not readily flow when the
lever is pumped (H8254) or squeezed (H8255)
ten to fifteen times, follow the Bleeding Air
Pockets
instructions on Page 4.
3. Remove an empty cartridge by carefully
unlatching the follower rod from the container
cap, and allowing it to slowly move into the
container body.
4. After ejecting the used cartridge, pull back on
the follower rod until it is fully extended, then
pull it sideways to latch the rod groove into
the keyhole slot in the cap (Figure 2
).
5. Remove the caps from both ends of the new
lubricant cartridge and insert the large open
end of the cartridge into the container body.
6. Securely fasten the head and plunger assem-
bly to the container body and unlatch the fol
-
lower rod from the container cap.
7. Follow the Bleeding Air Pockets instruc-
tions on
Page 3.
Filling From a Bulk Lubricant
Container
If the grease gun was previously filled with a lubri-
cant cartridge instead of bulk lubricant, the seal
may need to be reversed. Follow the instructions
on Page 2 for this procedure.
To fill the grease gun with bulk lubricant:
1. Pull back on the follower rod until it is fully
extended, then pull it sideways to latch the
rod groove into the keyhole slot in the cap
(Figure 2).
2. Remove the head and plunger assembly
from the container body.

-4-
H8254/H8255 Grease Gun
Bleeding Air Pockets
After some lubricant filling procedures, or when-
ever lubricant does not dispense properly, you
may need bleed air from the gun.
To bleed air from the gun:
1. Make sure the head and plunger assembly is
securely fastened, then unscrew it 1
1
⁄2 turns.
2. Engage the follower rod with the follower by
rotating the follower handle (Figure 3
).
Note: The follower rod is designed to engage
and disengage from the follower assembly.
To engage or disengage the follower, the fol
-
lower rod should be pulled back and t
urned
so that the flanges on the follower rod mate
(or don't mate) with the flanges on the follow
-
er assembly.
Refer to Figure 3 for a diagram
of the follower rod and follower assembly.
Figure 3. The follower rod and follower assembly.
Follower Rod
Follower Assembly
Flanges
If the head and plunger assembly is too loose
when expelling air pockets, it may dislodge
and forcefully eject from the grease gun
causing serious injury. Never loosen the
head and plunger more than 1
1
⁄2 turns during
this procedure.
4. Disengage the follower rod from the follower
by rotating the follower handle (Figure 3
).
Push the follower rod into the container.
Filling the Grease Gun Using a Bulk
Lubricant Pump
If the grease gun was previously filled with a lubri-
cant cartridge instead of bulk lubricant, the seal
may need to be reversed. Follow the instructions
on Page 2 for this procedure.
To fill the grease gun using a bulk lubrican
t
pump:
1. Engage the follower rod with the follower by
rotating the follower handle (Figure 3
).
2. Insert the grease gun filler valve (H8254 part
#2, H8255 part #3) into the proper fitting on
the pump operated bulk lubricant container.
3. Extend the grease gun handle away from the
container tube (H8254 only.)
4. Operate the bulk lubricant pump to fill the
grease gun container.
5. As the grease gun fills, the follower rod will
extend from the container. When the follower
rod groove is exposed, the container is filled.
6. Disengage the follower rod from the follower
by rotating the follower handle (Figure 3
).
Push the follower rod into the container.
NOTICE
The instructions below DO NOT cover the
operation of a pump operated bulk lubricant
container. Be sure to follow the instructions
for your bulk lubricant pump as well as the
instructions below when filling the model
H8254 and H8255 grease guns.
3. Push in the follower handle until lubricant
oozes under the head and plunger assem
-
bly, then securely fasten the head and
plunger assembly.
If you need help with your new item, call our Tech
Support at: (570) 546-9663.

H8254/H8255 Grease Gun
-5-
H8254 Parts Breakdown and List
REF PART # DESCRIPTION REF PART # DESCRIPTION
1 PH8254001 HEAD AND PLUNGER ASSEMBLY 9 PH8254009 VALVE SEAT BOLT
2 PH8255002 FILLER VALVE 10 PH8255010 FOLLOWER ASSEMBLY WITH SEAL
3 PH8254003 COUPLER EXTENSION 11 PH8255011 FOLLOWER ROD
4 PH8254004 HYDRAULIC COUPLER 12 PH8254012 CONTAINER CAP
5 PH8255005 HYDRAULIC COUPLER CAP 13 PH8255013 FOLLOWER HANDLE
6 PH8254006 VALVE BALL 14 PH8255014 COMPRESSION SPRING
7 PH8254007 VALVE COMPRESSION SPRING 15 PH8254015 CONTAINER BODY
8 PH8254008 COPPER WASHER

-6-
H8254/H8255 Grease Gun
H8255 Parts Breakdown and List
REF PART # DESCRIPTION REF PART # DESCRIPTION
1 PH8255001 HANDLE LOCK RING 7 PH8255007 FOLLOWER ASSEMBLY WITH SEAL
2 PH8255002 HEAD AND PLUNGER ASSEMBLY 8 PH8255008 FOLLOWER ROD
3 PH8255003 FILLER VALVE 9 PH8255009 CONTAINER CAP
4 PH8255004 COUPLER EXTENSION HOSE 10 PH8255010 FOLLOWER HANDLE
5 PH8255005 HYDRAULIC COUPLER 11 PH8255011 COMPRESSION SPRING
6 PH8255006 HYDRAULIC COUPLER CAP 12 PH8255012 CONTAINER BODY
/