Whirlpool Thin Twin User guide
- Category
- Washing machines
- Type
- User guide

-.
9
- 01~
UseAndCare
-
ANoteToYou
2
Understandng
safety
3
Gettin To Know
Your ask/Dryer
vi
6
Operating Your
Washer
7
E2-‘Dw~ 12
ieg Your
14
Caring For Your
Washer/Dryer 19
Laundry Tips
23
If You Need
iEzz=or
.
37
Warranty
40
1400-253-1301
Cell us with queslions or camments.
LARGE CAPACITY
THIN TWIN’ AUTOMATIC WASHER/DRYER

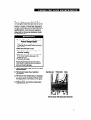
A Note ToYou
Thank you for buying a Whirlpool@ appliance.
You have purchased a quality, wor/d-c/sss home appliance.
Years
of engineering experience have
gone into its manufacturing. To ensure many years of trouble-free operation, we have developed
this Use and Care Guide. It is full of valuable information on how to operate and maintain your
appliance properly and safely. Please read it carefully. Also, please complete and mail the Owner-
ship Registration Card provided with your appliance. This will help us notify you about any new
information on your appliance.
Your safety is important to us.
This guide contains safety symbols and statements. Please pay special attention to these symbols
and follow any instructions given. Here is a brief explanation of the use of each symbol.
This symbol will help alert you to such
This symbol will help you avoid actions
which could cause product damage
Our Consumer Assistance Center number, l-800-253-1301, is
toll-free 24 hours a day.
If you have a question concerning your appliance’s operation, or if you need service, first see ‘If
You Need Assistance Or Service” on page 37. If you need further help, call us. When calling, you
will need to know your appliance’s complete model number and serial number. You can find this
information on the model and serial number label (see diagram on page 6). For your convenience,
we have included a handy place below for you to record these numbers, the purchase date from
the sales slip and your dealer’s name and telephone number. Keep this book and the sales slip
together in a safe place for future reference.
Model Number
Serial Number
Purchase Date
Dealer Name
Dealer Phone
2

Understanding Safety
For your safety, the information in this manual must
be followed to minimize the risk of fire or explosion
or to prevent property damage,
personal injury or
-Do not store or use gasoline or other flammable vapors and liquids
in the vicinity of this or any other appliance.
-WHAT TO DO IF YOU SMELL GAS:
l
Do not try to light any appliance.
l
Do not touch any electrical switch; do not use any phone in your
building.
l
Clear the room, building or area of all occupants.
l
Immediately call your gas supplier from a neighbor’s phone.
Follow the gas supplier’s instructions.
l
If you cannot reach your gas supplier, call the fire department.
Installation and service must be performed by a qualified installer,
service agency or the gas supplier.

IMPORTANT SAFETY INSTRUCTIONS
To reduce the risk of fire, electrical shock or injury to persona
when
ualng your washer/dryer, follow bask
precautlons,
including
l Read all instructions before using your
THIN TWIN@ washer/dryer.
l Do not machine wash or machine dry
items cleaned, washed, soaked in, or
spotted with wax, paint, gasoline, oil, dry
cleaning solvents, or other flammable
fluids. The fumes can create a fire hazard
or explosion. Always hand wash and line
dry items containing these materials.
l Flammable fluids (dry-cleaning solvents,
kerosene, gasoline, etc.) should not be
used or stored in or near your washer/
dryer. Do not add flammable fluids to your
wash water. These substances give ofl
vapors that can create a fire hazard or
explosion.
l Do not allow children to operate, play with,
or crawl on or inside your washer/dryer.
Supervise children closely when your
washer/dryer is used near them.
l Before your washer/dryer is removed from
service or discarded, remove the lid and
door to prevent accidental entrapment.
l After starting a cycle, do not reach into the
basket unless the washer Cycle Control
Knob is pushed in and all motion stops.
l Do not reach into your dryer if the drum is
moving.
l Do not dry rubber, rubber-like, or heat-
sensitive materials with heat.
l Do not tamper with the controls.
l If your hot water has not been used
recently (usually 2 weeks or longer),
hydrogen gases may build up in your
water heater and your hot water pipes.
HYDROGEN GAS IS EXPLOSIVE.
To
prevent injury or damage, before using
your washer/dryer, turn on all hot water
faucets and allow water to run for several
minutes. This will allow gases to escape.
Do not smoke or use any open flame near
your faucet while it is open.
Please . . .
l Install and level washer/dryer in a well-
ventilated room and on a floor that can
support the weight.’
l Connect washer/dryer to the correct
3-prong outlet, electrical supply, water
supply, and drain.*
l Ground washer/dryer properly.’
l Have only a qualified person install,
repair, or replace parts on washer/dryer.
l Protect washer/dryer from the weather
and keep it where the temperature is
above 45°F (7°C).
l Maintain washer/dryer properly.
l Use only fabric softeners specifically
labeled as not being harmful to the dryer.
l Do not allow lint to build up inside the
dryer or exhaust system. Cleaning should
be done periodically by a qualified
person.
l Clean lint screen before or after each
load.
l Do not let dust, lint, paper, rags, chemi-
cals, etc. pile up around or under your
washer/dryer.
‘See the Installation Instructions.
- SAVE THESE INSTRUCTIONS -
4

Understanding your responsibilities
l Unplug the power supply cord or turn off
electrical power before attempting to
service your washer/dryer. Shut off gas
valve if you have a gas washer/dryer.
l Do not wash or dry items that are soiled
with vegetable or cooking oil. These items
may contain some oil after laundering.
Due to the remaining oil, the fabric may
smoke or catch fire by itself.
*Store flammable solvents or fluids away
from your washer/dryer.
l Dry cleaning solvents or fluids should
never be put directly into your washer/
dryer.
l Store detergent, laundry aids and other
materials in a cool, dry place where
children cannot reach them (in a locked
cabinet if possible).
l Read and follow instructions on packages
of detergent and laundry aids, especially
warnings and precautions.
l Do not use chlorine bleach and ammonia
or acids (such as vinegar or rust remover)
in the same wash. Hazardous fumes can
form.
l Unplug power supply cord before attempt-
ing to service your washer/dryer.
l Do not machine wash or dry fiberglass
materials. Small particles can stick to the
fabrics in following loads and cause skin
irritation.
l Never operate your washer/dryer if:
-it is not working right (i.e. noisy, too hot).
-it is damaged.
-parts are missing.
-all panels are not in place.
-the lint screen is loose, damaged, or
missing.
l Be sure that your washer/dryer:
-is properly connected to fuel and exhaust
systems (gas dryers must be vented
outdoors).*
-is not installed against draperies or
curtains, or on carpet.’
-is used only for jobs normally expected
of a home washer/dryer.
-is not used by anyone unable to operate
it properly.
‘See the Installation Instructions.
- SAVE THESE INSTRUCTIONS -
5

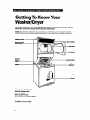
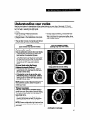
Getting To Know Your
Washer/Dryer
The parts and features of your THIN TWIN@washer/dryer are illustrated in this section. Become
familiar with all parts and features before using your washer/dryer.
NOTE: The drawings in this book may vary from your model. They are designed to show the
different features of all models covered by this book. Your model may not include all features.
Washer controls
Model and serial
number label
Air inlet
Optional
exhaust
outlet
Agitator
Tub
Basket
Lid instructions
Bleach
dispenser’
Other features not shown:
Automatic dryness control
End of cycle signal’
MAGIC CLEAfP lint filtef
Manual clean lint filter (inoida agitator)
*Available on some models
6

Operating Your Washer
I
In This Section
PW
Paw
Before starting your w-her
..............................
7 Sebctfng a cycle and time
..............................
8
Starting or stopping your wuhr .................... .7
Using rinse nd spin
......................................
10
Selecting a load size
..........................................
7 Using drain and spin
.....................................
10
Sofectfng wash-rinse temperatures ................. .8
What happens in each cycle ......................... 11
Operating your washer property ensures maximum washing efficiency. This section gives you
important information to help you to select a cycle, time, and temperature for your wash load.
Before starting your washer
Add measured detergent. Then place a sorted
NOTE: If your washer/dryer has a Consumer
load in the washer before starting. See page 23
Features Guide, remove it and place it in your
for additional “Before you wash or dry” Use and Care Guide.
information.
Starting or stopping your washer
Starting your washer:
1. Select load size and water temperatures.
2. Push in the Cycle Control Knob and turn it
clockwise. Stop when the indicator on the
knob’s outer ring points to the number in the
wash cycle you want. The numbers are
minutes of wash time.
3. Pull out the Cycle Control Knob.
Refer to pages 8-l 1 for additional information
to help you make selections.
Stopplng and restarting your washer:
l To stop the washer at any time, push in the
Cycle Control Knob.
l To restart the washer, close the lid (if neces-
sary) and pull out the Cycle Control Knob.
Selecting a load size
Position the Load Size Selector at the setting
that corresponds to the size load you want to
wash. Select a load size based upon the size
of the load and the fabric you are washing. See
page 24 for additional loading information.
To change the load size setting after the
washer has started to fill, move the Selector to
the desired new setting.
Settinp may vary with mode4
7

Load size tips
l Items should move freely in the washer. Do
not overload the machine or select a load size
that is too small for the wash load.
l Use a large load size setting for best results
with permanent press clothes.
l Reduce wash time when using a small load
size setting. Loads with only a few small items
need less wash time.
Selecting wash-rinse temperatures
Match the water temperature to the type of
fabric and soils being washed. The top tempera-
ture is the wash water and the bottom tempera-
ture is the rinse water.
Water temperature tips
l Use warm wash water with the Permanent
Press and Delicate cycles.
l Always use cold rinse water for permanent
press fabrics.
l For heavily soiled permanent press or knit
clothes, prewash or presoak before washing in
warm water.
Settings may vary with mode4
See the “Water usage guide” on page 28 for
more information.
Selecting a cycle and time
You will find information you need to help you
make correct cycle selections in this section.
l Pages 9-10: Use the information on these
pages to guide you when selecting a wash
cycle and time.
l Page 11: Use this page to help you under-
stand what happens during a wash cycle.
NOTE: Your model may not look exactly like
the illustrations.
Cycles may vary with model
8

Regular cycle
The Regular cycle features the Gentle Wash
system and high spin speeds to shorten drying
time.
l Use 14 minutes of wash time to clean
sturdily-constructed cotton and linen
fabrics that are heavily soiled loads.
l Use 10 minutes of wash time to clean
cotton and linen fabrics that are lightly to
moderately soiled.
Permanent Press cycle
The Permanent Press cycle features the
Gentle Wash system, a cool-down rinse, and
low spin speeds to reduce wrinkling.
l Use 10 minutes of wash time to clean
permanent press and some synthetic fabrics
that are moderately soiled.
l Use 6 minutes of wash time to clean perma-
nent press and some synthetics that are
lightly soiled.
NOTE: The washer pauses briefly during the
wash cycle. This is normal for washer
operation.
Delicate cycle
The Delicate cycle features a reduced agitation
speed for gentle soil removal. Low spin speeds
reduce wrinkling.
l Use 6 minutes of wash time to clean delicate
items and washable knits that are lightly to
moderately soiled.
Soak cycle
(on some models)
The Soak cycle features brief periods of
agitation and soak time to help remove heavy
soils and stains that need pretreatment.
l Use warm water when soaking laundry. (Hot
water can set stains.) See pages 25-27 for
stain removal information.
l Use the amount of detergent or presoak
additive recommended by manufacturer.
l After the Soak cycle ends, add detergent
and set a new wash cycle.
Permanent pres8 cycle
Delicate cycle
Soak cycle
9

Pre-Wash cycle
(on some model@
The Pre-Wash cycle features a brief period of
high speed agitation to help remove heavy
soils and stains that need pretreatment.
l Use warm water for prewashing stained
laundry. (Hot water can set stains.) See
pages 2527 for stain removal information.
l After the Pre-Wash cycle ends, add deter-
gent and set a new wash cycle.
Super Wash cycle
(on rome models)
Super Wash automatically prewashes the
laundry and advances into the Regular wash
cycle. (The washer does not need to be reset
after the Super Wash cycle.) Use this cycle
when washing heavily soiled loads that need
maximum soil removal.
l For proper cleaning, use double the amount
of detergent recommended for a wash cycle.
NOTE: The machine pauses during Super
Wash. This is normal for washer operation.
Super wash cycle
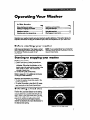
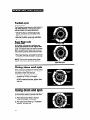
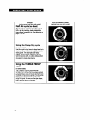
Using rinse and spin
When using extra detergent for heavily soiled
clothes, or washing special-care items, you
may want an extra rinse and spin.
1. Push Cycle Control Knob in and turn
clockwise to RINSE, as illustrated.
2. Pull Cycle Control Knob out. The washer
will fill to selected load size, agitate, drain,
and spin.
Using drain and spin
A drain and spin may help shorten drying times
for some heavy fabrics or special-care items
by removing excess water.
1. Push Cycle Control Knob in and turn
clockwise to SPIN, as illustrated.
2. Pull Cycle Control Knob out. The washer
will drain, and then spin.
10

What happens in each
cycle
When the Cycle Control Knob is set to a
number and pulled out, the washer fills (to the
selected load size) before agitation and timing
start. The washer will begin agitating immedi-
ately after filling; agitation can occur with the
washer lid up or down. After agitation starts, .
the Cycle Control Knob turns clockwise until tt
points to OFF and the cycle ends.
WASH
Fill
Wash’
*Agitation speed is
reduced in the last few
minutes
of most cycles. This provides
better fabric care.
Drain (or partial drain’)
No agitation
‘The Permanent Press cycle partially
drains, fills, agitates briefly, and drains.
l&l
Spin
The washer pauses briefly throughout each
cycle. These pauses are normal for washer
operation.
NOTE: A Gentle Wash system helps protect
your fabrics by reducing wash agitation speed
during the last few minutes of wash agitation in
the Regular and Permanent Press cycles.
RINSE
Fill
Rinse
Drain-No agitation
IZJ
Spin-Spray rinse
l%l
Spin
11

Other Washer/Dryer Features
In This Section
Paw
Paw
About your lint filter . . . . . . . . . . . . . . . . . . . . . . . . . . . . . . . . . . . . . . . . .
12
Using the chlorine bleach dispenser . . . . . . . . . . . 13
End of cycle signal . . . . . . . . . . . . . . . . . . . . . . . . . . . . . . . . . . . . . . . . . . . 12
Ordering a fabric ooftaner dispenwr . . . . . . . . . . . 13
Your washer may have the following features. Understanding the use of the features on your
machine will help you efficiently use your washer.
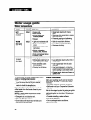
About your lint filter
Your washer has either a self-cleaning lint filter (requires no cleaning by you) or a manual clean
lint filter. Check the shape of your agitator to see if you need to clean your lint filter.
AGITATOR
MAGIC CLEAN@ lint filter
This lint filter requires no cleaning. (The lint
filter at the bottom of the washer basket cleans
itself.) During agitation, wash and rinse water
pass over the filter, separating the lint from the
water. The lint is then spun away from the filter
and out of the system during the spin part of
the cycle.
Spiral-&aped
agitator
If your washer drains into a tub, remove any
lint collected in the tub or strainer.
Barrel-shaped
agitator
ABOUT YOUR FILTER
Manual clean lint filter
If your agitator is barrel shaped, as illustrated, your
machine has a manual clean lint filter. Clean the
filter at the bottom of the agitator after every load
for the best filtering results.
To clean:
1. Lift off the agitator barrel.
2. Wash or wipe the filter clean in the bottom of the
agitator barrel. The filter is not removable.
3. Replace agitator barrel. Snap it into place.
FILTER
MAGIC
CLEAN
lint filter
q
aiket
interior
Mania1 clean
lint filter
End of cycle signal
(on some models)
The dryer sounds a signal to let you know when The signal is helpful when you are drying
the cycle is finished. The signal is not adjustable permanent press, synthetics, and other items
and cannot be turned off. that should be taken out as soon as the dryer
stops.
12

Using the chlorine bleach dispenser
(on
some
models)
Always measure liquid chlorine bleach. Do not
guess. Never use more than 1 cup (250 mL) for
a full load. Use less with lower water level
settings. Follow manufacturer’s directions for
safe use. Use a cup with a pouring spout to
avoid spilling.
1. Load the washer.
2. Pour measured chlorine bleach carefully into
dispenser. Do not let bleach splash, drip or
run down into washer basket. Undiluted
bleach will damage any fabric it touches.
3. Start the washer. Bleach will be diluted
automatically during wash part of cycle.
NOTE: Do not use this dispenser to add
powdered chlorine or all-fabric bleach to your
wash load. The dispenser is for chlorine bleach
use only.
Ordering a fabric softener dispenser
A fabric softener dispenser is available for your
washer. Order Fabric Softener Dispenser,
Part No. 3350834.
To order write to:
Whirlpool Corporation
Attention: Customer Service Dept.
1900 Whirlpool Drive
LaPorte, IN 46350
13

Operating Your Dryer
In This Section
PWP
Before
l
tartfng your &y~ . . . . . . . . . . . . . . . . . . . . . . . . . . . . . . . .
14
Starling your dryer
. . . . . . . . . . . . . . . . . . . . . . . . . . . . . . . . . . . . . . . . . . . .
14
Stopping your dryer
14
. . . . . . . . . . . . . . . . . . . . . . . . . . . . . . . . . . . . . . . . . .
Restarting your dryer
14
. . . . . . . . . . . . . . . . . . . . . . . . . . . . . . . . . . . . . . . .
Paw
Underatiding your
cyckn . . . . . . . . . . . . . . . . . . . . . . . . . . . . . .
15
Selecting the right cycle and setting
(modela without a temperature aelector) . . . . . . . . 17
Selecting the right cycle and setting
(models with a temperature aelector)
. . . . . . . . . . . . . 18
The information in this section helps you learn to use your dryer efficiently and safely. Refer to
“Laundry Tips” on page 23 for additional control setting, sorting, and loading information.
Before starting your dryer
Wipe the dryer drum with a damp cloth before
If your dryer has a Consumer Features Guide,
using to remove dust from storing and
remove it and place it with your Use and Care
shipping.
Guide.
Starting your dryer
1.
Load clothes into the dryer and close the
door.
2. Turn the Cycle Control Knob either way to
the desired setting. (If your dryer has a
Temperature Selector, set the selector to
the desired setting.)
3. Push the Start Button.
NOTE: Your dryer stops automatically when a
cycle ends.
Stopping your dryer
You can stop your dryer any time during a cycle.
Open the dryer door or turn the Cycle Control
Knob to OFF.
NOTE: The Cycle Control Knob should point to
an OFF area when the dryer is not in use. If you
want to stop the dryer before the cycle is
finished, turn the Cycle Control Knob to an OFF
area.
Restarting your dryer
1. Close the door.
2. Select a new cycle and temperature (if
necessary).
3. Press the Start Button.
14
Push to start

Understanding your cycles
See the chart below for descriptions of the cycles that are on your dryer. See page 17 (if your
model does not have a temperature selector) or page 18 (if your model has a temperature selec-
tor), for help in selecting the right cycle.
NOTES:
l Use the Energy Preferred Automatic
l To help reduce wrinkling, remove the load
Setting (*) to dry most loads.
from the dryer as soon as tumbling stops.
l Shaded areas in the illustrations show cycle
This is important for permanent press, knits,
locations.
and synthetic fabrics.
l The last few minutes of all cycles are without
heat to make the load easier to handle.
Use
an automatic cycle to dry most loads.
l The automatic cycle shuts off when your
load reaches the selected dryness.
. The Cycle Control Knob will not move until
the load is almost dry. After the cool-down,
the Cycle Control Knob automatically
moves to an OFF area and tumbling
stops.
Dry most loads uslng the Energy
Preferred Automatic Setting (.) .
. If the load is drier than you like, select a
setting closer to LESS DRY the next time
you dry
a
similar load.
l If the load is not as dry as you like, com-
plete drying using a Timed cycle. Select a
setting closer to VERY DRY the next time
you dry a similar load.
some items are damp after automatic drying.
This cycle is also useful for small loads or
large bulky items.
l For a damp dry, turn the Cycle Control
Knob to 30 minutes or less. (If your dryer
has
a
Damp Dry cycle, see page 16.)
NOTE: Some models offer high heat and low
heat timed cycles. Select the cycle to match
continued on next page

The Air cycle is unheated. Use this cycle to
fluff or air dry bedding, plastic tablecloths,
foam pillows, sneakers, etc. See Warning on
page 17 or 16.
on rome mo
Use this cycle to dry items to damp level or to
dry damp items that do not require an entire
drying cycle. Two examples are heavy
cottons, such as jeans, which you do not
want to become stiff, or cotton clothes which
are easier to press when damp.
cycle
(on some models)
The TUMBLE PRESS cycle removes
wrinkles from clothes that have been packed
in a suitcase, or from items not removed from
the dryer at the end of a cycle. Put only a few
items in your dryer for best results when
using this cycle. As soon as the dryer stops,
fold or put the items on hangers.
16

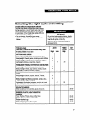
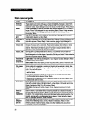
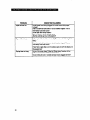
TYPE OF LOAD
AUTO TIMED
AIR
Check mark (J) denotes the recommended setting Select
minutes
minutes
the setting available on your dryer.
Hlgh Low High
COTTONS AND LINENS
Extra Heavy-Bedspreads, mattress pads, quilts
J
Heavyweight-Towels, jeans, corduroys, work clothes
/
Mediumweight-Sheets, cotton underwear, diapers
J
Lightweight-Batistes, organdies, lingerie
/
20
PERMANENT PRESS, SYNTHETICS AND BLENDS
Heavyweight-Work clothes, jackets, raincoats
J
Mediumweight-Shit-ts, play clothes, sheets, slacks
/
Lightweight-Lingerie, blouses, dresses
J
20
KNlTS
Heavyweight-Cottons, rayons, blends, T-shirts,
J
slacks, shirts
Mediumweight-Synthetics (polyester, acrylic, etc.),
J
dress slacks, skirts, sweaters
LightweightSynthetics (polyester, acrylic, etc.) and
J
20
blends, lingerie, blouses, dresses
DELICATE FABRICS
Sheer curtains (2 or 3 panels), gauze, lace, etc.
20-30
RUBBER, PLASTIC, HEAT-SENSlTIVE
FABRICS
Foam Rubber-Pillows, bras, stuffed toys
PlastioShower curtains, tablecloths
Rubber-backed rugs
Olefin, Polypropylene, Sheer nylon
20-30
20-30
40-50
1 O-20
Selecting the right cycle and setting
(models wlthout a temperature selector)
Use the chart below to guide you when making
drying selections. Use a Timed cycle only if the
recommended automatic cycle is not available
on your dryer. (Your model has cycles with one
or two temperature settings.)
l Do not overdty. Overdrying can cause
shrinkage, static cling, and damage to some
fabrics.
Fire Hazard
Do not dry heat-sensitive fabrics, plastic,
rubber, or some stuffed items with heat.
Use the Air cycle, or line dry.
Failure to do so could result in fire or
damaged items.
17

Selecting the right cycle and setting
(models with a temperature doctor)
Use the chart below to guide you when making
drying selections.
l Do not overdry. Overdrying can cause
shrinkage, static cling, anddamage to some
fabrics.
Flro Hazard
Do not dry heat-sensitive fabrics, plastic,
rubber, or some stuffed items with heat.
Use the Air cycle, or line dry.
Failure to do so could result in fire or
damaged items.
18
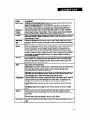
TYPE OF LOAD
CYCLE
COlTONS AND LINENS
Extra Heavy-Bedspreads, mattress pads, quilts
Heavyweight-Towels, jeans, corduroys, work clothes
MediumweightSheets, cotton underwear, diapers
Lightweight-Batistes, organdies, lingerie
Auto cycle
PERMANENT PRESS, SYNTHETICS AND BLENDS
Heavyweight-Work clothes, jackets, raincoats
MediumweightShit-ts, play clothes, sheets, slacks
Lightweight-Lingerie, blouses, dresses
Auto cycle
KNlTS
Heavyweight-Cottons, rayons, blends, T-shirts,
slacks, shirts
Auto cycle
MediumweightSynthetics (polyester, acrylic, etc.),
dress slacks, skirts, sweaters
Lightweight-Synthetics (polyester, acrylic, etc.) and
blends, lingerie, blouses, dresses
DELICATE FABRICS
Sheer curtains (2 or 3 panels), gauze, lace, etc.
Auto cycle
RUBBER, PLASTIC, HEAT-SENSlTIVE FABRICS
Foam Rubber-Pillows, bras, stuffed toys
PlasticShower curtains, tablecloths
Rubber-backed rugs
Olefin, Polypropylene, Sheer nylon
Air cycle
Sefflng may vary with modd
TEMPERATURE
OR TIME
HIGH
HIGH
MEDIUM
LOW
HIGH
MEDIUM
LOW
HIGH
MEDIUM
EX LOW or LOW
EX LOW or LOW
20-30 min
20-30 min
40-50 min
1 O-20 min

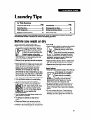
Caring For Your Washer/Dryer
I
In This Section
PW.
Paw
M8intonmce-avery load . . . . . . . . . . . . . . . . . . . . . . . . . . . . . . . . . . .
19
lips for caring for your wnherldryer . . . . . . . . . . 22
I
I
Maintmnca-as nm&d . . . . . . . . . . . . . . . . . . . . . . . . . . . . . . . . . . . 19
Care during periods of non-use . . . . . . . . . . . . . . . . . . . 22
I
Dryers require regular maintenance. Follow the suggestions below to maintain your dryer properly.
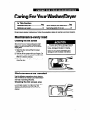
Maintenance-every load
Cleaning the lint screen
The lint screen is located at the front of the
dryer door opening. Clean lt before each
load. A screen blocked by lint can increase
drying time.
1
Do not run the dryer with the lint screen
Pr~uctand,FabrkDamageH;d
loose damaged blocked or missing
1. Open the door and pull the lint screen
straight up.
Doing so can cause overheating and
2. Roll lint off the screen with your fingers. Do
damage to both the dryer and fabrics.
not rinse or wash the screen to remove lint.
Wet lint is hard to remove.
3. Push the screen firmly back into place and
close the door.
Maintenance-as needed
Use the following suggestions about cleaning
and lint removal to maintain your washer/dryer
and keep it operating efficiently.
Cleaning the lint screen area
Periodically remove the dryer lint screen and
vacuum the opening. Use the long, thin
attachment (crevice tool) on your vacuum
cleaner.
19

Cleaning a clogged lint screen
Laundry detergents and fabric softeners can
cause a residue buildup on the lint screen. A
clogged lint screen can extend drying times.
Clean the lint screen every six months, or
more frequently, if it becomes clogged due to a
residue buildup. Use the following method:
1. Wet both sides of lint screen with hot water.
2. Wet a nylon brush with hot water and liquid
detergent.
3. Scrub lint screen with the brush until all
residue buildup is removed.
4. Rinse with hot water.
5. Thoroughly dry lint screen with a clean
towel and replace in dryer.
Cleaning the washer/dryer
interior
Washer:
l
If the washer interior needs cleaning, put
1 cup (250 mL) of chlorine bleach and
2 cups (500 mL) of detergent in the washer.
Run through a complete cycle using hot
water.
Dryer:
Electrkal Shock,
Personal Injury and Fire and
Exploslon Hazard
l
Turn off the electrical power before
cleaning the interior.
l
Make sure the dryer is cool.
l
Use nonflammable cleaner.
Failure to do so could result in electrical
shock or injury, fire or explosion.
Garments which contain unstable dyes, such
as denim blue jeans or brightly colored cotton
items, may discolor the dryer interior.
If you want to remove stains from the dryer
drum, use powdered laundry detergent.
1.
Make a paste with detergent and very warm
water.
2. Apply paste to a soft cloth and scrub area
until all excess dye is removed.
3. Wipe thoroughly with a damp cloth.
4. Tumble a load of rags to dry.
20
Page is loading ...
Page is loading ...
Page is loading ...
Page is loading ...
Page is loading ...
Page is loading ...
Page is loading ...
Page is loading ...
Page is loading ...
Page is loading ...
Page is loading ...
Page is loading ...
Page is loading ...
Page is loading ...
Page is loading ...
Page is loading ...
Page is loading ...
Page is loading ...
Page is loading ...
Page is loading ...
-
 1
1
-
 2
2
-
 3
3
-
 4
4
-
 5
5
-
 6
6
-
 7
7
-
 8
8
-
 9
9
-
 10
10
-
 11
11
-
 12
12
-
 13
13
-
 14
14
-
 15
15
-
 16
16
-
 17
17
-
 18
18
-
 19
19
-
 20
20
-
 21
21
-
 22
22
-
 23
23
-
 24
24
-
 25
25
-
 26
26
-
 27
27
-
 28
28
-
 29
29
-
 30
30
-
 31
31
-
 32
32
-
 33
33
-
 34
34
-
 35
35
-
 36
36
-
 37
37
-
 38
38
-
 39
39
-
 40
40


Whirlpool Thin Twin User guide
- Category
- Washing machines
- Type
- User guide
Ask a question and I''ll find the answer in the document
Finding information in a document is now easier with AI
Related papers
-
Whirlpool 3363560 User manual
-
-
-
-
-
-
-
-
-
Other documents
-
Frigidaire FFLE3911QW User guide
-
LG WF-S800C User manual
-
KitchenAid KAWE670B User manual
-
-
-
Crosley CLCG500FW1 Owner's manual
-
LG WF-S850CR User manual
-
-
Kenmore 41797912702 Owner's manual
-
Frigidaire GLGT1031FS2 Owner's manual