
USER MANUAL

JOIN THE GOPRO MOVEMENT
twitter.com/GoPro
facebook.com/GoPro youtube.com/GoPro
instagram.com/GoPro
Getting Started 4
Flying Safely 14
Pre-Flight Checklist 16
Taking Off 17
Capturing Video and Photos 18
Sharing Your Live Flight 21
Landing Karma 22
Offloading Content 25
Pairing and Calibration 26
Battery 27
Troubleshooting 29
GoPro Care 31
Trademarks 31
Regulatory Information 31
TABLE OF CONTENTS

4 5
8
9
7
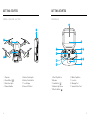
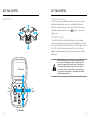
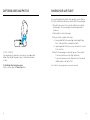
9. Start/Stop Button
10. Speaker
11. Land Button [ ]
12. Ambient Light Sensor
13. Shutter Button [ ]
1. Propellers
2. Power Button [ ]
3. Orientation Lights
4. Camera Stabilizer
5. Battery Status Lights
6. Battery Status Button
7. Touch Display
8. Camera Tilt Wheel
GETTING STARTED GETTING STARTED
2
3
6
5
13
15
14
16
17
14. Mode/Tag Button
15. Joysticks
16. Charging Port
17. Lanyard Tether Point
DRONE + STABILIZER + BATTERY CONTROLLER
1
4
6
5
11
12
10

6 7
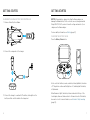
CHARGING THE KARMA BATTERY AND CONTROLLER
1. Remove the battery from Karma.
2. Connect the components to the charger.
3. Connect the charger to a wall outlet. The battery status lights on the
battery and the controller indicate the charge level.
GETTING STARTED
NOTICE: Using a battery charger other than the Karma charger can
damage the Karma battery. For the controller, use only chargers marked:
Output 0.5V 0.5-3A. If you do not know the voltage and current of your
charger, use the Karma charger.
For more battery information, see Battery (page 27).
CHECKING THE BATTERY LEVEL
Press the Battery Status button.
As the controller’s battery is used, one battery status light blinks, then turns
off. This pattern continues until all lights are off, indicating that the battery
is fully drained.
When Karma is in flight, the battery status is indicated at the top of the
touch display. However, Karma returns to the launch location if the battery
becomes too low. For more information, see Automatic Safety Landings
(page 23).
GETTING STARTED

8 9
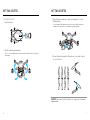
ASSEMBLING KARMA
1. Insert the battery.
2. Unfold the landing gear and arms.
Note: To close the landing gear, pull the legs toward the back of the drone, then bend
them inward.
3. Open the harness and insert a camera (sold separately, for some
Karma bundles).
Note: Although the Karma battery powers both the drone and the camera, the
camera must contain a battery so that Karma is properly balanced.
4. Securely tighten the propellers. Propellers are color-coded to match
the correct motors.
PRO TIP: Replacement parts for Karma or its components are available
at gopro.com.
GETTING STARTED GETTING STARTED

10 11
SETTING UP KARMA
The Karma controller contains everything you need to set up Karma and
control the drone during flight. In addition to flight data and safety info,
the controller contains an interactive flight simulator so you can practice
before Karma leaves the ground.
1. Power on the controller, then power on the drone. The light around
the Power button [ ] turns on. The orientation lights on the arms
help you identify the front and back of the drone during flight. The
lights on the front are green and those on the back are red.
2. Follow the on-screen instructions to set up your system and learn
how to fly.
PRO TIP: You can practice flying at any time with the flight
simulator on the controller. From the Home screen, tap Learn,
then tap Practice Flying.
GETTING STARTED GETTING STARTED
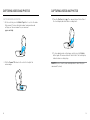
LEFT JOYSTICK
Fly Higher
Fly Lower
Rotate
Left
Rotate
Right

12 13
GETTING STARTED GETTING STARTED
RIGHT JOYSTICK
Fly Forward
Fly Backward
Fly
Left
Fly
Right
KARMA AND YOUR GOPRO
The controller operates both Karma and your camera, so the camera
buttons are disabled when you use your camera with the drone. In
addition, the camera’s wireless connection is turned off, the camera
uses Karma’s battery, and a drone icon [ ] appears on the camera
status screen.
SOFTWARE UPGRADES
To get the latest features and best performance from your Karma
components, make sure to periodically check for updates by connecting
the controller to a Wi-Fi network (from the Home screen, tap Connect >
Wi-Fi). The controller then automatically notifies you if a software
upgrade is available and provides instructions about how to download
and install it.
WARNING: Abide by all local laws when using Karma and
its accessories. Depending on where you plan to operate
Karma, there may be restrictions on use in certain areas,
such as populated public sporting events, near airports,
or in connection with certain activities, such as hunting.
It is solely your responsibility to comply with all local laws,
regulations and restrictions.

14 15
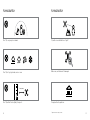
Don’t fly over people or animals.
Don’t fly within 5 miles (8km) of airports.
Don’t fly in fog, high winds, rain or snow.
Comply with all regulations.
*Flight restrictions vary by location.
Fly outdoors and within line of sight.*
5 miles (8km)
Make sure your Karma isn’t damaged.
FLYING SAFELY FLYING SAFELY

16 17
PRE-FLIGHT CHECKLIST TAKING OFF
Complete these items before every flight:
• Securely tighten the propellers
• Fully extend the landing gear and arms
• Be sure the camera stabilizer is securely locked into the drone
• Check battery levels for Karma, the controller, and the camera
• Check the available space on the microSD card
• Be sure your flight area is clear of people and obstacles
• Review all safety items in Flying Safely (page 14)
Before taking off, be sure to complete the items in Pre-Flight Checklist
(page 16).
1. Place Karma on flat, firm ground in an open area. Point the camera
away from you.
2. Power on Karma and the controller. Karma takes a few minutes
to warm up. During this time, the stabilizer might move around.
Do not move Karma until the light around the Start/Stop button
turns solid green.
3. When the controller confirms that Karma is ready for flight, press
and hold the Start/Stop button on the controller for 3 seconds to
start the motors.
Note: The Karma controller contains antennae that must be directed at Karma
at all times. If the connection is lost, Karma returns to the launch location. For
details, see Automatic Safety Landings (page 17).
4. Select one of these options:
• To take off automatically, tap the auto takeoff button on the
touch display.
• To take off manually, gently push the left joystick forward.
5. Use the joysticks to guide the drone during flight.
PRO TIP: As long as Karma has a GPS connection exists, the drone
hovers in place whenever you let go of the joysticks.
WARNING: Never touch Karma while it is in flight. Do not
touch the propellers while they are spinning. The propellers
have sharp edges and move rapidly with force.

18 19
3. Press the Shutter button [ ]. The camera status at the bottom of
the touch display indicates when recording starts.
4. To stop capturing video or time lapse content, press the Shutter
button again. The camera status at the bottom of the touch display
indicates when recording stops.
PRO TIP: For best results, make small adjustments when tilting the
camera and fly slowly.
CAPTURING VIDEOS AND PHOTOS CAPTURING VIDEOS AND PHOTOS
CAPTURING VIDEO AND PHOTOS
1. On the controller, press the Mode/Tag button to cycle to the mode
that you want. For more information about camera modes and
settings, see the user manual for your camera at
gopro.com/help.
2. Roll the Camera Tilt wheel on the controller to adjust the
camera angle.

20 21
CAPTURING VIDEO AND PHOTOS
HILIGHT TAGGING
You can mark specific moments in your video as they happen with
HiLight Tags. HiLight Tags make it easy to find the best moments
to share.
To Add HiLight Tags During Recording:
On the controller, press the Mode/Tag button.
SHARING YOUR LIVE FLIGHT
If you are flying Karma with friends, they can watch your live flight on
their iOS® or Android™ mobile devices with the GoPro Passenger App.
1. From the Home screen of the controller, tap Connect, and then
tap Passenger. This screen displays the name and password of
your drone.
2. Tap the button to turn on Passenger.
3. Ask your friend to complete these steps:
a. Download the GoPro Passenger App from the Apple© App
Store© or Google™ Play to a smartphone/tablet.
b. Open the app and follow the on-screen instructions to connect
to the controller.
4. When the Passenger app is connected, tap one of these options:
• To let your friend view your live flight, tap Viewer.
• To let your friend view your live flight and control the camera
stabilizer while you fly, tap Co-Pilot.
Note: The GoPro Passenger App cannot control the drone’s flight.

22 23
LANDING KARMA
AUTOMATICALLY LANDING KARMA
With an automatic landing, you have the option of Karma returning to
the launch location, returning to you, or landing in place. You can use the
joysticks to maneuver Karma around obstacles during the return flight
and descent.
1. Press the Land button [ ] on the controller.
2. Select where you want Karma to land:
• The launch location
• Your current location
• In place (straight down)
Unless you opt to land in place, Karma hovers for a few seconds,
moves to an altitude of 66ft (20m), then flies to the landing location.
Note: You can set the altitude for automatic landings in the Flight Settings on
the controller.
3. Use the joysticks to maneuver around obstacles during the return
flight. When Karma reaches the launch location, it hovers for 10
seconds before starting the descent.
4. When the propellers stop spinning, press and hold the Power button
[ ] on Karma. The button light and the orientation lights on the
arms turn off when Karma is powered off.
CANCELLING AN AUTOMATIC LANDING
To cancel an automatic landing and regain full control of Karma,
tap Cancel on the touch display.
MANUALLY LANDING KARMA
With a manual landing, you use the joysticks to control Karma during the
return flight and guide it to the ground.
1. Use the joysticks to guide Karma toward a safe landing area.
2. When you reach the landing area, gently pull the left joystick back
until Karma reaches the ground, then continue pulling this joystick
back until the propellers stop spinning.
3. Press and hold the Power button [ ] on Karma. The button light
turns off when Karma is powered off.
Note: In an emergency, you can stop the motors immediately by pressing and holding
the Start/Stop button and Land button simultaneously for 5 seconds.
AUTOMATIC SAFETY LANDINGS
To prevent damage to the drone and its surroundings, Karma includes
these built-in safety landings:
Low Battery Landings
If the Karma battery level becomes low during flight, Karma
automatically returns to the launch location. It is possible (although not
advised) to cancel this automatic flight and continue flying. If the Karma
battery then reaches a critical level, the controller notifies you and
Karma begins landing in place.
Lost Connection Landing
If the controller loses connection to Karma, Karma hovers in place while
the controller tries to re-establish a connection. If a connection cannot
be re-established, Karma returns to the launch location.
Karma automatically returns to the controller’s last known location, if the
controller moved more than 82ft (25m) from the launch location.
Note: During any automatic safety landing, you can use the joysticks to maneuver
Karma around obstacles only if a connection exists between the controller and
the drone.
LANDING KARMA

24 25
Critical Landing
If Karma encounters an emergency (such as a software problem),
the controller notifies you, and Karma immediately lands in place.
Unless the connection between Karma and the controller is lost,
you can still use the joysticks during these safety landings to maneuver
around obstacles.
LANDING KARMA OFFLOADING CONTENT
Your videos and photos are saved to the camera’s microSD card.
Transfer the content to a computer or mobile device to view, edit,
and share your aerial footage.
OFFLOADING CONTENT TO A MOBILE DEVICE
1. Download and install Capture from the Apple© App Store© or
Google™ Play to your smartphone/tablet.
2. Follow the on-screen instructions to connect your camera.
OFFLOADING CONTENT TO A COMPUTER
1. Download and install the Quik™ app for desktop from
gopro.com/apps.
2. Connect the camera to your computer using the USB cable that
came with your camera.
3. Power on the camera and follow the on-screen instructions in Quik.
You can also transfer files to a computer using a card reader (sold
separately). Connect the card reader to your computer and insert the
microSD card into the reader. You can then transfer your files to your
computer or delete selected files on your card.

26 27
PAIRING AND CALIBRATION
PAIRING THE KARMA DRONE AND THE KARMA CONTROLLER
If you replace the Karma Drone and/or the Karma Controller, you must
manually pair the two components.
1. Press the Power button [ ] on the controller.
2. Press the Power button [ ] on Karma until the orientation lights
on the arms blink front to back.
3. From the Home menu, tap Connect, then tap Pairing.
4. Follow the on-screen instructions.
CALIBRATION
Accelerometer and compass calibration might be required at times to
ensure the best flight performance from Karma.
The compass and accelerometer on both the drone and the controller
are calibrated automatically. However, if either of these components
must be recalibrated, the controller notifies you and provides step-by-
step instructions to guide you through the process.
BATTERY USE AND SAFETY
Do not drop, disassemble, open, crush, bend, deform, puncture, shred,
microwave, incinerate, or paint your Karma battery or Karma controller.
Do not insert foreign objects into the battery bay on your Karma. Do
not use your Karma or any GoPro product containing a battery if the
product has been damaged—for example, if cracked, punctured, or in
contact with liquids.
WARNING: Handle and store batteries properly to
avoid injury or damage. Most battery issues arise from
improper handling of batteries and, particularly, from the
continued use of damaged batteries.
Battery fluid can cause serious burns to the skin and eyes. In the unlikely
event that battery fluid leaks onto your skin, wash the affected area with
plenty of water and seek medical advice immediately.
Do not expose your Karma or battery to excessive heat, including direct
sunlight or fire and storage or use inside cars in hot weather, where it
can be exposed to temperatures in excess of 140� (60�). Doing so may
cause the battery to generate heat, rupture, or ignite. Using your Karma
battery in this manner also may result in loss of performance and a
shortened life expectancy.
If the battery is damaged and ignites, do not use water to extinguish
flames. Instead, use a functioning fire extinguisher. Do not short-circuit
batteries. Avoid storing them around metal objects such as keys, pocket
change, paper clips, and jewelry.
The battery charger must be used indoors only. It is neither designed
nor tested for outdoors, in recreation vehicles, or on boats. Make
no modifications to the battery charger. Unauthorized alterations
may compromise safety, regulatory compliance, and battery charger
performance, and may void the warranty. Do not drop the battery
charger or batteries.
BATTERY

28 29
The battery is intended only for use with the battery charger provided
with your Karma. Do not continue charging the battery if it does not
reach full charge within two hours. Overcharging may cause the battery
to become hot, rupture, or ignite. If you see any heat deformation or
leakage, properly dispose of the battery.
Do not charge or connect a battery if the power cable has been pinched
or shorted. Always inspect the battery and charger before charging. Do
not pierce, crush, dent, or deform the battery or charger in any way. If
either becomes deformed, properly dispose of it.
Do not dry your Karma which contains batteries with an external heat
source such as a conventional or microwave oven or hair dryer.
Do not attempt to use the Karma battery to power other electronics.
Doing so may result in permanent damage to your product and/or
personal injury.
BATTERY DISPOSAL
Most rechargeable lithium-polymer batteries are classified as non-
hazardous waste and are safe for disposal in the normal municipal waste
stream. Many localities have laws in place requiring battery recycling.
Check your local laws to make sure that you can dispose of rechargeable
batteries in your regular trash.
To safely dispose of lithium-polymer batteries, protect terminals from
exposure to other metal with packing, masking, or electrical tape so
they do not cause a fire while being transported. Lithium-polymer
batteries, however, do contain recyclable materials and are accepted for
recycling by the Rechargeable Battery Recycling Corporation’s (RBRC)
Battery Recycling Program. We encourage you to visit Call2Recycle
at call2recycle.org or call 1-800-BATTERY in North America to find
a convenient recycling location Never dispose of a battery in a fire
because it may explode.
BATTERY TROUBLESHOOTING
ONE OF MY KARMA PARTS BROKE
You have several options to replace the part:
• If the warranty period has not expired, contact Customer Support
for a replacement part.
• If you purchased GoPro Care, most replacement parts are included
in the plan (camera replacements are available for a fee). For more
info, visit shop.gopro.com/care.
• If the warranty period already expired and you did not purchase
GoPro Care, visit gopro.com to purchase a replacement.
KARMA OR THE CONTROLLER WON’T POWER ON
Make sure the component is charged. For details, see Charging the
Karma Battery and the Controller (page 6).
KARMA WON’T RESPOND TO THE CONTROLLER
Remove and re-insert the battery, then press the
Power
button [ ]
on the drone to turn it on.
THE CONTROLLER WON’T RESPOND WHEN I PRESS A BUTTON
Press and hold the
Power
[ ] button on the controller for 8 seconds
to restart it.
THE START/STOP BUTTON ON THE CONTROLLER IS RED
• Quickly blinking: A system error occurred that requires Customer
Support to resolve.
• Slowly blinking: The connection between Karma and the controller
is lost. If a lost connection occurs during flight, Karma attempts
to return to the launch location and land. If a connection is
re-established during the return flight, this light turns solid green.
At this point, you can tap Cancel on the touch display to cancel
the return flight and regain control of the drone.

30 31
TROUBLESHOOTING
THE POWER BUTTON ON KARMA IS YELLOW
Calibration is required. Whenever calibration is needed, the controller
also notifies you and provides step-by-step instructions.
KARMA WON’T PAIR WITH THE CONTROLLER
Karma Drone and the Karma Controller are paired out of the box.
But if you need to re-pair them, follow these guidelines:
• Move the controller at least 6ft (2m) away from the drone.
• Be sure to correctly follow the pairing instructions on
the controller.
For more information about Karma, see gopro.com/yourkarma.
GoPro Care (optional) provides unprecedented damage support
and replacement parts so you can fly worry free. For more info,
visit shop.gopro.com/care.
Actual product specifications may vary, and all features, functionality
and other product specifications are subject to change without notice
or obligation. GoPro, HERO and their respective logos are trademarks
or registered trademarks of GoPro, Inc. in the United States and other
countries. All other trademarks are the property of their respective
owners. © 2016 GoPro, Inc. All rights reserved.
To see the complete list of country certifications, refer to the Important
Product + Safety Instructions included with Karma.
GOPRO CARE
TRADEMARKS
REGULATORY INFORMATION
130-20141-000 REVA

130-20141-000 REVA
-
 1
1
-
 2
2
-
 3
3
-
 4
4
-
 5
5
-
 6
6
-
 7
7
-
 8
8
-
 9
9
-
 10
10
-
 11
11
-
 12
12
-
 13
13
-
 14
14
-
 15
15
-
 16
16
-
 17
17


