VM5251
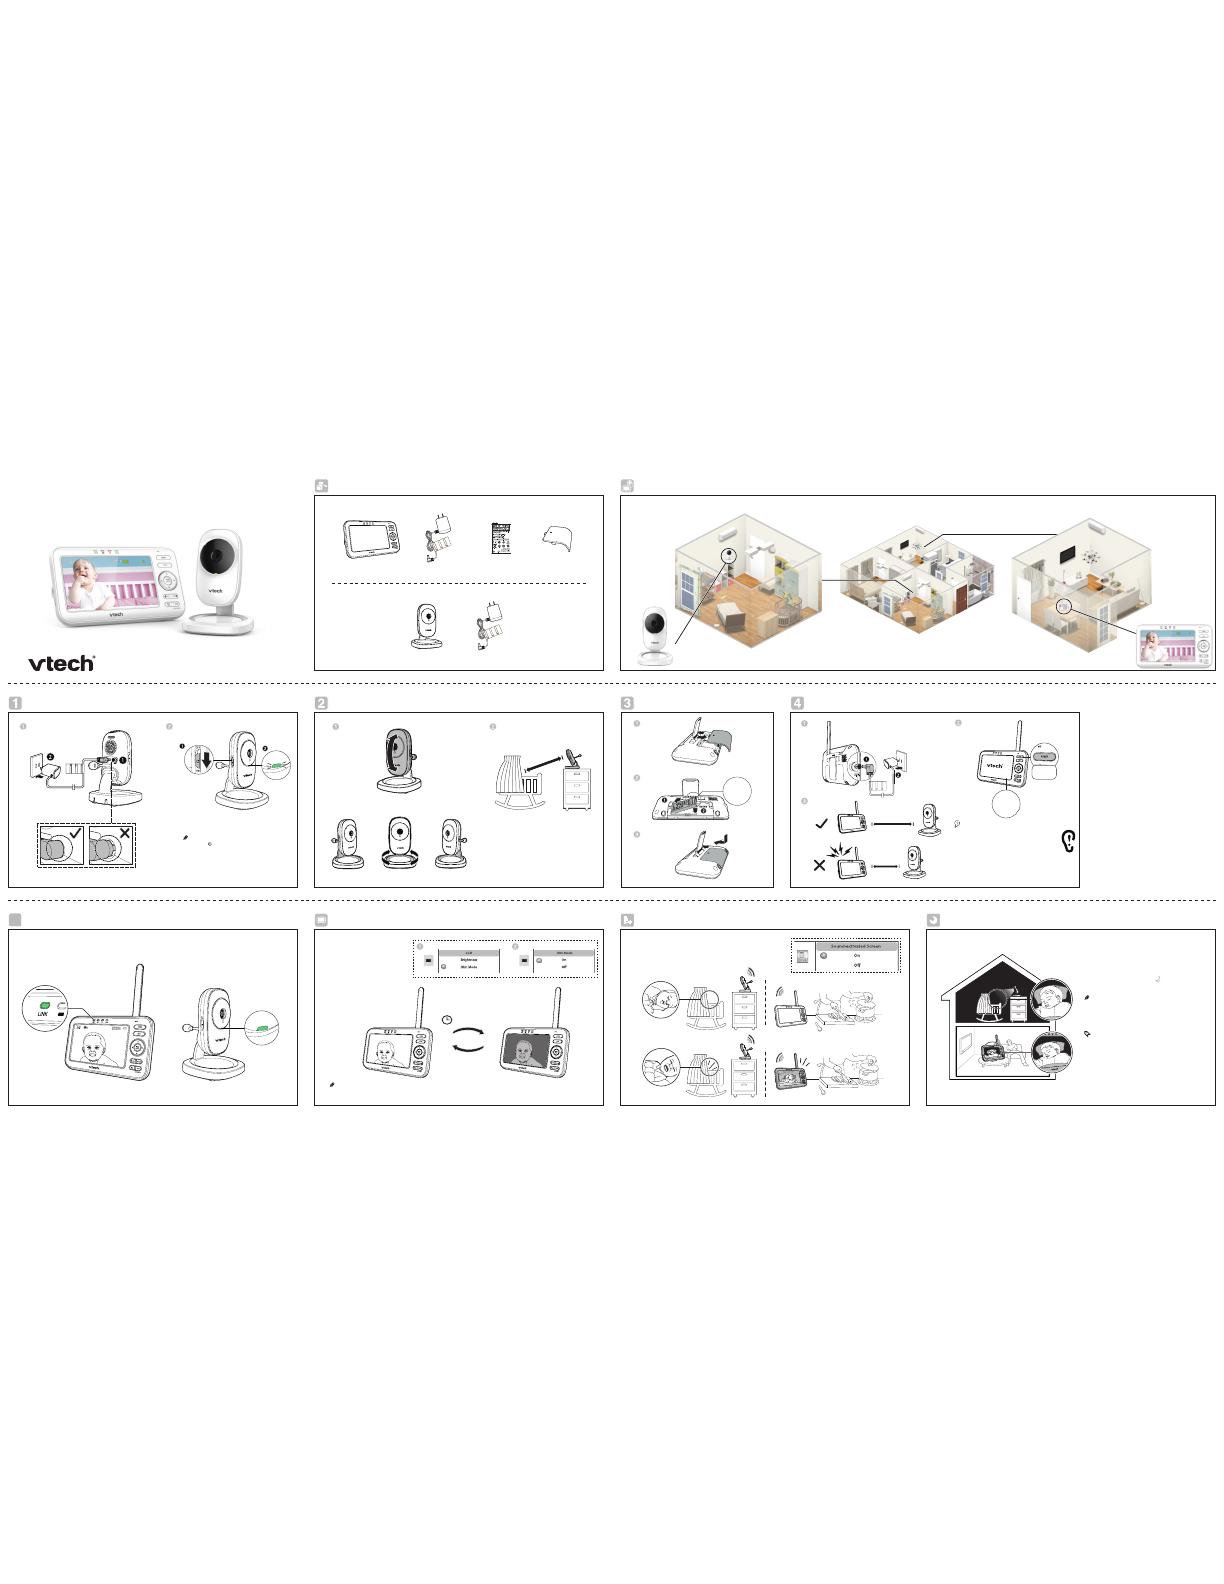
What’s in the box
Dim mode
With dim mode preset to on, your
parent unit display will dim to
conser ve energy after 10 minutes
of inactivity, in which there is
neither key pressed nor alert
received from the baby unit.
Connect and power on/off - Baby unit Connect and power on - Parent unit
The default volume of your parent unit is
level 4, and the maximum volume is level 7.
If you experience high-pitched screeching
noise from your baby monitor while
positioning:
Make sure your baby unit and parent unit
are more than 3 feet (1 meter) apart, OR
Turn down the volume of your parent unit.
•
-
-
Once you power on both your baby unit and parent unit, your parent unit displays image from the baby unit,
and the LI NK LED light turns on. The ON/OFF LED light of the baby unit also turns on.
Status check
VM5251 baby monitor system
Baby’s room Living room
Sound activation
When the baby unit detects no sound, the parent unit screen
stays off to save power. Once a sound is detected, the parent unit
screen turns on automatically. It will then turn off again after
50 seconds of no sound detection.
Sound-activated Screen
On
O
Night vision
The baby unit has infrared LEDs that allow you to
see your baby at night or in a dark room. When the
baby unit detects low light levels, the infrared LEDs
turn on automatically. The images from the baby
unit are in black and white, and appears on
screen.
It is normal if you see a short white glare on your pare nt
unit scree n as the baby unit is ad apting to the da rk
environment.
When the i nfrared LEDs are on, t he image s are in black
and whit e. This is no rmal.
Depending on the surroundings and other interfering
factors, like lightings, objects, colors and backgrounds,
the display resolution may vary. Adjust the baby unit’s
angle, or place the baby unit at a higher level to prevent
glare and blurry display.
•
•
•
Install the battery
Slide t he ON/OFF switch to OFF to power of f
your baby unit.
•
Positioning - Baby unit
If you do not w ant LCD to dim a utomatically, tur n off the D im Mod e. •
S
t
r
a
ngul
at
i
on
Ha
z
a
r
d
Ke
e
p
t
hi
s
c
o
r
d
ou
t
of
r
e
a
ch
of
c
h
i
l
dr
e
n
.
T
he
co
r
d
ne
e
ds
t
o
be
a
t
l
e
a
s
t
t
hr
e
e
fe
e
t
a
wa
y
fr
om
t
he
chi
l
d
a
t
a
l
l
t
i
me
s
.
D
o
no
t
us
e
w
i
t
h
a
n
e
x
t
e
ns
i
on
co
r
d
.
D
o
n
ot
r
e
m
ov
e
t
hi
s
t
a
g
.
É
l
o
i
gn
e
z
ce
co
r
do
n
de
s
e
nf
a
nt
s
.
L
e
cord
o
n
do
i
t
s
e
t
ro
u
v
e
r
à
a
u
mo
i
ns
t
ro
i
s
pi
e
ds
d’
u
n
e
nf
a
nt
e
t
ce
,
e
n
t
o
u
t
t
e
mp
s
.
N
’
u
t
i
l
i
s
e
z
pa
s
d
e
r
a
l
l
o
n
ge
.
N
e
re
t
i
re
z
pa
s
ce
t
t
e
é
t
i
qu
e
t
t
e
.
M
a
nt
e
ng
a
e
s
t
e
c
a
bl
e
fu
e
r
a
de
l
a
a
l
ca
nc
e
de
l
o
s
ni
ño
s
.
E
s
t
e
c
a
bl
e
d
e
be
e
s
t
a
r
po
r
l
o
m
e
no
s
t
r
e
s
pi
e
s
fu
e
r
a
de
l
a
a
l
ca
nc
e
de
l
ni
ño
e
n
t
od
o
mo
m
e
nt
o
.
N
o
l
o
us
e
con
u
na
e
x
t
e
ns
i
ó
n
i
na
l
á
m
br
i
ca
.
N
o
qu
i
t
e
e
s
t
a
e
t
i
q
u
e
t
a
.
Risque
d’
ét
r
anglemen
t
Ri
e
sg
o
de
est
ra
n
gulaci
ó
n
LCD
Brightness
Dim Mode
Dim Mode
On
10 min inactivity
Press any buttons
S
t
r
a
n
g
u
l
a
t
i
o
n
Ha
z
a
r
d
K
e
e
p
t
h
i
s
c
o
r
d
o
u
t
o
f
r
e
a
c
h
o
f
c
h
i
l
d
r
e
n
.
T
h
e
c
o
r
d
n
e
e
d
s
t
o
b
e
a
t
l
e
a
s
t
t
h
r
e
e
f
e
e
t
a
w
a
y
f
r
o
m
t
h
e
c
h
i
l
d
a
t
a
l
l
t
i
m
e
s
.
D
o
n
o
t
u
s
e
w
i
t
h
a
n
e
x
t
e
n
s
i
o
n
c
o
r
d
.
D
o
n
o
t
r
e
m
o
v
e
t
h
i
s
t
a
g
.
É
l
o
i
g
n
e
z
c
e
c
o
r
d
o
n
d
e
s
e
n
f
a
n
t
s
.
L
e
c
o
r
d
o
n
d
o
i
t
s
e
t
r
o
u
v
e
r
à
a
u
m
o
i
n
s
t
r
o
i
s
p
i
e
d
s
d
’
u
n
e
n
f
a
n
t
e
t
c
e
,
e
n
t
o
u
t
t
e
m
p
s
.
N
’
u
t
i
l
i
s
e
z
p
a
s
d
e
r
a
l
l
o
n
g
e
.
N
e
r
e
t
i
r
e
z
p
a
s
c
e
t
t
e
é
t
i
q
u
e
t
t
e
.
M
a
n
t
e
n
g
a
e
s
t
e
c
a
b
l
e
f
u
e
r
a
d
e
l
a
a
l
c
a
n
c
e
d
e
l
o
s
n
i
ñ
o
s
.
E
s
t
e
c
a
b
l
e
d
e
b
e
e
s
t
a
r
p
o
r
l
o
m
e
n
o
s
t
r
e
s
p
i
e
s
f
u
e
r
a
d
e
l
a
a
l
c
a
n
c
e
d
e
l
n
i
ñ
o
e
n
t
o
d
o
m
o
m
e
n
t
o
.
N
o
l
o
u
s
e
c
o
n
u
n
a
e
x
t
e
n
s
i
ó
n
i
n
a
l
á
m
b
r
i
c
a
.
N
o
q
u
i
t
e
e
s
t
a
e
t
i
q
u
e
t
a
.
Ri
s
q
u
e
d
’
é
t
r
a
n
g
l
e
me
n
t
R
i
e
s
g
o
d
e
e
s
t
r
a
n
g
u
l
a
c
i
ó
n
Strangulatio
n
Hazard
K
eep this cord
o
u
t of re
ach of
children.
Th
e
co
rd
n
ee
d
s
to
b
e at
l
e
ast
thre
e
fe
et
away
fr
o
m
th
e
c
h
ild at
a
l
l
times
. Do
no
t
use wi
t
h an
e
x
tensio
n cord. Do
no
t
r
e
mo
ve
t
h
is
t
ag
.
Éloignez
c
e
c
or
d
on de
s
en
f
ants
.
Le
c
o
r
do
n do
i
t
s
e
t
rouver
à
au
mo
i
ns tr
oi
s
p
i
eds d’
un
e
nfant et
ce
,
e
n tout
temp
s
.
N
’
ut
i
l
isez
pas de ra
ll
on
g
e.
N
e
reti
rez
p
as
c
et
t
e étiq
u
et
t
e.
Mant
e
ng
a
e
st
e
cable
f
ue
r
a
d
e
l
a al
canc
e
d
e
l
o
s
niño
s.
E
st
e
c
ab
l
e
d
ebe
e
star
por
l
o menos
tr
e
s
pi
e
s
f
ue
r
a
d
e
l
a
al
ca
n
c
e
d
e
l niño
e
n
t
od
o mome
nt
o.
No
l
o us
e
c
on una
e
x
t
e
nsió
n
ina
l
ámbrica. No
q
uite
e
s
ta
e
tiq
u
eta.
R
isqu
e
d’
ét
r
anglemen
t
R
iesgo de
estr
angulació
n
Strangulatio
n
Hazard
K
eep this cord
o
u
t of re
ach of
children.
Th
e
co
rd
n
ee
d
s
to
b
e at
l
e
ast
thre
e
fe
et
away
fr
o
m
th
e
c
h
ild at
a
l
l
times
. Do
not
use wi
t
h an
e
x
tensio
n cord. Do
n
o
t
r
e
mo
ve
t
h
is
t
ag
.
Éloignez
c
e
c
or
d
on de
s
en
f
ants
.
Le
c
o
r
do
n do
it
s
e
t
rouver
à
au
mo
i
ns tr
o
i
s
p
i
eds
d
’
un
e
nfant et
ce
,
e
n tout
temp
s
.
N
’
ut
i
l
isez
pas de ra
ll
on
g
e.
N
e
retirez
p
as
c
ett
e étiq
u
et
t
e.
Mant
e
ng
a
e
s
t
e
cabl
e
f
ue
r
a
de
l
a al
canc
e
d
e
l
o
s
niño
s.
E
st
e
c
ab
l
e
d
ebe
e
star
por
l
o menos
tr
e
s
pi
e
s
f
ue
r
a de
l
a
al
ca
n
c
e
d
e
l niño
e
n
t
od
o mome
nt
o.
No
l
o us
e
c
on una
e
x
t
e
nsió
n
ina
l
ámbrica. No
q
uite
e
s
ta
e
tiq
u
eta.
R
isqu
e
d’
ét
r
anglemen
t
R
iesgo de
estr
angulació
n
Long press
Go to www.vtechcanada.com
for the latest VTech product news.
Quick start guide
(Canada version)