Ferm PGM1004 Owner's manual
- Category
- Power generators
- Type
- Owner's manual
This manual is also suitable for

www.ferm.com 0705-03.1
GB Subject to change
D Änderungen vorbehalten
NL Wijzigingen voorbehouden
F Sous réserve de modifications
E Reservado el derecho de
modificaciones técnicas
P Reservado o direito a modificações
I Con reserva di modifiche
www.ferm.com
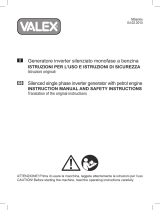
Art.no. PGM1004
FGG-2000N
GB
D
NL
F
E
P
I
USERS MANUAL 04
GEBRAUCHSANWEISUNG 09
GEBRUIKSAANWIJZING 14
MODE D’EMPLOI 20
MANUAL DE INSTRUCCIONES 25
ISTRUÇÕN A USAR 31
MANUALE UTILIZZATI 36
Page is loading ...
Page is loading ...

GENERATOR (4 STROKE)
THE NUMBERS IN THE FOLLOWING TEXT
CORRESPOND WITH THE PICTURES AT
PAGE 2 + 3
SAFETY AND OPERATING
INSTRUCTIONS
For your own safety and for the safety
of others, please read these
instructions carefully before using
this appliance. It will help you understand
your product more easily and avoid
unnecessary risks. Keep this instruction
manual in a safe place for future use.
CONTENTS:
1. Machine data
2. Safety instructions
3. Use
4. Service & maintenance
1. MACHINE DATA
INTRODUCTION
The generator is designated to generate
electricity with help of a 4 stroke fuel engine.
Now you can use your electric tools in the field
in spite of the lack of the electricity grid.
AVR
The AVR-system Automatic Voltage
Regulator) inside this generator produces a
stable and precise voltage output.
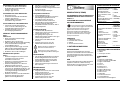
TECHNICAL SPECIFICATION
Contents of packing
1 Generator
1 Funnel
1 Plug spanner
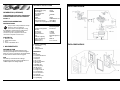
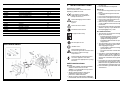
FEATURES
Fig. 1
1. Fuel tank
2. Fuel level indicator
3. Fuel cap
4. Exhaust
5. AC socket
6. Ground terminal
7. AC Switch
8. Oil filler cap
9. Oil drain plug
10. Oil sensor
11. Voltmeter
12. Engine switch
13. Choke lever
14. Recoil starter
15. Fuel tap
16. Air filter cover
17. Spark plug
Type Engine | Air cooled
| 4-stroke petrol
Cylinder arrangement | Inclined, 1
cylinder
Continuous | 4.0 kW
Max. output | 4.8 kW
Operation hours | 13 hours
Fuel | Unleaded petrol
Fuel tank capacity | 15 L
Engine oil capacity | 600 ml
Spark contact
point distance | 0.7 – 0.8 mm
Rated voltage | AC 230 V
Rated frequency (AC) | 50 Hz
Rated output | 2000W
Max. output power
of apparatus
| 2200 W
Tool class | I
Weight | 45 kg
Dimensions | 590x430x485 mm
Outdoor noise (Lwa) | 94,0 dB(A)
Sound pressure capacity(
Lpa
)
| 65,0dB(A)
4 Ferm Ferm 45
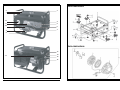
EXPLODED VIEW B
EXPLODED VIEW C

2. SAFETY INSTRUCTIONS
Explanation of symbols
In this manual and/or on the machine the
following symbols are used:
In accordance with essential
applicable safety standards of
European directives
Risk of damaging material and/or
physical
injuries
Risk of an electric shock
Read instruction manual
Keep bystanders away
Do not expose to rain
Outdoor noise
Risk of high temperature
Caution: the generator contains some
parts which might reach high
temperatures
Faulty and/or discarded electrical or
electronic apparatus have to be
collected at the appropriate recycling
locations.
SAFETY INSTRUCTIONS
Persons
• Never allow children or people unfamiliar
with these instructions to use the
appliance. Local regulations may restrict
the age of the operator.
• Always operate outdoors with good
ventilation. Exhaust gas contains
poisonous carbon monoxide.
• Always stop the engine before refilling the
fuel tank and clean the machine after filling
the fuel tank.
• Do not inhale fumes from petrol.
Electricity
• Do not touch the generator if you have wet
hands
• Do not operate the generator in wet
conditions.
• Do not operate the generator near water.
• Never connect two generators together.
• Never connect the generator to any
commercial power outlet.
• Make sure any extension cords used are in
a safe condition and of sufficient capacity
for the task.
• Ensure that the load on the generator falls
within its capacity as specified in the table
before plugging in any cords.
Fire and burn hazards
• The exhaust system gets hot enough to
ignite some materials:
- keep the generator at least 1 meter
away from buildings and other
equipment during operation.
- keep flammable materials away from
the generator.
• The exhaust becomes very hot during
operations and remains hot for a while
after stopping the engine:
- Let the engine cool before storing the
generator indoors.
- Do not touch the hot exhaust with your
hands.
• Gasoline is extremely flammable and is
explosive under certain conditions. Do not
smoke or allow flames or sparks where the
generator is refueled or where gasoline is
stored.
• Fuel vapors are extremely flammable and
may ignite after the engine has started.
Make sure that any spilled fuel has been
wiped up before starting the generator.
• Never shade the generator with clothes or
other articles.
Ferm 544 Ferm
SPAREPARTS LIST
NO. DESCRIPTION POSITION
203078 GASKET SET CYLINDERHEAD A3, 12
203079 SPARK PLUG A10
203080 SPARK PLUG WRENCH A15, 16
203081 GASKET SET CARBURATOR B14, 15, 17
203082 AIR FILTER COMPLETE C10
203083 GASKET SET EXHAUST D5, 11
203084 FUEL CAP E2, 3
203086 FILTER E4
203092 FUEL GAUGE E5
203091 GASKET E15
203087 MOTOR SUPPORT F2
203089 MOTOR SUPPORT F3
203085 RUBBER FOOT F6, 7
400890 ENGINE SWITCH -
400891 CIRCUIT BREAKER SWITCH -
203093 CARBON BRUSH WITH HOLDER -
15
16
EXPLODED VIEW A

Ferm 43
3. USE
BEFORE STARTING THE
GENERATOR
Ground terminal
The generator ground terminal is
connected to the frame of the generator, the
metal non-current-carrying parts of the
generator, and the ground terminals of each
receptacle. Before using the ground terminal,
consult a qualified electrician, electrical
inspector or local agency having jurisdiction for
local codes or ordinances that apply to the
intended use of the generator.
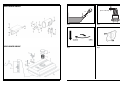
Fill and check oil level (quantity is 600 ml)
Always check the oil level (with machine in a
level position) before starting and if the
engine unexpectedly stops (fig. 2).
For general use you can use an “all
temperature” oil 10W-30
≤ 0ºC SAE#10
0ºC - 25 ºC SAE#20
25ºC -35 ºC SAE#30
≥ 35ºC SAE#40
Fill and check fuel level
• Use unleaded fuel only
• Remove any power cords
• Turn power switches off
• Do not overfill – leave air gap at top of fuel
level
• Always screw down fuel cap
• Clean up any spilled fuel
• Do not smoke while operating the
generator
Always use caution!
Starting the generator
Fig. 1 + 4 + 5
1. Turn on fuel tap (15).
2. Turn on engine switch (12).
3. Move choke lever (13) to closed position
(to restart a warm engine, leave the choke
lever in open or half-open position).
4. Pull slowly on the starter cord until it
engages, then pull sharply to start the
engine (14).
5. Allow the engine to run until it warms up,
and then move the choke lever to the open
position (13).
Using the AC Output (230 V)
• Start the generator.
• Plug in the electrical appliance plug.
• Press AC current protector downward to
“ON”(7).
• The voltmeter (11) displays the voltage on
the AC socket. Normally this should be ±
230 V during use.
Stopping the generator
Fig. 1 + 5
1. Unplug all cords (5)
2. Turn engine switch to “OFF” (12)
3. Turn off fuel tap (15)
4. SERVICE & MAINTENANCE
PERIODIC MAINTENANCE
Daily (pre-operation check)
• Check engine oil level
• Check fuel hose for cracks or other
damage. Replace if necessary.
• Check exhaust-system for leakage.
Retighten or replace gasket if necessary.
• Check choke operation
• Check recoil starter operation
1st Month or 20 hrs
• Replace engine oil
3 Months or 50 hrs
• Check condition of spark plug. Adjust gap
and clean. Replace if necessary.
• Clean, replace if necessary.
6 Months or 100 hrs
• Replace engine oil
• Clean fuel tap and fuel tank filter. Replace if
necessary.
• Check fittings and fasteners. Replace if
necessary.
12 Months or 300 hrs
• Contact a specialized service centre to
check the valve clearance.
• Check the fan of the cooling system for
damage.
6 Ferm

Service – notes on maintenance
Fig.1
Oil replacement
• Warm up engine on level ground
• Remove filler cap (8)
• Open drain plug (9) and let oil drain
completely into a pan placed under the
engine.
• Check gaskets, replace if required. Refit
drain plug and refill engine with clean oil.
• Replace filler cap.
Spark plug inspection
Fig. 3
• Disconnect the spark plug cap, and
remove any dirt from around the spark
plug area.
• Remove spark plug (17) with the plug
spanner supplied.
• Inspect the spark plug. It should be a tan
colour.
• Measure the gap (distance contact point)
with a suitable gauge. The gap should be
0,7 - 0,8 mm. Correct the gap, if necessary,
by carefully bending the side electrode.
• Replace the spark plug if the electrodes
are worn, or if the insulator is cracked or
chipped.
• Install the spark plug carefully, by hand, to
avoid cross-threading.
• Place the spark plug with correct torque:
20 Nm.
• Attach the spark plug cap.
Exhaust screen
• Wait for exhaust to cool.
• Exhaust screen may be blocked up with
carbon deposits.
• Undo the screw cap and remove the
exhaust screen.
• Clean the screen with a wire brush and
refit.
• Replace exhaust screen if damaged.
Air filter cleaning
• Remove the air filter cover (16).
• Remove filter element and wash well in
solvent.
• Pour a small amount of oil onto the filter
element and gently squeeze out any
excess oil.
•
Replace the filter element and air filter cover.
• Be sure the filter cover seals properly all
around.
Do not run the engine without the air
filter element in place.
Never place a wet filter (with solvent)
on the machine.
Fuel tap
• To remove the fuel tap filter, simply undo
the cup at the bottom of the fuel tank
• Use a small spanner to remove the tap
• Clean and wash out the filter and cup, and
replace.
TROUBLESHOOTING
Basic checks
• Make sure you have plenty of fuel
• Make sure the fuel tap is on
• Make sure the engine-switch is on
• Make sure the oil level is correct
• The generator has an oil sensor. When the
oil level is too low, the generator will not be
able to start.
• Remove spark plug, connect spark plug
lead and earth it to the generator. Pull
starter cord gently and look for a spark. If
there is no spark, replace spark plug.
Spark plug is OK, but engine still won’t
start
• Check fuel tap filter is clean
• Check fuel line is clear
• Check carburetor is not clogged
Engine will not start
• Clean or replace spark plug
• Check ignition system – if faulty, contact
your service centre
• Check compression – if low, contact your
service centre
• Check for loose cylinder head – tighten
bolts
• Check for damaged cylinder head gasket –
replace if necessary
Ferm 7
Dichiariamo, assumendo la piena
responsabilità di tale dichiarazione, che il
FGG-2000N
è conforme alle seguenti normative ai relativi
documenti.
EN12601
conforme alle direttive
98/37/EC, 73/23/EEC, 89/336/EEC,
2002/95/EC, 2002/96/EC
dal 01-01-2007
ZWOLLE NL
J.A. Bakker - van Ingen J. Lodewijk
CEO Ferm BV Quality Manager
Ferm Global
La nostra politica è sempre volta a migliorare i
nostri prodotti . Prodotti soggetti a modifiche
senza preavviso.
Ferm BV • Lingenstraat 6 • 8028 PM
Zwolle • Olandam
CE
ı
DICHIARAZIONE DI CONFORMITÀ
(
I
)
42 Ferm

• Assicurarsi che ci sia il tappo per il
carburante
• Assicurarsi che l’interruttore del motore
sia acceso
• Assicurarsi che il livello dell’olio sia giusto
• Il generatore è dotato di un sensore olio.
Quando il livello dell'olio è troppo basso, il
generatore non può essere avviato.
• Rimuovere la candela d’accensione,
collegare il filo della candela d’accensione
e collegarlo a terra al generatore. Tirare
gentilmente il filo d’accensione per
controllare se c’è una scintilla. Se non c’è
scintilla, sostituire la candela
d’accensione.
La candela d’accensione è OK, ma il
motore non parte ancora
• controllare che il filtro del tappo per il
carburante sia pulito
• Controllare che il tubo di alimentazione sia
pulito
• Controllare che il carburatore non sia
intasato
Il motore non parte
• Pulire o sostituire la candela di
accensione.
• Controllare il sistema di accensione – se
difettoso, contattare il proprio centro
servizi
• Controllare la compressione – se bassa,
contattare il proprio centro servizi
• Controllare che la testa del cilindro non si
sia allentata – stringere i bulloni
• Controllare che la guarnizione della testa
del cilindro non sia danneggiata –
sostituirla se necessario
PULIZIA
Pulire la carcassa regolarmente con un
panno morbido, preferibilmente prima d’ogni
uso. Eliminare polvere e sporco dalle prese di
ventilazione.
Togliere lo sporco ostinato con uno straccio
morbido, inumidito con acqua saponata.
Non usare solventi come petrolio, alcool,
ammoniaca, ecc. perché questi potrebbero
danneggiare i componenti di plastica.
CONSERVAZIONE (A LUNGO
TERMINE)
• Svuotare il serbatoio, il tappo per il
carburante, la ciotola del carburatore e il
carburatore.
• Versare una coppa d’olio da motore nel
serbatoio e scuotere il generatore per
spargere l’olio in tutto il serbatoio.
Svuotare l’olio in eccesso.
• Rimuovere la candela d’accensione e
versarvi 1 cucchiaio di olio da motore,
tirare il filo d’accensione diverse volte con
l’interruttore d’accensione spento.
Sostituire la candela di accensione
• Tirare il filo d’accensione finché non si
sente compressione e fermarsi.
• Pulire i generatori esteriori e di
rivestimento con un prodotto antiruggine.
• Posizionare il generatore su un piano e
coprirlo con un panno asciutto e pulito.
RIPARAZIONI E COMMERCIANTI
Se si presentano problemi a causa di, per
esempio, usuradi una parte della sega, si
prega di contattare il servizio diassistenza
all'indirizzo riportato sulla scheda di garanzia.
AMBIENTE
Per evitare che si danneggi durante il
trasporto, la macchina è imballata in un
contenitore resistente. La maggior parte dei
componenti dell'imballaggio sono riciclabili.
Portare tali materiali presso gli appositi centri
di riciclaggio.
Strumenti elettrici e/o elettronici
difettosi o usurati devono essere
smaltiti in appropriate aree di
riciclaggio.
GARANZIA
Si prega di leggere le condizioni di garanzia
sulla carta di garanzia che è inclusa.
Ferm 41
CLEANING
Clean the housing regularly with a soft cloth,
preferably every time it is used. Keep the air
vents free of dust and dirt.
Remove stubborn dirt with a soft rag
moistened in soapy water. Do not use any
solvents such as petrol, alcohol, ammonia,
etc. as such substances can damage the
plastic parts.
STORAGE (LONG TERM)
• Drain fuel tank, fuel tap, carburetor bowl
and carburetor
• Pour 1 cup of engine oil into the fuel tank
and shake the generator to spread the oil
around the tank. Drain excess oil.
• Remove spark plug and pour in 1 spoonful
of engine oil, pull the starter cord several
times with the starter switch OFF. Replace
spark plug.
• Pull on the starter cord until you feel
compression and stop.
• Clean the generators exterior and coat
with rust inhibitor.
• Place the generator on flat ground and
cover with a clean dry cloth.
FAULTS
Should a fault occur, e.g. after wear of a part,
please contact the service address on the
warranty card. In the back of this manual you
find an exploded view showing the parts that
can be ordered.
ENVIRONMENT
To prevent damage during transport, the
appliance is
delivered in a solid packaging which consists
largely of reusable material. Therefore please
make use of options for recycling the
packaging.
Faulty and/or discarded electrical or
electronic apparatus have to be
collected at the appropriate recycling
locations.
WARRANTY
Read the terms of warranty on the separate
warranty card which is enclosed.
We declare under our sole responsibility that
this
FGG-2000N
is in conformity with the following standards
or standardized documents
EN12601
in accordance with the regulations
98/37/EC, 73/23/EEC, 89/336/EEC,
2002/95/EC, 2002/96/EC
from 01-01-2007
ZWOLLE NL
J.A. Bakker - van Ingen J. Lodewijk
CEO Ferm BV Quality Manager
Ferm Global
It is our policy to continuously improve our
products and we therefore reserve the right to
change the product specification without
prior notice.
Ferm BV • Lingenstraat 6 • 8028 PM
Zwolle • The Netherlands
CE
ı
DECLARATION OF CONFORMITY
(
GB
)
8 Ferm
Page is loading ...
Page is loading ...
Page is loading ...
Page is loading ...
Page is loading ...
Page is loading ...
Page is loading ...
Page is loading ...
Page is loading ...
Page is loading ...
Page is loading ...
Page is loading ...
Page is loading ...
Page is loading ...
Page is loading ...
Page is loading ...
-
 1
1
-
 2
2
-
 3
3
-
 4
4
-
 5
5
-
 6
6
-
 7
7
-
 8
8
-
 9
9
-
 10
10
-
 11
11
-
 12
12
-
 13
13
-
 14
14
-
 15
15
-
 16
16
-
 17
17
-
 18
18
-
 19
19
-
 20
20
-
 21
21
-
 22
22
-
 23
23
-
 24
24


Ferm PGM1004 Owner's manual
- Category
- Power generators
- Type
- Owner's manual
- This manual is also suitable for
Ask a question and I''ll find the answer in the document
Finding information in a document is now easier with AI
in other languages
- italiano: Ferm PGM1004 Manuale del proprietario
- français: Ferm PGM1004 Le manuel du propriétaire
- español: Ferm PGM1004 El manual del propietario
- Deutsch: Ferm PGM1004 Bedienungsanleitung
- Nederlands: Ferm PGM1004 de handleiding
- português: Ferm PGM1004 Manual do proprietário
Related papers
Other documents
-
Scheppach SG950 User manual
-
Master XL6 Owner's manual
-
EINHELL TC-PG 10/E5 Operating Instructions Manual
-
 Valex 1371816 Owner's manual
-
AL-KO 2000i User manual
-
Scheppach SG1200 User manual
-
Parkside PGI 1200 A1 Operating And Safety Instructions Manual
-
Parkside PSE 2800 B2 Operation and Safety Notes
-
APRILIA Area 51 960x Service and Repair Manual
-
Yamaha EF2000iS - Inverter Generator Owner's manual
