Page is loading ...

BC 1909 HR
www.sigmasport.com
BIKE COMPUTER TOPLINE
DGB/USAFIENLPPLHCZ

26
www.sigmasport.com
CONTENTS
1 Introduction and packaging contents ................................................................. 27
2 Assembly ..................................................................................................................... 28
2.1 Installation of the 2
nd
Bike .............................................................................................. 29
3 Start-up ....................................................................................................................... 29
4 Display change/Key functions/Function overview ........................................ 30
5 The Synchronisation . ............................................................................................... 30
6 The Basic Settings ................................................................................................... 31
6.1 Setting the language ....................................................................................................... 32
6.2 Setting KMH/MPH .......................................................................................................... 32
6.3 Calculating wheel size ..................................................................................................... 33
6.4 Wheel size bike 1 and bike 2 ........................................................................................ 34
6.5 Setting the time ................................................................................................................ 35
6.6 Setting your age ............................................................................................................... 35
6.7 Setting your weight .......................................................................................................... 36
6.8 Setting your gender ......................................................................................................... 36
6.9 Setting the pulse upper/lower limit ............................................................................37
6.10 Setting the total odo for bike 1 or bike 2 ................................................................. 38
6.11 Setting the total trip time for bike 1 or bike 2 ........................................................ 38
6.12 Setting the contrast ........................................................................................................ 39
6.13 Exiting Basic Settings ..................................................................................................... 39
7 General functions ..................................................................................................... 40
7.1 Display illumination .......................................................................................................... 40
7.2 Compare Speed ................................................................................................................ 40
7.3 Showing/hiding the cadence/heart rate functions ............................................. 41
7.4 Stopwatch ........................................................................................................................... 41
7.5 Countdown ......................................................................................................................... 42
7.6 Trip up/down .................................................................................................................... 43
7.7 Reset Display ..................................................................................................................... 44
7.8 Totals bike 1 and bike 2 ................................................................................................. 44
7.9 Service interval ................................................................................................................. 44
7.10 Transport mode ................................................................................................................ 45
7.11 PC interface ....................................................................................................................... 45
7.12 Cable-connected universal bracket ............................................................................. 45
8 Technical Data ........................................................................................................... 46
8.1 Default/Min/Max values .............................................................................................. 46
8.2 Battery Change ................................................................................................................. 47
8.3 Trouble Shooting .............................................................................................................. 48
8.4 Warranty ............................................................................................................................ 49
CONTENTS

27
GB/USA
BC 1909 HR
1 INTRODUCTION AND PACKAGING CONTENTS
1 INTRODUCTION AND PACKAGING CONTENTS
Congratulations on having chosen a bicycle computer from SIGMA SPORT
®
. Your new
BC 1909 HR will provide you reliable service in riding your bike for many years to come.
The BC 1909 HR is a state-of-the-art measuring instrument. Please read instructions
carefully to become familiar with the functions and usage of this bicycle computer.
SIGMA wishes you an enjoyable time using your BC 1909 HR.
The BC 1909 HR is fitted with an automatic Start/Stop. As soon as this is assembled
on the mounting bracket a movement sensor activates the BC 1909 HR at the smallest
movement of the bicycle or the hiking mounting. This automatically starts the connection.

28
www.sigmasport.com
1 INTRODUCTION AND PACKAGING CONTENTS
Bike computer
BC 1909 HR
STS chest belt
including
elastic belt
STS speed
transmitter
STS cadence
transmitter
kSpoke magnet
kcadence magnet
khandlebar bracket
kbattery
compartment key
kfastening material
1 PACKAGING CONTENTS
2 ASSEMBLY
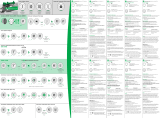
The illustrations for these installation texts can be found on the enclosed folding sheet!
INSTALLING THE BIKE BRACKET
kThe bracket can either be installed with cable ties
(permanent attachment) or optionally using the O-rings.
kHandelbars or front end.
kRemove the yellow foil.
4321

29
GB/USA
BC 1909 HR
2 ASSEMBLY
INSTALLING THE TRANSMITTERS –
SPEED AND CADENCE
kBoth transmitters can either be installed with cable ties
(permanent attachment) or optionally using the O-rings.
kIn order to achieve the necessary 12 mm or less install the transmittter
and the magnet closer to the wheel hub.
INSTALLING THE MAGNETS –
SPEED AND CADENCE/
PUTTING ON THE CHEST BELT
kRub water or cardio-gel on the electrodes.
Switching between BIKE 1 and BIKE 2 is automatic.
A second speed transmitter must be used.
(Accessory set “BIKE 2” Ref. No.: 00417,
“BIKE 2 incl. cadence” Ref. No.: 00415)
For reasons of energy consumption, the BC 1909 HR is supplied
without a battery.
Please insert the battery by opening the battery compartment
cover with the tool provided. Once you have inserted the battery,
close the battery compartment with the aid of the tool.
The display automatically jumps to setting mode.
2.1 INSTALLATION OF THE 2
ND
BIKE
3 START-UP
1909
o
p
e
n
-
c
l
o
s
e
8
24
19
11
7
23
5
9
21
15 16
18
10
6
22
141312
17

30
www.sigmasport.com
4 DISPLAY CHANGE/KEY FUNCTIONS/FUNCTION OVERVIEW
MODE 1 MODE 2
TRIP DIST AVG. PULSE
TRIP TIME MAX. PULSE
AVG. SPEED KCAL
MAX. SPEED CLOCK
AVG. CAD STOPWATCH
COUNTDOWN
TRIP UP +/-
TEMPERATUR
TOTAL ODO*
TOTAL TIME*
* not whilst moving
RESET
Reset the functions
listed below or scroll
backwards in a menu level.
SET
Set and save
the entered values.
MODE 2
Access the function
listed below or scroll
forwards in a menu level.
MODE 1
Access the functions
listed below.
5 THE SYNCHRONISATION
kInstallation of the BC 1909 HR into the mounting bracket -
a pairing is only possible if the bike computer is locked onto
the mounting bracket.
kThe zeros on the speed, cadence and pulse displays are flashing.
1909
1909

31
GB/USA
BC 1909 HR
1. Set off, usually the receiver has paired with the transmitter
within 3 or 4 wheel turns.
2. Turn front wheel or pedals until the KMH or cadence display
stops flashing.
kWhile wearing the chest strap
either go close to the BC 1909 HR
or climb on the bicycle. As a rule,
the BC 1909 HR pairs with the
chest belt in less than 10 seconds.
The pulse display is no longer flashing.
kTo synchronise the speed, cadence and heart rate,
there are 2 options:
5 THE SYNCHRONISATION
6 THE BASIC SETTINGS
kHold down SET button until the preset LANGUAGE (English)
appears on the display (SETTINGS OPEN is flashing).
n
3 sec.
1909
1909
1909
1909

32
www.sigmasport.com
6 THE BASIC SETTINGS
1
k Use MODE 1 button to switch to the preset LANGUAGE
(as standard the BC 1909 HR is preset to English).
2
k Press the SET button briefly. Display flashes.
3
k Set the desired language using the MODE 2 button (+) or the RESET button (-).
4
k Confirm by pressing the SET button. SET OK appears on the display.
1
k Change the display to KMH/MPH using the MODE 1 button.
2
k Press the SET button briefly. Display flashes.
3
k Select MPH or KMH using MODE 2 button.
4
k Confirm by pressing the SET button. SET OK appears on the display.
By switching from KMH to MPH, the distance format automatically changes from km to
mi, the temperature from °C to °F, the time from 24h mode to 12h mode and the weight
from kg to lb.
6.1 SETTING THE LANGUAGE
6.2 SETTING KMH/MPH
n
n
nn n
n
n
n
n
n
-
-
+
+
1909 1909 1909 1909
1
2
3
4
1909 1909 1909 1909
1 2
3 4

33
GB/USA
BC 1909 HR
6 THE BASIC SETTINGS
kDetermine the correct value for your wheel size from Table C “WHEEL SIZE CHART”.
kAlternatively: calculate/determine WS (Tab. A or Tab. B).
6.3 CALCULATING WHEEL SIZE
mm x 3,14
km/h:
WS = mm x 3,14
mph:
WS = mm x 3,14
1x
= WS (mm)
km/h:
WS = mm
mph:
WS = mm
A B
47-305
47-406
37-540
47-507
23-571
40-559
44-559
47-559
50-559
54-559
57-559
37-590
37-584
20-571
32-630
28-630
40-622
47-622
40-635
37-622
18-622
20-622
23-622
25-622
28-622
32-622
37-622
40-622
1272
1590
1948
1907
1973
2026
2051
2070
2089
2114
2133
2105
2086
1954
2199
2174
2224
2268
2265
2205
2102
2114
2133
2146
2149
2174
2205
2224
16x1.75x2
20x1.75x2
24x1 3/8 A
24x1.75x2
26x1
26x1.5
26x1.6
26x1.75x2
26x1.9
26x2.00
26x2.125
26x1 3/8
26x1 3/8x1 1/2
26x3/4
27x1 1/4
27x1 1/4 Fifty
28x1.5
28x1.75
28x1 1/2
28x1 3/8x1 5/8
700x18C
700x20C
700x23C
700x25C
700x28C
700x32C
700x35C
700x40C
ETRTO ETRTO
1
6
x
1
.
7
5
x
2
1
6
x
1
.
7
5
x
2
C
kmh
mph
kmh
mph

34
www.sigmasport.com
6 THE BASIC SETTINGS
6.4 SET WHEEL SIZE WS BIKE 1 OR WS BIKE 2
1
k Change the display to WS BIKE 1 or WS BIKE 2 using the MODE 1 button.
kPress the SET button briefly. The first input figure is flashing.
2
k Set the value using the MODE 2 button (+) or the RESET button (-).
3
k Move to the next figure using the MODE 1 button.
4
k Set the value using the MODE 2 button (+) or the RESET button (-).
5
k Confirm by pressing the SET button.
SET OK appears on the display.
n
n
n
nn nn
- -+ +
1909 1909 1909 1909 1909
1
2
3 4 5

35
GB/USA
BC 1909 HR
6 THE BASIC SETTINGS
1
k Change the display to CLOCK using the MODE 1 button.
kPress the SET button briefly. The hour display will blink.
2
k Set the value using the MODE 2 button (+) or the RESET button (-).
3
k Move to the minutes using the MODE 1 button.
4
k Set the value using the MODE 2 button (+) or the RESET button (-).
5
k Confirm by pressing the SET button.
SET OK appears on the display.
6.5 SETTING THE TIME
n
n
n
nn nn
- -+ +
1909 1909 1909
1909 1909
1
2
3
4 5
6.6 SETTING YOUR AGE
n n
1
k Use MODE 1 button to switch to AGE display.
2
k Press the SET button briefly. Display flashes.
3
k Set the value using the MODE 2 button (+) or the RESET button (-).
4
k Confirm by pressing the SET button. SET OK appears on the display.
n n
- +
1909 1909 1909
2
3 4
n
1909
1

36
www.sigmasport.com
6 THE BASIC SETTINGS
6.8 SETTING YOUR GENDER
6.7 SETTING YOUR WEIGHT
1
k Use MODE 1 button to switch to WEIGHT display.
2
k Press the SET button briefly. Display flashes.
3
k Set the value using the MODE 2 button (+) or the RESET button (-).
4
k Confirm by pressing the SET button.
SET OK appears on the display.
n n
1
k Use MODE 1 button to switch to the preset GENDER
(as standard the BC 1909 HR is preset to MALE).
2
k Press the SET button briefly. Display flashes.
3
k Set the gender using the MODE 2 button (+) or the RESET button (-).
4
k Confirm by pressing the SET button.
SET OK appears on the display.
n n
n n
- +
n n
- +
1909 1909 1909
2
3 4
n
n
1909
1909 1909 1909 1909
1
1 2
3
4

37
GB/USA
BC 1909 HR
6 THE BASIC SETTINGS
6.9 SETTING THE PULSE UPPER/LOWER LIMIT
Both pulse zone limits are automatically calculated once age, weight and gender have been
entered. (70 % - 80 % of the maximum heart rate for cardiovascular training). You can
modify these limits manually, however.
1
k Use MODE 1 button to switch to precalculated lower or upper limit.
2
k Press the SET button briefly. Display flashes.
3
k Set the value using the MODE 2 button (+) or the RESET button (-).
4
k Confirm by pressing the SET button.
SET OK appears on the display.
n n
n n
- +
n
1909 1909 1909 1909
1 2
3
4

38
www.sigmasport.com
6 THE BASIC SETTINGS
1
k Change the display to TIME BIKE 1 or TIME BIKE 2 using the MODE 1 button.
kPress the SET button briefly. The first input figure is flashing.
2
k Set the value using the MODE 2 button (+) or the RESET button (-).
3
k Move to the next figure using the MODE 1 button.
4
k Set the value using the MODE 2 button (+) or the RESET button (-).
5
k Confirm by pressing the SET button.
SET OK appears on the display.
6.10 SETTING THE TOTAL ODO BIKE 1 OR BIKE 2
6.11 SETTING THE TOTAL TRIP TIME BIKE 1 OR BIKE 2
1
k Change the display to ODO BIKE 1 or ODO BIKE 2 using the MODE 1 button.
kPress the SET button briefly. The first input figure is flashing.
2
k Set the value using the MODE 2 button (+) or the RESET button (-).
3
k Move to the next figure using the MODE 1 button.
4
k Set the value using the MODE 2 button (+) or the RESET button (-).
5
k Confirm by pressing the SET button.
SET OK appears on the display.
n
nn
n
nn
nn nn
- -+ +
n
n
n
n
-
-
+
+
1909 1909 1909 1909 1909
1
2
3
4
5
1909 1909 1909 1909 1909
1
2
3
4
5

39
GB/USA
BC 1909 HR
1
k Change the display to CONTRAST using the MODE 1 button.
2
k Press the SET button briefly. Display flashes.
3
k Set the value using the MODE 2 button (+) or the RESET button (-).
(1 = weak/3 = strong).
4
k Confirm by pressing the SET button.
SET OK appears on the display.
6 THE BASIC SETTINGS
6.12 SETTING THE CONTRAST
n n
n n
- +
n
1909 1909 1909 1909
1 2
3
4
6.13 EXITING BASIC SETTINGS
kPress the SET button down for 3 seconds in order to stop
entering settings (SETTINGS CLOSE flashes).
n
3 sec.
1909

40
www.sigmasport.com
7 GENERAL FUNCTIONS
kThe lighting function is switched on/off when you
press the SET and RESET button at the same
time. LIGHT ON/OFF is shortly displayed.
kThe display is illuminated when you press any
button and the function is switched on when you
press it again.
The illumination is not available during pairing!
Protect the battery by avoiding unnecessary
illumination!
7.2 COMPARE SPEED
7.1 DISPLAY ILLUMINATION
n
n
n
n
1909
1909
1909 1909 1909
1
2
3
1
k If the speed is nearly the same is displayed.
2
k If lower speed will be displayed.
3
k If higher speed will be displayed.
It is displayed for all functions except in the basic settings.

41
GB/USA
BC 1909 HR
7 GENERAL FUNCTIONS
1
k Change the setting to STOPWATCH using the MODE 2 button.
kStart or stop the stopwatch using the SET button.
kThe icon
in the display means the stopwatch is running.
2
k To reset the stopwatch:
hold down the RESET button for 3 seconds.
n n
n
3 sec.
7.4 STOPWATCH
Start Stop
1909 1909 1909 1909
1
2
7.3 SHOWING/HIDING THE CADENCE/HEART RATE FUNCTION
When the BC 1909 HR is operated without cadence signal transmitter and/or chest belt,
all cadence/heart rate functions (CADENCE, AVG. CAD, PULSE, AVG. PULSE, MAX. PULSE,
KCAL) are hidden for this trip.

42
www.sigmasport.com
7 GENERAL FUNCTIONS
n
n
3 sec.
Start
Stop
7.5 COUNTDOWN
1
k Use MODE 2 to switch to COUNTDOWN +/- display.
kHold down SET button for 3 seconds
(COUNTDOWN SET flashes).
2
k Set the value using the MODE 2 button (+) or the RESET button (-).
3
k Move to the next figure using the MODE 1 button.
Set the value as described above.
4
k Confirm by pressing the SET button.
SET OK appears on the display.
5
k Use the SET button to start or stop COUNTDOWN.
The
icon on the display means the countdown is running.
6
k Setting the countdown to zero: Hold down RESET button for 3 seconds
(the display switches back to the preset value).
n
n
n
n
3 sec.
n
n
n
n
-
-
+
+
1909 1909 1909 1909 1909
2
3
4
1909 1909 1909 1909
5 6
1

43
GB/USA
BC 1909 HR
1
k Change the display to TRIP UP/DOWN using the MODE 2 button.
kHold down the SET button for 3 seconds. The display flashes “+” or “-”.
2
k Set to “+” or “-” using the MODE 2 button.
3
k Confirm by pressing the SET button.
The display will jump to the distance setting.
4
k Set the value using the MODE 2 button (+) or the RESET button (-).
5
k Move to the next figure using the MODE 1 button.
Set the value as described above.
6
k Confirm by pressing the SET button.
SET OK appears on the display.
7 GENERAL FUNCTIONS
7.6 TRIP UP/DOWN
n
3 sec.
n
nn
n n
- +
nn nn
- -+ +
1909 1909 1909 1909
1
2
3
1909 1909 1909 1909
4
5
6

44
www.sigmasport.com
7 GENERAL FUNCTIONS
7.8 TOTALS FOR BIKE 1 AND BIKE 2
1
k Press MODE1/2 until the desired function is displayed.
kHold down the RESET button. Display flashes. After 2 seconds only the function
displayed is reset to 0.
2
k Hold down the RESET button for longer than 4 seconds to set the display from:
TRIP DIST, TRIP TIME, AVG. SPEED, MAX. SPEED , AVG. CAD, AVG. PULSE,
MAX. PULSE, KCAL to zero.
7.7 RESET DISPLAY
nn
4 sec.
The totals are first displayed separately for BIKE 1, BIKE 2 and
BIKE 1+2, if a second bike is added. If only one bike is ridden,
only the totals for the first bike are displayed.
The service interval tells you when the mileage until the next bike
inspection is reached.
The service interval can only be set by your dealer. After reaching
the preset mileage, INSPECTION appears on the display.
Pressing any button makes this display disappear.
7.9 SERVICE INTERVAL
1909 19091909 1909
2
1909
1909
1909
Press any button briefly.
1
/