
Installation Guide
SAMSUNG Solid State Drive

Contents
03 Installation Instructions
0
5 Notebook PC
09 Desktop PC
12 Configuring BIOS
13 Award Software Settings
15 AMI Settings
17 OS Installation
Solid State Drive

- 03 -
SAMSUNG SSD INSTALLATION GUIDE
Installation Instructions
This chapter provides the best practices and recommendations for safely
installing the SSD in your computer. For details about removing the computer’s
cover and HDD, refer to your computer’s user guide or inquire with the
computer manufacturer.
Caution
To reduce the risk of damage to the computer, damage to a drive, or loss of
information, observe these precautions:
1. Back up all data from your computer to other storage media such as an external
drive or online storage system.
2. Before handling a drive, discharge static electricity by touching the unpainted
metal surface of the drive.
3. Shut down the computer. If you are unsure whether the computer is off, in the
Suspend state, or in Hibernation, turn the computer on, and then shut it down
through the operating system.
4. Disconnect all cables and all external hardware devices connected to the
computer.
5. Disassembling the computer to install an SSD may violate the computer
manufacturer’s policy and void the warranty.

- 04 -
SAMSUNG SSD INSTALLATION GUIDE
Things that you will need
• Your Desktop PC or Notebook PC
• Your new Samsung SSD
• Screwdriver
• SSD Installation Guide(Print Preferred)
• Your computer’s user guide (Optional)
Solid State Drive
Solid State Drive
Solid State Drive
Solid State Drive

- 05 -
SAMSUNG SSD INSTALLATION GUIDE
Notebook PC
Note: The illustrations in this chapter are just an example. Your computer may look slightly different
from the illustrations in this chapter. For specific instructions about removing such as a battery,
HDD etc., you have to consult your computer manufacturer.
To remove a current drive:
1. Turn the computer upside down on a clear, flat, stable work surface.
2. Remove the battery from the computer (Refer to your computer’s user
guide for instructions to remove the battery).
3. Find your current drive and remove the screws using a screwdriver on HDD
cover from the computer. Store the screws in a container to reassemble.
4. Slide the HDD cover away from the computer to expose the HDD.
Memory
HDD
ODD
DVD
CD
Memory
HDD
ODD
2
4
3

- 06 -
SAMSUNG SSD INSTALLATION GUIDE
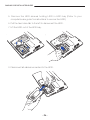
5. Remove the HDD screws holding HDD in HDD bay (Refer to your
computer’s user guide for instructions to remove the HDD).
6. Pull the hard drive tab to the left to disconnect the HDD.
7. Lift the HDD out of the HDD bay.
8. Disconnect all cables connected to the HDD.
6
5
5

- 07 -
SAMSUNG SSD INSTALLATION GUIDE
To install new SSD:
9. Detach the screws holding HDD in the spacer brackets or panels.
10. Detach the spacer brackets or panels from HDD.
11. Insert the SSD into the spacer brackets or panels.
12. Secure the SSD in the spacer brackets or panels with specification
screws (M3.0) or the screws from the HDD you are replacing.
13. Connect all cables to the SSD.
13
12
11
10
9
9

- 08 -
SAMSUNG SSD INSTALLATION GUIDE
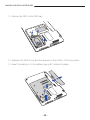
14. Secure the SSD in the HDD bay.
15. Replace the HDD cover and the screws on the bottom of the computer.
16. Insert the battery in to the battery bay until it clicks into place.
Memory
HDD
ODD
16
15

- 09 -
SAMSUNG SSD INSTALLATION GUIDE
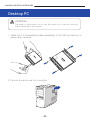
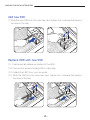
2. Remove the side cover from computer.
Solid State Drive
WARNING
The edges of metal panels can cut skin. Be careful not to slide skin along any
interior metal edge of the computer.
Desktop PC
1. Attach the 3.5” brackets(purchased separately) to the SSD and secure it in
place using 4 screws.

- 10 -
SAMSUNG SSD INSTALLATION GUIDE
Add new SSD:
3. Slide the new SSD into the drive bay, and tighten the 4 screws that secure
the drive in the bay.
Replace HDD with new SSD:
3-1. Disconnect all cables connected to the HDD.
3-2. Remove the screws holding HDD in drive bay.
3-3. Detach the HDD from your computer.
3-4. Slide the SSD into the drive bay, and tighten the 4 screws that secure
the drive in the bay.
3
-
2
3
-
3
3
-
4
3
-
4

- 11 -
SAMSUNG SSD INSTALLATION GUIDE
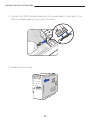
4. Connect the SATA interface cable and the power cable to the back of the
SSD by pressing each plug onto the connector.
5. Replace the side cover.

- 12 -
SAMSUNG SSD INSTALLATION GUIDE
Configuring BIOS
Close the computer case and restart your system. Your computer should
automatically recognize the newly-installed SSD. If not, use the following
instructions to detect the new SSD drive:
1. Restart the computer again.
2. While the system is initializing, run the system setup program (BIOS or
CMOS), which can be activated by pressing a special key such as ESC,
F2, F10 or DELETE. Check your computer’s user guide for the correct
key(s).
3. After running system setup program, select the default settings from Main
menu. Most of computers with Auto detection function should detect
automatically the SSD. If not, specify the SSD from User Define Mode to
detect it.
4. If system and OS support SATA 3Gbps interface, please be sure to set
AHCI mode to enable in Advanced Option (If you do not set AHCI mode
to enable, IDE mode can be selected by default and it may affect optimal
performance). If you can’t install in AHCI mode on some computers, please
contact the computer manufacturers.
5. Save the settings, and exit system setup program.
6. Restart the computer. When the computer restarts, it should now detect
the new drive.
7. It is recommended to reinstall OS for the optimal environment of using SSD.
Note1) If you operate the SSD using SATA 3Gbps interface in IDE mode, it can cause the
performance degradation. IDE (or Parallel ATA) mode supports theoretically up to 133MB / s (at
UDMA6 transmission mode) and SATA2 supports theoretically up to 300MB/s.
Note 2) AHCI driver is automatically installed in Windows 7 OS, but you must install it during
OS installation process in the sub version of the Windows OS (Windows XP, etc.). For more
information, contact your computer manufacturer or refer to OS installation manual.
Note 3) This product may not work correctly in the previous version of Mac OS Leopard.

- 13 -
SAMSUNG SSD INSTALLATION GUIDE
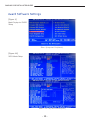
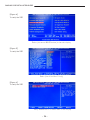
Award Software Settings
Select [Integrated Peripherals]
[Figure 1]
Main Display for CMOS
Setup
[Figure 2-3]
SATA Mode Setup
Select “On-Chip SATA Mode [Auto]

- 14 -
SAMSUNG SSD INSTALLATION GUIDE
Select [Advanced BIOS Feature] in the main display
Select [Hard Disk Boot Priority]
Verify “SAMSUNG 470 Series SSD” in the display
[Figure 4]
To verify the SSD
[Figure 5]
To verify the SSD
[Figure 6]
To verify the SSD

- 15 -
SAMSUNG SSD INSTALLATION GUIDE
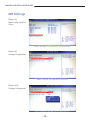
AMI Settings
Select [Storage Configuration] in the Main menu
Select ATA/IDE Conguration [Enhanced]
[Figure 1]
Main Display for BIOS
Setup
[Figure 2]
Storage Configuration
[Figure 3-4]
Storage Configuration

- 16 -
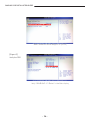
SAMSUNG SSD INSTALLATION GUIDE
Select Enhanced Mode Support on [S-ATA]
Verify “SAMSUNG 470 Series” in the Main display
[Figure 5]
Verify the SSD

- 17 -
SAMSUNG SSD INSTALLATION GUIDE
OS Installation
Windows 7 includes an AHCI control driver and does not require additional
configuration during installation.
For more information on other operating systems, visit http://www.
samsungssd.com. If you are the XP user, you have to get AHCI driver. Contact
your chip set manufacturer.

©
2011 Samsung Electronics Co., Ltd. All rights reserved.
www.samsung.com/ssd
All brand and product names are trademarks of their respective companies.
Design and contents of this manual are subject to change without notice.
-
 1
1
-
 2
2
-
 3
3
-
 4
4
-
 5
5
-
 6
6
-
 7
7
-
 8
8
-
 9
9
-
 10
10
-
 11
11
-
 12
12
-
 13
13
-
 14
14
-
 15
15
-
 16
16
-
 17
17
-
 18
18


Samsung MZ-5PA064C Installation guide
- Type
- Installation guide
- This manual is also suitable for
Ask a question and I''ll find the answer in the document
Finding information in a document is now easier with AI
Related papers
Other documents
-
Silicon Power Slim S60 User manual
-
Centon 128GB VVS1 Installation guide
-
Aspire Digital 3810TZG User manual
-
Acer KB.I140A.074 Datasheet
-
-
-
Acer Aspire TC-780 User manual
-
-
Gateway EC58 User manual
-
Tyan GT86A-B7051 Service Engineer's Manual