DeLonghi DES 12 User manual
- Category
- Dehumidifiers
- Type
- User manual
This manual is also suitable for
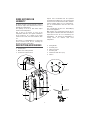
DeLonghi DES 12: Your compact dehumidifier for a healthier home environment. Effectively removes excess moisture from the air, preventing condensation and creating a more comfortable living space. Ideal for small rooms, it features adjustable humidity levels, a continuous drain option, and auto-shutoff when the water tank is full.
DeLonghi DES 12: Your compact dehumidifier for a healthier home environment. Effectively removes excess moisture from the air, preventing condensation and creating a more comfortable living space. Ideal for small rooms, it features adjustable humidity levels, a continuous drain option, and auto-shutoff when the water tank is full.


-
 1
1
-
 2
2
-
 3
3
-
 4
4
-
 5
5
-
 6
6
-
 7
7
-
 8
8
-
 9
9
-
 10
10


DeLonghi DES 12 User manual
- Category
- Dehumidifiers
- Type
- User manual
- This manual is also suitable for
DeLonghi DES 12: Your compact dehumidifier for a healthier home environment. Effectively removes excess moisture from the air, preventing condensation and creating a more comfortable living space. Ideal for small rooms, it features adjustable humidity levels, a continuous drain option, and auto-shutoff when the water tank is full.
Ask a question and I''ll find the answer in the document
Finding information in a document is now easier with AI
Related papers
-
DeLonghi DES 14 Instructions Manual
-
-
DeLonghi DEM 8.5 Owner's manual
-
DeLonghi DE 220 Owner's manual
-
-
-
DeLonghi DEC 21 User manual
-
DeLonghi Tasciugo AriaDry Compact DDS 25 User manual
-
-
Other documents
-
Sencor SDH 1028WH User manual
-
-
Meaco DD8L Zambezi User manual
-
electrio CD20L User manual
-
-
Trotec TTK 650 S Original Instructions Manual
-
ElectrIQ CD25PRO-LE User manual
-
-
-