Page is loading ...

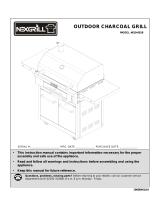
810-0021
CHARCOALOUTDOORGRILL
InstallationInstructionsandUse&CareGuide
For questions about features, operation/performance, parts, accessories or service, call: 1-877-373-2301
or visit our website at www.Kitchenaidgrills.com
ASADORPARAEXTERIORES
InstruccionesdeinstalaciónyManualdeusoycuidado
Para consultas respecto a características, funcionamiento, rendimiento, piezas, accesorios o servicio técnico,
llame al: 1-877-373-2301
o visite nuestro sitio de internet en www.Kitchenaidgrills.com
Table of Contents/Índice................................................................................. 2
19000449A0

OUTDOOR GRILL SAFETY……………………………....
INSTALLATION REQUIREMENTS………………………....
Tools and Parts……………...…………………………………
Location Requirements…………………………………..…...
Product Dimensions……………………………….………….
REPLACEMENT PARTS………………………………..…
PACKAGE CONTENTS LIST…………………...……….…
ALL PRE-ASSEMBLED SCREW LIST..............................
INSTALLATION INSTRUCTIONS………………….…...….
Freestanding Outdoor Grill Installation……………………..
TABLE OF CONTENTS
OUTDOOR GRILL USE …………………………………….….
Using Your Outdoor Grill ………………………………..…..….
TIPS FOR OUTDOOR GRILLING ……………………….…...
OUTDOOR GRILL CARE …………………………………..…
General Cleaning ………………………………………...........
ASSISTANCE ……………………………………………..……
WARRANTY ……………………………………………….…...
2
ÍNDICE
SEGURIDAD DEL ASADOR PARA EXTERIORE…...........
REQUISITOS DE INSTALACIÓN…………..………………..
Herramientas y piezas ……………...………………...……....
Requisitos de ubicación ……………………………...………
Medidas del producto ……………………………….………...
PIEZAS DE REPUESTO ……………………………...………
PAQUETE LISTA DE CONTENIDO …..…….............………
Tools los Tornillos pre-ensamblados listo…………………...
INSTRUCCIONES DE INSTALACIÓN ……………….……..
Instalación del asador autónomo para exteriores .........……
USO DEL ASADOR PARA EXTERIORES …………………...47
Cómo usar el asador para exteriores …………………………..47
CONSEJOS PARA ASAR AL AIRE LIBRE …………………..48
CUIDADO DEL ASADOR PARA EXTERIORES ………….….49
Limpieza general ………………………………………………….49
ASISTENCIA………………………………………………..……..49
GARANTÍA …………………………………………………..…....50
3
4
4
4
5
6
8
10
11
11
27
28
28
28
29
30
32
34
35
35
23
23
24
25
25
25
26

3
State of California Proposition 65 Warnings:
WARNING: This product contains one or more chemicals known to the State of California to cause cancer.
WARNING: This product contains one or more chemicals known to the State of California to cause birth defects or other
reproductive harm.
OUTDOOR GRILL SAFETY
IMPORTANT SAFETY INSTRUCTIONS
IMPORTANT: To reduce the risk of fire, injury to persons, or damage when using the outdoor cooking appliance,
follow basic precautions, including the following:
•Do not install portable or built-in outdoor cooking appliances in or on a recreational vehicle, portable trailer, boat, or
in any other moving installation.
•Always maintain minimum clearances from combustible construction, see "Locations Requirements" section.
•The outdoor cooking appliance shall not be located under overhead unprotected combustible construction.
•This outdoor cooking appliance shall be used only outdoors and shall not be used in a building, garage, or any other
enclosed area.
•Keep outdoor cooking appliance clear and free from combustible materials, gasoline or other flammable vapors or
liquids.
•This grill will become very hot while in use. Do not move it during operation.
•Do not use alcohol, gasoline or comparable fluids for lighting or re-lighting grill.
•Do not use this grill as a heater.
•Grill is to be used on a stable, level, non-flammable surface such as asphalt, concrete or
solid ground. Do not use this grill on flammable material such as carpet or a wood deck.
•Do not use this product in a manner other than its intended purpose.
•Do not leave the grill unattended while in use.
•Do not leave hot ashes unattended until the grill cools completely.
•Do not move the grill while in use or while ashes are still hot. Allow the grill to cool completely before moving or
storing.
•Dispose of cold ashes by placing in a noncombustible container. Make sure that there are
no other combustible materials in or near the container.
SAVE THESE INSTRUCTIONS

INSTALLATION REQUIREMENTS
Tools and Parts
Gather these required tools and parts before starting
installation. Read and follow the instructions provided with
any tools listed here.
Location Requirements
Select a location that provides minimum exposure to
wind and traffic paths. The location should be away from
strong draft areas.
Clearance to combustible construction for grill:
A minimum of 36” (91.4 cm) must be maintained
between the front of the grill hood, sides and back of
the grill and any combustible construction.
A 36” (91.4 cm) minimum clearance must also be
maintained below the cooking surface, and the grill
shall not be used under overhead combustible
construction.
Tools needed
Phillip screwdriver
Wrench or pliers
Scissors or cutting
pliers (to remove
tiedowns)
4

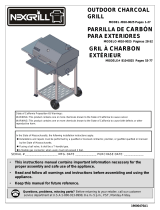
Product Dimension
The model/serial number rating plate is located on the right side of
cart. See the following illustration.
A. Model/serial number plate
A
30"(760mm)
59.9"(1522.5mm)
15"(380mm)
51.3"(1305mm)
28.9"(735mm)
5

REPLACEMENT PARTS
53
53
49
01
02
02
03
04
05
06
07
08
07
09
10
28
12
14
13
15
16
17
18
14
19
20
22
23
24
25
26
30
31
34
21
19
22
23
22
22
44
54
35
27
11
21
43
40
36
37
39
38
41
41
42
46
40
47
47
48
48
49
50
50
52
51
32
32
33
45
29
14
6

No. Part (Description) Warranty
coverage
QTY No. Part (Description) Warranty
coverage
QTY
1 Main lid 1 1 28 Charcoal pan adjustment L
shape bracket ,left
11
2 Main lid hinge 1 2 29 Charcoal pan adjustment L
shape bracket ,right
11
3 Chimney lid 1 1 30 Charcoal pan raising rod
fixing bracket
12
4 Charcoal Chimney 1 1 31 Charcoal pan adjustment
assembly
11
5 Temperature gauge
housing
1 1 32 Charcoal pan adjustment
assembly support bracket
12
6 Temperature gauge 1 1 33 Stage screw B 1 4
7 Main lid handle seat 1 2 34 Charcoal ash tray 1 1
8 Main lid tube 1 35 Charcoal ash tray handle
Assembly
11
9 Cooking grid lifter 1 1 36 Left cart leg ,back 1 1
10 Cooking grid with hole 3 3 37 Left cart leg, front 1 1
11 Charcoal bowl
assembly
Non-
replaceable
1 38 Swivel caster with brake 1 1
12 Main control panel 1 1 39 Swivel caster 1 1
13 Ventilation adjustment
bracket
1 1 40 Firebox support side panel 1 2
14 Stage screw A 1 4 41 Charcoal ash tray support
bracket, side
12
15 Logo 1 1 42 Charcoal ash tray support
bracket, middle
11
16 Ventilation door
control knob
1 1 43 Firebox support rear panel 1 1
17 Ventilation panel 1 1 44 Side shelf, right 1 1
18 Charcoal pan control
knob
1 1 45 Right cart leg, back 1 1
19 Side shelf support
bracket A
1 2 46 Right cart leg, front 1 1
20 Side shelf trim piece,
left
1 1 47 Wheel 1 2
21 Side shelf support
bracket B
1 2 48 Wheel cap 1 2
22 Side shelf stage screw 1 8 49 Bottom panel cross bar A 1 2
23 Side shelf hook 1 4 50 Bottom panel cross bar B 1 2
24 Side shelf, left 1 1 51 Bottom panel 1 2
25 Warming rack 1 1 52 Cart beam, front 1 1
26 Charcoal pan 1 1 53 Heat shield panel 1 2
27 Charcoal pan support 1 1 54 Side shelf trim piece, right 1 1
7
Parts List

A. Left front leg-1pc B. Right front leg-1pc C. Left rear leg-1pc D. Right rear leg-1pc E. Firebox assembly-
1pc
F. Left side shelf-
1pc
G. Right side shelf-
1pc
H. Side shelf support
bracket A- 2pcs
I. Side shelf support
bracket B-2pcs
J. Side shelf trim
piece,left-1pc
K. Side shelf trim
Piece,right-1pc
L. Side panel-2pcs M. Rear panel-1pc N. Ash tray support
bracket,side-2pcs
O. Ash tray support
bracket, middle-1pc
P. Cart beam, front-
1pc
Q. Head shield panel-
2pcs
R. Ash tray-1pc T. Wheel cap-2pcs S. Mica plate -2pcs
PACKAGE CONTENTS LIST
8

U. Bottom panel
cross bar A-2pcs
V. Bottom panel
cross bar B-2pcs
W. Bottom panel
-1pc
X. Ash tray handle
seat-2pcs
Y. Ash tray handle
-1pc
Z. Cooking grid-
3pcs
AA. Warming rack
-1pc
AB. Chimney-1pc AC. Chimney lid-
1pc
AD. Grid lifter-1pc
AE. Charcoal pan
control knob-1pc
AF. Swivel caster
with brake-1pc
AG. Swivel caster
-1pc
AH. Wheel-2pcs
9

Hardware Contents
Ref# Description Qty
FF-1
Screw W1/4"-20x3/5’’
12PCS
FF-2
Screw W5/32"-32x2/5’’
14PCS
FF-3 Nut W1/4"-20’’
1PC
FF-4
M6 Washer
1PC
FF-5
Stage Screw ¼-in.x15-mm
4PCS
FF-6
Chimney lid spring
1PC
10

INSTALLATION INSTRUCTIONS
Freestanding Outdoor Grill Installations
Unpack Grill
1. Remove all packaging materials and remove grill from the shipping base.
2. Move grill close to desired outdoor location.
3. Open the grill hood.
Remove Packaging Material Inside the Grill
1. Use scissors to cut yellow straps and packing tape to open box from top and remove the boxes
2. Remove the warming shelf and grill grates from inside the grill and remove the package inside
the firebox.
3. Remove foam block and wrap from inside the grill.
1. Loosen the two screws on top and bottom of two legs (A&C), add the side panel (L) on the top,
cross bar (V) on the bottom and slide into the screws and tighten the screws as shown.
Assemble the Grill
11

2. Loosen the two screws on top and bottom of two legs (B&D), add the side panel (L) on the top,
cross bar (V) on the bottom and slide into the screws and tighten the screws as shown.
3. Loosen the screws on inside face of leg , slide the cart beam (P) and rear panel (M) , then
tighten the screws as shown.
12

13
4. Loosen the screws that are facing inward in the front and rear bottom panel cross bars (U),
then slide the bottom panel (W) into the screws and tighten them as shown.
5. Screw the caster without brake (AG) into the front leg (A) and screw the caster with brake
(AF) in rear (C) as shown.

6. Take the cap (T) off, remove the screws and washer from leg axle, then assemble the wheels
(AH ) onto axle and add washers (FF-4) and nuts (FF-3) and tighten. Add the cap as shown.
7. Loosen eight screws on the cart beam (P) and rear panel (M). Then place the two
panels (Q) and slide into the hole as shown, do not tighten the screws at this step.
14

8. Place the bracket (O) on the middle ,then slide into the holes and tighten the screws as shown.
9. Place the brackets (N) on the left and right side ,then slide into the holes and tighten
the screws as shown.
15

10. Place the firebox assembly (E) into the cart , then use 4 pieces W1/4"-20x3/5’’(FF-1) to screw
the firebox with leg as shown
11. Use 8 pieces W1/4"-20x3/5“ screws (FF-1) to assembly the four brackets (H&I) on the
four outer corners of firebox as shown.
16

17
12a) Use 4 pieces W5/32"-32x2/5 screws (FF-2) from the firebox inside to outside to
assemble the left and right side shelf trim piece (J&K) as shown. Use 2 pieces for left , 2
pieces for right.
12b) Use 4 pieces W5/32"-32x2/5“screws (FF-2) from the bottom of side shelf trim piece
(J&K) to the top as shown. Use 2 pieces for left , 2 pieces for right.
13. Install the left and right side shelves (F&G) using 4 pieces ¼-in.x15-mm stage screw
(FF-5) as shown.

14. Insert the charcoal chimney (AB) from inside lid to outside. Seat the chimney to the inside
of the lid, then attach it onto the hood with the 2 pieces W5/32"-32x2/5" screws (FF-2) and
tighten.
18

19
15. Attach the chimney lid (AC) onto the charcoal chimney (AB), then spring (FF-6) and then the
washer (FF-4) and nut (FF-3). Tighten the nut (FF-3) in the end as shown.
16. Insert 4 legs of the warming rack (AA) into two holes in firebox side panel back and two holes
in lid as shown.

17. Place the charcoal pan control knob (AE) onto charcoal pan control rod located behind of
control panel and tighten clockwise to secure as shown.
18. Install the cooking grids (Z) as shown.
20
/