Page is loading ...

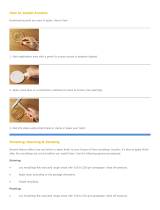
1. Preparation of surfaces:
Clean all surfaces. Wall surface and moulding shall be clean and dry.
All surfaces shall be a minimum of 38 degrees farenheit (3.3 degrees celcius) or higher.
Building surface shall be level, plum and ready to accept stucco mouldings.
Installer shall contact general contractor responsible for work if building surfaces are not level, plum and
clean before application of stucco mouldings.
All mouldings shall be cut and dry fit prior to applying any adhesive materials
2. Apply adhesive to the back surface of stucco moulding. Use approved adhesive such as PL premium or
equal for the purpose of adhering to the substrate (building surface).
We recommend using Ceme-coat cement mix when joining moulding to moulding.
When joining moulding to moulding at miter joints, remove ¼”deep x approx. 3/8” wide of foam before
applying Ceme-coat material to allow for adequate adhesion. Wipe away all excess material when miter is
joined together.
Apply approved adhesive using a 3/8" notched trowel. Adhesive shall be applied vertically and all excess
adhesive shall be wiped clean prior to installation.
3. With adhesive applied, push moulding into place after providing all level and plum guide lines. You should use
mechanical fasteners to hold mouldings while adhesive cures.
4. See detail for mechanical fastener if required, provide pre-drilled holes prior to using fastening nail.
5. Clean all surfaces of adhesive prior to adhesion during curing period.
6. After adhesive cures, apply cauking at all joints between mouldings and building substrate. Provide caulking
between joined mouldings.
7. Allow all materials to cure and dry before painting with elastomeric masonry, stucco & brick paint
Brick Installation
Brick Installation

1. Preparation of surfaces:
Clean all surfaces. Wall surface and moulding shall be clean and dry.
All surfaces shall be a minimum of 38 degrees farenheit (3.3 degrees celcius) or higher.
Building surface shall be level, plum and ready to accept stucco mouldings.
Installer shall contact general contractor responsible for work if building surfaces are not level, plum and
clean before application of stucco mouldings.
All mouldings shall be cut and dry fit prior to applying any adhesive materials
2. Apply adhesive to the back surface of stucco moulding. Use approved adhesive such as PL premium or
equal for the purpose of adhering to the substrate (building surface).
We recommend using Ceme-coat cement mix when joining moulding to moulding.
When joining moulding to moulding at miter joints, remove ¼”deep x approx. 3/8” wide of foam before
applying Ceme-coat material to allow for adequate adhesion. Wipe away all excess material when miter is
joined together.
Apply approved adhesive using a 3/8" notched trowel. Adhesive shall be applied vertically and all excess
adhesive shall be wiped clean prior to installation.
3. With adhesive applied, push moulding into place after providing all level and plum guide lines. You should use
mechanical fasteners to hold mouldings while adhesive cures.
4. See detail for mechanical fastener if required, provide pre-drilled holes prior to using fastening nail.
5. Clean all surfaces of adhesive prior to adhesion during curing period.
6. After adhesive cures, apply cauking at all joints between mouldings and building substrate. Provide caulking
between joined mouldings.
7. Allow all materials to cure and dry before painting with elastomeric masonry, stucco & brick paint
Siding Installation
Siding Installation

1. Preparation of surfaces:
Clean all surfaces. Wall surface and moulding shall be clean and dry.
All surfaces shall be a minimum of 38 degrees farenheit (3.3 degrees celcius) or higher.
Building surface shall be level, plum and ready to accept stucco mouldings.
Installer shall contact general contractor responsible for work if building surfaces are not level, plum and
clean before application of stucco mouldings.
All mouldings shall be cut and dry fit prior to applying any adhesive materials
2. Apply adhesive to the back surface of stucco moulding. Use approved adhesive such as PL premium or
equal for the purpose of adhering to the substrate (building surface).
We recommend using Ceme-coat cement mix when joining moulding to moulding.
When joining moulding to moulding at miter joints, remove ¼”deep x approx. 3/8” wide of foam before
applying Ceme-coat material to allow for adequate adhesion. Wipe away all excess material when miter is
joined together.
Apply approved adhesive using a 3/8" notched trowel. Adhesive shall be applied vertically and all excess
adhesive shall be wiped clean prior to installation.
3. With adhesive applied, push moulding into place after providing all level and plum guide lines. You should use
mechanical fasteners to hold mouldings while adhesive cures.
4. See detail for mechanical fastener if required, provide pre-drilled holes prior to using fastening nail.
5. Clean all surfaces of adhesive prior to adhesion during curing period.
6. After adhesive cures, apply cauking at all joints between mouldings and building substrate. Provide caulking
between joined mouldings.
7. Allow all materials to cure and dry before painting with elastomeric masonry, stucco & brick paint
Stucco Installation
Stucco Installation

1. Preparation of surfaces:
Clean all surfaces. Wall surface and moulding shall be clean and dry.
All surfaces shall be a minimum of 38 degrees farenheit (3.3 degrees celcius) or higher.
Building surface shall be level, plum and ready to accept stucco mouldings.
Installer shall contact general contractor responsible for work if building surfaces are not level, plum and
clean before application of stucco mouldings.
All mouldings shall be cut and dry fit prior to applying any adhesive materials
2. Apply adhesive to the back surface of stucco moulding. Use approved adhesive such as PL premium or
equal for the purpose of adhering to the substrate (building surface).
We recommend using Ceme-coat cement mix when joining moulding to moulding.
When joining moulding to moulding at miter joints, remove ¼”deep x approx. 3/8” wide of foam before
applying Ceme-coat material to allow for adequate adhesion. Wipe away all excess material when miter is
joined together.
Apply approved adhesive using a 3/8" notched trowel. Adhesive shall be applied vertically and all excess
adhesive shall be wiped clean prior to installation.
3. With adhesive applied, push moulding into place after providing all level and plum guide lines. You should use
mechanical fasteners to hold mouldings while adhesive cures.
4. See detail for mechanical fastener if required, provide pre-drilled holes prior to using fastening nail.
5. Clean all surfaces of adhesive prior to adhesion during curing period.
6. After adhesive cures, apply cauking at all joints between mouldings and building substrate. Provide caulking
between joined mouldings.
7. Allow all materials to cure and dry before painting with elastomeric masonry, stucco & brick paint
Stone Installation
Stone Installation

1. Preparation of surfaces:
Clean all surfaces. Wall surface and moulding shall be clean and dry.
All surfaces shall be a minimum of 38 degrees farenheit (3.3 degrees celcius) or higher.
Building surface shall be level, plum and ready to accept stucco mouldings.
Installer shall contact general contractor responsible for work if building surfaces are not level, plum and
clean before application of stucco mouldings.
All mouldings shall be cut and dry fit prior to applying any adhesive materials
2. Apply adhesive to the back surface of stucco moulding. Use approved adhesive such as PL premium or
equal for the purpose of adhering to the substrate (building surface).
We recommend using Ceme-coat cement mix when joining moulding to moulding.
When joining moulding to moulding at miter joints, remove ¼”deep x approx. 3/8” wide of foam before
applying Ceme-coat material to allow for adequate adhesion. Wipe away all excess material when miter is
joined together.
Apply approved adhesive using a 3/8" notched trowel. Adhesive shall be applied vertically and all excess
adhesive shall be wiped clean prior to installation.
3. With adhesive applied, push moulding into place after providing all level and plum guide lines. You should use
mechanical fasteners to hold mouldings while adhesive cures.
4. See detail for mechanical fastener if required, provide pre-drilled holes prior to using fastening nail.
5. Clean all surfaces of adhesive prior to adhesion during curing period.
6. After adhesive cures, apply cauking at all joints between mouldings and building substrate. Provide caulking
between joined mouldings.
7. Allow all materials to cure and dry before painting with elastomeric masonry, stucco & brick paint
Vinyl Installation
InstallInstaInstallatio
n
Vinyl Siding Installation
/