American Pro Decor HDC-1048-SAMP Installation guide
- Type
- Installation guide
This manual is also suitable for
American Pro Decor HDC-1048-SAMP is a versatile and powerful tool that can help you with a variety of tasks. With its 3-speed motor and 10 different attachments, you can use it for everything from sanding to polishing to cutting. The variable speed control allows you to adjust the speed to match the task at hand, and the soft-grip handle provides a comfortable and secure grip.
Here are some of the possible use cases for the American Pro Decor HDC-1048-SAMP:
- Sanding: The HDC-1048-SAMP is a great choice for sanding wood, metal, and other materials. The variable speed control allows you to adjust the speed to match the material you are sanding, and the 10 different attachments provide you with the right tool for the job.


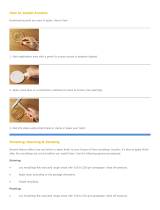
-
 1
1
-
 2
2
-
 3
3
-
 4
4
-
 5
5


American Pro Decor HDC-1048-SAMP Installation guide
- Type
- Installation guide
- This manual is also suitable for
American Pro Decor HDC-1048-SAMP is a versatile and powerful tool that can help you with a variety of tasks. With its 3-speed motor and 10 different attachments, you can use it for everything from sanding to polishing to cutting. The variable speed control allows you to adjust the speed to match the task at hand, and the soft-grip handle provides a comfortable and secure grip.
Here are some of the possible use cases for the American Pro Decor HDC-1048-SAMP:
- Sanding: The HDC-1048-SAMP is a great choice for sanding wood, metal, and other materials. The variable speed control allows you to adjust the speed to match the material you are sanding, and the 10 different attachments provide you with the right tool for the job.
Ask a question and I''ll find the answer in the document
Finding information in a document is now easier with AI
Related papers
Other documents
-
Gibraltar Building Products FV146G-1/8 Installation guide
-
-
Ekena Millwork MLD07X01MO Installation guide
-
Unbranded HDSP444 Installation guide
-
House of Fara 9604 User manual
-
Plum Ram 4 User manual
-
 House of Fara 314 Installation guide
-
Royal Mouldings 0244808012 Installation guide
-
Royal Mouldings 0214909031 Operating instructions
-
 ANViL ROOF-TEC 121401 Installation guide

