Page is loading ...

INSTALLATION:
LED VANITY
SAFETY PRECAUTIONS:
TOOLS AND MATERIALS REQUIRED:
Phillips
Screwdriver
Wire Cutters
Pliers Wrench
1. TURN OFF ELECTRICAL POWER BEFORE STARTING INSTALLATION OF LIGHT FIXTURE.
2. THIS PRODUCT MUST BE INSTALLED IN ACCORDANCE WITH THE APPLICABLE INSTALLATION CODE
BY A PERSON FAMILIAR WITH THE CONSTRUCTION AND OPERATION OF THE PRODUCT AND THE
HAZARDS INVOLVED.
3. CONNECT THE GROUND WIRES (BARE COPPER OR GREEN) FROM YOUR FIXTURE TO THE GROUND
WIRE (BARE COPPER OR GREEN) OR GROUND SCREW IN THE ELECTRICAL BOX.
4. TO CLEAN THE FIXTURE, TURN OFF THE POWER, WAIT FOR IT TO COOL, AND WIPE THE FIXTURE WITH
A CLEAN, SOFT CLOTH.
NOTE: Product may not look exactly as shown in figures.
Wiring supplies
as required by
local electrical
code
QUESTIONS OR CONCERNS CONTACT AT:
1-800-265-1833 (English) / 1-800-567-2513 (French) Monday through Friday 8:00 AM to 5:00 PM E.S.T.
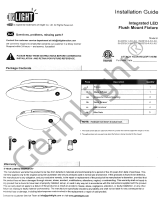
1. Remove the 4 screws to
remove the back cover from
the fixture.
2.
Feed power cords from
the electrical box through
the centre hole of the back
cover. Align holes of back
cover over electrical box and
secure with electrical box
screws (not included).
NOTE: Make sure the back
cover is level before
tightening the screws.
3. Additional support may
be required for fixtures
longer than 20” . Position the
fixture and add wood screws
(one on each side) for the
wooden studs or plastic wall
anchor and wood screws for
dry wall.
4. Connect the ground
wires (bare copper or
green) from your fixture to
the ground wire (bare
copper or green) or ground
screw in the electrical box.
Attach the black wire from
the light fixture to the
black wire in the electrical
box. Attach the white wire
from the light fixture to the
white wire in the electrical
box.
NOTE: Do not disconnect
any pre-wired
connections.
5. Once connections of
wires are completed,
carefully tuck wires and
wire nuts into the
electrical box making sure
no bare wire (on the black
and white) is visible at the
wire nuts.
6. Reverse the process of
step1 to install the fixture.
7. Insert the bottom glass
panel into the fixture as
shown.
8. Position the bottom
glass panel in place slightly.
Tel: (613) 342-5424, Fax: (800) 263-4598
LVL117A36
09/17
White
Black
House
supply
Ground
wire
Fixture
Ground wire
Back
Cover
Wood Screw
Electrical Box
Screws
(not included)
Electrical
Box
Back
Cover
Back
Cover
Screws
Fixture
Bottom Glass Panel
Back Plate
1
2
CAUTION: THIS REPLACMENT MUST BE DONE BY A QUALIFIED ELECTRICIAN WITHOUT CUTTING OF THE WIRES.
For replacing the driver (LKAD035D) or LED panel (EN003) supplied by CSA file No. 157644 if necessary:
Disconnect the driver and LED panel by loosing the screws. Unplug the male and female plug. Reverse these steps for
replacement of driver and LED panels.
dimmable
This LED light is suitable to be dimmed by
LEVITON# 742-6672-HLW , 722-6674-PDW MAX 150 W,
Lutron # SCL-153PH-WH MAX 150 W.
The MAX rated wattage of this model is 41.5 W
/