LG Electronics LP1419IVSM Installation guide
- Type
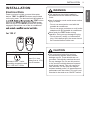
- Installation guide
LG Electronics LP1419IVSM is a versatile and powerful air conditioning unit that offers a range of features to keep you comfortable all year round. With its powerful cooling and dehumidifying capabilities, it can quickly transform a hot and humid room into a cool and dry oasis. The fan-only mode provides refreshing air circulation without cooling, making it ideal for those times when you just need a gentle breeze. The sleep mode gradually increases the temperature while you sleep, ensuring a comfortable and restful night's sleep.
LG Electronics LP1419IVSM is a versatile and powerful air conditioning unit that offers a range of features to keep you comfortable all year round. With its powerful cooling and dehumidifying capabilities, it can quickly transform a hot and humid room into a cool and dry oasis. The fan-only mode provides refreshing air circulation without cooling, making it ideal for those times when you just need a gentle breeze. The sleep mode gradually increases the temperature while you sleep, ensuring a comfortable and restful night's sleep.


-
 1
1
-
 2
2
-
 3
3
-
 4
4
-
 5
5
-
 6
6
-
 7
7
-
 8
8


LG Electronics LP1419IVSM Installation guide
- Type
- Installation guide
LG Electronics LP1419IVSM is a versatile and powerful air conditioning unit that offers a range of features to keep you comfortable all year round. With its powerful cooling and dehumidifying capabilities, it can quickly transform a hot and humid room into a cool and dry oasis. The fan-only mode provides refreshing air circulation without cooling, making it ideal for those times when you just need a gentle breeze. The sleep mode gradually increases the temperature while you sleep, ensuring a comfortable and restful night's sleep.
Ask a question and I''ll find the answer in the document
Finding information in a document is now easier with AI
Related papers
-
LG Electronics LP1419IVSM User guide
-
-
-
LG LP1419IVSM User manual
-
-
-
-
-