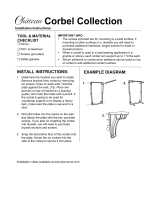
Assembly: If your shelf does not include corbels or an arch, no assembly is required. If your shelf does include corbels or corbels and arch, please refer to the
additional instruction sheet included in your carton for assembly instructions.
Wood and MDF (Medium Density Fiberboard) are combustible materials. Heat clearances must be adhered to.
Before installing, adhere to your local building codes and manufacturer’s requirements for your specific firebox or stove.
THANK YOU FOR PURCHASING A PEARL MANTELS SHELF!
Look for the Pearl Inlay on the right-hand corner of your new mantel shelf.
This is your guarantee of an authentic Pearl Mantels™ product!
Included in your carton: Mantel Shelf, Detached Mitered Hanger Board (Hardware to install
detached hanger board not included), Instruction Sheet, Certificate of Authenticity and
(If Applicable): Corbels with hardware for attaching to the bottom of the shelf and (If Applicable):
Arch with hardware for attaching between the corbels and to the bottom of the shelf.
(If Applicable): Included hardware pack will be wrapped in red tape.
Not included: Mounting hardware for detached hanger board. There are many different
mounting surfaces, i.e. brick, stone, drywall…and each requires a different hardware for secure
attachment. Always consult a professional.
Measuring/Mounting
Always check Building Codes and Heat Clearances; Wood and MDF are Combustible.
Always attach hanger board to studs. Always consult a professional.
Hanger Board
(inside back of shelf)
sits atop second
Hanger Board
(attached to
wall studs).
We suggest
drilling pilot holes
prior to inserting
the appropriate
hardware.
Shelf with inside
mitered Hanger Board
sits atop second mitered
Hanger Board attached
to wall studs
Second
mitered Hanger Board
(Attached to wall studs)
Mitered
Hanger Board
Attached Inside
Back of Shelf
Side View of Shelf
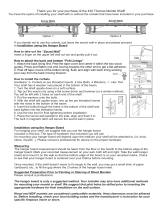
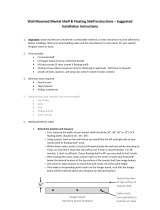
The Hanger Board system consists of 2 mitered hanger
boards, one is attached to the back of the mantel shelf and
the other is packed separately in the carton and will attach
to your mounting surface. When married together, the mantel
shelf will be locked in place on the wall.
* Mounting hardware for detached hanger board
is NOT INCLUDED.
Do not proceed without full understanding of the firebox’s wood clearance requirements and local building codes.
Wood and MDF are combustible and required clearances must be adhered to or damage will occur to your mantel.
Unfinished Wood Mantel Shelf: Always consult a professional before applying paint or stain.
Pearl Inlay: If you have purchased an unfinished piece, your Pearl Inlay is masked with red tape so that you may paint or stain over it. After you have completed
the paint/stain process, remove the mask.
Always consult a professional.
Measuring: Measure from bottom of the shelf to the bottom of the hanger board
(1) (See Figure A. below). This measurement is where the bottom of the shelf will be
when mounted on the hanger board and this distance must be in compliance with heat
clearance requirements of the firebox and building codes.
Measure from the floor or the hearth to where the bottom edge of the hanger board will
be, remembering to add the distance to the bottom of the shelf (see Fig. A), and mark
your recorded measurements on the wall both right and left. Center your hanger board
(see Figure (B), ensure your pilot holes align to studs and mount the hanger board so that
the bottom of the board is on your recorded marks. Hang your shelf. Some surfaces may
not be flush which may require shims or filling of gaps. Always consult a professional.
of Hanger Board
X
FIREBOX
Always Observe Heat Clearances!
Mark distance
from bottom of
hanger rail to
bottom of shelf
Marry Hanger Boards (1) & (2) together, then measure from the
bottom of the Shelf to the bottom of Hanger Board (1)
Measure this distance
(1)
(2)
(1)
Centering: Find center point over firebox by measuring from one side
to the other, mark the center point on mounting surface, do the same
for the hanger board. (See Figure B. below)
Figure A. Figure B.
Shelf
Arch (if applicable)
Corbels (if applicable)
We suggest that pilot holes be drilled into the hanger board prior to
inserting the appropriate hardware for final installation on the wall.
Always attach to studs.
Suggested Installation for Mantel Shelves using the included Hanger Board system
The hanger board is only a suggested method; your installer may have additional methods for mounting your mantel shelf. Always consult a professional.


