Page is loading ...

INSTALLATION AND SAFETY INSTRUCTIONS
INSTALLATION WITH OPTIONAL SWITCH
ITEM #
GENERAL
WARNING: BE SURE THE ELECTRICITY TO THE WIRES YOU
ARE WORKING ON IS SHUT OFF. EITHER THE FUSE REMOVED
OR THE CIRCUIT BREAKER OFF .
NOTE:
FOR FIXTURES PROVIDED WITH 75˚C OR 90˚C SUPPLY
WIRE ONL
Y—(THESE WARNINGS ARE PROVIDED ON THE U.L.
LABEL AND ON THE FIXTURE CARTON): RISK OF FIRE. MOST
DWELLINGS BUILT BEFORE 1985 HAVE SUPPLY WIRE RATED
60˚C. CONSUL
T A QUALIFIED ELECTRICIAN BEFORE
INSTALLING.
You don’t need special tools to install this fixture. Be sure to follow
the steps in the order given. Under no circumstances should a
fixture be hung on house electrical wires, nor should a swag type
fixture be installed on a ceiling which contains a radiant type heating
system. NOTE: Proper wiring is essential for the safe operation of
this fixture. Read instructions carefully.
If you are unclear as to how
to proceed, consult a qualified electrician.
INSTALLATION WITH OPTIONAL SWITCH HC-259
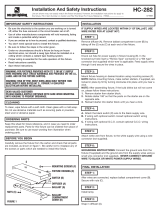
Carefully remove the fixture from the carton and check that all parts
are included, as shown in Figure 1. Be careful not to misplace any of
the screws or parts which are needed to install this fixture.
Fill in item number located on carton and file this sheet
for future reference
HC-259
020896
MOUNTING SCREWS (F)
FIXTURE HOUSING (E)
SWITCH (D)
DIFFUSER (A)
BALLAST (G)
BALLAST COMPARTMENT COVER (B)
NUTS (C)
FIGURE 1
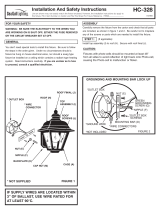
Remove dif
fuser (A). Remove ballast compartment cover (B) by
taking off the (2) nuts (C) at each end of the fixture.
STEP
1:
Attach switch (D) by removing knock out required. Snap switch (D)
in place.
STEP 2:
Knock out hole for power supply in fixture housing (E).
STEP 3:
Mount fixture housing in desired location using mounting screws (F).
STEP 4:
After wires are connected, replace ballast compartment cover (B).
Secure with nuts (C).
STEP 1:
Install lamp.
STEP 2:
Snap in diffuser (A).
STEP
3:
Attach black wire (or red wire which ever is applicable) from ballast
(G) to one wire of switch using a wire connector (not supplied).
Attach other switch wire to the black supply wire in the same
manner.
STEP 5:
Attach white wire from fixture to white supply wire using a wire
connector (not supplied).
STEP 6:
STEP 7:
FINAL ASSEMBLY
GROUNDING INSTRUCTIONS: Connect the ground wire from the
fixture (if supplied) and the ground wire from the supply wires using
a small wire connector (not supplied).
NOTE: Underwriters Laboratories (U.L.) does not require all fixtures to
h
ave ground wires. These fixtures still meet all U.L. specifications.
The listing mark of Underwriters on the product identifies products
manufactured under its listing and Follow-Up Service Programs.
NEVER CONNECT GROUND WIRE TO BLACK OR WHITE
POWER SUPPLY WIRES.
DEAR VALUED CUSTOMER
PLEASE HANDLE ACRYLIC DIFFUSER WITH
CARE WHEN INSERTING INTO HOUSING TO
PREVENT BREAKAGE.
IF SUPPLY WIRES ARE LOCATED WITHIN 3”
OF BALLAST
, USE WIRE RA
TED FOR AT
LEAST 90˚C.
/