
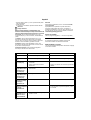
D
.....1
NL
.....6
PL
.....11
P
.....16
BG
.....21
CN
.....26
GB
.....2
S
.....7
UAE
.....12
TR
.....17
EST
.....22
UA
.....27
F
.....3
DK
.....8
GR
.....13
SK
.....18
LV
.....23
RUS
.....28
E
.....4
N
.....9
CZ
.....14
SLO
.....19
LT
.....24
I
.....5
FIN
...10
H
.....15
HR
.....20
RO
.....25
DESIGN + ENGINEERING
GROHE GERMANY
www.grohe.com
31 312
GROHE BLUE
®
99.0206.131/ÄM 233843/09.15
English .....1
Français .....4
Español .....7

I
S.v.p remettre cette instruction à l'utilisateur de la robinetterie!
Entregue estas instrucciones al usario final de la grifería!
Please pass these instructions on to the end user of the fitting.
Page is loading ...

1
English
Application
Operation is possible in conjunction with:
• Pressurized storage heaters
Operation is not possible with:
Low-pressure storage heaters (displacement water heaters)
The water filtrate is classified as Category 2 according
to EN 1717.
Safety notes
Avoid danger due to damaged power cords. In the
case of damage, the control unit must be replaced by
the manufacturer or his customer service department
or an equally qualified person.
• The filter system must always be operated with cold water
of foodstuff grade.
• The control unit and plug must not be directly or indirectly
sprayed with water when cleaning.
• The control unit must be connected to a permanent power
supply.
• At the installation location, the filter system must be
protected against mechanical damage, heat and direct
sunlight.
Do not install near heat sources or an open fire.
• Installation of the faucet with filter cartridge is only
permitted in frost-free rooms.
• Use only genuine replacement parts and accessories.
The use of other parts will result in voiding of the warranty.
Specifications
Electrical data:
• Voltage supply: 100 - 240 V AC / 50/60 Hz
• Power consumption: 9 W
• Standby power loss: < 1.0 W
• Type of protection
– Control unit: IP 68
– Mains plug: IP 40
Sanitary data:
• Flow pressure:
– min. 0.1 MPa
– recommended 0.2 – 0.5 MPa
• Operating pressure
– Faucet: max. 0.8 MPa
– Filter cartridge and filter head: 0.2 – 0.8 MPa
• Test pressure of faucet: 1.6 MPa
If static pressures exceed 0.5 MPa, a pressure-reducing valve
must be installed.
Avoid major pressure differences between hot and cold water
supply.
• Max. flow faucet (tap water):
6.6 l/min or 1.75 gpm/0.41 MPa
• Flow rate (GROHE Blue
®
water): approx. 0.9 gpm
• Ambient temperature: 39 – 90 °F
• Temperature
– Hot water inlet: max. 158 °F
– Recommended (energy saving): 140 °F
– Thermal disinfection possible
• Filter capacity: max. 793 gallons
corresponds to max. 12 months
• Water connection: cold - blue
hot - red
Electrical test data
• Software class: A
• Contamination class: 2
• Rated surge voltage: 2 500 V
• Temperature for ball impact test: 100 °C
The test for electromagnetic compatibility (interference
emission test) was performed at the rated voltage and rated
current.
Electrical installation
Electrical installation work must only be
performed by a qualified electrician and in
accordance with National Electric Code
and/or local requirements!
Installation
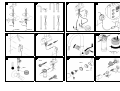
Refer to the dimensional drawing on fold-out page I.
Install faucet, see fold-out page II, Figs. [1] and [2].
Important: The cable must not be pinched.
Flush piping system prior and after installation of faucet
thoroughly!
Install control unit, see Figs. [3] and [4].
Important: Do not connect voltage supply yet.
Connect faucet, see Figs. [2], [5] to [7].
Open hot and cold water supply and check connections
for leakage.
Connect voltage supply via mains plug, see Fig. [8].
The display illuminates and the remaining filter capacity is
displayed in percent.

2
English
If the Blue
®
handle is flashing red and E4 or E6 appears in
the display, the faucet and control unit must be
synchronised as follows, see Fig. [8]:
• Press and hold the and buttons simultaneously until SE
flashes in the display.
• Press the button until SE stops flashing.
• Release the button, C- flashes in the display.
• Keep pressing the or button until H- flashes in the
display.
• Press the button until H- stops flashing.
• Blue
®
handle synchronisation starts; HC appears in the
display and the Blue
®
handle lights up red.
• As soon as the Blue
®
handle lights up green, open the
faucet fully by turning the Blue
®
handle.
• As soon as the Blue
®
handle briefly flashes green, close the
faucet by turning the Blue
®
handle, HC flashes in the
display.
• Confirm the setting by pressing the button longer, HC
appears.
• Release the button.
The remaining filter capacity is displayed.
Operation / Commissioning
Open lever in order to draw hot and cold tap water, see
fold-out page II, Fig. [9].
Open Blue
®
handle to draw off filtered GROHE Blue
®
water.
Control unit, see fold-out page II, Fig. [8].
The buttons perform the following functions:
Filter replacement reset
Filter size selection
Carbonate hardness adjustment
Display, see fold-out page II, Fig. [8].
In the inactive state, the remaining filter capacity is displayed
in percent.
Display of filter capacity in Blue
®
handle:
The control unit of the GROHE Blue
®
faucet is set for opera-
tion with the 159 gallons filter cartridge (Prod no.: 40 404 001)
at the factory.
For operation with the activ carbon cartridge (40 457 001) the
control unit must be set out.
Setting filter size, see fold-out page II, Fig. [8].
button for filter size selection:
• Press and hold button once until the currently setted
value (e. g. F1) flashes in the display
• Press the button and select the required value appears
- F1: 40 404 000
- F2: 40 430 000
- F3: 40 412 000
- F4: 40 404 001
- F5: 40 430 001
- F6: 40 412 001
- F7:
- F8: 40 547 001 (Activ carbon)
• Press and hold the button until the required value stops
flashing
• Release the button:
The remaining filter capacity is displayed.
The faucet is now fully installed and ready for operation.
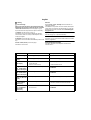
A filter system with water softener must be used in regions with
a carbonate hardness exceeding 10 grain/gal, see Replace-
ment parts, fold-out page I, Prod. no.: 40 404 001, 40 412 001
or 40 430 001.
For operation with this filter cartridges the carbonat
hardness must be set to the filter head and control unit:
Set carbonate hardness at filter head, see Fig. [10].
The relevant water supplier can provide information on the
carbonate hardness.
Set carbonate hardness at bypass setting of filter head to local
conditions, see table column A on fold-out page III.
Setting carbonate hardness on control unit, see table
column B on fold-out page III and Fig. [8].
button for carbonate hardness adjustment:
• Press and hold the button once until the currently setted
value (e. g. C3) flashes in the display
• Press the button and select the required value:
- C4: carbonate hardness
≤ 9(bypass 3)
- Factory setting:
C3: carbonate hardness 10 - 25 (bypass 2)
- C2: carbonate hardness 26 - 30 (bypass1)
- C1: carbonate hardness
≥ 31 (bypass 0)
• Press and hold the button until the setted value stops
flashing
• Release the button.
The remaining filter capacity is displayed.
The gallon capacity of the cartridge varies according to the
water hardness set and the size of the cartridge, see table on
fold-out page III.
Note: The various filter cartridges can be ordered at
www.grohe.com.
Maintenance
Resetting filter capacity after changing filter cartridge, see
fold-out page II, Fig. [8].
button for filter replacement reset:
• Press and hold button until rF flashes in the display.
• Release the button and press again until rF stops
flashing.
• Release the button.
The remaining filter capacity is reset and then displayed
again.
Flashing signal Meaning
Filter capacity of more than 10%
Filter capacity of less than 10%
Order filter cartridge
Filter capacity of less than 1%
Change filter cartridge soon
No filter capacity Change filter
cartridge immediately

3
English
Warning
Risk of damage:
Always disconnect the power supply before performing
maintenance work on the system. The plug-in connectors
can then be disconnected, see fold-out page II, Fig. [8].
Inspect and clean all components and replace if necessary.
I. Cartridge, see fold-out page II, Fig [11].
Assemble in reverse order. When installing the cartridge,
ensure that the seals are correctly seated. Replace screw
coupling and tighten.
II. Headpart, see fold-out page II, Fig. [12].
Assemble in reverse order. Note the installation position of the
stop.
III. Flow control (64 374), see fold-out page I.
Assemble in reverse order.
Service
Note the Fault / Cause / Remedy table for information on
eliminating problems.
If EE flashes or the problem cannot be rectified, interrupt the
power supply and consult a specialist installer or contact the
GROHE Service Hotline via email under TechnicalSupport-
Replacement parts
See fold-out page I (* = special accessories).
Care
Instructions for care of this faucet will be found in the Limited
Warranty supplement.
Environment and recycling
Used filter cartridges can be disposed of hazard-free in
domestic waste.
Fault Cause Remedy
Water not flowing • Water supply interrupted - Open shut-off valves
Filtered water not
flowing
• Water supply interrupted - Establish water supply to faucet
No filtered water, E3
in the display
• No connection between faucet and
cooler/carbonator
• Cable or connector faulty
- Connect plug-in connector
- Contact GROHE Service
No filtered water,
Blue
®
handle flashes
red, E4 in the display
• Faucet and control unit not synchronized - Synchronise with one another, see section
Installation
No filtered water,
Blue
®
handle flashes
red, E6 in the display
• Values range does not concur - Synchronise with one another, see section
Installation
Blue
®
handle flashes
orange, E7, E8 in the
display
• Filter capacity exceeded - Change filter cartridge immediately
Indicator lamps
do not flash/flash
continuously
• Control not recognised - With mains plug connected, disconnect plug-in
connector, wait 30 seconds and reconnect
Display in handle
does not illuminate
or illuminates
continuously
• No connection between faucet
and control unit
- Synchronise with one another, see section
Installation
Page is loading ...
Page is loading ...
Page is loading ...
Page is loading ...
Page is loading ...
Page is loading ...
Page is loading ...

III
Carbonate hardness Bypas Value Capacity
Dureté carbonatée Dérivat Valeur Capacité
Dureza de carbonatos Bypas Valor Capacidad
grain/gal °fH/°TH ppm mmo/L
AB
40 457 001 40 404 001 40 430 001 40 412 001
gal l gal l gal l gal l
≤ 9 ≤ 16 ≤ 169 ≤ 1.69 3 C4 793 3 000 423 1 600 1 057 4 000 1 717 6 500
10 - 25 17 - 43 170 - 437 1.7 - 4.37 2 C3 159 600 396 1 500 608 2 300
26 - 30 44 - 52 446 - 522 4,38-5.22 1 C2 93 350 264 1.000 396 1 500
≥ 31 ≥ 53 ≥ 535 ≥ 5.33 0 C1 66 250 172 650 264 1 000
USA
F
E
Page is loading ...

2014/03/21
www.grohe.com
D
A
AUS
Argent Sydney
&
+(02) 8394 5800
Argent Melbourne
&
+(03) 9682 1231
B
BG
&
+359 2 9719959
grohe-bulgaria@grohe.com
CAU
CDN
CH
CN
&
+86 21 63758878
CY
CZ
DK
E
EST
F
FIN
&
+358 10 8201100
teknocalor@teknocalor.fi
GB
GR
H
HK
I
IND
IS
J
KZ
LT
LV
MAL
&
+1 800 80 6570
info-singapore@grohe.com
N
NL
NZ
&
+09/373 4324
P
PL
RI
&
+62 21 2358 4751
info-singapore@grohe.com
RO
ROK
&
+82 2 559 0790
info-singapore@grohe.com
RP
&
+63 2 8041617
RUS
&
+7 495 9819510
info@grohe.ru
S
SGP
&
+65 6 7385585
info-singapore@grohe.com
SK
T
&
+66 2610 3685
info-singapore@grohe.com
TR
&
+90 216 441 23 70
GroheTurkey@grome.com
UA
USA
&
+1 800 4447643
us-customerservice@grohe.com
VN
&
+84 8 5413 6840
info-singapore@grohe.com
BiH
AL
HR
KS
ME
MK
SLO
SRB
&
+385 1 2911470
Eastern Mediterranean,
Middle East - Africa
Area Sales Office:
&
+357 22 465200
IR
OM
UAE YEM
-
 1
1
-
 2
2
-
 3
3
-
 4
4
-
 5
5
-
 6
6
-
 7
7
-
 8
8
-
 9
9
-
 10
10
-
 11
11
-
 12
12
-
 13
13
-
 14
14
-
 15
15
-
 16
16


Ask a question and I''ll find the answer in the document
Finding information in a document is now easier with AI
in other languages
- français: GROHE BLUE 31 312 Manuel utilisateur
- español: GROHE BLUE 31 312 Manual de usuario
Related papers
-
GROHE 31312DC1 Installation guide
-
-
-
-
-
-
-
-
-