Indesit MB 3821 VL (SP) User guide

Category
Fridge-freezers
Type
User guide

This manual is also suitable for

Frigorífico-freezer combinado
Instalación y uso
Kühl/Gefrier-Kombination
Installation und Gebrauch
Fridge/freezer combined
Installation and use
Frigorífico-freezer combinado 1
Instrucciones para la instalación y uso
Kühl/Gefrier-Kombination 12
Installation- und Gebrauchshinweise
Fridge/freezer combined 23
Instructions for installation and use
MB 3821 VL
MB 3822 BL
E
D
Para garantizar la eficacia y seguridad de este electrodoméstico:
- Diríjase exclusivamente al Servicio Técnico Oficial del Fabricante.
- Solicite siempre la utilización de recambios originales.
Um die Leistungsfähigkeit und Sicherheit dieses Gerätes zu gewährleisten,
bitte folgendes beachten:
- wenden Sie sich ausschließlich an unsere autorisierten Service-Stellen
- verlangen Sie, daß nur Original-Ersatzteile verwendet werden
To maintain the EFFICIENCY and SAFETY of this appliance, we recommend:
- call only the Service Centers authorized by the manufacturer
- always use original Spare Parts
GB
23
GB
mouth because they could stick to your mouth and cause burns.
7. Do not carry out any cleaning or maintenance operations
without first having disconnected your appliance from the mains
power supply (by unplugging it or turning off the cut-out switch
in your home); turning the thermostat knob to " " is not
enough to eliminate all electric contacts.
8. Before having your old refrigerator picked up for disposal,
remove or make inoperable any locking devices to prevent chil-
dren who might play in or around the appliance from being
locked inside.
9. Before calling for service/assistance in the case of malfunc-
tion, consult the chapter entitled “Is There a Problem? to de-
termine whether it is possible to eliminate the problem. do not
try to repair the problem by trying to access the internal com-
ponents of the appliance.
10. If damaged, the power supply cord on this appliance
must necessarily be replaced by our service centre because
special tools are required for replacement.
11. Do not use electric appliances inside the compartment for
food storage, if these are not those recommended by the
manufacturer.
12. At the end of the functional life of your appliance –
containing cyclopentane gas in the insulation foam and perhaps
gas R600a (isobutane) in the refrigeration circuit – the latter
should made safe before being sent to the dump.
For this operation, please contact your dealer or the Local
Organisation in charge of waste disposal.
ATTENTION
Read your manual carefully since it contains instructions
which will ensure safe installation, use and maintenance of
your appliance.
Your Refrigerator is built to International safety standards
(EN60) ans has been awarded the European approval mark
(IMQ) for compliance with UK electrical safety requirements.
It also meets the EC standards on the prevention and elimi-
nation of readio interference (EC directive 87/308 - 02.06.89).
1. This appliance must not be installed outdoors - not even in
an area protected by a roof. It is extremely dangerous to leave
it exposed to rain or storms.
2. It must only be used by adults and exclusively to refrigerate
and freeze foodstuffs, following the instructions for use con-
tained in this manual.
3. Do not ever touch or handle the appliance with bare feet or
with wet hands or feet.
4. It is highly recommended that you do not use extension
cords or multiple socket adapters. If the refrigerator is installed
between cabinets, make sure that the cord is not bent or dan-
gerously pinched or compressed.
5. Never pull on the cord or the refrigerator to remove the plug
from the wall socket - this is very dangerous.
6. Never touch the cooling components within the appliance,
especially with wet hands because this could result in injury.
Never put ice cubes just removed from the freezer into your
Safety - a good habit to get into.
Installation
Proper installation of the appliance is essential to en-
sure the best and most efficient performance of your
appliance.
Ventilation
The compressor and condenser generate heat and, there-
fore, need to be ventilated properly. Rooms with less than
perfect ventilation are not very suited for installation of the
appliance. Therefore, it should be installed in a room with
an opening (window or French window) that provide the
appropriate amount of air re-circulation. It is also important
that the room not be too humid.
During installation, make sure not to cover or obstruct the
grates that allow for proper ventilation of the appliance.
For proper ventilation of the appliance, you must leave:
- a space of at least 10 cm between the top part and any
cabinets above it;
- a space of at least 5 cm between the sides of the appliance
and any adjacent cabinets/walls.
To install the appliance between furniture units, please
follow the instructions provided on the attached sheet.
Away from Heat
Avoid positioning the appliance in a place where it is directly
exposed to sunlight or near an oven, cook top or the like.
Levelling
The floor should be perfectly level; if not, you can adjust the
feet at the front of the appliance.
Earthing
Before making the electrical connection, check that the volt-
age shown on the data plate, that you will find on the bot-
tom left hand side of the appliance next to the crisper, cor-
responds to that of your home and that the socket is earthed
in compliance with all current electrical regulations. If the
system is not earthed, the manufacturer declines all liability
for consequent damages or losses. Do not use adapters or
multiple sockets.
Position the appliance in such a way that you can access
the socket where it is plugged in.
Check the power load
The electrical socket must support the maximum power load
of the appliance shown on the data plate (on the bottom
left hand side of the appliance next to the crisper).
Before plugging the appliance to the mains
Stand the appliance upright and wait at least 3 hours before
plugging the appliance into the mains to ensure proper per-
formance.
24
GB
A Closer Look
A
Temperature regulator knob for the fridge
compartment
This knob allows you to adjust the fridge tempera-
ture on different positions;
the fridge is off;
1 least cold;
5 coldest
B
Red alarm lamp
When this red warning light comes on for a pro-
longed period of time, it means that the freezer is
not functioning properly and the temperature is
rising too much.
This warning light might come on for a brief period
when:
a) the door is left open for an extended period of
time (when the freezer is being loaded or
unloaded).
b) the “E” knob is turned to the “Super freeze
setting.
In these two cases, the fact that the warning light
comes on does not indicate that the freezer is
malfunctioning or there is a defect.
C
Green lamp
When lit, it indicates that the appliance is connected
to the electricity network
D
Rapid freezing lamp
This yellow indicator light will come on when the
"E" knob is on the "Super freeze" setting.
E
Temperature regulator knob for the freezer
compartment
This knob allows you to adjust the freezer tempera-
ture on different positions:
the fridge and freezer are off;
1 least cold;
5 coldest
Super freeze Fast freeze
You can adjust the knob from position "1" to posi-
tion "4" according to your requirments.
The Super freeze setting (the yellow "D" indicator
light comes on) is used when fresh foods must be
frozen. Once they have been frozen, the knob must
be returned to one of the normal settings.
F
Removable lidded shelf, with egg tray and
butter dish
G
Removable miscellaneous shelf
H
Hinged bottle rack
I
Bottle trap
J
Removable door shelf for bottles
K
Ice tray
L
Adjustable feet
M
"Drain" System for the removal of defrosting
water
N
Compartment for storing frozen foods
O
Compartment for freezing fresh foods and
storing frozen foods
P
Fruit and Vegetable Crispers
Q
Sliding meat and cheese box
R
Removable/Adjustable Shelves
S
"A.I.R." Sysrem
(Ariston Integrated Refrigeration)
26
GB
How to Start the Appliance
NOTICE
After the appliance has been delivered, stand it in the
upright position and wait approximately 3 hours be-
fore connecting it to the electrical outlet to guarantee
that it operates properly.
Before placing foodstuffs in the refrigerator or freezer, clean
the interior well with warm water and baking soda.
After having plugged the appliance in, make sure that pilot
lamp "C" is lit.
How to use the refrigerator compartment...
Refrigerator compartment
Set knob "A" on to a medium position (3) and you can
place food in the fridge after only a few hours.
Freezer compartment
Set knob "E" to position "Super freeze" (yellow pilot lamp
"D" will come on).
The knob will remain locked until
the freezer has reached the temperature shown.
When the red "D" light turns off, turn the "E" knob to a
setting between (3).
At this point, the freezer is ready for use.
The temperature inside the refrigerator compartment auto-
matically adjusts itself according to the position of the tem-
perature regulator knob.
1 = least cold 5 = coldest
We recommend, however, a medium position.
The refrigerator compartment of your appliance is equipped with
"A.I.R. System" (Ariston Integrated Refrigeration ) which makes
it possible to achieve optimal food storage while simplifying the
use of the refrigerator thanks to the following features:
- Fast temperature reset: after the doors heve been opened,
the internal temperatures return to optimal values faster,
improving food storage.
- More uniform temperature distribution: this makes it
possible to place any type of food on any shelf.
- Higher humidity level: this allows you to store food longer.
A
B
A
B
B
A - Blown air which is cooled when it comes into contact
with the refrigeration panel
B - Hotter air is drawn in
Remember to follow our instructions on the storage life of
foods: If not stored correctly, even the freshest food will
deteriorate quite quickly.
Contrary to popular belief, cooked foods do not keep longer
than fresh food.
The refrigerator compartment of your appliance is fitted with
practical removable shelves (Fig. 1) whose height can be
adjusted to allow storage of large containers. This shelves
can also be tilted for storage of opened bottles.
Remember to cool hot food before storing otherwise the
temperature inside the appliance will increase, causing the
compressor to work harder and use more energy.
Do not store liquids in unsealed containers since this will
increase the humidity and lead to the formation of frost in
the refrigerator.
To use the meat/cheese box, unhook it and remove it from
the shelf. To optimise space according to your needs, the
same can be moved laterally (Fig. 2). The side bottle rack
can be used either for storing bottles (Fig. 3) as well as several
cans (2-4) placed horizontally (Fig. 4). If not in use, the bottle/
can rack can be tipped up and away to make more room
inside the refrigerator.
Fig. 1
1
2
Fig. 2
Fig. 3
Fig. 4
27
GB
For the preparation of food to be frozen, please con-
sult a specialized manual.
- Food that has be thawed, even partially, must not be re-
frozen: you must cook it in order to consume it (within 24
hours) or to freeze it once again.
- When freezing fresh foods, remember that they should
not touch other previously frozen or deep frozen foods. Place
the food that you wish to freeze in the top compartment
where the temperature will fall below -18°C, which is ideal
for freezing food properly. Remember that proper conserva-
tion depends on the speed of freezing.
- During the freezing process, avoid opening the door of the
freezer.
- The maximum amount of food you can freeze per day is
indicated on the data plate situated inside the refrigerator
compartment.
- The first time you use your freezer, or if you have not run
the freezer for some time, allow the appliance to run until
red LED "B" turns off before storing your food.
- To freeze foods when the freezer is running follow these
steps: to freeze small quantities of food (under the maximum
quantity shown on the data plate) set knob "E" to "Super
freeze" when you store the food. For large quantities, set
the knob to "Super freeze" 24 hours before storing the
food that you wish to freeze.
- After 24 hours have passed and the fresh food has been
frozen, turn the "E" knob back to one of the normal
settings. Attention: Do not forget to change the tempera-
ture setting if you want to avoid useless wastes of en-
ergy.
- In order to freeze and then thaw foods optimally, it is rec-
ommended that you divide food into small portions so that
they freeze quickly and uniformly. The packages should be
clearly marked with the content and the date they were
frozen.
- In order to obtain a larger amount of space in the freezer
compartment, you can remove the central drawer, and place
the food directly onto the evaporator plate. Make sure that,
after having inserted the load, the door closes correctly.
To maximize the freezer volume, it is possible to remove the
drawers (except the lowest one), and to arrange the food
directly on top of the evaporating plates. Ensure that the
door is properly closed after putting food in the freezer.
- Do not open the freezer door in the event of a power
failure or malfunction. This precaution will slow the rise in
temperature within the compartment. If the door is not
opened, frozen and fast-frozen foods will remain in their
current state for approximately 9-14 hours.
- Do not place full bottles in the freezer: they could easily
burst because all liquids increase in volume when they freeze.
How to use the freezer compartment...
Cubetas de hielo
Este nuevo concepto de cubetas de hielo, es una patente
exclusiva Merloni. El hecho de estar colocadas en la
contrapuerta del congelador asegura mayor ergonomía y
limpieza: el hielo no está más en contacto con los alimentos
ubicados en el congelador; además se evita el goteo de agua
en el momento de la carga (se suministra también la tapa
para cerrar el orificio después de la operación de carga de
agua).
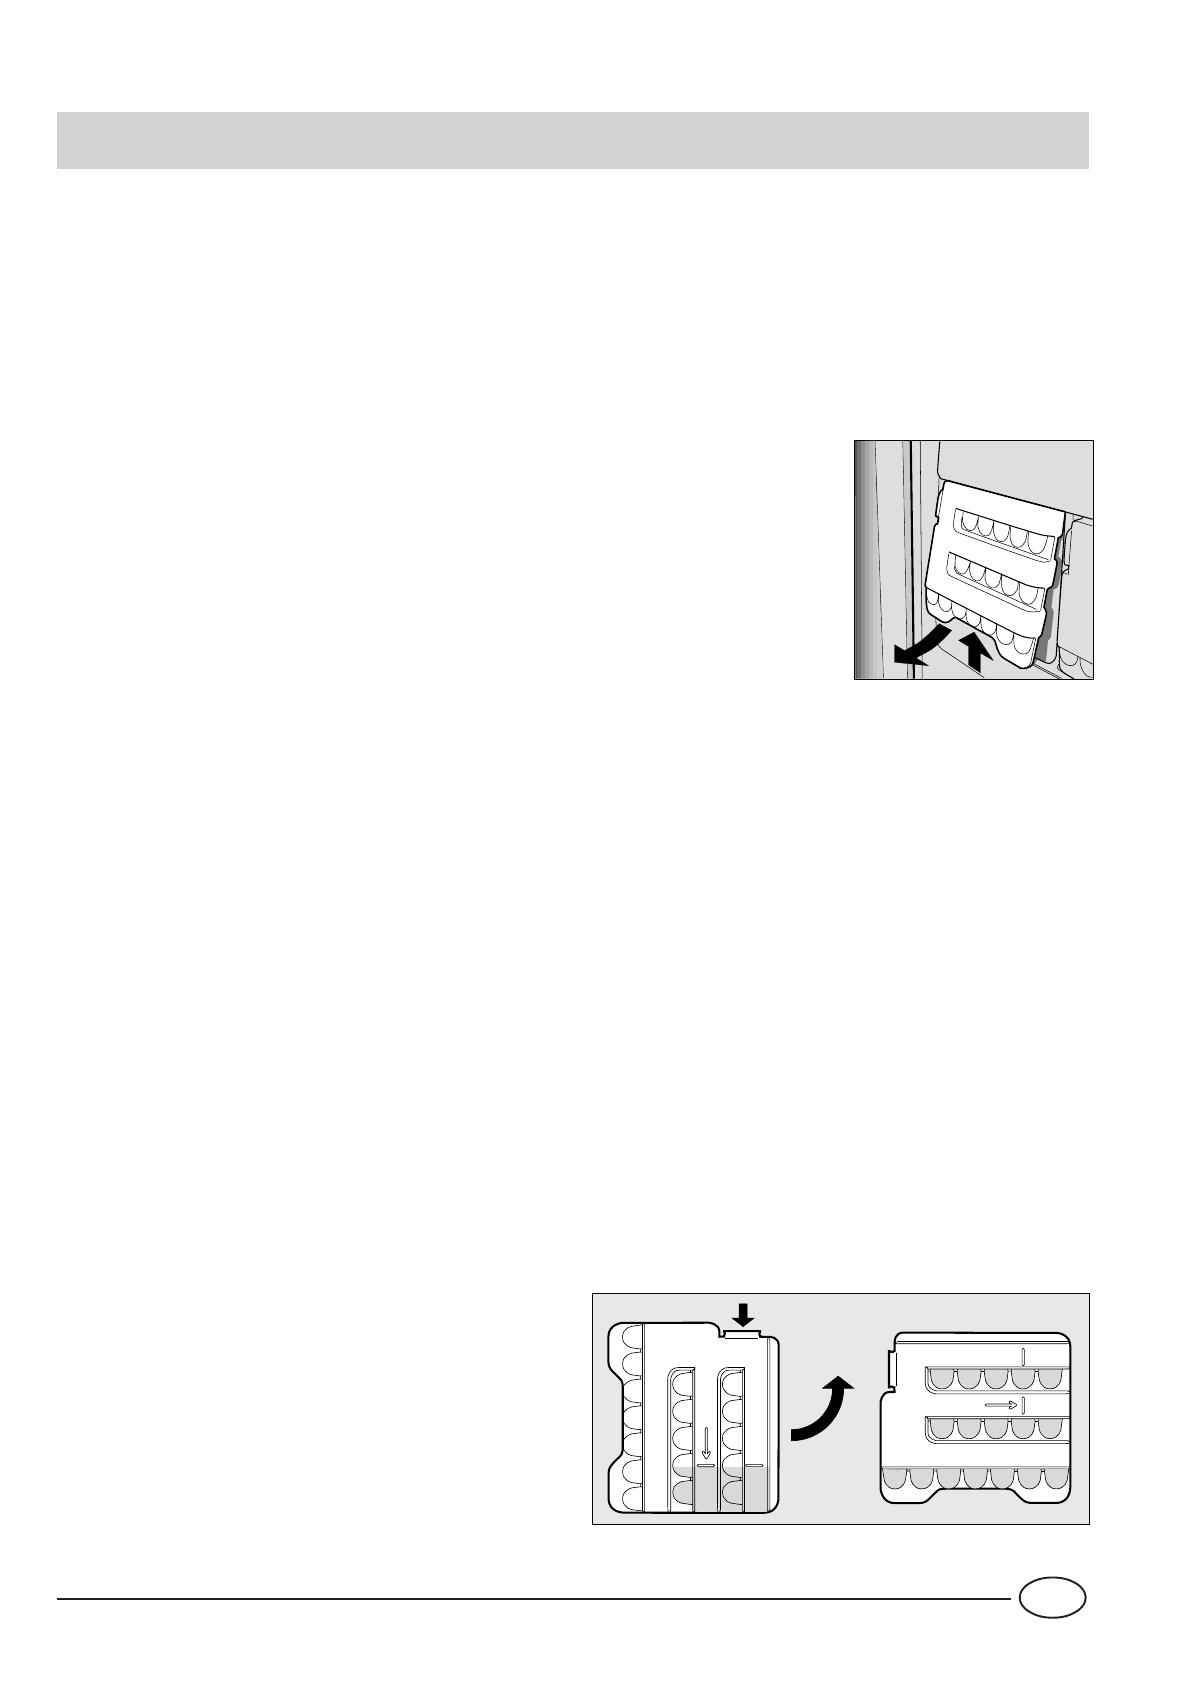
Para extraer las cubetas de
hielo de su alojamiento,
empuje la cubeta hacia arriba
y luego extráigala (fig. 5).
Para volver a colocar la
cubeta, introduzca la parte
superior en el alojamiento
correspondiente y, una vez
puesta en posición vertical,
déjela caer.
Modo de uso (Fig. 6)
Llene la cubeta con agua a través del orificio correspondiente
hasta el nivel indicado (MAX WATER LEVEL), teniendo cuidado
de no superarlo: la introducción de agua en cantidad superior
a la necesaria, provocará una formación de hielo tal que
podría obstaculizar la salida de los cubitos.
Si se ha introducido una cantidad excesiva de líquido, se
deberá esperar que el hielo se derrita, vaciar la cubeta, y
repetir la operación de llenado
Una vez efectuada la operación de carga a través del orificio
indicado, gire la cubeta 90 °. Por el principio de vasos
comunicantes, el agua llena las distintas formas de la cubeta,
después de lo cual, se podrá cerrar el orificio con el tapón
correspondiente y colocar la cubeta en la contrapuerta.
Después que se formó el hielo, bastará golpear la cubeta
sobre una superficie dura para que los cubitos se despeguen
de sus alojamientos y puedan salir por el mismo orificio por
el cual se ha introducido el agua. Para facilitar la salida de los
cubitos, vierta agua en el exterior de la cubeta.
ATENCIÓN: cada vez que efectúa la carga con agua, verifique
que la cubeta esté completamente vacía y que no hayan
quedado residuos de hielo.
El tiempo mínimo necesario para una mejor formación de
hielo es de aproximadamente 8 horas.
MAX
WATER LEVEL
MAX
WATER LEVEL
Fig. 6
28
GB
Guide to Using the Freezer
Meat and Fish
Food Wrapping
Tenderising
(days)
Storage
(months)
Thawing Time
Beef Roast Tinfoil 2 / 3 9 / 10 Not required.
Lamb Tinfoil 1 / 2 6 Not required.
Pork Roast Tinfoil 1 6 Not required.
Veal Roast Tinfoil 1 8 Not required.
Veal/Pork Chops
Each piece wrapped in cling wrap and
then in tinfoil (4 to 6 slices)
6 Not required.
Veal/Lamb Cutlets
Each piece wrapped in cling wrap and
then in tinfoil (4 to 6 slices)
6 Not required.
Minced Meat
In aluminium containers covered with cling
wrap.
Freshly
minced
2 Slowly in refrigerator.
Heart and Liver Plastic Baggies 3 Not required.
Sausages Cling Wrap or Tinfoil 2 As necessary.
Chicken and Turkey Tinfoil 1 / 3 9 Very slowly in refrigerator.
Duck and Goose Tinfoil 1 / 4 6 Very slowly in refrigerator.
Pheasant, Partrige and
Wild Duck
Tinfoil 1 / 3 9 Very slowly in refrigerator.
Hare and Rabbit Tinfoil 3 / 4 6 Very slowly in refrigerator.
Venison Tinfoil or Cling Wrap 5 / 6 9 Very slowly in refrigerator.
Large Fish Tinfoil or Cling Wrap 4 / 6 Very slowly in refrigerator.
Small Fish Plastic Baggies 2 / 3 Not required.
Crustaceans Plastic Baggies 3 / 6 Not required.
Shellfish
Store in salted water in aluminium
containers or plastic containers.
3 Very slowly in refrigerator.
Boiled Fish Tinfoil or Cling Wrap 12 In hot water.
Fried Fish Plastic Baggies 4 / 6 Directly in pan.
29
GB
Fruits and Vegetables
Food Preparation
Blanching
Time
Wrapping
Storage
(months)
Thawing Time
Apples and Pears Peel and cut into slices. 2’
In Containers (cover
with syrup)
12
In refrigerator very
slowly.
Apricots, Peaches,
Cherries and Plums
Peel and pit. 1’ / 2’
In Containers (cover
with syrup)
12
In refrigerator very
slowly.
Strawberries
Blackberries and
Raspberries
Rinse and fry.
In Containers (cover
with sugar)
10 / 12
In refrigerator very
slowly.
Cooked Fruit Cut, cook and strain.
In Containers (add
10% sugar)
12
In refrigerator very
slowly.
Fruit Juice Wash, cut and crush.
In Containers (sugar
to taste)
10 / 12
In refrigerator very
slowly.
Cauliflower
Remove leaves, cut head
into small pieces and blanch
in water and a little lemon
juice.
2’ Plastic Baggies 12 Not required.
Cabbage and
Brussel Sprouts
Wash and cut into small
pieces.
1’ / 2’ Plastic Baggies 10 / 12 At room temperature.
Peas Shell and wash. 2’ Plastic Baggies 12 Not required.
French Beans Wash and slice if required. 2 Plastic Baggies 10 / 12 Not required.
Carrots, Peppers
and Turnips
Peel, wash and slice if
necessary.
3’ / 4’ Plastic Baggies 12 Not required.
Mushrooms and
Asparagus
Wash, peel and cut up. 3’ / 4’
Plastic Baggies or
Containers
6 At room temperature.
Spinach Wash and mince. 2’ Plastic Baggies 12 At room temperature.
Vegetable for Soups
Wash and cut up in small
pieces.
3’
Plastic Baggies or
Containers
6 / 7 Not required.
Various Foods Preparation
Blanching
Time
Wrapping
Storage
(months)
Thawing time
Bread Plastic Baggies 4
At room temperature
and in the oven.
Cakes Plastic Baggies 6
About 10 minutes at
room temperature,
cook at 100/200°C.
Cream Plastic Containers 6
At room temperature or
in refrigerator.
Butter
In original wrapping
or tinfoil
6 In refrigerator.
Boiled Food or
Vegetable Soup
Plastic or Glass
Containers
3 / 6
At room temperature or
in hot water.
Eggs
Freeze without shells
in small containers
10
At room temperature or
in refrigerator.
30
GB
Tips on Saving Energy
- Install it well
And therefore far from heat sources, from direct sunlight, in
a well aired place and according to the distances indicated
in the section on "Installation/Aeration".
- Just the right cold
Too cold a compartment increases energy consumption.
- Do not Overfill
To conserve food properly, the cold air must circulate freely
within the refrigerator. If it is overfilled, this will prevent proper
air circulation, forcing the compressor to work continuously.
- Close the Doors
Open your refrigerator as little as possible because each time
you do so you loose much of the cold air. To raise the tem-
perature to the proper level again, the motor must work for
a long time, consuming energy.
- Keep an Eye on the Seals
Keep the seals clean and make sure that they adhere well to
the door. This alone will ensure that no cold air escapes.
- No Hot Foods
A hot pot or pan placed in the refrigerator immediately raises
the temperature several degrees. Let hot cookware and food
cool to ambient temperature before placing them in the re-
frigerator.
- Defrost the Freezer
Check the thickness of the frost on the walls of the freezer
and immediately defrost it if the layer of frost is too thick.
(see the section entitled, “Keeping your Appliance in Shape”).
31
GB
Keeping Your Appliance in Shape
Before doing any cleaning, disconnect the appliance
from the electricity (by pulling out the plug or turning
off the general switch in your home).
Defrosting
WARNING: do not damage the refrigeration circuit.
Do not use mechanical devices or other tools to speed
up the defrosting process, unless they have been rec-
ommended by the manufacturer.
How to Defrost the Refrigerator
This appliance defrosts automatically and the water is chan-
neled to the back toward the drain installed for this purpose
(fig. 7). Here, the heat produced by the compressor will make
it evaporate. The only thing you must do is to periodically
check and clean the hole of the drain, which is located be-
hind the vegetable crispers, so that the water drains prop-
erly.
How to defrost the freezer compartment
- Remove the frost from time to time with the aid of the
special scraper provided (do not use knives or metal objects).
- If the frost is more than 5 mm thick, then you must defrost
the freezer completely. Set the thermostat knob "E" on
position " ".
Wrap all frozen foods in newspaper and place them either
in another refrigerator or in a cool place. Leave the door
open, so as to allow all the frost to melt completely, helping
it along with containers filled with lukewarm water.
The unit is provided with a system which allows the defrost
water to be collected in a container to be placed beneath
the unit (proceed as illustrated in fig. 8).
Clean and dry the appliance thoroughly before switching it
back on.
Cleaning and maintenance
Always unplug the appliance from the mains before
cleaning.
- Your appliance is manufactured with hygienic odourless
materials. To preserve these characteristics, always use sealed
containers for strong smelling foods to avoid the formation
of odours that are difficult to remove.
- Use only a water and bicarbonate solution: Clean the
internal and exterior of your appliance with a sponge soaked
with a warm water and sodium bicarbonate solution, which
is also a good disinfectant. If you do not have any sodium
bicarbonate at home, use neutral detergent.
- What not to use: Do not use abrasive detergents, bleach or
detergents containing ammonia. Never use solvent based
products.
- Dishwashable: All the removable parts can be cleaned by
soaking in hot soapy water or detergent. If you own a
dishwasher, you may wash these parts in the dishwasher.
Remember to dry thoroughly before replacing them.
- What about the back panel? Dust may deposit on the back
panel and affect the proper running of the appliance. To
remove dust, vacuum away the dust very carefully using the
appropriate vacuum cleaner accessory.
- Discontinued use of the appliance: If the appliance is not in
use for any length of time, remember to clean the interior
and dry thoroughly, leaving the doors open to prevent the
formation of bad odours and mould.
- Replacing the light bulb.
When replacing the light of the refrigerator compartment
unplug the unit from the power supply and chang the used
lamp with another one of not more than 15 W.
For access ti lamp "A", remove the centre screw "B" at the
back of the lamp cover, as indicated in fig. 9.
Fig. 9
A
B
Fig. 7
Fig. 8
32
GB
Is There a Problem?
The refrigerator does not function.
Have you checked whether:
The main switch for the electricity to the apartment or
home has been turned off;
The plug is properly inserted in the outlet;
The outlet is adequate; try inserting the plug into another
outlet in the room.
The refrigerator and the freezer do not cool
properly.
Have you checked whether:
The doors do not close well or the seals are faulty;
The doors are left open too long;
The thermostat knob is not on the proper setting;
The refrigerator or freezer is overfilled.
The food in the refrigerator becomes too cold.
Have you checked whether:
The thermostat knob is on the proper setting;
The food is in contact with the back wall - which is the
coldest part.
The motor runs continuously.
Have you checked whether
· You have not left knob "E" on rapid freezing setting
"Super freeze":
The doors are not closed well or have remained open too
long;
The ambient temperature is too high;
The thermostat knob is not on the proper setting.
The appliance makes too much noise.
The gas refrigerant produces a slight noise even when the
compressor is not running (this is not a defect).
Have you checked whether:
The refrigerator is level.
The appliance was installed between cabinets or objects
that vibrate and make noise.
There is water on the bottom of the refrigerator.
Have you checked whether:
The hole for draining the water from the frost is clogged
(see fig. 7).
If after all the checks, the appliance still does not operate or
the problem persists, call the nearest Service Centre and
inform them of: the type of problem, the abbreviation of
the model name (Mod.) and the relative numbers (S/N) writ-
ten on the rating plate located at the bottom left next to
the vegetable crisper (see example in the figure below).
Never call on unauthorized technicians and always
refuse spare parts which are not originals.
Mod.
RG 2330
TI
Cod.
93139180000 S/N 704211801
220 - 240 V- 50 Hz 150 W
W
Fuse
A
Max 15 w
Total
Gross
Bruto
Brut
Compr.
Kompr.
Syst.
R 134 a
kg 0,090
Gross
Bruto
Brut
340
Net
Util
Utile
Gross
Bruto
Brut
Freez. Capac
Poder de Cong
75
Made in Italy 13918
Test
P.S-I.
Pressure
HIGH-235
LOW 140
kg/24 h
4,0
Class
Clase
N
Classe
3
1
2
Reversibilidad abiertura puertas
Reversibilitaet der Tueroeffnungen
Reversing the door opening
11/2004 - 195037093.01 - Xerox Business Services DocuTech
Via Aristide Merloni, 47
60044 Fabriano (AN) Italj
tel. +39 0732 6611
www.merloni,com
  • Page 1 1
  • Page 2 2
  • Page 3 3
  • Page 4 4
  • Page 5 5
  • Page 6 6
  • Page 7 7
  • Page 8 8
  • Page 9 9
  • Page 10 10
  • Page 11 11
  • Page 12 12
  • Page 13 13
  • Page 14 14
  • Page 15 15
  • Page 16 16
  • Page 17 17
  • Page 18 18
  • Page 19 19
  • Page 20 20
  • Page 21 21
  • Page 22 22
  • Page 23 23
  • Page 24 24
  • Page 25 25
  • Page 26 26
  • Page 27 27
  • Page 28 28
  • Page 29 29
  • Page 30 30
  • Page 31 31
  • Page 32 32
  • Page 33 33
  • Page 34 34
  • Page 35 35
  • Page 36 36
  • Page 37 37
  • Page 38 38
  • Page 39 39
  • Page 40 40

Indesit MB 3821 VL (SP) User guide

Category
Fridge-freezers
Type
User guide
This manual is also suitable for

Ask a question and I''ll find the answer in the document

Finding information in a document is now easier with AI