Page is loading ...

Thank you for selecting American Standard...
the benchmark of fine quality for over 100 years.
To ensure that your installation proceeds smoothly-please read
these instructions carefully before you begin.
RECOMMENDED TOOLS
1
M965686 Rev. 1.9 (1/19)
(A) Installation on 1-hole mounting surface: (please refer to template provided)
• Make certain the SEAL (2) is properly seated in bottom recess of MOUNTING RING (10) and SEAL (13) in top recess of
MOUNTING RING (10). Place mounting ring over mounting hole at the deck. Insert CABLES (12), HOSES (3) and SHANK (4)
through mounting ring and deck, seat SPOUT BASE onto sink or mounting surface. Do not use putty.
• From below: Insert CABLES (12) and HOSES (3) through RUBBER WASHER (6), BRASS WASHER (7), and threaded
LOCKNUT (8).
• Assemble RUBBER WASHER (6), BRASS WASHER (7), and threaded LOCKNUT (8) onto SHANK (5) from underside
of sink or mounting surface. Hand tighten LOCKNUT (8).
• Make sure faucet is aligned properly with handle on the right and logo facing directly forward.
• Use a screwdriver to tighten SCREWS (9) on LOCKNUT (8). Work your way around LOCKNUT (8), tightening the screws
slightly each time until all are snug to ensure even pressure.
(B) Optional: Installation on 3-hole mounting surface: Requires Deck Escutcheon - order separately
• Make certain the SEAL (13) is properly seated in top recess of DECK ESCUTCHEON (1) and FOAM SEAL (14) is properly
seated in bottom recess of DECK ESCUTCHEON (1). Do not use putty. (Please refer to the template provided)
• Screw in two THREAD RODS (15) onto bottom of DECK ESCUTCHEON (1).
• Place deck escutcheon over mounting holes of the deck.
• Insert SUPPLY CABLES (12), HOSES (3), SPRAY HOSE (4) and SHANK (5) through hole of DECK ESCUTCHEON (1) and
mounting surface.
• Follow mounting instructions above
to secure faucet to mounting surface.
Thread the MOUNTING NUTS (11) to
secure DECK ESCUTCHEON.
INSTALL FAUCET WITH OR WITHOUT DECK ESCUTCHEON
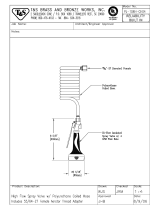
BEALE
™
ELECTRONIC PULL-DOWN
KITCHEN FAUCET
INSTALLATION
INSTRUCTIONS
4931380
4931385
Flat Blade Screwdriver Adjustable WrenchPhillips Screwdriver
Certied to comply with ANSI A112.18.1M
3
7
9
8
4
1
13
14
5
6
11
15
B (OPTIONAL)
A
SPOUT BASE
SINK OR
MOUNTING
SURFACE
SPOUT BASE
2
12
10
13
5
3
6
7
9
4
8
CAUTION
Turn off water at
main supply
- 1 -
Product names listed herein are trademarks of AS America, Inc.
© AS America, Inc. 2016
13
10
2

2
M965686 Rev. 1.9 (1/19)
3
CONNECT SPRAY HOSE AND SOLENOID ASSEMBLY,
AND INSTALL WEIGHT
• Turn off hot and cold water supplies before beginning.
• Place each SCREEN FILTER (3) on each
wall supply outlet. Be sure that SCREEN
FILTER (3) is inserted in the correct direction.
(See Illustration)
• Connect FLEXIBLE SUPPLY HOSES (1, 2) directly to
water supplies. Connection on tting supplies are 3/8"
compression. Connect left supply hose (Red Stripe)
to Hot wall supply. Connect right supply hose (Blue
Stripe) to Cold wall supply. Use adjustable wrench to
tighten connections. Do not over tighten.
*
Faucet supplies are 35" long from faucet base.
• Note: If additional supply length is required,
installer must purchase additional parts separately.
• Important: If SUPPLY HOSES (1, 2) are too long,
loop as illustrated to avoid kinking.
MAKE WATER SUPPLY CONNECTIONS
8
7
9
3
2
4
1
18"
5
6
A
B
- 2 -
• Push the SPRAY HOSE END (1) into FEMALE ADAPTER
(2) and slide down locking collar to secure connection.
• Orient solenoid valve with the orientation label facing up.
• Push SOLENOID ASSEMBLY (3) connection “B” into the
HOSE CONNECTOR (4) as shown, and slide down
locking collar towards SOLENOID ASSEMBLY (3) to
secure connection.
• Push SOLENOID ASSEMBLY (3) connection “A” into
other end of FEMALE ADAPTER (2) as shown, and slide
locking collar towards SOLENOID ASSEMBLY (3) to
secure connection.
• With HAND SPRAY (5) seated in SPOUT (6), install
WEIGHT (7) at labeled area onto HOSE (8), secure
with SCREW (9).
• Important: Make sure you pull out hose and check to
see that it moves freely and is not obstructed by supply
hoses, solenoid valve or items in the bottom of the
cabinet.
Slide
locking
collar to
secure
UP
Locking
Collar
IMPORTANT: Do not
use sealent on threads
1
2
3
COLD
HOT
(3) SCREEN
FILTER
BULGE
SIDE DOWN

5
ELECTRICAL CONNECTIONS – BATTERY HOLDER
ELECTRICAL CONNECTIONS - SENSOR TO SOLENOID
4
M965686 Rev. 1.9 (1/19)
5
9
6
7
1
12
3
11
2
UP
• Connect SOLENOID CONNECTOR (12) with
the sensor connector from the faucet with the
yellow tag stickers, secure this connection by
installing inside the CONNECTORS HOUSING
(3) as shown and lock by twisting the white
end pieces.
NOTE:
Use Qty. (4) AA Alkaline type
batteries only.
- 3 -
• Identify desired battery holder location. Battery
holder should be located so batteries can be
easily accessed, with in 6ft of the faucet hook
and loop (black strip).
• Attach CABLE MOUNTS (4) along the inside
of the kitchen cabinet walls positioning them
accordingly as shown. Wipe clean surfaces
before attaching CABLE MOUNTS (4).
• Attach ‘HOOK TO LOOP’ FASTENER (black strip)
(5) to the back side of the BATTERY HOLDER (7)
and attach ‘HOOK TO LOOP’ FASTENER (black
strip) (5) on desired location inside the kitchen
cabinet. Wipe mounting surface clean before
attaching ‘HOOK TO LOOP’ FASTENER (black
strip) (5).
• Secure longer SENSOR CABLE (6) to the CABLE
MOUNTS (4) using the WIRE TIES (8) provided.
• Ensure that the BYPASS KNOB (10) on the
SOLENOID ASSEMBLY (1) is in the “OFF”
position.
• With the SLIDING DOOR (11) in the open
position, connect the BATTERY HOLDER CABLE
(9) to the other end of the long SENSOR CABLE
(6), that is coming out of the faucet. The sensor
will start to blink several times and then stop.
5
9
6
7
1
12
10
8
4
2
UP
11

M965686 Rev. 1.9 (1/19)
7a
1
REMOVE
2
3
•Turn ON water at main supply.
• With HANDLE (1) in “off” position, unthread SPRAY (3) from HOSE (2).
• Operate handle back to front, in COLD and HOT positions, to ush water
lines thoroughly.
• Replace SPRAY (3) onto HOSE (2).
• Please make sure that there is no cross threading.
- 4 -
7
6
FAUCET OPERATION – AUTOMATIC MODE, MANUAL MODE AND FEATURES
2
3
1
OPEN
CLOSED
Hot
Cold
Open
Closed
Automatic Mode
• Make sure the SLIDING DOOR (1) and HANDLE (2) are in the open position.
• To turn on the water, momentarily place your hand within 3" of the
SENSOR (3).
• To turn off the water, momentarily place your hand again within 3" of the
SENSOR (3).
Manual Mode
• Close the SLIDING DOOR (1) and use the HANDLE (2) to turn on and off
the water.
FEATURES
Safety Timer
• The faucet will automatically turn off the water after 5 minutes of
continuous use. Momentarily place you hand in front of the sensor to
turn on the water.
Low Battery Indication
• The sensor will start to blink constantly every second. This is the indication
that the batteries are low in power. Replace the batteries with Qty. (4) AA
Alkaline type batteries.
• Battery lifetime is approximately 1 year under normal use.
TEST INSTALLED FAUCET
CHECK CONNECTIONS FOR LEAKS
• Move HANDLE (1) into “off” position.
• Turn on water supplies and check connections for leaks.
• Operate HANDLE (2) up and down, left and right to ush
water lines thoroughly.
• Operate HAND SPRAY and check connections for leaks.
CHECK CONNECTIONS
FOR LEAKS

8
M965686 Rev. 1.9 (1/19)
SPRAY OPERATION
• With FAUCET on, press TOGGLE BUTTON (4) on SPRAY (3) to switch
from stream to spray.
• Press and hold PAUSE BUTTON (5) to temporarily stop ow from SPRAY
(3). Release PAUSE BUTTON (5) to resume ow from SPRAY (3).
STREAM (AERATOR)
SPRAY
5
3
4
9
DO: CLEAN WITH CLEAR WATER. DRY WITH A SOFT COTTON FLANNEL CLOTH.
DO NOT: DO NOT CLEAN THE PRODUCT WITH SOAPS, ACID, POLISH, ABRASIVES, HARSH CLEANERS, OR A
CLOTH WITH A COARSE SURFACE.
CARE:
- 5 -
Battery needs replacement:
• Sensor will start to blink continuously every second.
This is the indication that the batteries are low in power.
• Replace batteries in battery holder with Qty (4) AA alkaline
type batteries.
• Batteries last approximately one year.
• Always change all 4 batteries. Failure to replacing all 4
batteries at the same time may cause faucet electronics
to not work properly.
Reduced or distorted flow:
Debris or dirt accumulating at inlet or AERATOR MAY
CAUSE REDUCED OR DISTORTED FLOW.
A) Clean lter screen at inlet hoses.
B) Turn hot and cold water supply off. Open valve in mixed
position for two seconds to relief pressure close valve.
C) Disconnect inlet hoses at stop valve and clean screen
lter. If necessary remove screen lter and rinse at another
water source.
Aerator Clean Out
• AERATOR may accumulate dirt causing distored and
reduced water ow. Remove AERATOR by using the
AERATOR KEY (9) and rinse to clear any debris.
• Clean out the SCREEN (10) by removing
SPRAY HEAD (11).
Power failure (manual bypass):
• In the event of a power failure, turn the BYPASS KNOB (1)
on the SOLENOID ASSEMBLY (2) to the “ON” position.
The faucet will be in MANUAL MODE (see section 5) and
the HANDLE (2) can be used to turn on and off the water.
SERVICE
7b
1
2
1
2
4
5
6
6a
3
7
9
10
11
SCREEN FILTER

M962146-0070A
MOUNTING KIT
M964452-YYY0A
MOUNTING RING
M970094-0070A
WEIGHT
M964483-0070A
CABLE TIE &
CABLE MOUNT
M970109-0070A
BATTERY PACK
M951483-0070A
CARTRIDGE
M918511-0070A
CARTRIDGE SCREWS
M907315-YYY0A
ESCUTCHEON CAP
M964453-YYY0A
HANDLE KIT
M970620-0070A
PLUG BUTTON & SCREW
M922372-0070A
AERATOR KEY
M954486-0070A
SOLENOID
ASSEMBLY
M921403-0070A
FEMALE ADAPTER
9431888-YYY
ESCUTCHEON AND SEAL
(OPTIONAL)
M910513-0070A
SCREEN FILTER
M964450-YYY0A
SPRAY WITH HOSE
A911897-0070A
SEAL
M918205-0070A
SLEEVE
M970209-0070A
AERATOR
HOT LINE FOR HELP
For toll-free information and answers to your questions, call:
1 (800) 442-1902
Mon. - Fri. 8:00 a.m. to 8:00 p.m. EST
Saturday 10:00 a.m. to 4:00 p.m. EST
IN CANADA 1-800-387-0369
(TORONTO 1-905-306-1093)
Weekdays 8:00 a.m. to 7:00 p.m. EST
IN MEXICO 01-800-839-1200
M965686 Rev. 1.9 (1/19)
Replace the “YYY” with
appropriate finish code
POLISHED CHROME 002
STAINLESS STEEL 075
MODEL NUMBER
BEALE
™
ELECTRONIC PULL-DOWN
KITCHEN FAUCET
- 6 -
4931380
4931385

- 6 -
M970620-0070A
BOUCHON ET VIS
M962146-0070A
ENSEMBLE DE MONTAGE
M964452-YYY0A
D'ANNEAUX DE
MONTAGE
M970094-0070A
POID
M964483-0070A
ATTACHE DE CÂBLE
ET SUPPORT DE CÂBLE
M951483-0070A
CARTOUCHE
M918511-0070A
VIS DE LA CARTOUCHE
M907315-YYY0A
CAPUCHON DE L'ÉCUSSON
M964453-YYY0A
ENSEMBLE POUR
POIGNÉE
M922372-0070A
CLÉ DE L'AÉRATEUR
9431888-YYY
ÉCUSSON ET PLAQUE
D'ÉTANCHÉITÉ
(EN OPTION)
M954486-0070A
SOLÉNOÏDE
M921403-0070A
ADAPTATEUR
FEMELLE
M964450-YYY0A
JET PULVÉRISATEUR
AVEC TUYAU
A911897-0070A
JOINT
M970109-0070A
BOÎTIER POUR PILES
M910513-0070A
FILTRE À TAMIS
M918205-0070A
MANCHON
M970209-0070A
AÉRATEUR
M965686 FR Rev. 1.9 (1/19)
LIGNE D’URGENCE
Pour obtenir des renseignements ou une réponse à vos questions,
composez sans frais le :
1 (800) 442-1902
Du lundi au vendredi de 8 h à 20 h, HNE
Samedi 8 h à 16 h, HNE
AU CANADA 1-800-387-0369
(TORONTO 1-905-306-1093)
En semaine de 8 h à 19 h, HNE
AU MEXIQUE 01-800-839-1200
BEALE
MC
ÉLECTRONIQUE DÉROULANTS
ROBINET DE CUISINE
4931380
4931385
NUMÉRO DU MODÈLE
Remplacer le «YYY» par le code
de fini approprié
CHROME POLI 002
ACIER INOXYDABLE 075

- 6 -
M964483-0070A
ENLACE PARA
CABLES Y MONTAJE
PARA CABLES
A911897-0070A
SELLO
9431888-YYY
CHAPETÓN Y PLACA
(OPCIONAL)
M962146-0070A
JUEGO DE MONTAJE
M970094-0070A
CONTRAPESO
M964450-YYY0A
ROCIADOR CON
MANGUERA
M951483-0070A
CARTUCHO
M918511-0070A
TORNILLOS DEL CARTUCHO
M907315-YYY0A
TAPA DEL CHAPETÓN
M964453-YYY0A
KIT DE MANIJAS
M922372-0070A
LLAVE DEL
AIREADOR
M964452-YYY0A
ARO DE
MONTAJE
M954486-0070A
CONJUNTO
DEL SOLENOIDE
M921403-0070A
ADAPTADOR
HEMBRA
M918205-0070A
MANGUITO
M970109-0070A
PAQUETE DE BATERÍAS
M910513-0070A
FILTRO DE REJILLA
M970209-0070A
AIREADOR
M970620-0070A
BOTÓN Y TORNILLO
DEL TAPÓN
M965686 SP Rev. 1.9 (1/19)
BEALE
™
ELECTRÓNICA DE
GRIFO DE COCINA
DESPLEGABLE
NÚMERO DE MODELOS
Reemplace las “YYY” conel
código de terminación adecuado
CROMO PULIDO 002
ACERO INOXIDABLE 075
LÍNEA DE AYUDA DIRECTA
Si desea obtener información o tiene preguntas, llame sin cargo al
(1) 800-442-1902.
Lunes a Viernes 8:00 a.m. a 6:00 p.m.
Sabado 10:00 a.m. a 4:00 p.m.
Hora normal del este
EN CANADÁ: 1-800-387-0369
(TORONTO: 1-905-306-1093)
Los días de semana de 8:00 a.m. a 7:00 p.m.
Hora normal del este
EN MÉXICO: 01-800-839-1200
4931380
4931385
/