Page is loading ...

Shop Vac
®
Wet/Dry Vacuums
ATTENTION!
Read all safety rules careful-
ly before attempting to oper-
ate. Retain for future reference.
Patents Issued and Pending.
Brevets délivrés et en instance.
Patentes registradas y en trámite.
© 2010 Shop-Vac Corporation. All rights reserved.
© Shop-Vac Corporation, 2010. Tous droits réservés.
© 2010 Shop-Vac Corporation. Todos los derechos
reservados.
Manual del usuario. Por favor lea este manual antes de usar la aspiradora.
User manual. Please review before operating vac.
BRAND/MARQUE/MARCA
BRAND/MARQUE/MARCA
Guide de l'utilisateur. À lire avant d'utiliser l'aspirateur
¡ATENCIÓN!
Lea cuidadosaments todas las
normas de seguridad antes de uti-
lizar la aspiradora. Conserve este
manual para futuras consultas.
ATTENTION!
Lire attentivement les consignes
de sécurité avant d'utiliser cet
aspirateur. Conserver ce Guide
pour s'y reporter ultérieurement.
DANGER!
Never operate this unit when
flammable materials or vapors
are present because electrical
devices produce arcs or sparks
that can cause a fire or explo-
sion.
NEVER OPERATE
UNATTENDED!
¡PELIGRO!
Nunca opere esta unidad ante
la presencia de materiales
inflamables o vapores, ya que
los aparatos eléctricos produ-
cen arcos o chispas que pueden
causar un incendio o una
explosión.
¡NO DEJE LA
ASPIRADORA
FUNCIONANDO SIN
VIGILANCIA!
DANGER!
Ne jamais utiliser cet aspirateur
en présence de vapeurs ou de
matières inflammables. Les
appareils électriques produisent
des arcs ou des étincelles qui
peuvent causer un incendie ou
une explosion.
NE JAMAIS LAISSER
FONCTIONNER CET
APPAREIL SANS
SURVEILLANCE!
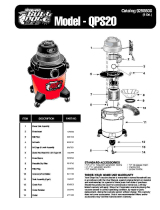
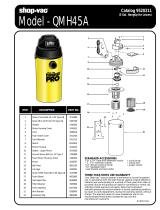
Commercial/Industrial Use
Description
The Shop-Vac
®
Wet/Dry vacuum cleaners are for vacuuming wet and dry non-volatile materials. Equipped with powerful,
permanently lubricated, Single or Two-Stage By-Pass motors. Standard filtration systems to handle dry or wet pick-up. Double
filtration is available for most Shop-Vac
®
Vacs and is standard on Shop-Vac
®
Commercial Vacuums. Equipped with heavy duty dolly
or easy roll caster system. Automatic float shut off prevents overflow during wet pick-up. Includes versatile 1-1/4” (3.18cm), 1-1/2”
(3.81cm) or 2-1/2” (6.35cm) diameter accessories. Tank styles include steel with rust resistant epoxy phenolic coated interiors,
durable stainless steel and rugged dent resistant polypropylene tank. UL listed.
SERIES 586, 587, 610, 850, 925, 950, 962, 965, 970, 984, 991
87543-51
Aspiradoras para aspiración en húmedo y seco Shop Vac
®
Aspirateurs pour déchets secs et humides Shop Vac
MD
Para Uso Comercial/Industrial
Descripción
Las aspiradoras para aspiración en húmedo /seco Shop-Vac
®
han sido diseñadas para aspirar materiales sólidos y líquidos no
volátiles. Vienen equipadas con motores potentes, de lubricación permanente, de derivación y de una o dos etapas. Sistemas de
filtrado estándar con funciones para aspiración en húmedo o seco. La mayoría de las aspiradoras Shop-Vac
®
cuentan con doble
filtrado y es una función estándar en todas las aspiradoras comerciales Shop-Vac
®
. Equipadas con una carretilla de construcción
fuerte o un sistema de ruedas de fácil desplazamiento. El cierre automático del flotador evita derrames durante la aspiración de líqui-
dos. Incluye accesorios versátiles con diámetros de 3,18 cm. (1-1/4”), 3,81 cm. (1-1/2”) o 6,35 cm. (2-1/2”). Los diseños del depósito
incluyen exteriores de acero con interiores revestidos en plástico fenólico epóxico anticorrosivo, acero inoxidable durable y depósito
de polipropileno resistente a las abolladuras. Incluida en el listado de UL.
SERIE 586, 587, 610, 850, 925, 950, 962, 965, 970, 984, 991
À usage commercial et industriel
Description
Les aspirateurs pour déchets secs et humides Shop-Vac
MD
sont prévus pour aspirer des déchets secs et humides non volatiles. Ils
sont équipés d’un puissant moteur à dérivation, à un ou deux étages. Ils sont lubrifiés en permanence et dotés de systèmes de filtra-
tion livrés de série qui permettent d’aspirer des déchets secs ou humides. Un système à double filtration est livrable sur la
plupart des aspirateurs Shop-Vac
MD
.Ce type de système est livré de série sur les aspirateurs à usage commercial Shop-Vac
MD
.
Équipés d’un chariot ultra-robuste ou d’un système à roulettes, ils peuvent être déplacés facilement. Lorsqu’on aspire des déchets
humides, le flotteur arrête automatiquement l’aspirateur de fonctionner pour éviter un débordement. Ils sont livrés avec des acces-
soires polyvalents de 3,18 cm (1-1⁄4 pouce), de 3,81 cm (1-1⁄2 pouce) ou de 6,35 cm (2-1⁄2 pouces). Les cuves sont soit en acier à
intérieur enduit de résine phénolique résistant à la rouille, soit en acier inoxydable durables ou en polypropylène solide résistant aux
coups. Classés UL.
SÉRIE 586, 587, 610, 850, 925, 950, 962, 965, 970, 984, 991
SHOP-VAC CORPORATION
2323 Reach Road, P.O. Box 3307
Williamsport, PA 17701-0307
(570) 326-3557
www.shopvac.com
SHOP-VAC CANADA
1770 Appleby Line
Burlington, Ontario L7L 5P8
(905) 335-9730
www.shopvac.ca
Shop Vac-México, S.A. de C.V.
Calle Niños Héroes #1553
Colonia Agua Blanca
45236 - Zapopan, Jalisco
52 (33) 3188 6388

When using an electrical appliance, basic precautions should always be followed, including the
following: READ ALL INSTRUCTIONS BEFORE USING THIS APPLIANCE.
WARNING – TO REDUCE THE RISK OF FIRE, ELECTRIC
SHOCK OR INJURY:
1. Do not leave appliance when plugged in. Unplug from outlet when not in use and before
servicing. Connect to a properly grounded outlet only. See Grounding Instructions.
2. Do not expose to rain – store indoors.
3. Do not allow to be used as a toy. Close attention is necessary when used by or near children.
4. Use only as described in this manual. Use only Manufacturer’s recommended attachments.
5. Do not use with damaged cord or plug. If appliance is not working as it should, has been
dropped, damaged, left outdoors or dropped into water, contact Shop-Vac Corporation for
assistance.
6. Do Not: pull or carry by cord, use cord as a handle, close a door on cord or pull cord around
sharp edges or corners. Do not run appliance over cord. Keep cord away from heated sur-
faces.
7. Do not unplug by pulling on cord. To unplug, grasp the plug; not the cord.
8. Do not handle plug or appliance with wet hands.
9. Do not put any object into openings. Do not use with any openings blocked; keep free of dust,
lint, hair and anything that may reduce air flow.
10. Keep hair, loose clothing, fingers and all parts of body away from openings and moving parts.
11. Do not pick up anything that is burning or smoking, such as cigarettes, matches or hot ashes.
12. Do not use without dust bag and/or filters in place.
13. Turn off all controls before unplugging.
14. Use extra care when cleaning on stairs.
15. Do not use to pick up flammable or combustible liquids such as gasoline or use in areas
where they may be present.
16. Do not use your cleaner as a sprayer of flammable liquids such as oil base paints, lacquers,
household cleaners, etc.
17. Do not vacuum toxic, carcinogenic, combustible or other hazardous materials such as
asbestos, arsenic, barium, beryllium, lead, pesticides or other health endangering materials.
Specially designed units are available for these purposes.
18. Do not pick up soot, cement, plaster or drywall dust without cartridge filter and collection filter
bag in place. These are very fine particles that may pass through the foam and affect the
performance of the motor or be exhausted back into the air. Additional collection filter bags
are available.
19. Do not leave the cord lying on the floor once you have finished the cleaning job. It can become
a tripping hazard.
20. Use special care when emptying heavily loaded tanks.
21. To avoid spontaneous combustion, empty tank after each use.
22. The operation of a utility vac can result in foreign objects being blown into eyes, which can
result in eye damage. Always wear safety goggles when operating vacuum.
23. STAY ALERT. Watch what you are doing and use common sense. Do not use vacuum
cleaner when you are tired, distracted or under the influence of drugs, alcohol or medication
causing diminished control.
IMPORTANT SAFETY INSTRUCTIONS
SAVE THESE INSTRUCTIONS
When using the appliance at a distance where an extension cord becomes necessary, a 3-con-
ductor grounding cord of adequate size must be used for safety, and to prevent loss of power and
overheating. Use the table below to determine A.W.G. wire size required. To determine ampere
rating of your vacuum, refer to nameplate located on rear of motor cover.
EXTENSION CORDS
This appliance is for use on a
nominal 120-volt circuit, and has
a grounded plug that looks like
the plug illustrated in sketch A. A
temporary adapter that looks like
the adapter illustrated in sketches
B and C may be used to connect
this plug to a 2-pole receptacle as
shown in sketch B if a properly
grounded outlet is not available. The
temporary adapter should be used
only until a properly grounded out-
let (sketch A) can be installed by a qualified electrician. The green colored rigid ear, lug or the
like extending from the adapter must be connected to a permanent ground such as a properly
grounded outlet box cover. Whenever the adapter is used, it must be held in place by a metal
screw.
IN CANADA, THE USE OF A TEMPORARY ADAPTOR IS NOT PERMITTED BY THE
CANADIAN ELECTRICAL CODE. Make sure that the appliance is connected to an outlet having
the same configuration as the plug. No adapter should be used with this appliance.
This appliance must be grounded. If it should malfunction or breakdown, grounding provides a
path of least resistance for electric current to reduce the risk of electric shock. This appliance is
equipped with a cord having an equipment-grounding conductor and grounding plug. The plug
must be inserted into an appropriate outlet that is properly installed and grounded in accor-
dance with all local codes and ordinances.
WARNING – IMPROPER CONNECTION OF THE EQUIP-
MENT-GROUNDING CONDUCTOR CAN RESULT IN A RISK OF
ELECTRIC SHOCK. CHECK WITH A QUALIFIED ELECTRICIAN OR
SERVICE PERSON IF YOU ARE IN DOUBT AS TO WHETHER THE
OUTLET IS PROPERLY GROUNDED. DO NOT MODIFY THE PLUG
PROVIDED WITH THE APPLIANCE – IF IT WILL NOT FIT THE
OUTLET, HAVE A PROPER OUTLET INSTALLED BY A QUALIFIED
ELECTRICIAN.
GROUNDING INSTRUCTIONS
1. Remove vacuum cleaner and all accessories from the carton.
2. Important: Open tank cover by pushing latches or clamps outward with thumbs and remove
any accessories that may have been shipped in the tank.
3. Assemble dolly or caster system following instructions in included Replacement Parts
Manual.
UNPACKING
4. Before replacing cover, please refer to Dry Pick-up or Wet Pick-up operation to ensure proper
filter installation.
5. Replace cover and make sure latches or clamps are secured over raised area of tank cover.
2
WARNING – DO NOT LEAVE VACUUM UNATTENDED WHEN IT IS PLUGGED IN AND/OR OPERATING. UNPLUG UNIT WHEN NOT IN USE.
Before using appliance, inspect power cord for loose or exposed wires and damaged insulation.
Make any needed repairs or replacements before using your appliance. Use only three-wire out-
door extension cords which have three-prong grounding-type plugs and three-pole receptacles
which accept the extension cord’s plug. When vacuuming liquids, be sure the extension cord
connection does not come in contact with the liquid.
NOTE: STATIC SHOCKS ARE COMMON IN DRY AREAS OR WHEN THE RELATIVE HUMID-
ITY OF THE AIR IS LOW. THIS IS ONLY TEMPORARY AND DOES NOT AFFECT THE USE
OF THE APPLIANCE. TO REDUCE THE FREQUENCY OF STATIC SHOCKS IN YOUR HOME,
THE BEST REMEDY IS TO ADD MOISTURE TO THE AIR WITH A CONSOLE OR INSTALLED
HUMIDIFIER.
Volts
Total length of cord in feet
120V
Ampere Rating
More Not More
Than Than
0 - 6
6 - 10
10 - 12
12 - 16
25 50 100
150
AWG
18
18
16
14
16
16
16
12
16
14
14
14
12
12
Not recommended

3
*CleanStream
®
, Gore
®
and designs are registered trademarks of W.L. Gore & Associates, Inc. **Ultra Web
®
is a registered tademark of Donaldson Co., Inc.

ASSEMBLY
REAR CASTER ACCESSORY CADDY AND
FRONT CASTER FEET ASSEMBLY
(Not standard with all models)
You will find four casters, two caster feet, an accessory caddy and
four screws with your wet/dry vacuum.
If your accessory caddy looks like the one pictured in (Figure a)
assemble as follows.
1. With cord disconnected from receptacle and tank cover
removed, turn tank upside down so that the bottom is facing up.
2. Insert two caster feet into adjacent slots at front of tank. Secure
with screws provided.
3. Take accessory caddy and place into remaining slots at back of
tank. Secure with screws provided (Figure 2).
4. Install casters into caddy and feet by inserting the caster stems
into the holes provided. Apply pressure and twisting motion until
casters snap into place.
REAR CASTER DOLLY/TOOL HOLDER
AND FRONT CASTER FEET ASSEMBLY
(Not standard with all models)
You will find four casters (c.), two caster feet (d.), rear caster dolly/tool holder (e.), and four
screws with your wet/dry vacuum. Assemble as follows:
1. With cord disconnected from receptacle and tank cover removed, turn tank upside down so
that the bottom is facing up.
2. Take rear caster dolly and place into slots (on rear of tank, opposite of drain) and secure
with screws provided (Figure 10).
3. If flatwashers are included in hardware package place flatwasher over stem of caster before
installing casters into feet.
NOTE: Flatwashers are not required with all units.
4. Insert casters into bottom of rear caster dolly by placing stem of caster into holes provided.
Apply pressure and twisting motion until casters snap into place (Figure 11).
5. With tank drain facing you, take caster foot marked with the letter A (Figure 12) and place
in slot on left side of tank also marked with the letter A and secure with screw provided
(Figure 13).
6. Take caster foot marked with the letter B (Figure 14) and place in slot on right side of tank
also marked with the letter B and secure with screw provided (Figure 15).
7. Insert casters into feet by placing stem of caster into holes provided. Apply pressure and
twisting motion until casters snap into place (Figure 16).
8. Return tank to upright position.
9. Place tool basket (Not standard with all models) with curved surface against tank on rear
caster dolly assembly
(Figure 17).
c.
d.
e.
11
10
13
14
15
16 17
4
(Not standard with all models)
You will find two casters (f.), two large rear wheels (g.), one axle (h.), rear dolly/
basket (i.), two caster feet (j.) and four screws with your wet/dry vacuum. Assemble as follows:
1. With cord disconnected from receptacle and tank cover removed, turn tank upside down so that
the bottom is facing up.
f
g
j
i
h
REAR WHEEL DOLLY/TOOL HOLDER
AND FRONT CASTER FEET ASSEMBLY
TOP HANDLE ASSEMBLY
To attach top handle, align holes in handle and holes in motor cover
and secure with screws provided (Figure 1).
1.
2.
a.
If your accessory caddy looks like the one pictured in (Figure b) assembly as follows.
1. With cord disconnected from receptacle and tank cover removed, turn tank upside down so
that the bottom is facing up.
2. Take accessory caddy and place into slots (on rear of tank opposite of drain). Secure with
screws provided (Figure 3).
3. With tank drain facing you, take caster foot marked with the letter A (Figure 4) and place in
slot on left side of tank also marked with the letter A. Secure with screw provided (Figure 5).
4. Take caster foot marked with the letter B (Figure 6) and place in slot on right side of tank
also marked with the letter B. Secure with screw provided (Figure 7).
5. If flatwashers are included in hardware package place flatwasher over stem of caster before
installing casters into feet or accessory caddy. NOTE: Flatwashers are not required with all
units.
6. Install casters into caster feet and accessory caddy by inserting the caster stems into the
holes provided. Apply pressure and twisting motion until caster snap into place (Figure 8 &
9).
b. 3.
A
4.
A
5.
A
B
6.
A
B
7.
8. 9.
12

(Not standard with all models)
1. With cord disconnected from recep-
tacle and tank cover removed, turn
tank upside down so that the bottom
is facing up.
2. With a pair of scissors, trim the
enclosed template to fit your size
tank. Sizes will be 11”, 14” or 16”
diameters.
3. Once template is cut out, place on
bottom of tank. Align inlet arrow on
template with center of inlet on tank
(Figure 27).
4. If caster feet are attached together,
separate by removing webbing.
5. Take caster foot marked with the letter
A and align arrow on foot (Figure 28)
with arrow on template also marked
with the letter A (Figure 29).
6. Place groove of foot over rim of tank
and push until the caster foot is tight
against bottom of tank (Figure 30).
7. Secure feet with screw and washer when provided (Figure 31).
8. If flatwashers are included in hardware package place flatwasher over stem of caster
before installing casters into feet.
NOTE: Flatwashers are not required with all units.
9. Insert casters into feet by placing stem of caster into holes provided. Apply pressure and
twisting motion until casters snap into place (Figure 32).
11
10. Repeat steps 3-8 with remaining feet.
11. Return tank to upright position.
5
REAR WHEEL DOLLY/TOOL HOLDER
AND FRONT CASTER FEET ASSEMBLY
FOR METAL TANKS
(Not standard with all models)
You will find two casters (k.), two large rear wheels (l.), one axle (m.), rear dolly (n.), two
caster feet (o.) and four screws with your wet/dry vacuum. Assemble as follows:
1. With cord disconnected from receptacle and tank cover removed, turn tank upside down
so that the bottom is facing up.
2. Place axle upright on a hard surface and hammer on (1) cap nut. Place (1) wheel on axle
and slide down to cap nut (Figure 33). Be sure flat side of wheel hub is facing outward.
3. Slide axle through holes provided in dolly (Figure 34).
4. Slide remaining wheel onto axle and hammer on second cap nut (Figure 35).
5. With a pair of scissors, trim the enclosed template to fit your size tank. Sizes will be 11”,
14” or 16” diameters.
6. Once template is cut out, place on bottom of tank, align inlet arrow on template with center
of inlet on tank (Figure 36).
7. Align cutouts in center of rear dolly with bars on template (Figure 37).
8. Place groove of rear dolly over rim of tank and push until the dolly is tight against bottom
of tank (Figure 38).
9. Secure dolly with screw and washer provided (Figure 39).
10. If caster feet are attached together, separate by removing webbing.
11. Take caster foot marked with the letter A and align arrow on foot (Figure 40) with arrow
on template also marked with the letter A (Figure 41).
12. Place groove of foot over rim of tank and push until the caster foot is tight against
bottom of tank (Figure 42).
13. Secure feet with screw and washer provided (Figure 43).
14. Insert casters into feet by placing stem of caster into holes provided. Apply pressure and
twisting motion until casters snap into place (Figure 44).
15. Place tool basket (not standard with all models), with curved surface against tank, on
rear wheel dolly assembly (Figure 45).
Tank Bottom
42
37
43
45
44
A
Arrow
A
39
41
40
38
B
B
A
A
Template
Bottom of Tank
34
36
35
33
o
n
k
l
m
DOLLY, CARRIAGE HANDLE AND
BASKET ASSEMBLY FOR METAL TANKS
(Not standard with all models)
1. Remove head from tank and place tank upside down on a flat surface.
2. Place wheels on rear frame/axle assembly with extended hub of wheel towards dolly
frame and place cap nuts on axle. Secure with hammer.
3. Insert caster socket into front frame and secure with phillips head screw.
4. Place groove in front frame into lip of tank and position so frame is directly above inlet.
5. Position grooves of rear frame into lip of tank and align so rear and front frames engage.
6. Secure dolly frame to tank by placing machine screws up through holes in dolly frame.
Ensure head of screw is fully recessed in area provided. After machine screw is inserted,
tighten with flatwasher and hex nut.
7. Insert caster in caster socket and apply downward pressure until caster snaps into place.
8. Return vacuum to upright position. Attach carriage handle to tank by inserting bolt through
the center hole of handle and tank, secure with nut provided. Attach side handles with
screws provided. Be sure to spread ends of carriage handle when assembling to prevent
damage to tank.
9. Insert basket through center of carriage handle and slide into place.
B
B
A
A
Template
Bottom of Tank
27
A
Arrow
28
Tank bottom
30
31
32
A
29
2. Place axle upright on a hard surface and hammer on (1) cap nut. Place (1) wheel on axle and slide
down to cap nut (Figure 18). Be sure flat side of wheel hub is facing outward.
3. Slide axle through holes provided in dolly/basket (Figure 19).
4. Slide remaining wheel onto axle and hammer on second cap nut (Figure 20).
5. Take rear dolly assembly and place into slots (on rear of tank opposite drain) and secure with
screws provided (Figure 21).
6. With tank drain facing you, take caster foot marked with the letter A (Figure 22) and place in
slot on left side of tank also marked with the letter A and secure with screw provided (Figure
23).
7. Take caster foot marked with the letter B (Figure 24) and place in slot on right side of tank
also marked with the letter B and secure with screw provided (Figure 25).
8. If flatwashers are included in hardware package place flatwasher over stem of caster
before installing casters into feet.
NOTE: Flatwashers are not required with all units.
9. Insert casters into feet by placing stem of caster into holes provided. Apply
pressure and twisting motion until casters snap into place (Figure 26).
10. Return tank to upright position.
19
CASTER FEET AND CASTER ASSEMBLY
FOR METAL TANKS
20
21
25
24
23
22
26
18
(Not standard with all models)
Stand vacuum right side up. Place metal carriage handle outside of
tank and under the side carrying handles. Be sure to spread the ends
of the carriage handles when assembling to prevent damage to the
tank. Align holes of carriage handle to holes in tank and fasten tightly
with screws, washers, and nuts provided. The sealing washer and
screw have a close fitting tolerance. Rubber side of sealing washer
should fit against inside wall of tank. Failure to properly install rubber
washer could result in water leakage or loss of performance. Replace
the tank cover and clamp the lid latches securely.
INSTALLING THE CARRIAGE HANDLE
19

6
For 14" Diameter Tanks
For 16" Diameter Tanks
FOUR WHEEL HEAVY DUTY DOLLY
ASSEMBLY
(Not standard with all models)
Tools required:
(2) 1/2 inch open end wrenches, (2) 7/16 inch open end wrenches, or a socket set and a ham-
mer.
1. Insert 2
1
/
2
inch long bolt through center hole in rear frame, attach split lockwasher and nut
and tighten securely.
2. Attach handle brace to back of rear frame with 5/8 inch long machine screws, lockwash-
ers, and nuts. (Finger tighten only.)
3. Position main frame inside rear frame. Attach (2) 5/8 inch long machine screws, lockwash-
ers and nuts in both sides. Tighten securely.
4. Attach handle uprights, inside main frame (make sure buttons at top face inward) using 5/8
inch long machine screws, lockwashers and nuts. (Finger tighten only.) Align holes at top
of handle braces with holes in handle uprights. Attach with 1
1
/
4
inch long machine screws,
lockwashers and nuts. (Tighten securely.)
5. Go back and tighten machine screws at bottom of uprights and braces.
6. Attach caster sockets (open end down) to front of main frame using 5/8 inch long
machine screws, lockwashers and nuts. Insert casters into sockets.
7. Slide basket adapters on handle.
8. See Figure 47 and Figure 48 for correct installation of adapters.
Handle
Handle
47
49
Tank
Basket
Basket
Adapter
Basket
Adapter
Pull Outward
on Basket
Handle
Handle
48
ITEM DESCRIPTION PART NO.
1 Cap nut 43002-99
2 8" Wheel 24250-10
3 Axle 24415-00
4 Rear frame 93921-00
5 Caster socket 75405-00
6 Front frame 93920-00
7 #8 x 1/2" lg. Screw 15015-99
8 1/4-20 x 3/4" lg. Machine screw 09029-99
9 1/4" Flatwasher 07003-99
10 1/4-20 Hex nut 13001-99
11 Caster 67736-00
1
2
4
3
5
Dolly
Hex
Nut
Tank
Machine
Screw
Flat
Washer
1
4
11
5
8
7
6
2
3
10
9
Bottom of Tank
1. Remove head from tank and place tank upside
down on a flat surface.
2. Place wheels on rear frame/axle assembly with
extended hub of wheel towards dolly frame and
place cap nuts on axle. Secure with hammer.
3. Insert caster socket into front frame and secure
with phillips head screw.
4. Place groove in front frame into lip of tank and
position so frame is directly above inlet.
5. Position grooves of rear frame into lip of tank
and align so rear and front frames engage.
6. Secure dolly frame to tank by placing machine screws
up through holes in dolly frame. Ensure head of screw
is fully recessed in area provided. After machine screw
is inserted, tighten with flatwasher and hex nut.
7. Insert caster in caster socket and apply downward
pressure until caster snaps into place.
8. Return vacuum to upright position. Attach carriage
handle to tank by inserting bolt through the center hole
of handle and tank, secure with nut provided. Attach
side handles with screws provided. Be sure to spread
ends of carriage handle when assembling to prevent
damage to tank.
9. Insert basket through center of carriage handle and
slide into place.
ITEM DESCRIPTION PART NO.
1 Metal tank handle 20882-00
2 Handle & hardware Pkg. 93555-96
(includes items 3-6)
3 Side tank handle 93551-00
4 #10 x 3/4" Screw hex head 15039-99
5 Bolt 1/4-20 x 1/2" 64012-99
6 1/4-20 Hex nut 13001-99
ITEM DESCRIPTION PART NO.
1 Cap nut 43002-99
2 8" Wheel 24250-10
3 Axle 24415-00
4 Rear frame 93921-00
5 Caster socket 75405-00
6 Front frame 93920-00
7 #8 x 1/2" lg. Screw 15015-99
8 1/4-20 x 3/4" lg. Machine screw 09029-99
9 1/4" Flatwasher 07003-99
10 1/4-20 Hex nut 13001-99
11 Caster 67736-00
1
2
4
3
5
Dolly
Hex
Nut
Tank
Machine
Screw
Flat
Washer
1
4
11
5
8
7
6
2
3
10
9
Bottom of Tank
1. Remove head from tank and place tank upside
down on a flat surface.
2. Place wheels on rear frame/axle assembly with
extended hub of wheel towards dolly frame and
place cap nuts on axle. Secure with hammer.
3. Insert caster socket into front frame and secure
with phillips head screw.
4. Place groove in front frame into lip of tank and
position so frame is directly above inlet.
5. Position grooves of rear frame into lip of tank
and align so rear and front frames engage.
6. Secure dolly frame to tank by placing machine screws
up through holes in dolly frame. Ensure head of screw
is fully recessed in area provided. After machine screw
is inserted, tighten with flatwasher and hex nut.
7. Insert caster in caster socket and apply downward
pressure until caster snaps into place.
8. Return vacuum to upright position. Attach carriage
handle to tank by inserting bolt through the center hole
of handle and tank, secure with nut provided. Attach
side handles with screws provided. Be sure to spread
ends of carriage handle when assembling to prevent
damage to tank.
9. Insert basket through center of carriage handle and
slide into place.
ITEM DESCRIPTION PART NO.
1 Metal tank handle 20882-00
2 Handle & hardware Pkg. 93555-96
(includes items 3-6)
3 Side tank handle 93551-00
4 #10 x 3/4" Screw hex head 15039-99
5 Bolt 1/4-20 x 1/2" 64012-99
6 1/4-20 Hex nut 13001-99
1. Cap nut
2. 8" wheel
3. Axle
4. Rear frame
5. Caster socket
6. Front frame
ITEM NUMBER & DESCRIPTION
1. Metal tank handle
2. Side tank handle
3. #10 x 3/4" Screw hex head
7. #8 x 1/2" lg. Screw
8. 1/4 - 20 x 3/4" lg.
Machine screw
9. 1/4" Flatwasher
10. 1/4 - 20 Hex nut
11. Caster
ITEM NUMBER & DESCRIPTION
4. Bolt 1/4 - 20 x 1/2"
5. 1/4 - 20 Hex nut
SIDE TANK HANDLE ASSEMBLY
(Not standard with all models)
Attach side handles to tank with screws provided (Figure 46).
46
9. Attach handle onto uprights by pushing down and holding buttons in on uprights.
10. Place tank retaining bracket through slot and bolt in rear frame and screw on knob.
11. Slide bumper down over main dolly frame until it bottoms out.
12. Place axle upright on a hard surface and hammer on (1) cap nut. Place (1) wheel on axle
and slide down to cap nut. Slide axle through rear of frame and slide on other wheel.
Before assembling cap nut on other end of axle, be certain dolly is assembled correctly.
(You may place tank on dolly and tighten knob of retaining bracket to be sure of correct
assembly.)
13. After ensuring dolly is assembled correctly remove tank and place dolly on side with
installed cap nut on hard surface and hammer second cap nut on axle.
14. Place accessory basket on adapters and pull out on outer rim of basket and snap into
place (Figure 49).
1
10
7
14
15
2
3
23
6
5
12
13
23
4
15
22
19
18
15
17
8
9
5
16
5
15
21
11
20
1. Handle
2. Handle upright
3. Handle brace
4. 1/4 - 20 x 1
1
/4" Hex head
machine screw (Black)
5. 1/4" External tooth
lockwasher
6. 1/4 - 20 Hex nut (Black)
7. Rear dolly frame
8. Main dolly frame
9. 5/16 - 18 x 2
1
/2" Hex head bolt
10. 5/16" Split lockwash
11. 5/16 - 18 Hex nut
ITEM NUMBER & DESCRIPTION
12. Tank retainer bracket
13. Threaded knob
14. Axle
15. 1/4 - 20 x 5/8" Hex head
machine screw
16. 1/4 - 20 Hex nut
17. Caster socket
18. Caster
19. Bumper
20. 10" Wheel (25.4cm)
21. Cap nut
22. Accessory basket
23. Basket adapter
BAND DOLLY ASSEMBLY
(Not standard with all models)
1. Place casters into sockets on band assembly.
2. Place tank upside down and slip band assembly over lip on bottom of tank.

7
Keep Filters Clean
The efficiency of these vacuum cleaners is largely dependent on the filter.
A clogged filter can cause overheating and possibly damage the vacuum cleaner.
Clean or replace filters regularly. Do not use the vacuum or filters for collecting hazardous or
other health endangering materials.
NOTE: Never machine wash or dry filters.
OPERATION
This equipment incorporates parts such as switches, motors or the
like that tend to produce arcs or sparks that can cause an explosion.
Do not pick up flammable, combustible, or hot materials. Do not use
around explosive liquids or vapors, as electrical devices produce arcs
or sparks which can cause a fire or explosion - do not use at filling
stations or anywhere gasoline is stored or dispensed.
Blower Use
Some vacuum cleaners can be used as a powerful blower by inserting the hose into the motor
housing exhaust port.
ALWAYS WEAR EYE PROTECTION TO PREVENT ROCKS OR DEBRIS
FROM BEING BLOWN OR RICOCHETING INTO THE EYES OR FACE WHICH
CAN RESULT IN SERIOUS INJURY.
INSTALLATION
(See Operation section for Filters)
3. Insert bolt and tighten nut until secure.
3
4
1
2
1. 55 Gal. band assembly
2. Caster
ITEM NUMBER & DESCRIPTION
3. Hex head bolt, 1/4 - 20 x 1
3
/4
4. Hex nut, 1/4 - 20
TOOL HOLDER
Cartridge Filter Maintance
This filter is made of high quality paper designed to stop small
particles of dust. The filter can be used for wet or dry pick-up. A dry
filter is necessary to pick up dry material. If you use your vac to pick
up dust when the filter is wet, the filter will clog quickly and be very
difficult to clean. The filter may become saturated when picking up
large quantities of liquid causing misting to appear in the exhaust
air. At this time, you should dry or change the filter to eliminate this
occurrance. Please handle the filter carefully when removing it for
cleaning or when installing it. Check the filter for tears or small holes.
Even a small hole can cause dust to be exhausted. Do not use a filter
with holes or tears. Replace it immediately.
NOTICE
The cartridge filter is not compatible when utilizing the QPV® Pump
Vacuum’s pump pick-up assembly.
Dry Pickup
See the Shop-Vac
®
Vacuum Filter Reference and Installation chart on page 3 to determine
which type of dry filtration is best for your needs. Better quality filtration is required for finer
dry
materials. Collection filter bags are recommended for very fine materials such as dry wall dust.
Note: When using the vacuum to pick-up very fine dust such as sawdust or dry wall dust, it
will be necessary to empty the tank and clean the filter at more frequent intervals to maintain
maximum pick-up power or upgrade to collection filter bags.
Wet Pickup
See the Shop-Vac
®
Vacuum Filter Reference and Installation chart on page 3 to determine
which type of wet filtration is best for your needs. Remove the dry filters plus all dirt and debris
found in the tank assembly. Wet pick-up requires only the foam sleeve or cartridge filter to be in
place. Do not use dry filters for wet pick-up. When picking up several tanks full of liquid, the filter
will become saturated and misting may appear in the exhaust air. At this time, you should dry
the filter or change to a dry filter to eliminate the misting and possible dripping of liquid around
the lid. After completing a wet pick-up job, raise the hose to drain
into tank before shutting off the
vac. The interior of the tank should be periodically rinsed clean.
Note: Wet pick-up accessories should be washed periodically with soap and water, especially
after picking up wet, sticky liquids.
Installing & Cleaning:
1. Slide cartridge filter down over filter cage (Figure 56).
2. Place filter retainer on top of cartridge filter (Figure 57).
3.
Hold onto base of lid cage with one hand and turn retainer clockwise to tighten (Figure 58).
4. To remove filter for cleaning, again hold onto base of lid cage with one hand and turn
retainer counter clockwise to loosen (Figure 59).
5. Slide cartridge filter off filter cage (Figure 60).
6. Clean dry filter by tapping it on inside of waste can (Figure 61).
7. Clean wet filter by rinsing from the inside (Figure 62).
8. When wet (to prevent mold and/or mildew build-up), the cartridge filter should be removed
and allowed to air dry for a 24-hour period before being re-installed back onto the filter cage.
ALWAYS DISCONNECT THE PLUG FROM THE WALL OUTLET BEFORE
REMOVING THE TANK COVER.
(Not standard with all models)
If your tool holder looks like the one pictured in Figure 50, follow these instructions.
1. With rear of unit facing you, take tool holder and position it with tabs facing rear of unit
(Figure 51).
2. Place “J” shaped tabs into the slots on cord wraps (Figure 52).
3. Press down until tabs snap into place.
4. Press down on center of tool holder until tab latches on bottom lid (Figure 53).
If your tool holder looks like the one pictured in Figure 54, follow these instructions.
1. With rear of unit facing you, take tool holder and slide over notches on rear of tank (Figure 55).
51
54
53
55
52
50
TIGHTEN
7
6
4
LOOSEN
56 57 58 59
60
61
62

Automatic Shutoff
The vacuum cleaner is equipped with an automatic shutoff that operates when picking up liq-
uids. When the liquid in the tank reaches a certain level, an internal float will seat itself against
a seal at the intake of the motor, shutting off suction. When this happens, the motor will develop
a higher than normal pitch noise indicating that you need to switch off the vac and empty the
liquid.
Note: If accidently tipped over, the float shutoff device could seat against the seal and shut off
suction. If this happens, simply place the vacuum cleaner in upright position and turn off the
switch until the float returns to its normal position.
8
Emptying Tank
Use special care when emptying heavily loaded tanks. Your Wet/Dry Vacuum may be emptied of
liquid waste by removing the tank cover. To empty, switch off the vac and remove the plug from
the wall receptacle. Remove the tank cover and empty the tank.
Note: For those models with a drain plug, tank can be emptied by removing drain cap and
draining liquid waste into a suitable drain.
Maintenance
Be sure to disconnect power supply before attempting to service or remove any
components.
Storage
Before storing the vacuum cleaner, always empty and clean the tank. Never allow liquids to sit
in the tank for any extended period of time.
Always store the vacuum cleaner indoors.
Lubrication
No lubrication is necessary as the motor is equipped with lifetime lubricated bearings.
Service
Do not attempt to service your Shop-Vac
®
wet/dry vacuum cleaner beyond that described in
this manual. Refer all other servicing to a qualified service center.
If any of the motor housing parts should become detached or broken, exposing
the motor or any other electrical components, operation should be discontinued
immediately to avoid personal injury or further damage to the vacuum. Repairs should
be made before reusing the vacuum.
Nozzles and Accessories
Accessories, Hoses and Wands
Wands
Hoses
All Shop-Vac
®
vacuums covered in this manual come with
accessories to cover wet and dry cleanup jobs. Not all vacs
include all accessories shown.
Deluxe 12" (30.48cm) Nozzle
Inserts snap-in and out.
Elbow swivels.
All Friction Fit
Accessories
Insert wand end or hose
into accessory and twist to
form a tight fit.
14" (35.56cm) ABS Plastic
Master Nozzle
Inserts lock into place by
sliding red buttons. Elbow swivels.
Lock
Lock
Floor
Brush
Insert
Double
Blade
Squeegee
Insert
Carpet
Tool
Insert
(1.25" (3.18cm)
utility nozzle
shown)
14" (35.56cm) Metal
Master Nozzle
Inserts lock into place by
sliding insert onto nozzle.
All Friction Fit Wands
Insert wand ends together
and twist to form a tight fit.
Positive Locking Wands
Insert wand ends together
until metal push button locks.
Locking Nut Wand End
Insert wand end over nozzle
and tighten nut.
Dual Surface Selector Nozzle
Levers control brush position for
various types of cleaning.
All Friction Fit Hoses
Insert machine hose end into
tank and twist to form a
tight fit.
Posi-Lock Hoses
Insert hose collar onto
threaded tank inlet and
tighten.
Brush Insert Shown
Carpet
Tool
Insert
Squeegee
Insert
ACCESSORIES, HOSES AND WANDS
All Shop-Vac
®
vacuums covered in this manual come with accessories to cover wet and dry cleanup jobs. Not all vacs include all accessories shown.
Nozzles and Accessories
Accessories, Hoses and Wands
Wands
Hoses
All Shop-Vac
®
vacuums covered in this manual come with
accessories to cover wet and dry cleanup jobs. Not all vacs
include all accessories shown.
Deluxe 12" (30.48cm) Nozzle
Inserts snap-in and out.
Elbow swivels.
All Friction Fit
Accessories
Insert wand end or hose
into accessory and twist to
form a tight fit.
14" (35.56cm) ABS Plastic
Master Nozzle
Inserts lock into place by
sliding red buttons. Elbow swivels.
Lock
Lock
Floor
Brush
Insert
Double
Blade
Squeegee
Insert
Carpet
Tool
Insert
(1.25" (3.18cm)
utility nozzle
shown)
14" (35.56cm) Metal
Master Nozzle
Inserts lock into place by
sliding insert onto nozzle.
All Friction Fit Wands
Insert wand ends together
and twist to form a tight fit.
Positive Locking Wands
Insert wand ends together
until metal push button locks.
Locking Nut Wand End
Insert wand end over nozzle
and tighten nut.
Dual Surface Selector Nozzle
Levers control brush position for
various types of cleaning.
All Friction Fit Hoses
Insert machine hose end into
tank and twist to form a
tight fit.
Posi-Lock Hoses
Insert hose collar onto
threaded tank inlet and
tighten.
Brush Insert Shown
Carpet
Tool
Insert
Squeegee
Insert
Nozzles and Accessories
Note: When using 1.5" (3.8cm) accessories, adapter
may be needed to attach accessory to hose end.

9
SHOP-VAC
®
ONE YEAR INDUSTRIAL/COMMERCIAL WARRANTY
Shop-Vac
®
Corporation warrants the vacuum cleaner contained in this package for one year from the date of purchase to correct by repair or parts replacement without charge any product defect
due to faulty material or workmanship. Should this product be used for rental service, a 90 day limited warranty will apply. THIS WARRANTY DOES NOT COVER ACCESSORIES. Shop-Vac
®
assumes no responsibility for damage or faulty performance caused by misuse or careless handling, or where repairs or modifications have been made or attempted by others. Proof of purchase
date is required. This warranty gives you specific legal rights, and you may also have other rights which vary from state to state or province to province.
Customers in the United States: for product service contact Shop-Vac
®
Corporation Customer Service, at (570) 326-3557 or go to www.shopvac.com/support. Visit www.shopvac.com for your
vacuum's parts list schematic.
Customers in Canada: for product service return the complete unit, (transportation prepaid), to the Authorized Shop-Vac
®
Service Centre nearest you. A complete list of Authorized Service Centres
is included with each vacuum cleaner.
Customers in Mexico: for product service see paperwork that came with your unit.
Foam Sleeve
Rinse with soap and
water, dry and reinstall
Reusable Disc Filter
Rinse with soap and
water, dry and reinstall;
do not machine wash
Cartridge Filter
From inside of filter,
rinse with soap and
water, dry completely
and reinstall; do not
use with foam sleeve
Super Performance Filter
Dispose of after filter
develops rips or tears
Full Polyester Filter
Brush off dirt and reinstall;
if filter gets wet, rinse
with water, dry and
reinstall
All Collection Bags
Dispose of bag when full
Foam Sleeve
Rinse with water, dry and reinstall.
SHOP-VAC
®
VACUUM FILTER
CLEANING REFERENCE
Troubleshooting Chart
Parts/accessories missing 1. Packed in tank 1. Check in tank
Vacuum cleaner will not start 1. No power at receptacle 1. Check for power
2. Defective switch 2. Replace switch
3. Defective motor 3. Replace motor
Dust discharging from exhaust 1. Filter not installed/not installed properly 1. Properly install filter
2. Filter damaged 2. Replace filter
3. Filter clogged or dust is too fine 3. Use more efficient filter
4. Filter not functional 4. Clean and replace filter
Loss of suction 1. Loose hose connection 1. Tighten hose connection
2. Filter clogged 2. Clean or replace filter
3. Full tank 3. Empty tank
4. Hole in hose 4. Replace hose
Static shock 1. Dry environment 1. Add moisture to air (if practical, use a console
or installed humidifier).
2. Relative humidity of air is low 2. This situation is temporary and does not
affect the use of the vacuum cleaner.
Symptom Possible Cause(s) Corrective Action
Foam Sleeve
Rinse with soap and
water, dry and reinstall
Reusable Disc Filter
Rinse with soap and
water, dry and reinstall;
do not machine wash
Cartridge Filter
From inside of filter,
rinse with soap and
water, dry completely
and reinstall; do not
use with foam sleeve
Super Performance Filter
Dispose of after filter
develops rips or tears
Full Polyester Filter
Brush off dirt and reinstall;
if filter gets wet, rinse
with water, dry and
reinstall
All Collection Bags
Dispose of bag when full
Reusable Disk Filter
Rinse with water, dry and reinstall; do not
machine wash.
Foam Sleeve
Rinse with soap and
water, dry and reinstall
Reusable Disc Filter
Rinse with soap and
water, dry and reinstall;
do not machine wash
Cartridge Filter
From inside of filter,
rinse with soap and
water, dry completely
and reinstall; do not
use with foam sleeve
Super Performance Filter
Dispose of after filter
develops rips or tears
Full Polyester Filter
Brush off dirt and reinstall;
if filter gets wet, rinse
with water, dry and
reinstall
All Collection Bags
Dispose of bag when full
Cartridge Filter &
Ultra Web
®
Cartridge Filter
From inside of filter, rinse with water, dry
completely and reinstall; do not use with foam
sleeve (except for 962 series).
Foam Sleeve
Rinse with soap and
water, dry and reinstall
Reusable Disc Filter
Rinse with soap and
water, dry and reinstall;
do not machine wash
Cartridge Filter
From inside of filter,
rinse with soap and
water, dry completely
and reinstall; do not
use with foam sleeve
Super Performance Filter
Dispose of after filter
develops rips or tears
Full Polyester Filter
Brush off dirt and reinstall;
if filter gets wet, rinse
with water, dry and
reinstall
All Collection Bags
Dispose of bag when full
Super Performance Filter
Dispose of after filter develops rips or tears.
Foam Sleeve
Rinse with soap and
water, dry and reinstall
Reusable Disc Filter
Rinse with soap and
water, dry and reinstall;
do not machine wash
Cartridge Filter
From inside of filter,
rinse with soap and
water, dry completely
and reinstall; do not
use with foam sleeve
Super Performance Filter
Dispose of after filter
develops rips or tears
Full Polyester Filter
Brush off dirt and reinstall;
if filter gets wet, rinse
with water, dry and
reinstall
All Collection Bags
Dispose of bag when full
Full Polyester Filter
Brush off dirt and reinstall; if filter gets wet,
rinse with water, dry and reinstall.
Foam Sleeve
Rinse with soap and
water, dry and reinstall
Reusable Disc Filter
Rinse with soap and
water, dry and reinstall;
do not machine wash
Cartridge Filter
From inside of filter,
rinse with soap and
water, dry completely
and reinstall; do not
use with foam sleeve
Super Performance Filter
Dispose of after filter
develops rips or tears
Full Polyester Filter
Brush off dirt and reinstall;
if filter gets wet, rinse
with water, dry and
reinstall
All Collection Bags
Dispose of bag when full
All Collection Bags
Dispose of bag when full.
Foam Sleeve
Rinse with soap and
water, dry and reinstall
Reusable Disc Filter
Rinse with soap and
water, dry and reinstall;
do not machine wash
Cartridge Filter
From inside of filter,
rinse with soap and
water, dry completely
and reinstall; do not
use with foam sleeve
Super Performance Filter
Dispose of after filter
develops rips or tears
Full Polyester Filter
Brush off dirt and reinstall;
if filter gets wet, rinse
with water, dry and
reinstall
All Collection Bags
Dispose of bag when full
Cleanstream
®
Abrasion Resistant
Cartridge Filter
Clean installed filter by simply tapping or
shaking the vacuum unit. To restore optimum
airflow, remove filter, tap end cap against
a hard surface to loosen debris. Additional
debris can be removed by rinsing outside
surface of filter with running water. Avoid
dampening inside of filter. Completely air dry
filter after washing.
Important: DO NOT BRUSH. DO NOT
clean filter media with abrasive materials.
Do not scrub to clean between pleats. This
will permanently damage the filter's ability to
stop dust.
One year limited warranty

Recherche des pannes
Des pièces ou des accessoires 1. Ils sont emballés dans la cuve. 1. Vérifier dans la cuve
manquent
L’aspirateur ne démarre pas 1. Le courant ne parvient pas à la prise 1. Vérifier l’arrivée de courant
2. l’interrupteur est défectueux 2. Le remplacer
3. Le moteur est défectueux 3. Le remplacer
De la poussière s’échappe 1. Le filtre n’est pas posé ou bien il est mal posé 1. Le poser comme il faut
par la sortie d’air 2. Le filtre est endommagé 2. Le remplacer
3. Le filtre est colmaté ou bien la poussière 3. En utiliser un plus efficace
est trop fine
4. Le filtre ne fonctionne pas 4. Le nettoyer ou le remplacer
Perte d’aspiration 1. La connexion du tuyau souple est desserrée 1. La serrer
2. Le filtre est colmaté 2. Le nettoyer ou le remplacer
3. La cuve est pleine 3. La vider
4. Le tuyau souple est troué 4. Le remplacer
Décharges statiques 1. L’atmosphère est sèche 1. Ajouter de l’humidité dans l’air (dans la mesure
du possible, utiliser un humidificateur à installation
fixe ou à console).
2. L’humidité relative dans l’air est trop basse 2. Cette situation est temporaire et n’affectera pas
l’utilisation de l’aspirateur.
Promlèmes Cause(s) possibles(s) Remèdes
8 Fr
Foam Sleeve
Rinse with soap and
water, dry and reinstall
Reusable Disc Filter
Rinse with soap and
water, dry and reinstall;
do not machine wash
Cartridge Filter
From inside of filter,
rinse with soap and
water, dry completely
and reinstall; do not
use with foam sleeve
Super Performance Filter
Dispose of after filter
develops rips or tears
Full Polyester Filter
Brush off dirt and reinstall;
if filter gets wet, rinse
with water, dry and
reinstall
All Collection Bags
Dispose of bag when full
Filtre en mousse
Le nettoyer à l’eau et le laisser sécher, puis
le réinstaller.
Foam Sleeve
Rinse with soap and
water, dry and reinstall
Reusable Disc Filter
Rinse with soap and
water, dry and reinstall;
do not machine wash
Cartridge Filter
From inside of filter,
rinse with soap and
water, dry completely
and reinstall; do not
use with foam sleeve
Super Performance Filter
Dispose of after filter
develops rips or tears
Full Polyester Filter
Brush off dirt and reinstall;
if filter gets wet, rinse
with water, dry and
reinstall
All Collection Bags
Dispose of bag when full
Filtre à disque réutilisable
Le nettoyer à l’eau et le laisser sécher, puis le
réinstaller. Ne pas le laver dans une laveuse.
Foam Sleeve
Rinse with soap and
water, dry and reinstall
Reusable Disc Filter
Rinse with soap and
water, dry and reinstall;
do not machine wash
Cartridge Filter
From inside of filter,
rinse with soap and
water, dry completely
and reinstall; do not
use with foam sleeve
Super Performance Filter
Dispose of after filter
develops rips or tears
Full Polyester Filter
Brush off dirt and reinstall;
if filter gets wet, rinse
with water, dry and
reinstall
All Collection Bags
Dispose of bag when full
Filtre à cartouche et filtre à
cartouche Ultra Web
MD
De l’intérieur, les nettoyer à l’eau, puis les
laisser complètement sécher avant de les
réinstaller. Ne pas utiliser ces filtres en même
temps qu’un filtre en mousse (à l’exception de
la série 962).
Foam Sleeve
Rinse with soap and
water, dry and reinstall
Reusable Disc Filter
Rinse with soap and
water, dry and reinstall;
do not machine wash
Cartridge Filter
From inside of filter,
rinse with soap and
water, dry completely
and reinstall; do not
use with foam sleeve
Super Performance Filter
Dispose of after filter
develops rips or tears
Full Polyester Filter
Brush off dirt and reinstall;
if filter gets wet, rinse
with water, dry and
reinstall
All Collection Bags
Dispose of bag when full
Filtres Super Performance
Les jeter dès qu’on remarque des signes de
déchirures.
Foam Sleeve
Rinse with soap and
water, dry and reinstall
Reusable Disc Filter
Rinse with soap and
water, dry and reinstall;
do not machine wash
Cartridge Filter
From inside of filter,
rinse with soap and
water, dry completely
and reinstall; do not
use with foam sleeve
Super Performance Filter
Dispose of after filter
develops rips or tears
Full Polyester Filter
Brush off dirt and reinstall;
if filter gets wet, rinse
with water, dry and
reinstall
All Collection Bags
Dispose of bag when full
Filtres en polyester pleine
circonférence
Enlever la poussière avec une brosse, puis
reposer le filtre. Si le filtre est mouillé, le
rincer à l’eau, puis le laisser sécher avant de
le reposer.
Foam Sleeve
Rinse with soap and
water, dry and reinstall
Reusable Disc Filter
Rinse with soap and
water, dry and reinstall;
do not machine wash
Cartridge Filter
From inside of filter,
rinse with soap and
water, dry completely
and reinstall; do not
use with foam sleeve
Super Performance Filter
Dispose of after filter
develops rips or tears
Full Polyester Filter
Brush off dirt and reinstall;
if filter gets wet, rinse
with water, dry and
reinstall
All Collection Bags
Dispose of bag when full
Tous les sacs récupérateurs
Les jeter dès qu’ils sont pleins.
Foam Sleeve
Rinse with soap and
water, dry and reinstall
Reusable Disc Filter
Rinse with soap and
water, dry and reinstall;
do not machine wash
Cartridge Filter
From inside of filter,
rinse with soap and
water, dry completely
and reinstall; do not
use with foam sleeve
Super Performance Filter
Dispose of after filter
develops rips or tears
Full Polyester Filter
Brush off dirt and reinstall;
if filter gets wet, rinse
with water, dry and
reinstall
All Collection Bags
Dispose of bag when full
Filtres à cartouche résistant
à l’abrasion Cleanstream
MD
Le filtre étant encore dans l’aspirateur, taper
sur l’aspirateur ou le secouer. Pour redonner
au filtre toute son efficacité, le déposer, taper
son extrémité contre une surface dure pour
détacher les débris. On peut également le
nettoyer en rinçant sa surface extérieure à
l’eau courante. Éviter de mouiller l’intérieur du
filtre. Le laisser complètement sécher à l’air
avant de la reposer.
Important: NE PAS LES BROSSER. NE
PAS nettoyer le filtre avec une substance
abrasive. NE PAS frotter pour nettoyer entre
les plis. Ceci risquera de modifier de façon
permanente la capacité du filtre de retenir la
poussière.
RÉFÉRENCE DES FILTRES DE
NETTOYAGE POUR LES ASPIRATEURS
SHOP-VAC
®
Remisage
Avant de remiser un aspirateur, toujours vider et nettoyer sa cuve. Ne jamais laisser de liquide
reposer dans la cuve d’un aspirateur pendant de longues périodes.
Les aspirateurs doivent toujours être remisés à l’intérieur
Lubrification
Ces aspirateurs ne nécessitent aucune lubrification. Leur moteur est équipé de paliers lubrifiés
en permanence.
Entretien
Ne jamais essayer de procéder à d’autres entretiens sur ces aspirateurs pour déchets secs
et humides Shop-Vac
MD
que ceux stipulés dans ce Guide. Pour toute autre intervention,
s’adresser à un centre de réparation agréé Shop-Vac
MD
.
Si une des pièces du carter du moteur se détache ou se brise, ce qui exposerait
le moteur ou un de ses composants électriques, cesser immédiatement d’utiliser
l’aspirateur pour éviter de subir des blessures corporelles et d’endommager encore
plus l’aspirateur. Avant de réutiliser l’aspirateur, le faire réparer.

8 Sp
Partes/accesorios faltantes 1. Empaquetados en el depósito 1. Verifique si se encuentran en el depósito
La aspiradora no se enciende 1. No hay energía en el tomacorriente 1. Verifique si hay energía
2. Interruptor defectuoso 2. Reemplace el interruptor
3. Motor defectuoso 3. Reemplace el motor
Polvo sale del escape 1. Filtro no instalado /no instalado adecuadamente 1. Instale el filtro correctamente
2. Filtro dañado 2. Reemplace el filtro
3. Filtro obturado o el polvo es muy fino 3. Utilice un filtro más eficiente
4. Filtro no funciona 4. Limpie o reemplace el filtro
Pérdida de succión 1. Conexión de manguera suelta 1. Ajuste la conexión de la manguera
2. Filtro obturado 2. Limpie o reemplace el filtro
3. Depósito lleno 3. Vacíe el depósito
4. Orificio en manguera 4. Reemplace la manguera
Choque estático 1. Entorno seco 1. Humidifique el aire (de ser práctico, utilice una
consola o humidificador instalado)
2. Humedad relativa de aire es baja 2. Esta situación es temporaria y no afecta el
uso de la aspiradora.
Síntoma Posible causa Acción correctiva
Tabla de Solución de Problemas
UN AÑO DE GARANTÍA INDUSTRIAL /COMERCIAL DE SHOP-VAC
®
Shop-Vac
®
Corporation garantiza la aspiradora contenida en este paquete durante un año a partir de la fecha de compra para reparar el equipo o reemplazar sus partes sin cargo alguno siempre
que los defectos resulten de fallas en los materiales o en la mano de obra. Si este producto se utiliza para alquiler, se aplicará una garantía limitada de 90 días. ESTA GARANTÍA NO CUBRE LOS
ACCESORIOS. Shop-Vac
®
no asume ninguna responsabilidad por daños o desempeño defectuoso del equipo causados por uso incorrecto o manipulación negligente, o cuando terceros intentaron
realizar o efectivamente realizaron reparaciones o modificaciones al equipo. Se requiere recibo de compra. Esta garantía le otorga derechos legales específicos, y también puede tener otros derechos
que variarán de un estado a otro o de una provincia a otra.
Clientes en los Estados Unidos: para soporte técnico, póngase en contacto con Shop-Vac
®
Corporation, Atención al Cliente, al número (570) 326-3557, o visite www.shopvac.com/support. Visite www.
shopvac.com para un diagrama del listado de piezas de su aspiradora.
Clientes en Canadá: regrese la unidad completa (transporte prepago) al Centro de Servicio Técnico Autorizado de Shop-Vac® más cercano a su domicilio. Una lista completa de Centros de Servicio
Autorizados se incluye con cada aspiradora.
Clientes en México: para reparaciones del producto, consulte la documentación que recibió junto con la unidad.
Un año de garantía limitada
Foam Sleeve
Rinse with soap and
water, dry and reinstall
Reusable Disc Filter
Rinse with soap and
water, dry and reinstall;
do not machine wash
Cartridge Filter
From inside of filter,
rinse with soap and
water, dry completely
and reinstall; do not
use with foam sleeve
Super Performance Filter
Dispose of after filter
develops rips or tears
Full Polyester Filter
Brush off dirt and reinstall;
if filter gets wet, rinse
with water, dry and
reinstall
All Collection Bags
Dispose of bag when full
Manga de hule-espuma
Enjuagar con agua, secar y volver a instalar.
Foam Sleeve
Rinse with soap and
water, dry and reinstall
Reusable Disc Filter
Rinse with soap and
water, dry and reinstall;
do not machine wash
Cartridge Filter
From inside of filter,
rinse with soap and
water, dry completely
and reinstall; do not
use with foam sleeve
Super Performance Filter
Dispose of after filter
develops rips or tears
Full Polyester Filter
Brush off dirt and reinstall;
if filter gets wet, rinse
with water, dry and
reinstall
All Collection Bags
Dispose of bag when full
Filtro de disco reutilizable
Enjuagar con agua, secar y volver a instalar;
no lavar a máquina.
Foam Sleeve
Rinse with soap and
water, dry and reinstall
Reusable Disc Filter
Rinse with soap and
water, dry and reinstall;
do not machine wash
Cartridge Filter
From inside of filter,
rinse with soap and
water, dry completely
and reinstall; do not
use with foam sleeve
Super Performance Filter
Dispose of after filter
develops rips or tears
Full Polyester Filter
Brush off dirt and reinstall;
if filter gets wet, rinse
with water, dry and
reinstall
All Collection Bags
Dispose of bag when full
Filtro de cartucho y filtro de
cartucho Ultra Web
®
Desde el interior del filtro, enjuague con agua,
seque completamente y vuelva a instalar; no
utilice con manga de hule-espuma (salvo por
la serie 962).
Foam Sleeve
Rinse with soap and
water, dry and reinstall
Reusable Disc Filter
Rinse with soap and
water, dry and reinstall;
do not machine wash
Cartridge Filter
From inside of filter,
rinse with soap and
water, dry completely
and reinstall; do not
use with foam sleeve
Super Performance Filter
Dispose of after filter
develops rips or tears
Full Polyester Filter
Brush off dirt and reinstall;
if filter gets wet, rinse
with water, dry and
reinstall
All Collection Bags
Dispose of bag when full
Filtro de gran desempeño
Deséchelo una vez que el filtro presente rotu-
ras o rasgaduras.
Foam Sleeve
Rinse with soap and
water, dry and reinstall
Reusable Disc Filter
Rinse with soap and
water, dry and reinstall;
do not machine wash
Cartridge Filter
From inside of filter,
rinse with soap and
water, dry completely
and reinstall; do not
use with foam sleeve
Super Performance Filter
Dispose of after filter
develops rips or tears
Full Polyester Filter
Brush off dirt and reinstall;
if filter gets wet, rinse
with water, dry and
reinstall
All Collection Bags
Dispose of bag when full
Filtro 100% de políester
Quite la suciedad cepillando y vuelva a
instalar. Si el filtro se moja, enjuague con
agua, seque y vuelva a instalar.
Foam Sleeve
Rinse with soap and
water, dry and reinstall
Reusable Disc Filter
Rinse with soap and
water, dry and reinstall;
do not machine wash
Cartridge Filter
From inside of filter,
rinse with soap and
water, dry completely
and reinstall; do not
use with foam sleeve
Super Performance Filter
Dispose of after filter
develops rips or tears
Full Polyester Filter
Brush off dirt and reinstall;
if filter gets wet, rinse
with water, dry and
reinstall
All Collection Bags
Dispose of bag when full
Todas las bolsas colectoras
Cuando la bolsa esté llena, deséchela.
Foam Sleeve
Rinse with soap and
water, dry and reinstall
Reusable Disc Filter
Rinse with soap and
water, dry and reinstall;
do not machine wash
Cartridge Filter
From inside of filter,
rinse with soap and
water, dry completely
and reinstall; do not
use with foam sleeve
Super Performance Filter
Dispose of after filter
develops rips or tears
Full Polyester Filter
Brush off dirt and reinstall;
if filter gets wet, rinse
with water, dry and
reinstall
All Collection Bags
Dispose of bag when full
Filtro de cartucho resistente
a la abrasión Cleanstream
®
Limpie el filtro instalado simplemente con
un golpecito o sacudiendo la aspiradora.
Para restaurar el flujo de aire óptimo, quite el
filtro, golpee la tapa del extremo contra una
superficie dura para desprender los residuos.
Se puede eliminar el residuo adicional enjua-
gando la superficie externa del filtro con agua
corriente. Evite mojar el interior del filtro. Deje
secar completamente al aire el filtro después
de lavarlo.
Importante: NO CEPILLARLO. NO LIMPIE
los elementos filtrantes con materiales abra-
sivos. NO friegue para limpiar entre los
pliegues. Esto dañará permanentemente la
capacidad del filtro de captar la suciedad.
LIMPIEZA DE LOS FILTROS DE LAS
ASPIRADORAS SHOP-VAC
®
No intente realizar un servicio a su aspiradora para líquidos y sólidos Shop-Vac® que exceda al
descrito en el presente manual. Diríjase a un centro de servicio técnico calificado para todas las
otras tareas de mantenimiento.
Si alguna de las partes del alojamiento del motor se desprende o rompe, de manera que
el motor u otros componentes eléctricos queden expuestos se debe interrumpir la oper-
ación de inmediato para evitar lesiones personales o daños mayores a la aspiradora. Se
deben realizar las reparaciones antes de volver a utilizarla.
Almacenamiento
Antes de almacenar la aspiradora siempre deberá vaciar y limpiar el depósito. Nunca permita
que permanezca líquido en el mismo durante un período prolongado.
Siempre guarde la aspiradora bajo techo.
Lubricación
No es necesario realizar ningún tipo de lubricación ya que el motor está equipado con cojinetes
con lubricación permanente.
Servicio
/