Texas Equipment TS4518 Owner's manual
- Category
- Power chainsaws
- Type
- Owner's manual
Page is loading ...
Page is loading ...
Page is loading ...
Page is loading ...
Page is loading ...
Page is loading ...
Page is loading ...
Page is loading ...
Page is loading ...
Page is loading ...
Page is loading ...
Page is loading ...

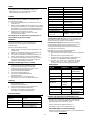
13
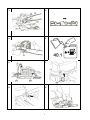
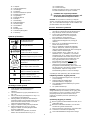
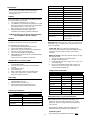
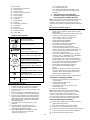
Warning symbols
Warning! Hazard. Incorrect use of the
machine may be hazardous to the
operator and others.
Read the user manual thoroughly
before using the machine.
Use ear defenders, safety goggles
and a safety helmet.
Use safety gloves.
Use safety shoes and safety pants with cut-
retardant material (cut-retardant padding).
Kickback hazard!
Kickback is a fast and uncontrollable
movement of the chainsaw in the
direction of the user.
When using the power chainsaw, hold it
securely with both hands to ensure control
of the machine and reduce the risk of
kickback.
Never operate the power chainsaw
with one hand!
Avoid working in rainy weather or on wet
surfaces, since this increases the risk of
accidents.

14
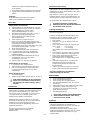
Table of content
Illustrations ....................................................................... 2
Warning symbols ............................................................ 13
Safety instructions .......................................................... 14
Preparation ..................................................................... 14
Operation ....................................................................... 14
Petrol safety ................................................................... 15
Maintenance and storage ............................................... 15
Identification of parts ...................................................... 15
Symbols on the machine ................................................ 16
Fitting the guide bar and chain ....................................... 16
Prior to start - Fuel and chain oil .................................... 16
Start/Stop ........................................................................17
Chain brake .....................................................................17
Automatic chain lubrication .............................................17
Adjusting the carburettor .................................................17
Fuel filter .........................................................................17
Air inlet ............................................................................17
Oil tank filter ....................................................................18
Air filter ............................................................................18
Spark plug .......................................................................18
Guide bar and chain maintenance .................................. 18
Storage............................................................................ 18
Technical specifications .................................................. 18
Maintenance schedules................................................... 18
Warranty and general terms and conditions .................... 18
Troubleshooting .............................................................. 19
CE Declaration of Conformity ........... 27
Safety instructions
Congratulations with the purchase of your new power
chainsaw. Please read this user manual thoroughly,
especially the safety-related warnings marked with the
symbol:
Preparation
Read the user manual thoroughly. Ensure that you
become familiar with the different control functions,
settings and handles on the equipment.
When working with power chainsaws, the saw’s
safety equipment must always be in full working
condition. Before using the saw, it is important that
the saw’s brake is cleaned, the chain is inspected
and filed, and that the chain brake’s function is
checked.
Find out how you stop the machine and check
that you know how the chain brake works.
The power chainsaw is equipped with a chain
brake. The chain brake must engage if there is
light forward pressure on the chain brake handle.
Test the function with the engine started and
running at full throttle.
The chainsaw will stop immediately when you
have pressed on the chain brake handle.
The chain brake is fitted with anti-kickback, which
protects against rapid upward movement of the
guide bar. This can occur when the guide bar
point encounters foreign bodies. It is therefore
important that you know that the chain brake is
functioning correctly.
The chain brake must be cleaned and if there
is a fault with the chain brake, any worn parts
must be replaced.
Adults who have not read this user manual and
children must never be allowed to use the machine.
NB: There may be local regulations limiting
the age of the machine operator.
If you are unwell or have consumed
alcohol or medicine you should not
operate the machine.
Always inspect the machine before use. Check
that there are no worn or broken parts.
The operator is responsible for other
people’s safety.
Never use the machine in the vicinity of children
or animals. The operator will be held liable for
any accidents or if other people or their
property are exposed to danger.
Avoid re-fuelling indoors or when the engine
is running.
Spilled petrol is highly flammable. Never re-fuel
while the engine is still warm.
Wipe up spilled petrol before starting the
engine. Petrol can lead to a fire or explosion!
The wearing of boots/shoes with non-slip soles
and steel toe caps, safety gloves, safety pants
with cut-retardant material, safety helmet with
visor and ear defenders is mandatory. Avoid
wearing loose-fitting clothing.
Before starting the chainsaw, ensure that the
chain is not in contact with anything.
Check the chainsaw for wear, loose fitting
or broken parts. Ensure that bolts and nuts
are tightened.
The machine should only be used when
it is in the correct and safe operating
condition.
Make sure that the chain always stationary
when the engine is in idle running.
Ensure that the handles are clean and that
there are no oil or petrol remnants.
Do not start the chainsaw without the bar and
chain fitted, otherwise the engine may run at a
higher rpm than the clutch and chain brake are
designed for. This could damage the machine
and cause personal injury to the user.
Operation
Always start the machine in the work zone.
Never leave the work zone when operating
the machine. Should it be necessary to
leave the work zone, switch off the engine
first before leaving the zone.
When transporting the machine, always
have the guide bar inside the guide bar
sheath.
Registering the product / spare parts
Register your product online at My Texas. To find My
Texas, visit www.texas.dk. Once you have registered,
Texas can provide even better service.
Once you have registered your product, Texas
ensures that all of the relevant information related to
the product is available. In addition, Texas may
contact you with relevant information relating to your
product.
On our website www.texas.dk. You will receive
faster service if you find the parts numbers first.
Purchase spare parts online at www.texas.dk or
contact your nearest dealer. Visit www.texas.dk to
find your nearest dealer.

15
Be careful not to burn your fingers on the
hot exhaust.
Immediately stop the engine if there is contact
with foreign bodies, remove the spark plug
terminal and carefully inspect the machine for
damage. Repair any damage before
continuing.
If the machine starts to vibrate abnormally, stop
the engine and immediately find the cause of the
vibration. Vibrations are normally signs of damage.
Always switch off the engine and check that all of
the moving parts have stopped completely
before carrying out repairs, adjustments or
servicing.
Never allow anyone to come near the machine.
Ensure that the machine is operated in daylight or
in areas where there is full visibility.
Ensure that there is good footing and keep
a good grip of the handles. Walk. Never
run with the machine.
Hold onto the handle of the chainsaw using both
hands and with your thumb under the front bar.
Keep it close to you, so that you are in control at
all times.
Let the engine body lie against the tree, while you
saw. Avoid sawing using the guide bar tip and
ensure that the guide bar tip will not hit anything
while you saw.
Never attempt to make adjustments when the
engine is running.
Never operate the machine indoors or in areas
with poor ventilation. The exhaust from the
engine contains carbon monoxide. Failure to
observe this may result in permanent injury or
death.
Wear a safety helmet with visor and ear defenders.
Wear pants with cut-retardant material, safety
shoes and gloves.
Keep people, children and animals at least 15 m
away from your position.
Tie up long hair up to ensure that it does not come
into contact with the machine.
Never work in poor lighting conditions.
Ensure you have a good footing and balance.
Do not reach out too far.
Do not touch the engine. It becomes hot when
running. Always stop the engine and remove the
spark plug terminal before carrying out any
adjustments or repairs.
Ensure that the chainsaw is correctly fitted and
securely tightened, otherwise it can lead to a
dangerous situation.
Exercise extra caution when sawing bushes and
small trees. Small branches can become
snagged in the chain and wind towards you or
cause you to lose balance.
Work only with tree felling if you are specially
trained to do that.
Due to vibrations, long-term use can lead to white
fingers.
If your arms, hands or fingers grow tired – or if
there are visible signs of white fingers, stop the
machine immediately and take a long break so
that you become fully rested.
To avoid white fingers, you should not operate
the machine for more that 1.5 hours a day.
Follow the instructions for filing and
maintenance in this user manual.
Petrol safety
Exercise extreme caution when in contact with petrol.
Petrol is highly flammable and its fumes are explosive.
Serious personal injury can result if you spill petrol
onto your clothes or person. Rinse skin immediately
and change clothes immediately!
Use only an approved petrol canister. Never
use a soft drink bottle or similar!
Extinguish all cigarettes, cigars, pipes and
any other source of ignition.
Never re-fuel the machine indoors.
Ensure the motor has cooled down before
refueling. Avoid filling the tank more than 1 cm
below the filler’s base, so that there is room for
the fuel to expand.
Ensure that the petrol cap is securely attached
after filling the tank.
Never use the lock function on the petrol
dispenser when filling the tank.
Never smoke when filling the tank.
Never fill the tank inside a building or where petrol fumes
can come into contact with sources of ignition.
Keep the petrol and engine away from appliances,
flames, outdoor barbecues, electrical appliances,
machinery, etc.
Only ever empty the petrol tank outdoors. Petrol
is highly flammable and its fumes are explosive.
Maintenance and storage
Stop the engine when carrying out
maintenance work and cleaning or when
replacing a tool or when transporting by any
other means than own power.
The engine must have cooled down completely
before storing indoors or under a canopy.
If the machine has not been used for a period of
time, refer to the instructions in this user manual.
Maintain or replace safety and
instruction labels, as required.
Any repairs that are not described in this user
manual, may only be carried out by specially
trained personnel at an authorised service centre.
Using incorrect tools can destroy your chainsaw.
Use only original spare parts or accessories. If
non-original spare parts or accessories are used,
the warranty is void.
Check that the machine lies securely during
transport on a trailer, etc.
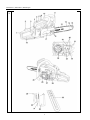
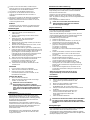
Identification of parts
See Fig. 1 and illustration:
1.
Rear handle/grip
2.
Safety button
3.
Throttle
4.
Ignition start/stop switch
5.
Choke
6.
Finger screw
7.
Top cover (for air filter and spark plug)
8.
Air filter
9.
Spark plug
10.
Front handle/grip
11.
Chain brake trigger handle
12.
Guide bar
13.
Saw chain
14.
Lubrication hole for nose wheel
15.
Nose wheel
16.
Securing nut
17.
Plastic guard

16
18.
Base plate
19.
Lubrication hole (chain oil)
20.
Threaded pins
21.
Bumper spike
22.
Screw for securing the plate
23.
Chain tensioner
24.
Harness point
25.
Chain oil cover
26.
Cooling fin
27.
Starter handle
28.
Fuel cap
29.
Spark plug screwdriver
30.
Screwdriver
31.
Round file
32.
Mixing container
33.
Guide bar sheath
34.
Primer bulb
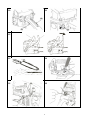
Symbols on the machine
(2) = loosening the chain
(3) = tightening the chain
The chain must be tightened enough so that
you can just lift a link free of the track on the
guide bar.
Chain saws have very sharp teeth.
Therefore, always use protective gloves
when you fit/remove/adjust the chain.
NB: A new chain may stretch in length to begin with.
Ensure therefore that you regularly inspect and
tighten it, otherwise a loose chain may jump off or
lead to wear on both the chain itself and on the guide
bar.
Prior to start - Fuel and chain oil
• This product is equipped with a 2-stroke
engine, which requires 2-stroke engine oil with
added petrol.
• Always use lead-free petrol (minimum octane 95).
• Never use ready-mixed petrol/oil from
petrol stations, which are designed for
use in scooters, motorcycles, etc.
• Always follow the oil supplier’s
instructions regarding the mix
percentage (see the back of container).
• Use a clean and approved petrol
container to mix the petrol and oil in.
• Use an approved 2-stroke oil for air-cooled
engines, power saws, trimmers and similar. (Do
not use hitch engine oil or lubrication oil for
cars). Mix in small amounts.
• Texas recommends Alco Multi-Mix universal 2-
stroke oil - Art. no. 90406520 (0.1 l) / 90406521
(1 l) mixed in ratio 2.5% (40:1). This
corresponds to 0.1 l 2-stroke oil mixed with 4 l
petrol. If another oil is used, the ratio should be
4%. However, always follow the manufacturer's
instructions on the back of the container.
• Mix oil and petrol thoroughly and shake
the container each time before filling
(Fig. 5)
Fitting guide bar and chain
1.
Pull the chain brake handle back towards the
machine, so that the brake is not activated.
2.
Loosen the nuts and remove the plastic screen.
See Fig. 2 (3).
3.
Place the guide bar on the threaded pins See
Fig. 2 (1) and push it against the drive wheel.
4.
Put the chain around the drive wheel with the
teeth pointing forwards (towards the tip of the
guide bar). See Fig. 3. Place the chain’s drive
link, so that it is in engaged correctly with the
drive wheel’s teeth.
5.
Ensure that the chain sits precisely on the
guide bar.
6.
Re-fit the plastic screen See Fig. 2 (3).
Ensure that the chain-tensioning pin sits
correctly in the guide bar’s hole.
7.
Before tightening the nut, tighten the chain
using the chain tensioner, until it fits
precisely. See Fig. 4 (1)
• NEVER use a petrol mix that is more than 90
days old, otherwise the engine can have start
problems. Never store the same petrol mix in
the tank for more than 30 days.
In case of long-term storage, always empty the tank.
Petrol filling – Smoking prohibited!
1.
Slowly unscrew the petrol cap and place on
a clean surface.
2.
Carefully pour the oil mix into
the tank. Avoid spilling.
3.
Immediately screw the cap back on, and
secure it by hand.
4.
Wipe up any spilled fuel.
NB: Always switch off the engine before adding
fuel, never pour fuel on a machine that is running
or if it has a hot engine. Before starting the
machine, ensure that you are at least 3 m away
from the location where you added the fuel. Wait
for a minimum of two minutes before adding fuel.
Adding fuel (smoking is prohibited)
Always mix and store fuel in containers that are
approved for that purpose.
Only mix fuel outdoors in a location where
there is no risk of naked flames or sparks.
Select a bare location, switch off the engine and let it
cool for at least two minutes before adding fuel.
Loosen the fuel cap slowly to allow
Tank cover for fuel
(oil mixed with petrol)
Tank cover for chain oil
Ignition start/stop switch:
Position up: Start
Position down: Engine stops
Choke button:
Pull the button out to apply choke
Chain brake: The white arrow
shows the direction of the chain
brake handle when it is deactivated.
Adjusting chain oil amount:
MAX = Increases, MIN = Reduces
L
Idle screw
(may only be set by service centre)
H
Full throttle screw
(may only be set by service centre)
T
Idle screw

17
pressure to escape and avoid fuel flowing
onto the cap.
Wipe up any spilled fuel from the chainsaw. Before
starting the machine, ensure that you are at least 3 m
away from the location where you added the fuel.
Chain oil
Always use chain oil to lubricate the guide bar and
chain. Texas recommends Alco chain oil.
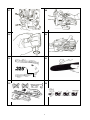
Start/stop
How to start a cold engine
1.
Add chain oil (1) and fuel (2). See Fig. 6.
2.
Place the power chainsaw on a level and
solid surface.
3.
Ensure that the chain brake is not triggered
(pull the chain brake handle back).
4.
Put the start/stop switch (3) in the up position.
See Fig. 7.
5.
Press the primer bulb 6-10 times, to
pump petrol into the carburetor.
6.
Pull the choke (4) all the way out. See Fig. 8.
7.
While holding the saw securely on the ground,
with the foot inside the rear handle (let the foot
activate the throttle at the same time), pull the
starter handle a couple of times using your right
hand, until the first ignition attempts are heard.
See Fig. 9.
8.
Push the choke all the way in.
9.
Pull the starter cord again until the engine starts.
10.
After 30 seconds, activate the safety button (6)
and press the throttle (5) in and increase the
engine rpm. See Fig. 10.
11.
Repeat points 5-8 if the engine did not start.
How to start a warm engine
1.
Leave the choke all the way in.
2.
Pull the starter cord until the engine starts.
3.
After 6-7 seconds, activate the safety button and
press the throttle in to increase the engine rpm.
How to stop the engine
1.
Release the throttle.
2.
Switch the ignition switch to “STOP”. See Fig. 11.
Keep your distance from the chain,
because it will begin to operate when the
saw starts. Only start the saw
when it is lying on a stable surface. Never
start it in the hand!
Chain brake
When working with power chainsaws, the saw’s safety
equipment must always be in full working condition.
Before using the saw, it is important that the saw’s
brake is cleaned, the chain is inspected and filed, and
that the chain brake’s function is checked.
The chain brake must engage if there is light forward
pressure on the chain brake handle. See Fig 12.
Test the function with the engine started and running
at full throttle. The chainsaw will stop immediately
when you have pressed on the chain brake handle.
The chain brake must be cleaned and if there is a fault
with the chain brake, any worn parts must be replaced.
Automatic chain lubrication
The chainsaw is equipped with an automatic
lubrication system, which ensures the chain is always
lubricated optimally. However, the systems depend
on there always being chain oil in the machine.
After the engine has started, apply half throttle.
Check that the chain oil sprays out as shown in
the image (Fig. 13). The amount of oil can be
manually adjusted (Fig.14)
Texas recommends Alco chain oil type SAE 30.
Always check the machine is full with chain
oil before starting. Operation without chain
oil may lead to damage to the saw.
Adjusting the carburetor
The carburetor is factory-set but may require
a fine adjustment.
When adjusting the carburetor, a well-lubricated
guide bar and chain must always be fitted, as
well as clean air and fuel filters and use the
correct fuel mix.
1.
Stopping the engine
2.
Tighten the screws L (1) and H (2)
completely clockwise (Fig. 15).
3.
Loosen the following by turning
anticlockwise:
L screw = 1¼ turn
H screw = 1¾ turn
It is recommended that this is only carried
out at a service center!
4.
Start the engine and allow it to warm up at
half throttle. Next, let it run without throttling.
5.
Slowly turn the L screw clockwise and
find the position with the max. rpm.
Next, turn the screw a ¼ turn anticlockwise.
6.
Tighten the idle speed screw T (3)
clockwise, until the chain starts to move.
Next, loosen the screw slowly, until the
chain stops.
7.
Carry out a test sawing, and adjust the
H screw to get the best performance
(not highest rpm).
If in doubt, let a service center carry
out the adjustment of the engine!
Fuel filter
1.
Remove the fuel tank’s cap.
2.
Drain all of the fuel from the tank.
3.
Form a hook from a piece of steel wire.
4.
Grip the fuel filter (Fig. 16) in the tank
using a hook.
5.
Clean the filter in petrol or replace if necessary.
6.
Re-insert filter/hose in the tank, ensure
that they are positioned correctly again
at the bottom of the tank.
7.
Add fuel again.
Never use the machine without a fuel filter.
Otherwise this may damage the machine’s
inner parts and shorten the lifetime of the
machine.
Air intake
It is important that the air intake at the start cord
and the cylinder's cooling fin is free of any build-
up of sawdust. Clean them as soon as there are
any signs of dirt and sawdust building up.
Accumulations will degrade the engine’s
performance and may lead to damage of the
engine as well as other important parts
(ignition coil, oil pump, etc.) because of
overheating.

18
Oil tank filter
Clean the same way as for the fuel filter. Also
clean off any dirt in the tank, where possible.
See Fig. 17.
Air filter
For the correct performance and durability, the air filter
should be kept free of sawdust and dirt.
1.
Loosen and remove the top cover (1). See Fig 18.
2.
Remove the air filter and tap carefully against a hard
surface to remove the dust. If the air filter is very soiled,
it can be separated into two parts (Fig. 19).
Next, clean with a soft brush.
3.
Re-fit the filter and top cover again. Ensure
that the filter and cover close tightly.
Spark plug
The spark plug is positioned underneath the air
filter. The spark plug should be kept clean so
that it functions optimally.
Check the spark plug by:
1.
Set the machine’s ignition switch to “stop”.
2.
Remove the spark plug terminal from the spark
plug.
3.
Brush off dirt from around the spark plug.
4.
Unscrew it using the spark plug screwdriver.
5.
Check, clean and replace if necessary.
6.
Fit the spark plug securely and reconnect the spark
plug terminal to the spark plug.
Product no. for a new spark plug: 10011003
Guide bar and chain maintenance
1.
Empty all of the fuel in the tank into a
container that is approved to hold petrol.
2.
Start the machine and let it operate until
all of the fuel is used up.
3.
Let the machine cool down.
4.
Unscrew the spark plug.
5.
Insert 1 spoonful of 2-stroke oil into the spark plug hole.
6.
Slowly pull the starter cord 2–3 times to
ensure the oil is distributed in the engine.
Storage
1.
Screw on the spark plug
securely and reconnect the
spark plug terminal.
2.
Store the engine in a dry place.
3.
Comply with all safety instructions regarding
the safe storage and handling of petrol.
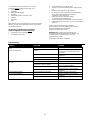
Technical specifications
Model
TS 4518
Cubic capacity
45 cc
Power
1.8 kW (8500 rpm)
Ignition
Electronic
Fuel
Oil mix 40:1 (2.5 %): Lead-
free 95 octane and 2-stroke
oil
Lubrication hole (Fig. 21). Remove the guide bar and
check that the lubrication hole (1) is not blocked with
sawdust or dirt. Lubricate with oil/grease.
Guide bar (Fig. 22). Clean the nose wheel and chain
groove of any dirt. If required, turn the guide bar over
to evenly share wear. A worn guide bar can be
hazardous to use and should therefore be replaced.
Chain (Fig 23-24). The chain should be filed regularly
to ensure the best result.
1.
Ensure that the guide bar is securely attached.
2.
Use a 4.8 mm (3/16”) file.
3.
File all of the teeth with 3–4 strokes, so that they
are uniform, as shown in the illustration.
4.
The height of the teeth must be checked
regularly, and if they are too high, they must
be filed down using a flat file (not supplied).
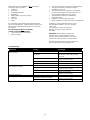
Maintenance schedules
Part
Action
After
Screws/bolts
Check/tighten
Each time used
Air filter
Clean/Replace
Every 10 hours
Fuel filter
Replace
Every 20 hours
Guide bar/Drive
wheel
Clean
Each time used
Spark plug
Clean/Adjust/
Replace
Every 20 hours
Fuel hose
Check
Every 20 hours
If necessary
Chain brake
Check
Each time used
If necessary
Warranty and general terms and conditions
The warranty period begins from the date of purchase
and is valid for three years for private users in Denmark,
and two years in other EU countries Machines sold for
commercial use have a one-year warranty.
The warranty covers substandard performance,
i.e. manufacturing defects or material or
functional defects.
Qualifications and requirements
Normal wear and the replacement of wearing
parts are NOT covered by the warranty.
Tank (fuel)
500 ml
Tank (chain oil)
240 ml
Chain lubrication
Chain oil SAE 30
Anti-vibration
Yes
Dry weight
6.8 kg
Guide bar length
18”/45 cm
Nose wheel
7 teeth
Guide bar type
Oregon Pro-Am .325”
Chain type
Oregon 0.325 (v-no. 40-213)
Chain brake
Yes
Hand screen
Yes
Bumper spike
Yes
Chain catch
Yes
Level of noise
113 dB(A)
Vibrations
K = 1.5 m/s
2
Front handle: 5.650 m/s
2
Rear handle: 6.027 m/s
2

19
Wearing parts whose durability is NOT guaranteed
to last more than 12 months:
• Guide bar
• Saw chain
• Diaphragms/gaskets
• Spark plug
• Engine liquids (oil, petrol, grease)
• Chain oil
• Start cord
• Filters
If you start the engine without having filled it with the
correct oil and petrol mix, it will damage the engine and
will be not be repairable and therefore not covered by
the warranty.
The warranty does NOT cover defects
or faults caused by the following:
• Lack of service and maintenance
• Design changes
• The machine has been exposed to external effects
• Damage to the paint, damage to the guard,
handlebar, panels, etc.
• The machine has been misused or overloaded
• Oil, fuel or liquid types have been which are not
those recommended in this user manual
• Substandard or dirty fuel, contamination
of the fuel system
• Fitting/use of non-original spare parts
• Other conditions, for which Texas A/S is not liable for
At all times, only an authorized service center
may determine whether a case is a warranty
case or not.
Your purchase receipt is your proof of
warranty. Therefore, it must never be
discarded.
Remember: When making a request for a
warranty repair, always provide the model
number, year and serial number. This can be
found on the CE mark, which is on the product.
*TEXAS reserves the right to make changes and
are not responsible for any printing errors.
Troubleshooting
PROBLEM
CAUSE
SOLUTION
Starts, but will not operate.
Does not start.
Wrong start procedure.
Follow the instructions in this manual.
No throttle
Attempt to activate the throttle grip
with the foot, while pulling on the
start cord.
Carburetor adjusted incorrectly.
Adjust the carburetor.
Contact a service center.
Defective spark plug.
Clean or replace the spark plug.
Fuel filter blocked.
Clean or replace the fuel filter.
The engine starts, but the machine
has no power capacity.
Wrong choke position.
Put the choke to run.
Dirty spark arrester.
Clean spark arrester.
Contact a service center.
Dirty air filter.
Clean air filter.
Carburetor adjusted incorrectly.
Adjust the carburetor.
Contact a service center.
Operates irregularly.
Wrong/dirty spark plug.
Clean or replace spark plug.
Makes a lot of smoke.
Carburetor adjusted incorrectly.
Adjust the carburetor.
Contact a service center.
Incorrect fuel mix.
Use the prescribed 2-stroke mix.
Page is loading ...
Page is loading ...
Page is loading ...
Page is loading ...
Page is loading ...
Page is loading ...
Page is loading ...

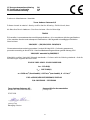
27
CE Overensstemmelseserklæring DK
EC Certificate of conformity GB
CE-Konformitätserklärung DE
Producent • Manufacturer • Hersteller
Texas Andreas Petersen A/S
Erklærer herved at materiel • Hereby certifies that the following • Erklärt hiermit, dass
die Maschine Benzin kædesav • Gasoline chainsaw • Benzin-Motorsäge
TS4518
Er fremstillet i overensstemmelse med følgende direktiver • Is in compliance with the specifications
of the machine directive and subsequent modifications • Mit folgenden einschlägigen Richtlinien
übereinstimmt
2006/42/EC – (EU)2016/1628 - 2014/30/EU
Overensstemmelsesvurdering procedure i henhold til bilag III/VI • Conformity assessment
procedure according to Annex III/VI • Konformitätsbewertungsverfahren gemäß Anhang III/VI
2000/14/EC amended by 2005/88/EC
Materiellet er udført i henhold til følgende standarder • Conforms with the following standards • Und die
Anforderungen folgender Normen erfüllt
EN ISO 11681-1:2011 - EN ISO 14982:2009
L
WA
: 113 dB(A)
L
pA
: 102.78 dB(A)
a
h
= 5.650 m/s
2
(front handle) / 6.027 m/s
2
(rear handle), K = 1.5 m/s
2
EU5: e9*2016/1628*2017/656SHA1/P*1053*00
S/N: 1901130001 - 2112139999
Texas Andreas Petersen A/S Responsible for documentation
Knullen 22 • DK-5260 Odense S Johnny Lolk
07.03.2018
Johnny Lolk
Managing Director
Page is loading ...
-
 1
1
-
 2
2
-
 3
3
-
 4
4
-
 5
5
-
 6
6
-
 7
7
-
 8
8
-
 9
9
-
 10
10
-
 11
11
-
 12
12
-
 13
13
-
 14
14
-
 15
15
-
 16
16
-
 17
17
-
 18
18
-
 19
19
-
 20
20
-
 21
21
-
 22
22
-
 23
23
-
 24
24
-
 25
25
-
 26
26
-
 27
27
-
 28
28


Texas Equipment TS4518 Owner's manual
- Category
- Power chainsaws
- Type
- Owner's manual
Ask a question and I''ll find the answer in the document
Finding information in a document is now easier with AI
in other languages
Related papers
-
Texas XCS4500 Owner's manual
-
Texas XCS4200 Owner's manual
-
Texas 90063257 User manual
-
Texas TSE2010 Owner's manual
-
Texas Pro Weed 700 Owner's manual
-
-
Texas Razor 4010 Owner's manual
-
Texas PCX2000 User manual
-
Texas Snow King 565TG Owner's manual
-