
www.glemm.eu
Microphone mixer
Mixer microfonico
MANUALE DI ISTRUZIONI
Instruction Manual
MXD 06
MXD 08
MXD 10

2
• OTHER LANGUAGES •
• OTROS IDIOMAS •
• AUTRES LANGUES •
• OUTRAS LÍNGUAS •
INDICE / INDEX
• ITALIANO
• ENGLISH
PAG. 2
PAG. 12
Faça a leitura deste código QR para
verificar a disponibilidade do manual na
sua língua
Escanea este código QR para
comprobar la disponibilidad del manual
en tu idioma
Scannez le code QR pour vérifier la
disponibilité du mode d’emploi
dans votre langue.
Scannen Sie den QR-Code, um
nach dem Handbuch in Ihrer
Sprache, wenn es verfügbar
is, zu suchen
PT
ES
FR
DE
GRAZIE PER IL VOSTRO ACQUISTO
Il prodotto da Lei acquistato è frutto di un’accurata progettazione da parte di ingegneri specializzati.
Per la sua fabbricazione sono stati impiegati materiali di ottima qualità per assicurarne il funzionamento nel
tempo. Il prodotto è stato realizzato in conformità alle normative imposte dall’Unione Europea, garanzia di
affidabilità e sicurezza.
Vi preghiamo di leggere attentamente questo manuale prima di iniziare ad utilizzare l’apparecchio al fine di
sfruttarne appieno le potenzialità.
Augurandoci che rimarrete soddisfatti del vostro acquisto, vi ringraziamo nuovamente per la fiducia riposta
nel nostro marchio e vi invitamo a visitare il nostro sito internet www.glemm.eu dove troverete l’intera
gamma dei prodotti, insieme ad informazioni ed aggiornamenti utili.
ATTENZIONE: Il presente manuale si riferisce a 3 diversi apparecchi che differiscono tra loro solo per il
numero di canali microfonici supportati (4, 6 o 8).

3
Il fabbricante, allo scopo di migliorare i propri prodotti, si riserva il diritto di modificarne le
caratteristiche siano esse tecniche o estetiche, in qualsiasi momento e senza al cun preavviso.
The manufacturer, in order to improve its products, reserves the right to modify their
characteristics whether technical or aesthetic, at any time and without notice.
IT
EN
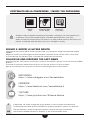
CONTENUTO DELLA CONFEZIONE / INSIDE THE PACKAGING
MIXER
Mixer MANUALE
Instructions
ALIMENTATORE.
Power adaptor
All’apertura della confezione controllate che il prodotto sia integro e che siano presenti tutti i
componenti. Comunicate immediatamente al venditore eventuali danni o mancanze.
When you open the package check that product is in good condition and that all the parts are
present. Immediately notify the seller if any part is damaged or missing.
INSTAGRAM:
https://www.instagram.com/karmaitaliana
FACEBOOK:
https://www.facebook.com/karmaitaliana.it
YOUTUBE:
https://www.youtube.com/@karma.italiana
SEGUICI E SCOPRI LE ULTIME NOVITA’
L’acquisto del tuo nuovo prodotto è solo la partenza per uno strardinario viaggio nel mondo dei prodotti
KARMA.
Migliaia di articoli in costante aggiornamento che potrai conoscere anche tramite I nostri canali social.
Iscriviti subito per non perdere I post sui prodotti più interessanti del momento.
FOLLOW US AND DISCOVER THE LAST NEWS
By purchasing your new product you have just started an extraordinary journey across the world of KARMA
products.
Thousands of constantly updated items that you can discover also on our social channels.
Sign up now and don’t miss the posts on the most interesting products of the moment.

4
PRECAUZIONI ED AVVERTENZE
• Leggete con attenzione le istruzioni riportate su questo manuale e seguitele scrupolosamente.
• Conservate il manuale per future consultazioni e allegatelo se cedete l’apparecchio ad altri.
• Non aprite il dispositivo, non smontatelo e non apportate modifiche.
• L’installazione del prodotto deve essere effettuata esclusivamente da persone competenti.
In caso di installazione o collegamenti errati il produttore non si assume alcuna responsabilità
per danni a persone o cose.
• Prima di effettuare collegamenti con altri dispositivi controllate che tutti gli apparecchi siano
spenti e scollegati dall’alimentazione.
• Il prodotto non è adatto per usi esterni. Per evitare il rischio di cortocircuiti non esponetelo a
temperature elevate (oltre i 40°), pioggia o umidità.
• Evitate che nel prodotto entrino liquido infiammabile, acqua o oggetti metallici.
• Non toccate il prodotto con le mani bagnate.
• Non posizionate recipienti pieni di liquido, come ad esempio vasi, sull’apparecchio o in
prossimità di esso.
• Installate il prodotto in posizione stabile e areata, lontano da fonti di calore e non ostruite le
prese d’aria.
• Trattate l’apparecchio, i suoi comandi e gli accessori con la dovuta delicatezza, evitando
vibrazioni, cadute o colpi.
• In caso di problemi di funzionamento interrompete l’uso immediatamente. Non tentate di
riparare l’apparecchio per conto vostro, ma rivolgetevi all’assistenza autorizzata.
Riparazioni effettuate da personale non competente potrebbero creare gravi danni sia
all’apparecchio che alle persone.
• Non accendere e spegnere il prodotto a brevi intervalli: potrebbe ridurre la durata del
dispositivo
• Scollegate l’unità dall’alimentazione quando non è in uso.
• Non tagliate modificate o piegate il cavo dell’alimentatore e controllate sempre che sia in buone
condizioni.
• Lasciate raffreddare il prodotto prima di effettuare pulizia o manutenzione.
• Per la pulizia del prodotto usate esclusivamente uno panno umido, evitando solventi o detersivi
di qualsiasi genere.
• I bambini devono essere sorvegliati se presenti durante l’utilizzo del prodotto.
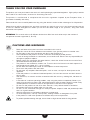
Questo simbolo vi avverte della presenza di istruzioni d’uso e manutenzione importanti, nel manuale
o nella documentazione che accompagna il prodotto
Questo simbolo indica il rischio di scossa elettrica in caso di uso improprio o manomissione del
prodotto.
Il marchio CE indica che questo prodotto è conforme alle direttive europee e relative normative ad
esso applicabili. La documentazione di conformità in forma completa è reperibile presso la società
Karma Italiana Srl.
Ai sensi del Decreto Legislativo N°49 del 14 Marzo 2014 - “ Attuazione delle Direttive 2012/19/UE
sui rifiuti di apparecchiature elettriche ed elettroniche (RAEE)”.
Il simbolo del cassonetto barrato riportato sull’apparecchiatura indica che il prodotto alla fine della
propria vita utile deve essere raccolto separatamente dagli altri rifiuti. L’utente dovrà, pertanto,
conferire l’apparecchiatura integra dei componenti essenziali giunta a fine vita agli idonei centri di
raccolta differenziata dei rifiuti elettronici ed elettrotecnici, oppure riconsegnarla al rivenditore al
momento dell’acquisto di nuova apparecchiatura di tipo equivalente, in ragione di uno a uno oppure
1 a zero per le apparecchiature aventi lato maggiore inferiore a 25 cm. L’adeguata raccolta
differenziata per l’avvio successivo dell’apparecchiatura dimessa al reciclaggio, al trattamento e allo
smaltimento ambientale compatibile contribuisce ad evitare possibili effetti negativi sull’ambiente e
sulla salute e favorisce il riciclo dei materiali di cui è composta l’apparecchiatura. Lo smaltimento
abusivo del prodotto da parte dell’utente comporta l’applicazione delle sanzioni amministrative di cui
al D.Lgs n. Decreto Legislativo N° 49 del 14 Marzo 2014.
• Per evitare possibili danni all’udito, limitare il tempo di ascolto a volumi elevati.

5
CONDIZIONI DI GARANZIA
Il prodotto è coperto da garanzia in base alle vigenti normative nazionali ed Europee.
Per le condizioni complete di garanzia e per effettuare richieste di assistenza visitate il sito:
www.karmaitaliana.it - www.glemm.eu
• La garanzia copre i difetti di fabbrica ed i guasti verificatisi nei primi 2 anni dalla data di acquisto.
Nel caso di acquisto con fattura, la garanzia è limitata ad 1 anno.
• Sono esclusi i guasti causati da imperizia o da uso non appropriato dell’apparecchio
• La garanzia non ha più alcun effetto qualora l’apparecchio risulti manomesso.
• La garanzia non prevede necessariamente la sostituzione del prodotto.
• Sono escluse dalla garanzia le parti esterne, le batterie, le manopole, gli interruttori, e le parti asportabili
o consumabili.
• Le spese di trasporto e i rischi conseguenti sono a carico del proprietario dell’apparecchio
• A tutti gli effetti la validità della garanzia è avallata unicamente dalla presentazione della fattura o
scontrino d’acquisto.
• In caso di invio in assistenza è importante che il prodotto sia completo dell’imballo originale:
vi raccomandiamo quindi di conservarlo.
Vi suggeriamo anche di procedere alla registrazione del prodotto sul nostro sito internet,
www.karmaitaliana.it loggandovi nell’area riservata. Avrete così la possibilità di tener traccia della validità della
garanzia e di ricevere aggiornamenti sui nostri articoli.

6
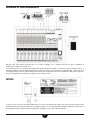
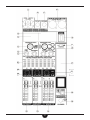
SCHEMA DI COLLEGAMENTO
RETRO
Questo mixer può essere utilizzato per i più svariati impieghi, sia in ambito musicale sia per la gestione di
conferenze, in palestre, scuole, ecc...
Lo schema mostra una classica situazione nella quale vengono collegati sia microfoni che strumenti musicali. Il
segnale miscelato, incluso quello proveniente ad esempio da uno smartphone tramite bluetooth, viene inviato ad
un amplificatore e quindi ai relativi diffusori (piuttosto che direttamente a casse amplificate). Alle prese “tape out”
sono stati collegati altri 2 diffusori amplificati usati come monitor.
31 32
La figura mostra la presa di alimentazione (30) e il tasto di accensione (31) posti sul retro del mixer. Assicuratevi
di collegare sempre l’apparecchio con il voltaggio corretto. In caso di necessità il fusibile, contenuto nella presa di
alimentazione, potrà essere sostituito dopo aver scollegato il mixer dalla presa elettrica.

7
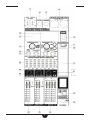
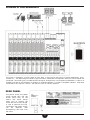
FUNZIONAMENTO
Prima di effettuare i collegamenti, assicuratevi che l’unità sia
scollegata dalla presa elettrica. Tutti i collegamenti devono
avvenire ad apparecchio spento.
6
7
LINE IN/MIC (1-2): Queste prese si
usano per segnali di livello microfonico o
linea. Usando un connettore XLR (1) si
otterrà un segnale bilanciato e sarà
possibile sfruttare l’alimentazione
phantom +48V per microfoni a
condensatore.
Attenzione: se l’alimentazione phantom
+48V è attiva, non collegate sorgenti
sbilanciate all’ingresso XLR. Per evitare
disturbi audio, disattivate sempre il
canale quando inserite o disinserite
l’alimentazione phantom +48V e quando
collegate o scollegate i cavi.
E’ disponibile anche una presa 6,3mm
sbilanciata (2) per microfoni dinamici
dotati di tale spina.
TRIM (3): Permette di regolare il livello
di guadagno del segnale d’ingresso del
rispettivo canale. Si suggerisce di
regolare il relativo vu-meter sul livello
medio “0”, in modo che il led PEAK non
resti stabilmente acceso. Una volta
impostato il livello del gain, utilizzate gli
appositi fader (8) per bilanciare ogni
segnale del mixaggio e regolare i volumi
dei canali.
EQ (4): Questi 3 comandi permettono
di regolare l’incidenza delle tonalità alte,
medie e basse sul segnale audio del
canale.
FX (5): Regola il livello di effetto
applicato al segnale audio del canale.
PAN (6): Ha la funzione di distribuire il
livello di segnale tra i canali di sinista e
destra, in modo da ottenere un effetto
simile alla stereofonia.
ON/OFF (7): La pressione del tasto
attiva o disattiva il canale in
miscelazione. Alla pressione il tasto si
illuminerà.
SLIDER (8): Muovendolo alza o
abbassa il volume del canale in
miscelazione. Il led PEAK indica i picchi di
segnale e non deve mai rimanere
acceso fisso. Il tasto SOLO consente di
inserire il canale nel preascolto in cuffia.

8
10
17
27
28
29
30
16
11

9
CD/TAPE (9): A queste prese possono essere
collegati dei segnali di linea in uscita e in entrata,
spesso dedicati a registratori. Il volume in
miscelazione è regolabile tramite il comando rotante
(28).
FX OUT (16): Invia il segnale dei canali nei quali si è
agito sul comando rotante FX (5). Il segnale elaborato
verrà restituito alla presa RETURNS (17) e quindi
messo in miscelazione.
MAIN OUT (10): Sono due prese XLR dalle quali
esce il segnale miscelato destinato all’amplificatore.
DISPLAY BT/MP3 (19): Mostra le informazioni
relative al brano riprodotto (tempo e n. traccia), oltre
che quelle relative alla ripetizione dei brani e alla
sezione bluetooth.
DISPLAY DSP (12): Mostra l’effetto DSP
impostato. Sono disponibili 16 settaggi. Il DSP opera
a 24bit e 40Khz.
PRESA USB (18): Qui potete collegare una
chiavetta o un disco esterno per la riproduzione dei
brani MP3 in esso memorizzati. La formattazione del
supporto deve essere FAT32.
MODULO DSP: Contiene la manopola principale
(13) che consente di selezionare l’effetto (ruotandola)
e di confermare la scelta (premendola), oltre ad altri
due comandi rotanti per regolare il livello dell’effetto
(14) e i suoi parametri (15).
MODULO MP3/REC (20): Contiene il selettore di
traccia (se premuto conferma la scelta), le
regolazioni di toni alti e bassi delle tracce e due tasti
rispettivamente per la ripetizione dei brani (uno, tutti,
una cartella o casuale) e pe la registrazione.
Quest’ultimo se premuto imposta la funzione,
premendo la manopola principale avvia la
registrazione o la pone in pausa, tenendo premuto il
tasto REC interrompe la registrazione.
PHANTOM +48V (11): Attiva l’alimentazione +48V
sulle prese XLR dei canali 1-4. Serve ad alimentare
microfoni a condensatore che richiedono tale
tensione.
Attenzione: non inserite altri microfoni a tasto
premuto; rischierete di danneggiare gli apparecchi.
EQUALIZZATORE (27): A 7 bande per una perfetta
equalizzazione del segnale miscelato.
VU METER (21): Mostra il livello del signale in
uscita o di quello in preascolto. Indica anche i picchi
di segnale. Abbiate cura che i livelli non siano
eccessivamente alti per evitare distorsioni o
danneggiamento degli apparecchi.
EFFECT (22): Regola il livello degli effetti sull’intera
miscelazione.
MP3/BT (23): Regola il volume del modulo Mp3 in
miscelazione.
MAIN L/R (24): Sono i due slider che regolano il
livello di volume generale in uscita.
BLUETOOTH (25): Tenendolo premuto attiverete la
ricevente Bluetooth. Cercate il mixer sul menù
bluetooth del vostro smartphone e abbinatelo per
poter inviare l’audio al mixer. Tenete premuto
nuovamente il tasto per uscire dalla funzione
bluetooth. I comandi basilari (avanti, indietro, play/
stop) saranno controllabili sia da mixer che da
smartphone.
PRESA PHONES (26): Presa per cuffia con jack
6,3mm. Per poter acoltare i canali in cuffia premete
il relativo tasto”SOLO”. Il led PFL posto accanto al
volume cuffia si illuminerà. Con preascolto attivo, i
VU- METERS (21)indicheranno il livello in cuffia.
AUX RETURN (29): Regola il livello del segnale di
ritorno AUX.
PFL/PHONES (30): Regola il livello del segnale di
preascolto in cuffia.

10
CARATTERISTICHE TECNICHE
ALIMENTAZIONE AC ~ 100V -240V
CANALI TOTALI 6 (MXD 06), 8 (MXD 08), 10 (MXD 10)
FUNZIONI Mp3 (tramite USB - FAT 32), Bluetooth, Echo, REC,
PC link, FX in/out, PFL
PHANTOM +48V, su canali bilanciati XLR
INGRESSI MICROFONICI
4 (MXD 06), 6 (MXD 08), 8 (MXD 10), connettori XLR bilanciati
Risposta in freq: <10Hz-150kHz(-1dB)/ <10Hz-200kHz(-3dB)
Range guadagno: +10 - 60dB
Livello massimo ingresso: + 12dBu - +10dB (gain)
INGRESSI DI LINEA 4 (MXD 06), 6 (MXD 08), 8 (MXD 10), - jack 6,3mm bilanciato
Range guadagno: da -10 a +40dB
Livello massimo in ingresso: 30 dBu
INGRESSI STEREO 1 tramite RCA - Livello massimo ingresso: +22dBu
AUX SEND Connettore jack 6,3mm sbilanciato - Livello max uscita: +22 dBu
AUX RETURN Connettore jack 6,3mm bilanciato - Livello max ingresso: +22 dBu
USCITE PRINCIPALI Connettori XLR bilanciati - Livello max uscita +28dBu / +22dBu
USCITE CUFFIA Connettore jack 6,3mm - Livello max uscita +19dBu/150 Ω(+25dBm)
DSP Delta-Sigma a 24 bit, oversampling 64/128 volte
Freq. campionamento 40kHz
EFFETTI 16
EQUALIZZATORE 7 Bande
Toni canali mono : bassi, medi, alti
Toni canali stereo: bassi, medio-bassi, medio-alti, alti
BLUETOOTH Vers. 5.0
REGISTRAZIONE Su supporto USB
VU-METERS L/R a led
DIMENSIONI 295 x 100 x 310 mm (MXD 06)
295 x 100 x 360 mm (MXD 08)
295 x 100 x 410 mm (MXD 10)
PESO 2,9 Kg (MXD 06)
3,35 Kg (MXD 08)
3,85 Kg (MXD 10)

11
DICHIARAZIONE DI CONFORMITA’ UE
EU COMPLIANCE DECLARATION
Il fabbricante, KARMA ITALIANA SRL, dichiara che gli apparecchi MXD 06, MXD 08 e MXD 10 è
conforme alla direttiva 2014/53/UE. Il testo completo della dichiarazione di conformità UE è
disponibile al seguente indirizzo Internet: www.karmaitaliana.it
Karma Italiana Srl

12
THANK YOU FOR YOUR PURCHASE
The product you have purchased is the result of careful planning by specialized engineers. High quality materials
were used for its construction, to ensure its functioning over time.
The product is manufactured in compliance with the strict regulations imposed by the European Union, a
guarantee of reliability and safety.
Please read this manual carefully before starting using the device in order to take advantage of its full potential.
Hoping that you will be satisfied of your purchase, we thank you again for your trust in our brand and we invite you
to visit our website www.glemm.eu where you will find the whole range of our products, along with useful
information and updates.
ATTENTION: This manual refers to 3 different devices that differ from each other only in the number of
microphone channels supported (4, 6 or 8).
CAUTIONS AND WARNINGS
• Read and follow strictly the instructions contained in this manual.
• Keep this manual for future reference and include it if you give the product to another user.
• Do not open or take apart the device and don’t make changes to it.
• The installation of the product must be carried out exclusively by skilled persons.
In case of wrong installation or connections, the manufacturer doesn’t take any responsibility for
damages to people or objects.
• Before making any connection with other devices, check that all the fixtures are turned off and
disconnected from the power source.
• The product is not suitable for outdoor use. To avoid the risk of shortcircuits don’t expose it to
high temperatures (above 40°), rain or humidity.
• Do not allow flammable liquid, water or metal objects to enter the product.
• Don’t touch the product with wet hands.
• Do not place any recipients filled with liquids, such as vases, on top of or directly next to the
appliance.
• Install the product in a stable and ventilated position, far from heat sources and don’t obstruct
the air vents.
• Use the fixture, its controls and the accessories with due accuracy, avoiding falls, vibrations or
impacts.
• In the event of a serious operating problem, stop using the product immediately. Never try to
repair it by yourself, but contact the authorized technical service center. Repairs carried out by
unskilled persons could lead to serious damages both to the fixture and to people.
• Do not turn the product on and off at short intervals, it may reduce the life of the device.
• Disconnect the unit from power when it is not used.
• Do not cut, kink, otherwise damage nor modify the power adaptor’s cable and periodically check
that it is in good condition.
• Wait for the product to cool before cleaning or maintenance.
• To clean the product, use only a damp cloth, avoiding solvents or detergents of any kind.
• If the product is used in the presence of children they must be supervised.
• To prevent possible hearing damage, do not listen at high volume levels for long periods.

13
This symbol alerts you of the presence of important operating and maintenance instructions, in the
manual or in the documentation accompanying the product
This symbol indicates a risk of electric shock in case of wrong use or alteration of the product.
The CE mark indicates that this product complies with the applicable European directives and their
related standards. Compliance documentation in complete form is available at the company Karma
Italiana Srl
Directive 2012/19/UE regarding electric and electronic equipment waste (WEEE).
The symbol of the crossed-out dustbin indicates that the product at the end of its life must be collected
separately from other waste. The user must, therefore, confer the fixture complete with all the essential
components to an authorized disposal center for collection of electronic and electrical waste, or return
it to the dealer when buying new equipment of equivalent type, at a rate of one to one, or one to zero if
external dimension is less than 25cm. Appropriate separate collection to send the decommissioned
equipment to recycling , treatment and environmentally compatible disposal helps to prevent negative
impact on the environment and human health and promotes recycling of the materials making up the
product. In Italy illegal dumping of the product by the user entails the application of administrative
sanctions pursuant to Legislative Decree n. 49 (14/03/2014).
WARRANTY CONDITIONS
The product is covered by warranty according to current national and European regulations.
For detailed warranty conditions and RMA requests please refer to our website: www.karmaitaliana.it - www.
glemm.eu
• The warranty covers manifacturing defects and faults occurred in the first 2 years from the date of
purchase. In case of purchase with invoice, the warranty is limited to 1 year.
• Damages caused by negligence or wrong use of the device are not covered by warranty.
• The warranty is no longer effective if the item is modified or disassembled by not authorized people.
• This warranty doesn’t necessarily envisage the product’s replacement.
• External components, batteries, knobs, switches and any removable or subject to wear and tear parts are
excluded from warranty.
• Shipment for the return of faulty items is at expense and risk of the owner.
• For all intents and porpuses the warranty is effective only upon exhibition of the invoice or of the purchase
receipt.
• If you send the product for repair, it must be shipped with complete original packaging: we therefore
recommend to save it.
We also suggest to register your product on our website www.karmaitaliana.it, after signing in to access the
reserved area. In this way you will have the possibility to keep track of the warranty validity and to receive
updates on our items.

14
SCHEMA DI COLLEGAMENTO
This mixer is suitable for a broad range of uses, both in the musical field and to manage conferences, gyms,
schools etc... The above diagram shows a typical situation, where both microphones and musical instruments are
connected. The mixed signal, included the one coming for example from a smartphone via bluetooth, is sent to an
amplifier and then to the speakers (or directly to amplified speakers. A further 2 amplified speakers have been
connected to the “tape out” sockets and they are uses as monitor speakers.
The picture shows the power
supply socket (30) and the
on/off switch (31) on the
mixer’s rear panel. Always
make sure to connect the
fixture with the correct voltage.
In case of necessity the fuse,
contained in the power socket,
can be replaced after
disconnecting the mixer from
the mains.
31 32
REAR PANEL

15
OPERATION
Before making any connection, check that the unit is unplugged from the
electrical outlet. All connections must be made with the appliance turned off.
6
7
LINE IN/MIC (1-2): These sockets are
used for microphone or line signals.
By using a XLR connector (1), you will
obtain a balanced signal and it will be
possible to use the +48V phantom power
for condenser microphones.
Warning: If the +48V phantom power
supply is activated, don’t connect
unbalanced sources to the XLR input. To
avoid audio interferences, always disable
the channel when you turn on/off the +48V
phantom power and when you connect or
disconnect the cables.
A 6,3mm unbalanced socket (2) is also
available for dynamic microphones
equipped with this kind of connector.
TRIM (3): Use it to adjust the input signal’s
gain level of the related channel.
We suggest to set the vu-meter on the
middle level “0”, so that the PEAK led
doesn’t remain steady on.
Once the gain level is set use the specific
faders (8) to balance each mixing signal and
to adjust the channels’ volumes.
EQ (4): Use these 3 controls to adjust how
treble, midrange and bass frequencies
affect the channel’s audio signal.
FX (5): It adjusts the level of the effect
applied to the channel’s audio signal.
PAN (6): It has the function of distributing
the signal level between the left and right
channels, in order to obtain a stereo like
effect.
ON/OFF (7): Press this button to activate
or deactivate the mixing channel. When
pressed the button will light up.
SLIDER (8): Move it to raise the volume of
the mixing channel. The PEAK led indicates
signal peaks and must never remain lit
steadily. The SOLO button allows you to
activate the headphone pre-listening on this
channel.

16
10
17
27
28
29
30
16
11

17
CD/TAPE (9): It is possible to connect to these
sockets output and input line signals, often intended
for recorders. The mixing volume can be adjusted
through the rotating control (28).
FX OUT (16): It sends the signal of the channels set
through the rotating knob FX (5). The processed
signal will be sent back to the RETURNS (17) socket
and then mixed.
MAIN OUT (10): Two XLR sockets used as output
of the mixed signal for the amplifier.
DISPLAY BT/MP3 (19): It shows information
about the current track (time and track number) as
well as those about track repeating and bluetooth
section.
DISPLAY DSP (12): It shows the currrent DSP
effect. 16 settings are available. The DSP operates
at 24 bits and 40 Khz.
USB SOCKET (18): You can connect here a USB
stick or an external disk to play the MP3 songs it
contains.The device must be in FAT 32 format.
DSP MODULE: It includes the main knob (13) to
select the effect (by rotating it) and to confirm the
choice (by pressing it), as well as a further two
rotating controls to adjust the level of the effect (14)
and its parameters (15).
MP3/REC MODULE (20): It includes the track
selector (press to confirm the choice), the controls
to adjust the tracks’ treble and bass and two buttons
for song playback (one, all, a folder or random) and
for recording. Press the REC button to set the
recording function, which can be started or paused
by pressing the main knob. Press again the REC
button to stop recording.
+48V PHANTOM (11): It activates the +48V power
supply on the XLR sockets of channels 1-4. It is
intended to power condenser microphones requiring
this voltage.
Warning: don’t connect further microphones when
the button is pressed; you will risk to damage the
fixtures.
EQUALIZER (27): 7-band equalizer for a perfect
equalization of the mixed signal.
VU METER (21): It shows the output or prelistening
signal’s level. It also indicates the signal peaks. Take
care that the levels are not too high to avoid
distorsions or damages to the fixtures.
EFFECT (22): It adjusts the level of the effects on
the whole mixing.
MP3/BT (23): It adjusts the volume of the Mp3
module when mixing.
MAIN L/R (24): These two sliders adjust the level
of the master output volume.
BLUETOOTH (25): Press and hold to activate the
Bluetooth receiver. Scan for the mixer on the
bluetooth menu of your smartphone and pair it to
send audio to the mixer. Keep pressed again the
button to exit the bluetooth function. The basic
controls (forward, back, play/stop) can be adjusted
both from the mixer and from the smartphone.
PHONES SOCKET (26): Socket for headphones
with 6,3 mm jack. To listen for the channels in your
headphone press the related button “SOLO”. The PFL
led next to the headphone volume will light up. When
prelistening is active the VU-METERS (21) will show
the headphone level.
AUX RETURN (29): It adjusts level of the AUX
return signal.
PFL/PHONES (30): It adjusts the level of the
headphone prelistening signal.

18
TECHNICAL SPECIFICATIONS
POWER SUPPLY AC ~ 100V -240V
TOTAL CHANNELS 6 (MXD 06), 8 (MXD 08), 10 (MXD 10)
FUNCTIONS Mp3 (via USB - FAT 32), Bluetooth, Echo, REC, PC link, FX in/out, PFL
PHANTOM +48V, on XLR balanced channels
MICROPHONE INPUTS
4 (MXD 06), 6 (MXD 08), 8 (MXD 10), balanced XLR connectors
Freq. response: <10Hz-150kHz(-1dB)/ <10Hz-200kHz(-3dB)
Gain range: +10 - 60dB
Max input level: + 12dBu - +10dB (gain)
LINE INPUTS 4 (MXD 06), 6 (MXD 08), 8 (MXD 10) - 6,3mm jack balanced connector
Gain range: from -10 to 40dB
Max input level: 30 dBu
STEREO INPUTS 1 via RCA - Max input level: +22dBu
AUX SEND 6,3mm jack unbalanced connector - Max output level: +22 dBu
AUX RETURN 6,3mm jack balanced connector- Max input level: +22 dBu
MAIN OUTPUTS XLR balanced connector - Max output level+28dBu / +22dBu
HEADPHONE OUTPUTS 6,3mm jack connector - Max output level +19dBu/150 Ω(+25dBm)
DSP 24bit - Sigma-Delta 64/128 times oversampling
Sampling rate 40 kHz
EFFECTS 16
EQUALIZER 7 Bands
Mono channels tones : low, mid , high
Stereo channels tones: low, low-mid, high-mid, high
BLUETOOTH Vers. 5.0
RECORDING On USB
VU-METERS L/R - 11 leds
DIMENSIONS 295 x 100 x 310 mm (MXD 06)
295 x 100 x 360 mm (MXD 08)
295 x 100 x 410 mm (MXD 10)
WEIGHT 2,9 Kg (MXD 06)
3,35 Kg (MXD 08)
3,85 Kg (MXD 10)

19
DICHIARAZIONE DI CONFORMITA’ UE
EU COMPLIANCE DECLARATION
Hereby, KARMA ITALIANA SRL declares that mixer MXD 06, MXD 08 and MXD 10 are in
compliance with Directive 2014/53/EU. The full text of the EU declaration of conformity is available
at the following internet address: www.karmaitaliana.it.
Karma Italiana Srl

www.glemm.eu
Made in China
Ver. 23.1
Prodotto da/ produced by:
KARMA ITALIANA SRL
Via Gozzano, 38 bis
21052, Busto Arsizio (VA) - Italy
-
 1
1
-
 2
2
-
 3
3
-
 4
4
-
 5
5
-
 6
6
-
 7
7
-
 8
8
-
 9
9
-
 10
10
-
 11
11
-
 12
12
-
 13
13
-
 14
14
-
 15
15
-
 16
16
-
 17
17
-
 18
18
-
 19
19
-
 20
20


Karma MXD 06 Owner's manual
- Category
- Musical Equipment
- Type
- Owner's manual
Ask a question and I''ll find the answer in the document
Finding information in a document is now easier with AI
in other languages
- italiano: Karma MXD 06 Manuale del proprietario