Page is loading ...

2.51m
9834"
94
12"
2.40m
34.92deg 34.92deg
44"
1.12m
2751
2"
7m
144
1
4
"
3.67m
14512"
3.70m
732310 - THOR 10 HAMMER CAGE
www.gillathletics.com
Page 1 of 29
INST732310
4/27/2021
All rights reserved.
800-637-3090
Copyright 2017 by Gill Athletics.
INSTRUCTIONS
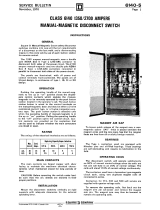
The 732310, Thor Hammer Cage, consists of four heavy duty aluminum net poles. The unique pole
structure reduces the incidence of implement impact and thereby reducing net damage and pole damage.
Ground Sleeve and Anchor Kit (73231001) is sold separately.
Hammer Circle
Discus Circle
12.59m
"
"
2
8.61m
339"
1
495
78
3
4
2m
2361
4"
6m
2
2751
"
7m
3933
4"
10m

www.gillathletics.com
Copyright 2017 by Gill Athletics.
All rights reserved.
800-637-3090
4/27/2021
INST732310
Page 2 of 29
732310 - THOR 10 HAMMER CAGE
INSTRUCTIONS
The net poles are custom aluminum extrusions. The poles are bent inward offsetting the net.
5/16" net rope swivel pulleys with eyebolts attach to the top of each net pole to facilitate the
raising and lowering of the net. The ground sleeves are 60" deep.
The doors only have a top frame. This design minimizes the frame structure a hammer can hit at
its most vulnerable position. The doors pivot on 1" OD stainless steel rods. The doors are held in
position with a 3/4" diameter spring loaded latch.
The nets are constructed of 749 lb. test, #84 knotted, weather treated nylon. The net is supported
between the poles by galvanized steel tubes. The bottom of the net is secure to net ground
anchors.
Read all of the instructions before begining.
Lower Pole Material
71
4"
714"
1
4"
Door Arm Material
4"
4"
1
4"
Upper Pole Material
512"
51
2"
14"
Extension Arm
Material
3"
3"
14"

!
WARNING
:
This product can expose you to Titanium Dioxide,
which is known to the State of California to cause cancer.
For more information go to www.p65warnings.ca.gov.
E
www.gillathletics.com
Copyright 2017 by Gill Athletics.
All rights reserved.
800-637-3090
4/27/2021
INST732310
Page 3 of 29
732310 - THOR 10 HAMMER CAGE
INSTRUCTIONS
Important Safety Instructions
It is the owner’s/manager’s responsibility to insure that all users of this equipment
become familiar with the contents of this manual, to instruct users on the proper operation
of the equipment, and to warn them of the potential hazards.
Prior to Operating:
ꞏ Read all instructions before using the equipment.
ꞏ Do not allow children on or near the equipment.
ꞏ Inspect the unit carefully for any worn, loose, or missing parts. If any defect is
suspected, do not use! Report suspected problems to authorized personnel
immediately!
ꞏ Use the equipment only for its intended purpose.
ꞏ Do not use the equipment alone.

44"
1.12m
1413
4"
3.60m
118"
3m
118"
3m
www.gillathletics.com
Copyright 2017 by Gill Athletics.
All rights reserved.
800-637-3090
4/27/2021
INST732310
Page 4 of 29
732310 - THOR 10 HAMMER CAGE
INSTRUCTIONS
NET ANCHOR PLACEMENT
Note A: These four net anchors will
also be used as anchors when raising
and lowering the poles. These anchors
require the chain. See footing details.
Net Anchor Footing
A
Ground Sleeve Footing
AA
A
14012"
3.57m
58"
1.48m
145"
3.68m
621
2"
1.59m
16514"
4.20m
27512"
7m
30214"
7.68m
35034"
8.91m
156"
3.96m
153
3
4
"
3.91m
203
1
4
"
5.16m
299
3
4
"
7.62m
378
14
"
9.61m
3051
2"
7.76m

www.gillathletics.com
Copyright 2017 by Gill Athletics.
All rights reserved.
800-637-3090
4/27/2021
INST732310
Page 5 of 29
732310 - THOR 10 HAMMER CAGE
INSTRUCTIONS
HOIST ANCHOR PLACEMET
Net Anchor Footing
A
Ground Sleeve Footing
AA
A
1413
4"
3.60m
14514"
3.69m
643
4"
1.64m
3723
4"
9.47m
159"
4.04m
398
3
4
"
10.13m
Note A: These four net anchors will
also be used as anchors when raising
and lowering the poles. These anchors
require the chain. See footing details.

www.gillathletics.com
Copyright 2017 by Gill Athletics.
All rights reserved.
800-637-3090
4/27/2021
INST732310
Page 6 of 29
732310 - THOR 10 HAMMER CAGE
INSTRUCTIONS
GROUND SLEEVE PLACEMET
Note A: These four net anchors will
also be used as anchors when raising
and lowering the poles. These anchors
require the chain. See footing details.
Align the ground sleeve with
the opposite hoist anchor.
Align the ground sleeve with
the opposite hoist anchor.
Net Anchor Footing
A
Ground Sleeve Footing
AA
A
16912"
4.31m
75
12"
1.92m
14534"
3.70m
26834"
6.83m
185
1
2
"
4.71m
30534"
7.77m

www.gillathletics.com
Copyright 2021 by Gill Athletics.
All rights reserved.
800-637-3090
4/27/2021
INST732310
Page 7 of 29
732310 - THOR 10 HAMMER CAGE
INSTRUCTIONS
GROUND SLEEVE DETAIL
Net Anchor Footing
12"
BB
After pouring the concrete piers, allow them to fully cure.
The dimensions of the concrete piers shown here should
be considered the minimum requirement. The overall
dimensions of the concrete piers are to be determined by
the local contractor and should take into consideration the
local soil conditions, water table, and frost line.
Cast the u-bolts into concrete for the net anchor footings.
Use a 3/4" or 1" dowel, PVC pipe, etc. to span the hole of
the footing hang to ubolt over this to maintain its height.
Pull the dowel out after the concrete has cured.
For the four special footing add chain to the u-bolt.
Net Anchor Footing
with chain
24"
CC
SECTION B-B
24"
SECTION C-C
36"

www.gillathletics.com
Copyright 2017 by Gill Athletics.
All rights reserved.
800-637-3090
4/27/2021
INST732310
Page 8 of 29
732310 - THOR 10 HAMMER CAGE
INSTRUCTIONS
SPIGOT ASSEMBLY
223
1
Install the threaded rods into the holes in the spigots.
Start with the threaded rods centered in the square tube.
If the spigot is loose in the ground sleeve, adjust the threaded rods
to be off-center. Make small adjustments.
Slide the spigots down into the ground sleeves.
Orient the spigots as shown.
PART # DESCRIPTION QTY.
1 73230920 Thor Spigot Weldment 1
2 HDWE030120E0 Hex Nut 5/8-11 8
3 732310601 Thor Spigot Threaded Rod 4

www.gillathletics.com
Copyright 2017 by Gill Athletics.
All rights reserved.
800-637-3090
4/27/2021
INST732310
Page 9 of 29
732310 - THOR 10 HAMMER CAGE
INSTRUCTIONS
BOOT ASSEMBLY
Rear Pole Bottom Section
73231040CXX
Part # Description Qty
1 73230925 Thor Boot Weldment 1
2 HDWE01315 1"-8 x 12" Hex Bolt; 18-8 SS 1
3 HDWE03105 1"-8 Hex Nut; 316 SS 1
4 HDWE04022 1" Lock Washer; 18-8 SS 2
5 HDWE05027 1" Flat Washer 2
6 HDWE01305 5/8"-11 x 9" Hex Bolt; 18-8 SS 2
7 HDWE05028 5/8" Flat Washer; 18-8 SS 4
8 HDWE03107 5/8"-11 Thin Hex Nut 2
9 HDWE04010 5/8" Lock Washer; 18-8 SS 2
1
6 7
2
Attach the boots to the spigots.
Install the bottom bolt first.
Slide the bottom upright sections into the boots
and fasten them in place with the top bolt.
34 4 5 5
7 9 8
Front Pole Bottom Section
73231030CXX
Install the bottom bolt first
Install the top bolt after the
upright is slid into place.

www.gillathletics.com
Copyright 2017 by Gill Athletics.
All rights reserved.
800-637-3090
4/27/2021
INST732310
Page 10 of 29
732310 - THOR 10 HAMMER CAGE
INSTRUCTIONS
REAR POLE ASSEMBLY
1
2
2
F
G
H
77
DETAIL H
3
6
5
5
9
10
10
11
4
3
8
7
DETAIL G
6
5
7
3
8
Insert the top section of the rear pole into the
bottom section of the rear pole.
Insert the extension arms into the sockets.
Install hardware.
PART # DESCRIPTION QTY
1 73231041 Thor 10 Rear Pole Upper Weldment 1
2 73231042 Thor 10 Rear Pole Extension Arm Weldment; 112" 2
3 PULY00100 PULLEY; 40MM SHEAVE; BALL BEARINGS 5
4 PULY00102 SS Shackle 1
5 CHAN00030 Quick Link 8
6 HDWE07031 3/8"-16 Eyebolt; 5" Shank; with Nut 4
7 M2534 Washer, Flat, 3/8" SAE, .875" OD, .4" ID 8
8 HDWE040020E0 Lockwasher - 3/8 Heavy 4
9 HDWE07032 1/2"-13 Eyebolt; 8" Shank; with Nut 1
10 M2543 1/2" Flat Washer; SS 2
11 HDWE04024 1/2" Lock Washer; 18-8 SS 1
12 HDWE01306 5/8"-11 x 8" Hex Bolt; 18-8 SS 1
13 HDWE05028 5/8" Flat Washer; 18-8 SS 2
14 HDWE04010 5/8" Lock Washer; 18-8 SS 1
15 HDWE03107 5/8"-11 Thin Hex Nut 1
12 14
DETAIL F
13 13 15
5

www.gillathletics.com
Copyright 2017 by Gill Athletics.
All rights reserved.
800-637-3090
4/27/2021
INST732310
Page 11 of 29
732310 - THOR 10 HAMMER CAGE
INSTRUCTIONS
FRONT POLE ASSEMBLY
1918
DETAIL J
20
7
1718
PART # DESCRIPTION QTY
1 73231031 Front Pole Upper Weldment 1
2 73231032 Extension Arm Socket Weldment 1
3 73231033 Front Pole Extension Arm Weldment; 106.5" 1
4 73231035 Thor Gate Over Rotate Stop Tube 1
5 PULY00100 PULLEY; 40MM SHEAVE; BALL BEARINGS 5
6 PULY00102 SS Shackle 1
7 CHAN00030 Quick Link 8
8 HDWE07031 3/8"-16 Eyebolt; 5" Shank; with Nut 4
9 M2534 Washer, Flat, 3/8" SAE, .875" OD, .4" ID 8
10 HDWE040020E0 Lockwasher - 3/8 Heavy 4
11 HDWE07032 1/2"-13 Eyebolt; 8" Shank; with Nut 1
12 M2543 1/2" Flat Washer; SS 22
13 HDWE04024 1/2" Lock Washer; 18-8 SS 11
14 HDWE01309 1/2"-13 x 3.5" Hex Bolt; 18-8 SS 2
15 HDWE01307 1/2"-13 x 7" hex Bolt; 18-8 SS 6
16 HDWE03108 1/2"-13 Hex Nut; 316 SS 10
17 HDWE01306 5/8"-11 x 8" Hex Bolt; 18-8 SS 1
18 HDWE05028 5/8" Flat Washer; 18-8 SS 6
19 HDWE04010 5/8" Lock Washer; 18-8 SS 3
20 HDWE03107 5/8"-11 Thin Hex Nut 3
Insert the top section of the front pole into the bottom section of the front pole.
Bolt the extenstion arm socket onto the top section of the front pole. The
socket should be pointing towards the rear of the cage and angled down.
Bolt the Stop Tube onto the top section of the front poles. It should be on the
side towards the rear of the cage.
Insert the extension arm into the socket.
Install hardware.
3
1
J
K
L
9
DETAIL K
9
5 7
8
10
13
DETAIL L
2
4
16
13
12
12
12
15
12
12
16
8
13
14
9
9
10
5
7
12
11
3
6

www.gillathletics.com
Copyright 2017 by Gill Athletics.
All rights reserved.
800-637-3090
4/27/2021
INST732310
Page 12 of 29
732310 - THOR 10 HAMMER CAGE
INSTRUCTIONS
GATE POSITION TUBE ASSEMBLY
Bolt the Position Tubes onto the Door Frame.
Make sure to build a "left" and "right" pair.
The bolts go inside the tubes.
Per Assembly
PART # DESCRIPTION QTY
1 HDWE01310 1/2"-13 x 1.5" Hex Bolt; 18-8 SS 2
2 HDWE03108 1/2"-13 Hex Nut; 316 SS 2
3 HDWE04024 1/2" Lock Washer; 18-8 SS 2
4 M2543 1/2" Flat Washer; SS 4
PART # DESCRIPTION QTY.
1 73231034 Thor 10 Gate Weldment 2
2 7323109201 Left Hand Strike Plate 1
3 7323109301 Right Hand Strike Plate 1
End View
3
4
2
4
1
1
1
3
2

www.gillathletics.com
Copyright 2017 by Gill Athletics.
All rights reserved.
800-637-3090
4/27/2021
INST732310
Page 13 of 29
732310 - THOR 10 HAMMER CAGE
INSTRUCTIONS
SPRING LATCH ASSEMBLY
PART # DESCRIPTION QTY
1 73231091CXX Thor Latch Pull Pin Assembly 1
2 HDWE01307 1/2"-13 x 7" hex Bolt; 18-8 SS 2
3 M2543 1/2" Flat Washer; SS 4
4 HDWE04024 1/2" Lock Washer; 18-8 SS 2
5 HDWE03108 1/2"-13 Hex Nut; 316 SS 2
Bolt the spring latch assembly onto the top
section of the front pole.
The spring latch assembly should be on
the front side of the pole. Make sure the
loop is towards the bottom of the pole and
the post is towards the top of the pole.
4
DETAIL N
1
3 325
M
N
DETAIL M

www.gillathletics.com
Copyright 2017 by Gill Athletics.
All rights reserved.
800-637-3090
4/27/2021
INST732310
Page 14 of 29
732310 - THOR 10 HAMMER CAGE
INSTRUCTIONS
DOOR ASSEMBLY
PART # DESCRIPTION QTY
1 73231061 Door Hinge Axle 1
2 BUSH00110 BRONZE SLEEVE BEARING; 1" ID; 1 1/4" OD; 1 1/2" FL; 3/4" LG; 6
3 SLVE00155 THOR DOOR HINGE PIN COLLAR 1
4 M1291 3/8"-16 Nylock hex nut, standard height 2
5 HDWE012070E0 3/8"-16 X 2-1/4" HEX HEAD CAP SCREW 1
6 HDWE012020E0 Hex Bolt 3/8-16 x 1.5 1
Assemble the door onto the top section of the front poles. The position tube should be on the front side.
Insert the bushings and slide the axle through the pole and door.
Secure the axle in place with collar and hardware.
3
5
4
6
4
2
1
This bushing goes in
the tube and then
down into the hole.

www.gillathletics.com
Copyright 2017 by Gill Athletics.
All rights reserved.
800-637-3090
4/27/2021
INST732310
Page 15 of 29
732310 - THOR 10 HAMMER CAGE
INSTRUCTIONS
DOOR PULLEYS
1
2
3554
R
Attach the pulleys to the back side of the door arm.
PART # DESCRIPTION QTY
1 PULY00100 PULLEY; 40MM SHEAVE; BALL BEARINGS 3
2 CHAN00030 Quick Link 3
3 HDWE07031 3/8"-16 Eyebolt; 5" Shank; with Nut 2
4 HDWE040020E0 Lockwasher - 3/8 Heavy 2
5 M2534 Washer, Flat, 3/8" SAE, .875" OD, .4" ID 4
1
DETAIL R
2
554
2
3
1

www.gillathletics.com
Copyright 2017 by Gill Athletics.
All rights reserved.
800-637-3090
4/27/2021
INST732310
Page 16 of 29
732310 - THOR 10 HAMMER CAGE
INSTRUCTIONS
REAR POLE ROPES
52' Rope
72' Rope
It is important to install the ropes BEFORE raising the
poles.
Tie off the bottom end of the ropes to the rope cleats on
the bottom section of the poles.
Run the ropes through the rope guides and pulleys.
Then tie the top end to a karabiner (M2223) using a strong
knot.
Pull the ropes through and wind the top of the ropes
around the rope cleats.
The ropes are supplied long. It is recommended that you
do not trim any ropes until the cage is fully assembled.
52' rope
72' Rope

www.gillathletics.com
Copyright 2017 by Gill Athletics.
All rights reserved.
800-637-3090
4/27/2021
INST732310
Page 17 of 29
732310 - THOR 10 HAMMER CAGE
INSTRUCTIONS
FRONT POLE NET ROPES
It is important to install the ropes BEFORE raising the
poles.
Tie off the bottom end of the ropes to the rope cleats on
the bottom section of the poles.
Run the ropes through the rope guides and pulleys.
Then tie the top end to a karabiner (M2223) using a strong
knot.
Pull the ropes through and wind the top of the ropes
around the rope cleats.
The ropes are supplied long. It is recommended that you
do not trim any ropes until the cage is fully assembled.
86' Rope
72' Rope
86' Rope
86' Rope
86' Rope
72' Rope

www.gillathletics.com
Copyright 2017 by Gill Athletics.
All rights reserved.
800-637-3090
4/27/2021
INST732310
Page 18 of 29
732310 - THOR 10 HAMMER CAGE
INSTRUCTIONS
LATCH ROPE
34' Rope
It is important to install the ropes BEFORE raising the poles.
Tie the rope to the door latch pull pin. Tie the bottom of the
rope to the rope cleat.
The ropes are supplied long. It is recommended that you do
not trim any ropes until the cage is fully assembled.
Note: The rope for the door latch should be to the outside of
the net when the installation is complete.

www.gillathletics.com
Copyright 2017 by Gill Athletics.
All rights reserved.
800-637-3090
4/27/2021
INST732310
Page 19 of 29
732310 - THOR 10 HAMMER CAGE
INSTRUCTIONS
WIRE ROPES
238" Wire Rope
344" Wire Rope
Attach the wire rope to the shacke at the top of
the pole as shown.
Connect the bottom of the wire rope to a 36"
elastic rope (732310743) with a snap hook
(M2223).
Connect the bottom of the elastic rope to the
D-ring at the bottom of the pole with a
tensioner (ROPE00131) and snap hook. See
tensioner detail on following page.

www.gillathletics.com
Copyright 2017 by Gill Athletics.
All rights reserved.
800-637-3090
4/27/2021
INST732310
Page 20 of 29
732310 - THOR 10 HAMMER CAGE
INSTRUCTIONS
TENSIONER DETAIL
ATTACH CARABINER
TO THE TENSIONER
AND NET ANCHOR
PULL ELASTIC ROPE
UNTIL DESIRED
TENSION IS ACHIEVED.
USE A ZIPTIE TO KEEP
THE ELASTIC ROPE
LOCKED IN PLACE
ELASTIC ROPE SHOULD
WEDGE ITSELF INTO
THIS SLOT WHEN TIGHT
FEED THE ELASTIC
ROPE THROUGH THE
TEAR DROP SLOT.
FINGER HOLE TO
STABILIZE
TENSIONER
ZIPTIE KEEPS ROPE
LOCKED IN PLACE
/