Page is loading ...

FK G X /HA S
Italiano
Istruzioni per l’uso
FORNO
English
Operating Instructions
OVEN
Français
Mode d’emploi
FOUR
Español
Manual de instrucciones
HORNO
Portuges
Instruções para a utilização
FORNO
Sommario
Istruzioni per l’uso,1
Avvertenze,3
Assistenza,7
Descrizione dell’apparecchio,9
Descrizione dell’apparecchio,11
Installazione,12
Avvio e utilizzo,15
Programmi,17
Precauzioni e consigli,18
Manutenzione e cura,18
Contents
Operating Instructions,1
Warnings,3
Assistance,7
Description of the appliance,9
Description of the appliance,11
Installation,20
Start-up and use,23
Cooking modes,25
Precautions and tips,26
Maintenance and care,26
Sommaire
Mode d’emploi,1
Avertissements,4
Assistance,7
Description de l’appareil,9
Description de l’appareil,11
Installation,28
Mise en marche et utilisation,31
Programmes,33
Précautions et conseils,34
Nettoyage et entretien,34
Sumario
Manual de instrucciones,1
Advertencias,4
Asistencia,7
Descripción del aparato,9
Descripción del aparato,11
Instalación,36
Puesta en funcionamiento y uso,39
Programas,41
Precauciones y consejos,42
Mantenimiento y cuidados,42
Índice
Instruções para a utilização,1
Advertências,5
Assistência,8
Descrição do aparelho,10
Descrição do aparelho,11
Instalação,44
Início e utilização,47
Programas,49
Precauções e conselhos,50
Manutenção e cuidados,50
Avvertenze
ATTENZIONE: Questo apparecchio e le
sue parti accessibili diventano molto caldi
durante l’uso. Bisogna fare attenzione ed
evitare di toccare gli elementi riscaldanti.
Tenere lontani i bambini inferiori agli 8
anni se non continuamente sorvegliati.
Il presente apparecchio può essere
utilizzato dai bambini a partire dagli 8
anni e da persone con ridotte capacità
mancanza di esperienza e di conoscenza
se si trovano sotto adeguata sorveglianza
oppure se sono stati istruiti circa l’uso
dell’apparecchio in modo sicuro e se
si rendono conto dei pericoli correlati.
I bambini non devono giocare con
l’apparecchio. Le operazioni di pulizia
e di manutenzione non devono essere
effettuate dai bambini senza sorveglianza.
Non utilizzare prodotti abrasivi né spatole
di metallo taglienti per pulire lo sportello
in vetro del forno in quanto potrebbero
la frantumazione del vetro.
Non utilizzare mai pulitori a vapore o ad alta
pressione per la pulizia dell’apparecchio.
ATTENZIONE: Assicurarsi che
l’apparecchio sia spento prima di sostituire
la lampada per evitare la possibilità di
scosse elettriche.
! Quando si inserisce la griglia assicurarsi
che il fermo sia rivolto verso l’alto e nella
parte posteriore della cavità.
Warnings
WARNING: The appliance and its
accessible parts become hot during use.
Care should be taken to avoid touching
heating elements. Children less than 8
years of age shall be kept away unless
continuously supervised. This appliance
can be used by children aged from 8 years
and above and persons with reduced
physical, sensory or mental capabilities
or lack of experience and knowledge
if they have been given supervision
or instruction concerning use of the
appliance in a safe way and understand
the hazards involved. Children shall not
play with the appliance. Cleaning and
user maintenance shall not be made by
children without supervision.
Do not use harsh abrasive cleaners or
sharp metal scrapers to clean the oven door
glass since they can scratch the surface,
which may result in shattering of the glass.
Never use steam cleaners or pressure
cleaners on the appliance.
WARNING: Ensure that the appliance is
switched off before replacing the lamp to
avoid the possibility of electric shock.
! When you place the rack inside, make
sure that the stop is directed upwards and
in the back of the cavity.
3
Descrizione dell’apparecchio
Vista d’insieme
1 POSIZIONE 1
2 POSIZIONE 2
3 POSIZIONE 3
4 POSIZIONE 4
5 POSIZIONE 5
6 GUIDE di scorrimento dei ripiani
7 Ripiano LECCARDA
8 Ripiano GRIGLIA
9 Pannello di controllo
Overall view
1 POSITION 1
2 POSITION 2
3 POSITION 3
4 POSITION 4
5 POSITION 5
6 GUIDES for the sliding racks
7 DRIPPING PAN
8 GRILL
9 Control panel
Description de l’appareil
Vue d’ensemble
1 NIVEAU 1
2 NIVEAU 2
3 NIVEAU 3
4 NIVEAU 4
5 NIVEAU 5
6 GLISSIERES de coulissement
7 Support LECHEFRITE
8 Support GRILLE
9 Tableau de bord
Vista en conjunto
1 POSICIÓN 1
2 POSICIÓN 2
3 POSICIÓN 3
4 POSICIÓN 4
5 POSICIÓN 5
6 GUÍAS de deslizamiento de las bandejas
7 Bandeja GRASERA
8 Bandeja PARRILLA
9 Panel de control
7
8
9 6
1
2
3
4
5
9
Descrizione dell’apparecchio
Pannello di controllo
1 Manopola FORNO/GRILL
2 Spia GRILL
3 Pulsante LUCE DEL FORNO
4 Manopola TIMER
Control panel
1 OVEN/GRILL knob
2 GRILL indicator light
3 OVEN LIGHT button
4 TIMER knob
Description de l’appareil
Tableau de bord
1 Bouton FOUR/GRIL
2 Voyant GRIL
3 Touche ECLAIRAGE FOUR
4 Bouton MINUTEUR
Panel de control
1 Perilla del HORNO/GRILL
2 Piloto GRILL
3 Botón LUZ DEL HORNO
4 Perilla del TEMPORIZADOR
Descrição do aparelho
Painel de comandos
1 Botão HORNO/GRILL
2 Indicador do GRILL
3 Botão LUZ DO FORNO
4 Selector dos TIMER
Descrierea aparatului
Panoul de control
1
2 Indicator
3 BEC CUPTOR
4 TIMER
1
2
3
4
1
2
3
4
1
2
3
4
45
15
30
0
150
180
220
11

Installation
! Please keep this instruction booklet in a safe place for
future reference. If the appliance is sold, given away or
moved, please make sure the booklet is also passed on to
contained within it.
! Please read this instruction manual carefully: it contains
important information concerning the safe operation,
installation and maintenance of the appliance.
Positioning
!
should be disposed of in accordance with local separated
!
accordance with the instructions provided. Incorrect installation
may damage property or cause harm to people or animals.
! This unit may be installed and used only in permanently
ventilated rooms in accordance with British Standard Codes Of
Editions. The following requirements must be observed:
that expels any combustion fumes. This may consist of
a hood or an electric fan that automatically starts each
time the appliance is switched on.
In a chimney stack or branched flue.
(exclusively for cooking appliances)
Directly to
the Outside
must not be less than 2 m
3
The air circulation system may
take air directly from the outside
by means of a pipe with an inner
cross section of at least 100 cm
2
the opening must not be vulnerable
to any type of blockages.
The system can also provide the air
needed for combustion indirectly,
air circulation tubes as described
above. However, these rooms must
not be communal rooms, bedrooms
hazard.
A
Examples of
ventilation holes
for comburant air.
Enlarging the ventilation slot
between window and floor.
Adjacent
Room
Room to be
Vented
than air. Therefore, rooms containing LPG cylinders must
also be equipped with vents to allow gas to escape in
the event of a leak. As a result LPG cylinders, whether
partially or completely full, must not be installed or stored
in rooms or storage areas that are below ground level
being used in the room, positioned so that it is not subject
cylinder above 50°C.
Built-in appliances
Use an appropriate cabinet to ensure that the appliance
operates properly:
resistant material.
glues which can withstand temperatures of up to 100°C.
under the counter
in a kitchen unit, the cabinet must have the following
dimensions:
595 mm.
595 mm.
25 mm.
545 mm.
5 mm.
567 mm.
23 mm.
575-585 mm.
45 mm.
558 mm.
547 mm. min.
! The appliance must not come into contact with electrical
parts once it has been installed.
The indications for consumption given on the data plate
have been calculated for this type of installation.
Ventilation
To ensure adequate ventilation, the back panel of the
cabinet must be removed. It is advisable to install the oven
so that it rests on two strips of wood, or on a completely
560 mm.
45 mm.
20
GB

Secure the appliance to the cabinet by opening the oven door
and inserting 4 screws into the 4 holes on the outer frame.
! All parts which ensure the safe operation of the appliance
must not be removable without the aid of a tool.
Electrical connection
Ovens equipped with a three-pole power supply cable are
designed to operate with alternating current at the voltage
and frequency indicated on the data plate located on the
Fitting the power supply cable
1. Open the terminal board
by inserting a screwdriver
into the side tabs of the
cover. Use the screwdriver
as a lever by pushing it
2. Install the power supply
cable by loosening the
cable clamp screw and the
three wire contact screws
L-N- .
Connect the wires to the
corresponding terminals:
the Blue wire to the terminal
to the terminal marked
3. Secure the cable by fastening the clamp screw.
4. Close the cover of the terminal board.
Connecting the supply cable to the mains
Install a standardised plug corresponding to the load
The appliance must be directly connected to the mains using
an omnipolar switch with a minimum contact opening of 3
mm installed between the appliance and the mains. The
switch must be suitable for the charge indicated and must
must be positioned so that it does not come into contact
N
L
! The installer must ensure that the correct electrical
connection has been performed and that it is fully compliant
with safety regulations.
Before connecting the appliance to the power supply, make
sure that
the law.
appliance, which is indicated on the data plate.
on the data plate.
If the socket is incompatible with the plug, ask an
authorised technician to replace it. Do not use extension
cords or multiple sockets.
! Once the appliance has been installed, the power supply
cable and the electrical socket must be easily accessible.
! The cable must not be bent or compressed.
! The cable must be checked regularly and replaced by
!
Gas connection
The appliance should be connected to the main gas supply
or to a gas cylinder in compliance with current National
regulations. Before carrying out the connection, make sure
the cooker is compatible with the gas supply you wish to
use. If this is not the case, follow the instructions indicated
in the paragraph “Adapting to different types of gas.”
When using liquid gas from a cylinder, install a pressure
regulator that complies with current National regulations.
! Check that the pressure of the gas supply is consistent
energy consumption.
! Should you need to install a gas hob on top of a built-in gas
oven, it is strictly forbidden to connect the two or to use a
single cut-off tap. The two appliances should be connected
separately, and each one should have its own stop tap
in order to make them completely independent from one
NO
OK
Connection with a rigid pipe (copper or steel)
! Connection to the gas system must be carried out in such a
way as not to place any strain of any kind on the appliance.
GB
21
There is an adjustable L
leaks. The seal must always be replaced after rotating the pipe
a threaded attachment
attachment. These pipes must be installed so that they are never
longer than 2000 mm when fully extended. Once connection has
not touch any moving parts and is not compressed.
! Only use pipes and seals that comply with current National
regulations.
! When installation has been completed, check the pipe
In order to adapt the oven to a type of gas other than the
follow these simple steps:
1. Open the oven door fully.
2. Slide out the bottom of the
oven.
V
3. Unscrew the burner
fastening screws.
4. Remove screw “V” and
then the oven burner.
5. Unscrew the oven burner
nozzle using the special
socket spanner for the
nozzles, or better still a 7 mm
socket spanner, and replace
it with a nozzle suited to the
6. Replace all the parts, following the steps described above
in the reverse order.
! Take particular care when handling the spark plug
The burner was designed not to need any adjustments to
the primary air.
and then to Min.
2. Remove the knob.
3. Remove the disk fastened to the control panel.
4. Adjust the screw located outside the thermostat cock pin
5. Make sure the burner does
not switch off when you turn
the knob from Max to Min
quickly, or when you open
and close the oven door
quickly.
! If the appliance is connected to liquid gas, the regulation
screw must be fastened as tightly as possible.
!
sticker with one indicating the new type of gas used. This
sticker is available from any of our Service Centres.
! If the gas pressure is different from the recommended
inlet pipe in accordance with current National Regulations.
DATA PLATE
Dimensions
width 43.5 cm
height 31 cm
depth 43.5 cm
Volume
58 l
Electrical
connections
see data plate
Gas features
see data plate
This appliance conforms to the
following European Economic
Community directives:
2006/95/EEC dated 12/12/06
(Low Voltage) and subsequent
amendments - 2004/108/EEC
dated 15/12/04 (Electromagnetic
compatibility) and subsequent
amendments - 93/68/EEC dated
22/07/93 and subsequent
amendments. 2009/142/EEC
dated 30/11/09 (Gas) and
subsequent amendments.
2012/19/EC and subsequent
amendments.
22
GB
Start-up and use
WARNING! The oven is
provided with a stop system
to extract the racks and
prevent them from coming
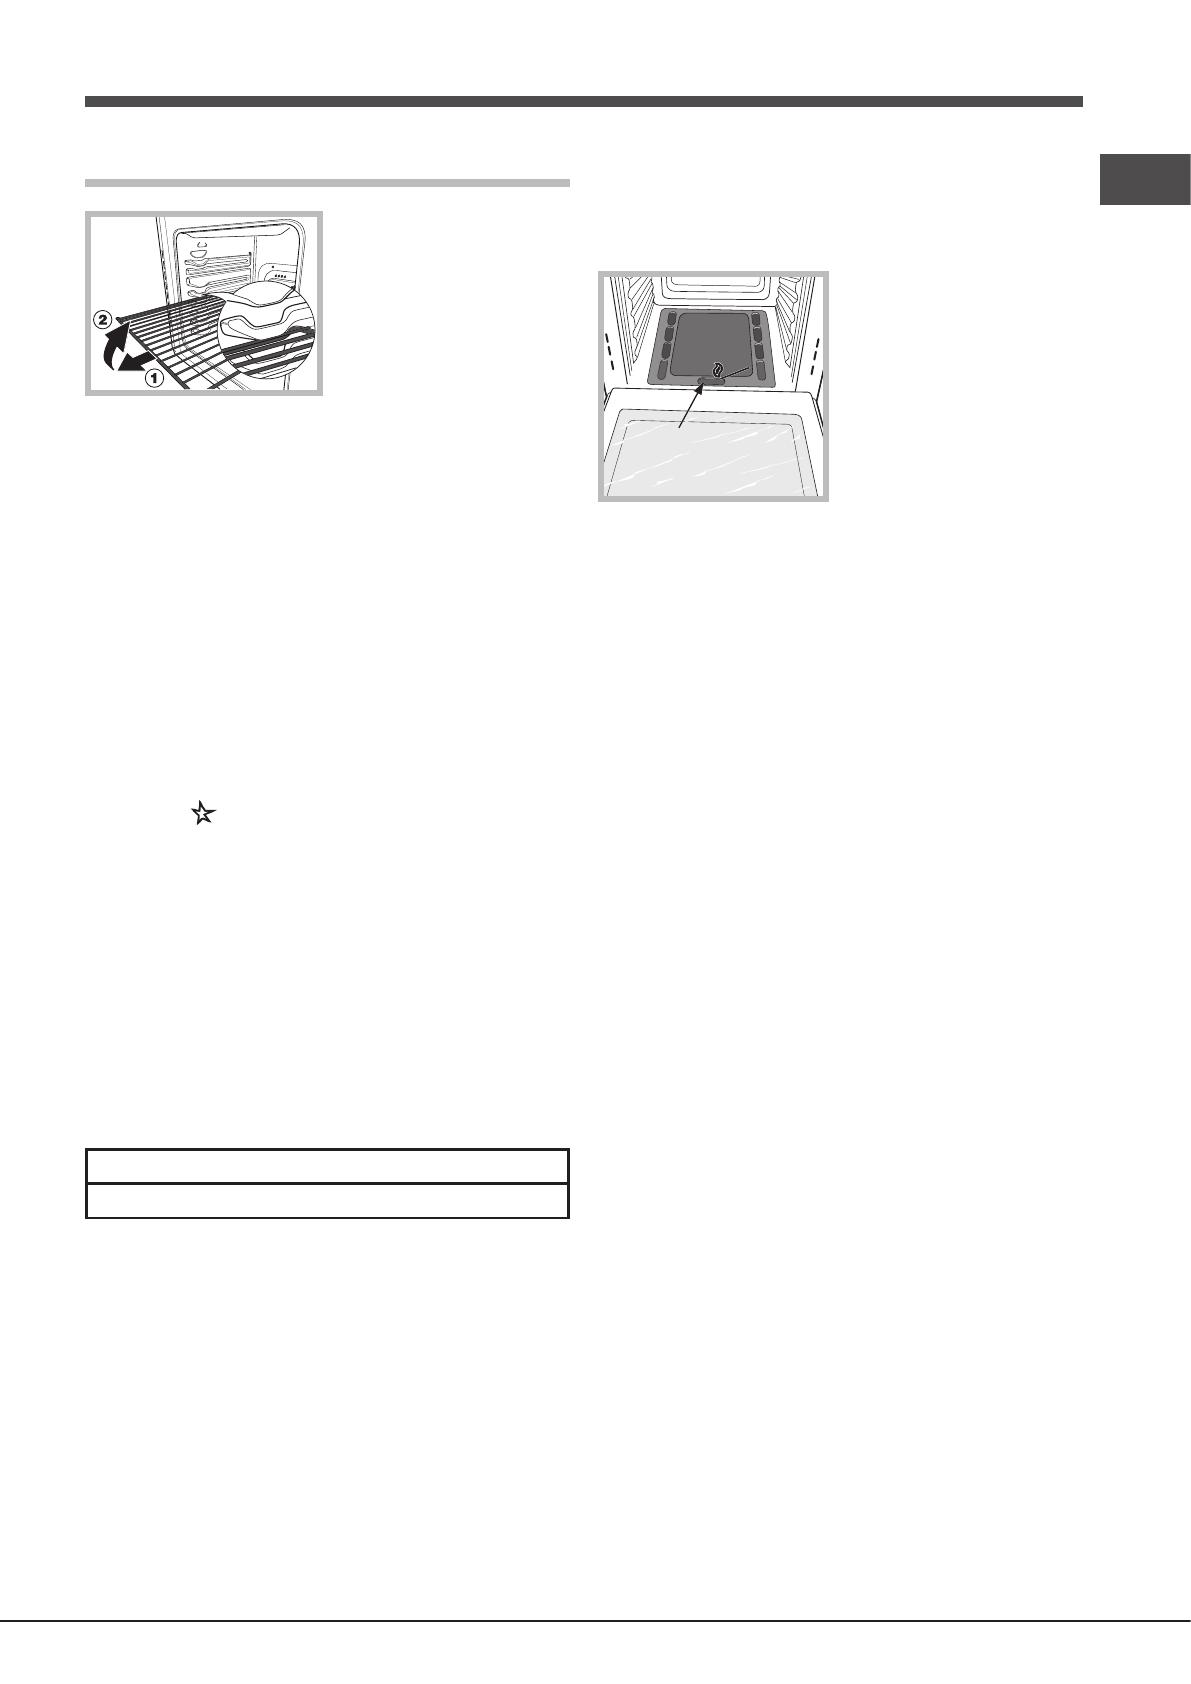
As shown in the drawing,
to extract them completely,
simply lift the racks, holding
them on the front part, and
!
with its door closed at its maximum temperature for at least half
an hour. Ensure that the room is well ventilated before switching
the oven off and opening the oven door. The appliance may emit
a slightly unpleasant odour caused by protective substances
used during the manufacturing process burning away.
Starting the oven
This knob is used not only to select the different oven
modes, but also to choose the right cooking temperature
for various foods from among the temperatures shown on
The electronic ignition device of the oven is built into the
control knob. To light the oven burner, press the OVEN
knob in as far as possible and turn it anti-clockwise, setting
it to position
equipped with a safety device. After lighting the burner allow
the gas to circulate until the safety thermocouple is heated
by keeping the OVEN knob pressed in for about 6 seconds.
! The electronic ignition device of the oven burner must not
be activated for more than 15 seconds. If the burner fails to
light after 15 seconds, stop pressing the OVEN knob, open
the oven door and wait for at least one minute before you
try to light the burner again.
The cooking temperature is selected by matching the
desired temperature with the reference mark on the control
Min• 150• 180• 220
•M
ax
140145 160200 230240
The oven will automatically reach the temperature set, and
the thermostat, which is controlled by the knob, will keep
the temperature constant.
Switching the oven on manually
In the event of a power failure, the oven burner can be lit
manually:
1. Open the oven door.
F
2. Hold a match or lighter near
the burner hole as shown in
F
anticlockwise, setting it to the
Max position.
The oven is equipped with a safety device. After lighting
the burner allow the gas to circulate until the safety
thermocouple is heated by keeping the OVEN knob pressed
in for about 6 seconds.
3. Once the burner is lit, shut the oven door.
!
control knob to the off position, open the oven door and wait
for at least one minute before trying to light the burner again.
The GRILL knob
Your oven is equipped with an electric grill. The extremely high
and direct temperature of the grill makes it possible to brown
the surface of meats and roasts while locking in the juices to
keep them tender. The grill is also highly recommended for
dishes that require a high surface temperature: beef steaks,
Some examples of how the grill may be used are included
in the “Practical Cooking Advice” section.
! When using the grill, the oven door must be kept shut.
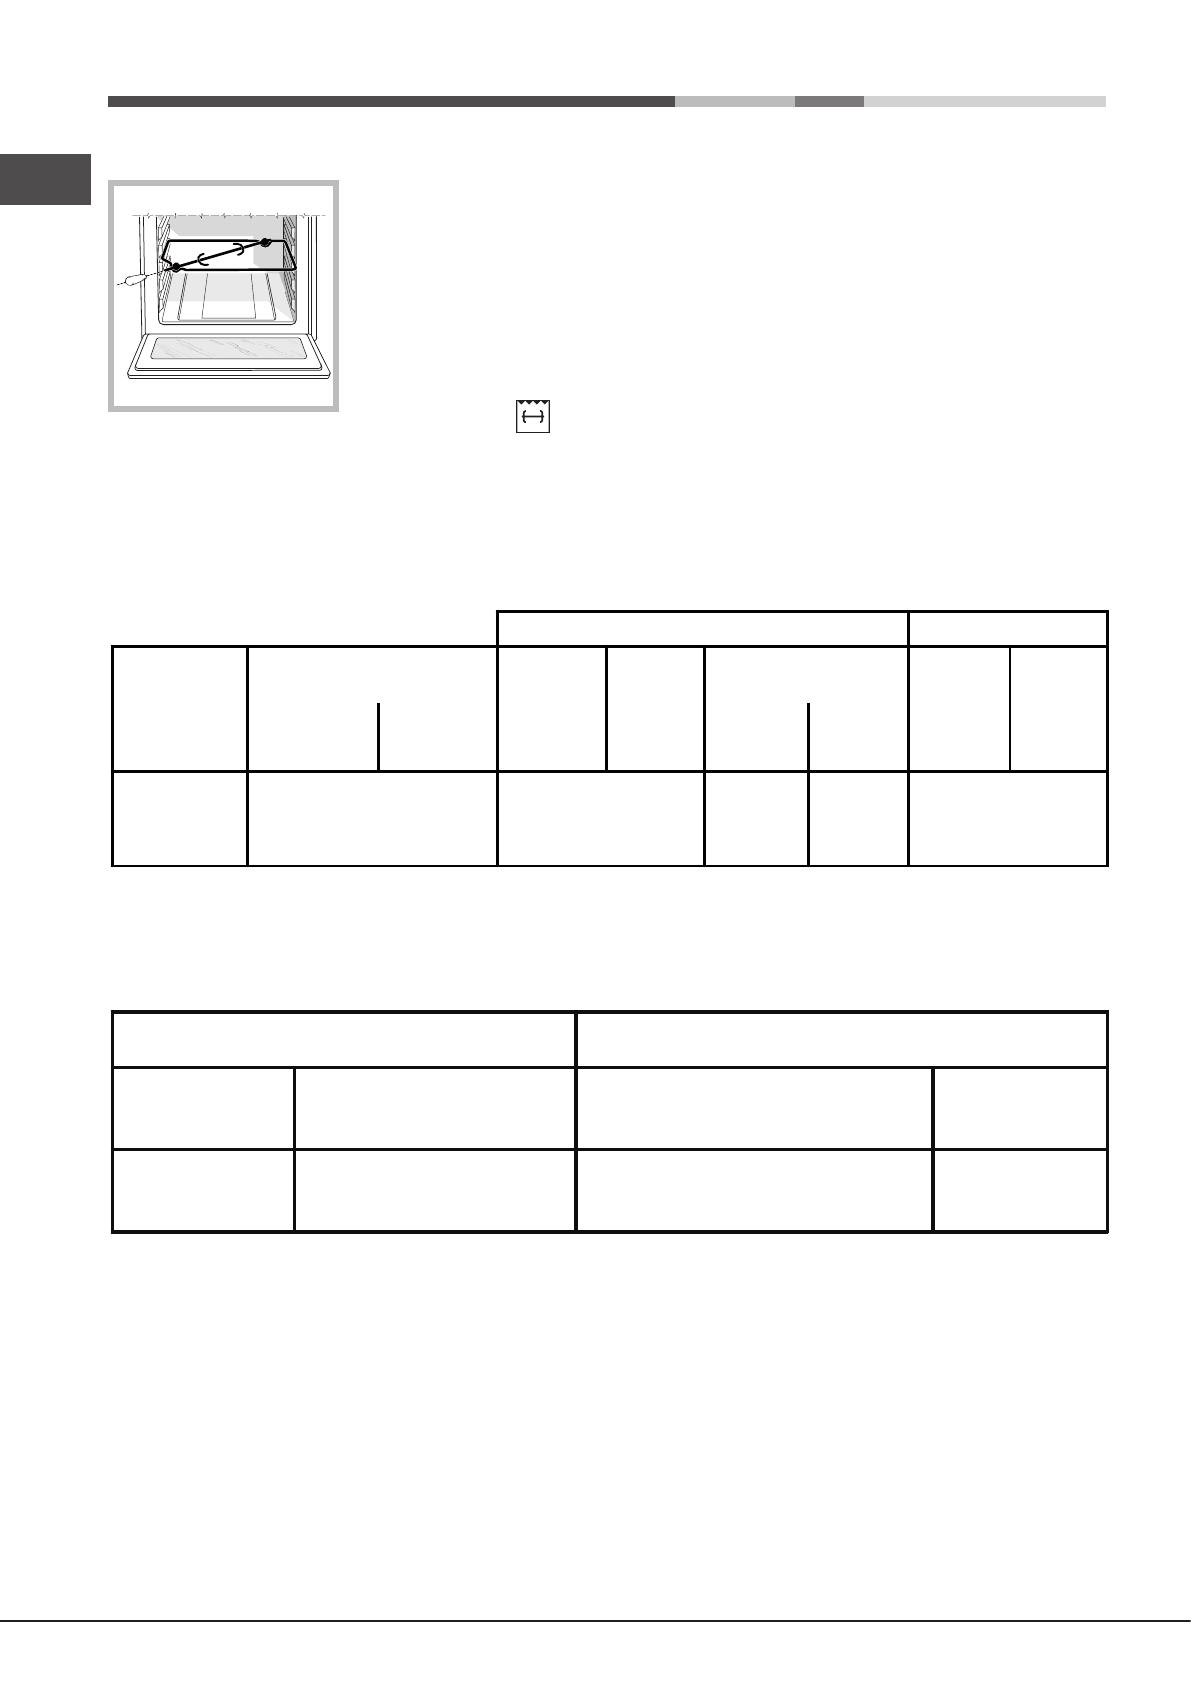
! Never put objects directly on the bottom of the oven - this
could result in damage to the enamel coating.
!
Cooling ventilation
In order to cool down the external temperature of the oven,
between the control panel and the oven door.
! Once the cooking has been completed, the cooling fan
GB
23
Burner and Nozzle specifications
* At 15°C and 1013,25 mbar-dry gas
** Propane P. C.S. = 50.37 MJ/Kg
*** Butane P. C.S. = 49.47 MJ/Kg
Natural P. C.S. = 37.78 MJ/m
3
Table
1L
iquid ga
sN
atural gas
Burner Thermal Power
kW (gross heat value)*
By-pass
1/100
Nozzle
1/100
Flow*
g/h
Nozzle
1/100
Flow*
l/h
NominalReduced (mm)
*** **
(mm)
Oven 2,60 1,00 49 78 189 186 11
92
48
Supply
pressures
Nominal (mbar)
Minimum (mbar)
Maximum (mbar)
28-30
20
35
37
25
45
20
17
25
Electric Part
Category Thermal Power
kW (1)
Voltage frequency Power
(W)
II2H3+
2,60 (189 g/h - G30)
(186 g/h - G31)
220-240V~ 50/60Hz2250
(1) The values in g/h refer to the capacities with liquid gas (Butane, Propane).
Gas Part
Turnspit*
To operate the rotisserie
proceed as follows:
1. Place the dripping pan in
position 1.
2. Place the rotisserie support
in position 3 and insert the spit
in the hole provided on the
back panel of the oven.
3. Start the rotisserie using
the knob to select
Oven light
This is switched on by pressing the LIGHT button.
How to use the timer
1. To set the buzzer, turn the TIMER knob clockwise almost
one complete revolution.
2. Turn the knob anticlockwise to set the desired time: align
the minutes shown on the knob with the indicator on the
control panel.
3. The timer operates in minutes: when the selected time
has elapsed, a buzzer will sound.
! The timer does not switch the oven on or off.
* Only available in certain models.
24
GB
Selector
knob
setting
Food to be cooked Weight
(in kg)
Cooking
rack
position
from oven
bottom
Preheating time
(minutes)
Thermostat
knob
setting
Cooking
time
(minutes)
Oven
Lasagne
Cannelloni
Pasta bakes
Veal
Chicken
Tu rkey roll
Duck
Rabbit
Pork loin
Leg of lamb
Mackerels
Dentex
Tr out baked in foil
Neapolitan-style pizza
Dry biscuits
Ta rt
Chocolate cake
Leavened cakes
2,5
2,5
2,2
1,7
1,5
2,5
1,8
2,0
1,5
1,8
1,3
1,5
1,0
0,6
0,5
1,1
1,0
1,0
3
3
3
2
3
3
3
3
3
3
3
3
3
3
4
3
3
4
10
10
10
10
10
10
10
10
10
10
10
10
10
15
15
15
15
15
200
200
200
210
200
200
200
200
200
200
200
180
200
210
180
180
165
165
55-60
40-45
50-55
80-90
70-80
80-90
90-100
80-90
70-80
80-90
30-40
30-40
30-35
15-20
25-30
30-35
50-60
50-60
Grill
Soles and cuttlefish
Squid and prawn kebabs
Cod filet
Grilled vegetables
Veal steak
Chops
Hamburgers
Sausages
To asted sandwiches
1
1
1
1
1
1,5
1
1,7
n.° 4
4
4
4
4
4
4
4
4
4
5
3
3
-
5
5
3
5
3
-
-
-
-
-
-
-
-
-
6
4
10
8-10
20-25
20-25
10-15
20-25
2-3
With rotisserie
(where present)
Veal on the spit
Chicken on the spit
Lamb on the spit
1.0
1.5
1.0
-
-
-
-
-
-
-
-
-
80-90
80-90
80-90
! Cooking times are approximate and may vary according to personal taste. When cooking using the grill, the
dripping pan must always be placed on the 1st oven rack from the bottom.
Cooking advice table
Cooking modes
Cooking modes
GRILL mode
The top heating element comes on. The extremely high and
direct temperature of the grill makes it possible to brown the
surface of meats and roasts while locking in the juices to
keep them tender. The grill is also highly recommended for
dishes that require a high surface temperature: beef steaks,
mode with the oven door closed.
Practical cooking advice
! In the GRILL cooking mode, place the dripping pan in
GRILL
food is in the centre of the grill.
The top heating element is regulated by a thermostat
and may not always be on.
PIZZA
provided.
the mozzarella cheese to the top of the pizza halfway
through the cooking process.
GB
25
Precautions and tips
! This appliance has been designed and manufactured
in compliance with international safety standards. The
following warnings are provided for safety reasons and
must be read carefully.
home and is not intended for commercial or industrial
use.
covered areas. It is extremely dangerous to leave the
appliance exposed to rain and storms.
the handles provided on the sides of the oven.
damp hands and feet.
Do not touch the heating elements or certain parts
appliances do not come into contact with the hot parts of
the oven.
be obstructed.
may be hot.
oven or when removing it.
appliance is switched on accidentally, the materials could
” position
when the appliance is not in use.
having disconnected the appliance from the electricity
mains.
should you attempt to perform the repairs yourself.
mental capacities, by inexperienced individuals or by
anyone who is not familiar with the product. These
individuals should, at the very least, be supervised by
someone who assumes responsibility for their safety or
receive preliminary instructions relating to the operation
of the appliance.
Disposal
legislation so that the packaging may be reused.
that old household electrical appliances must not
be disposed of in the normal unsorted municipal
waste stream. Old appliances must be collected
separately in order to optimise the recovery and
recycling of the materials they contain and reduce
the impact on human health and the environment.
The crossed out “wheeled bin” symbol on the product
reminds you of your obligation, that when you dispose
of the appliance it must be separately collected.
Consumers should contact their local authority or retailer
for information concerning the correct disposal of their
old appliance.
Respecting and conserving the
environment
supply network companies by using the oven in the
hours between late afternoon and the early hours of
the morning. The cooking mode programming options,
modes: This will achieve improved results while saving
they are free of debris so that they stick properly to the
door and do not allow heat to disperse.
Maintenance and care
Disconnect your appliance from the electricity supply before
carrying out any work on it.
Cleaning the appliance
the rubber seals may be cleaned using a sponge that
has been soaked in lukewarm water and neutral soap.
Use specialised products for the removal of stubborn
stains. After cleaning, rinse and dry thoroughly. Do not
use abrasive powders or corrosive substances.
26
GB
each use, while it is still lukewarm. Use hot water and
detergent, then rinse well and dry with a soft cloth. Do
not use abrasive products.
- can be washed like everyday crockery, and are even
dishwasher safe.
! Never use steam cleaners or pressure cleaners on the
appliance.
Cleaning the oven door
Clean the glass part of the oven door using a sponge and a non-
abrasive cleaning product, then dry thoroughly with a soft cloth.
Do not use rough abrasive material or sharp metal scrapers as
these could scratch the surface and cause the glass to crack.
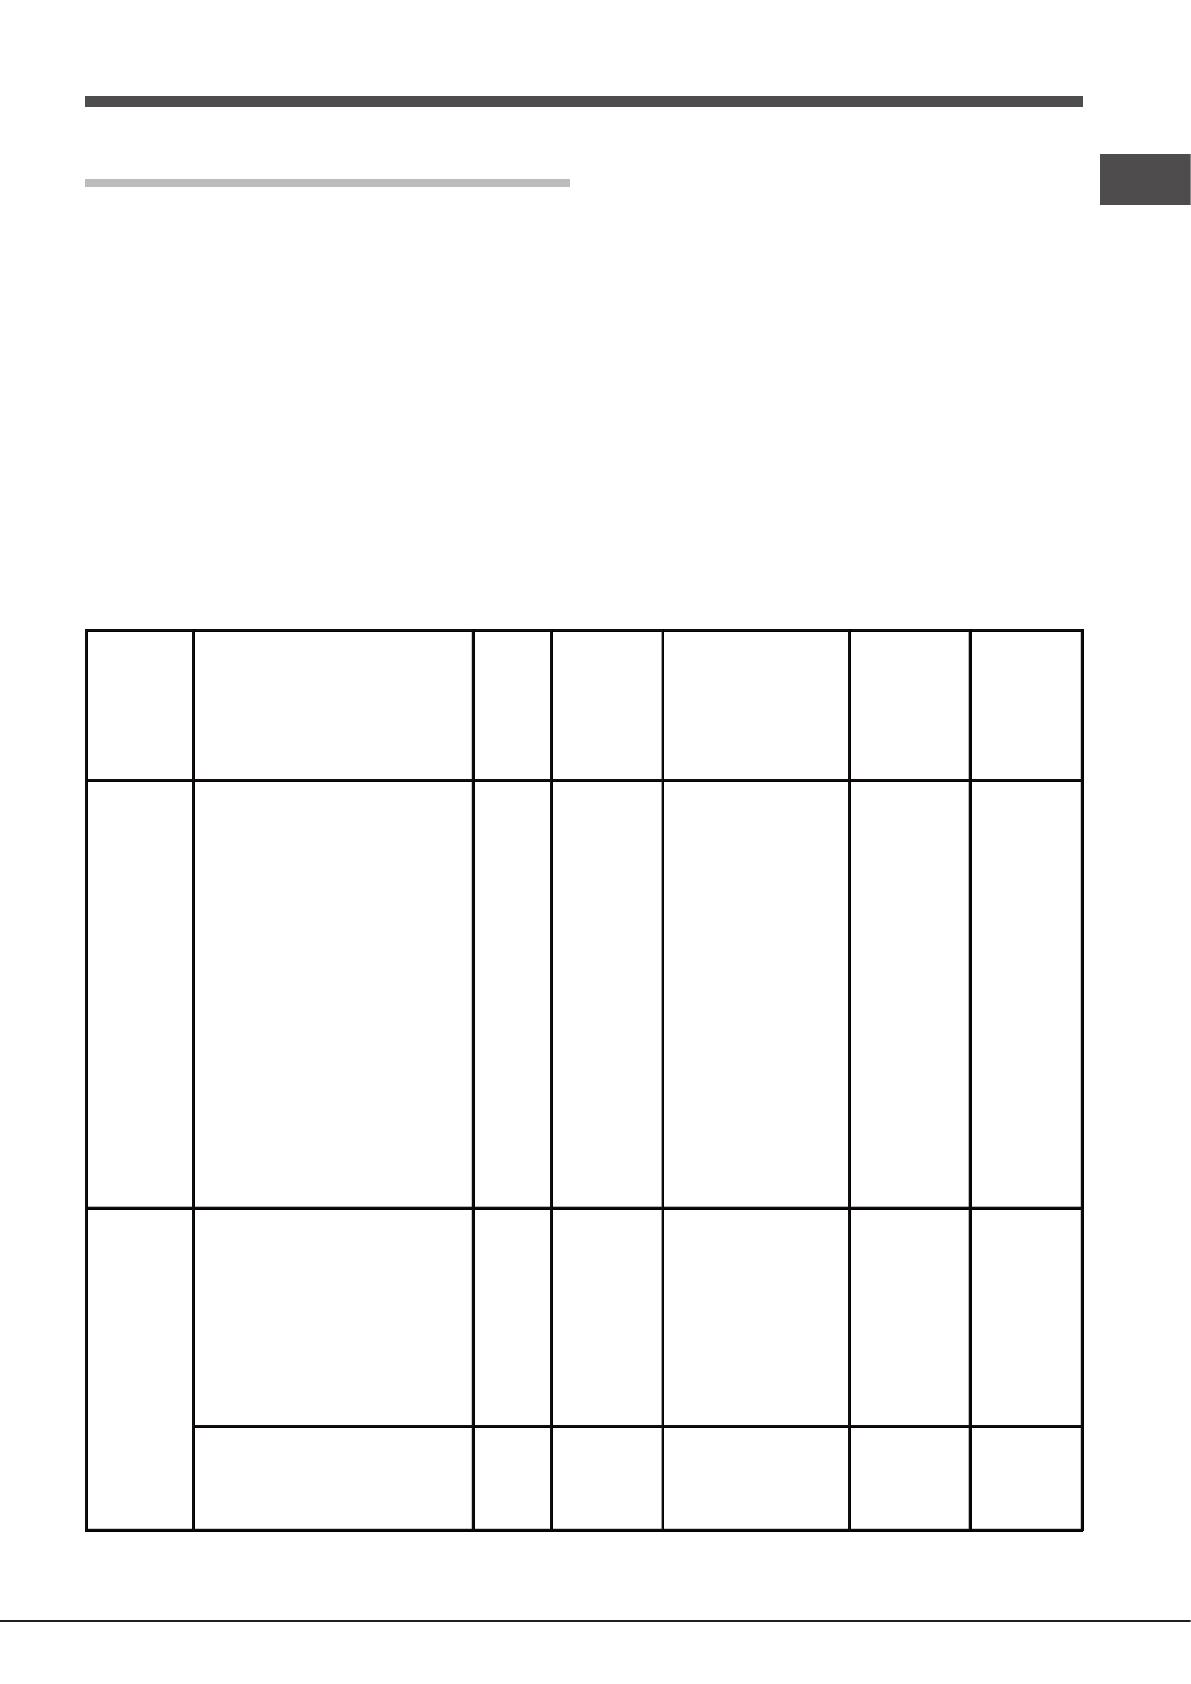
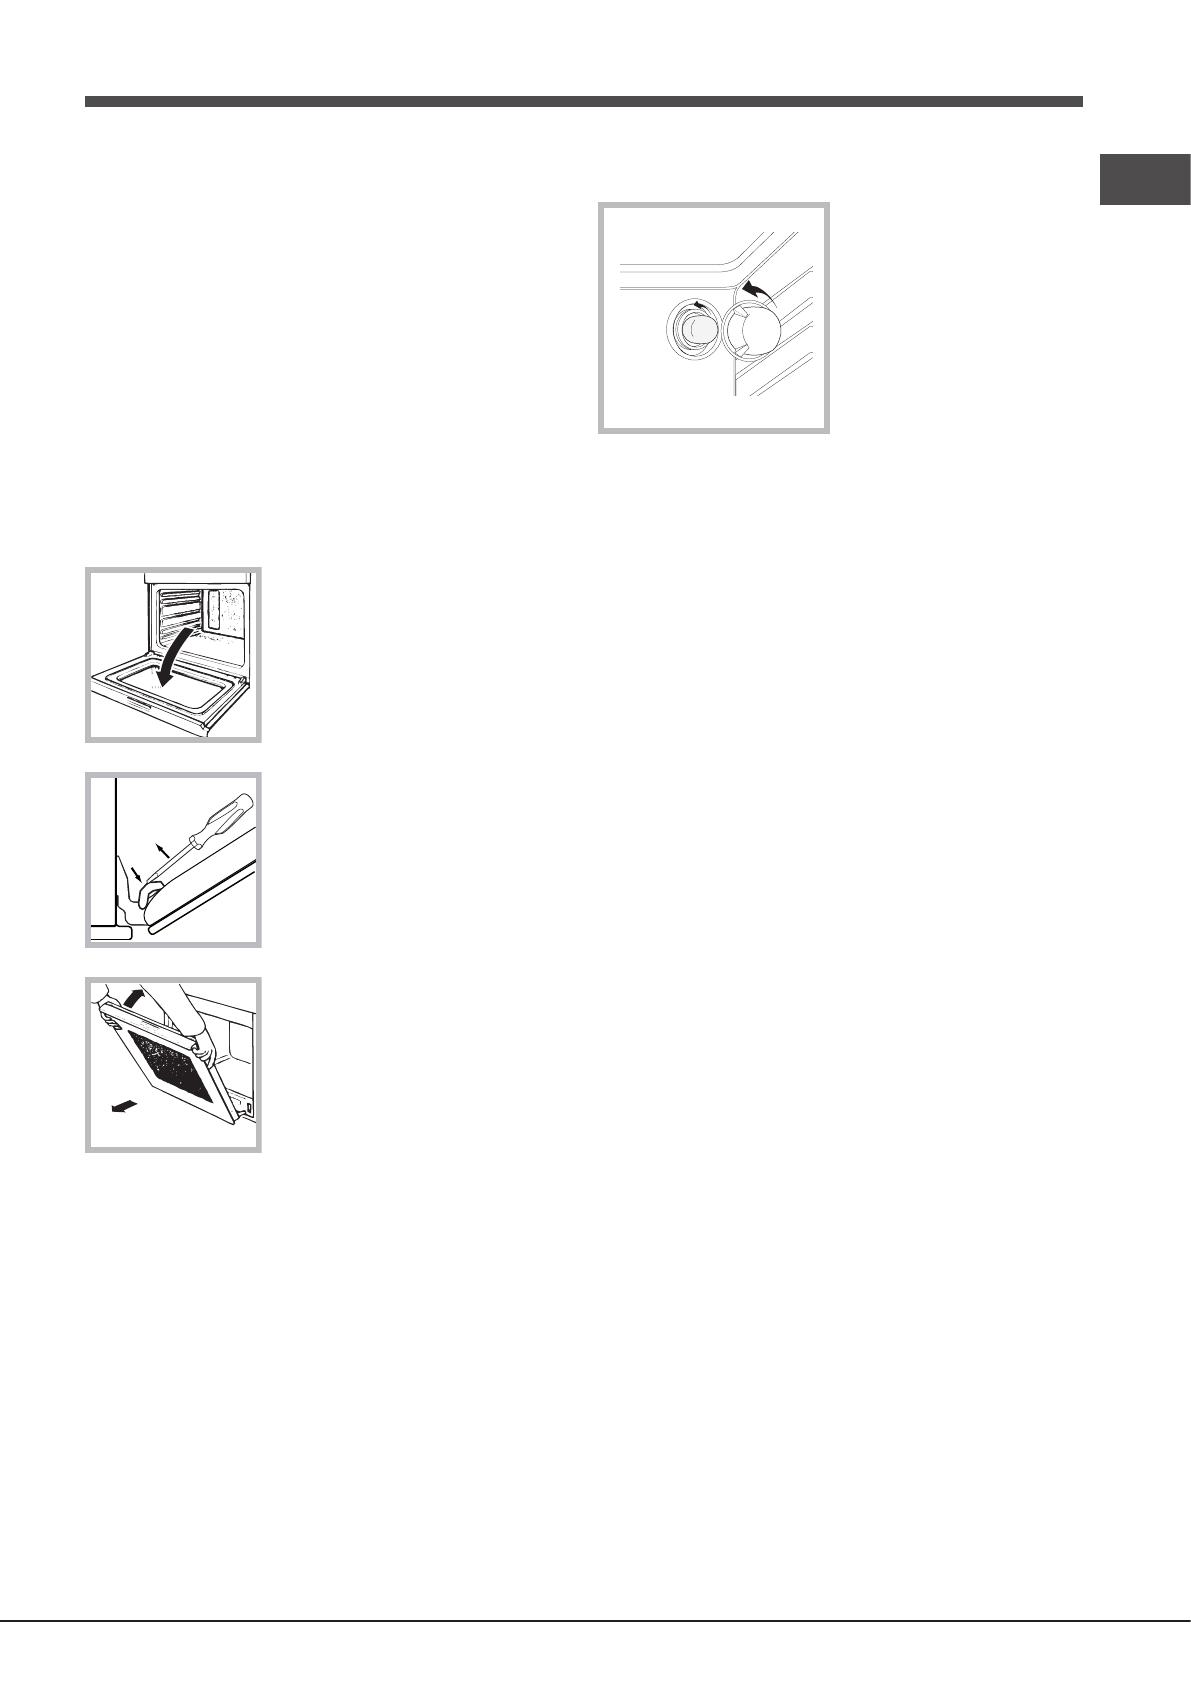
To clean the oven more thoroughly, you can remove its door:
F
2. Use a screwdriver to lift up and
turn the small levers F located on
3. Grip the door on the two external
sides and close it approximately
half way. Pull the door towards you,
To replace the door, reverse this sequence.
Inspecting the seals
Check the door seals around the oven regularly. If the seals
are damaged, please contact your nearest Service Centre
until the seals have been replaced.
Replacing the light bulb
To replace the oven light
bulb:
1. Remove the glass cover
of the lamp-holder.
2. Remove the light bulb and
replace it with a similar one:
Wattage 25 W, cap E 14.
3. Replace the glass cover
see diagram
!
GB
27
/